

User Manual
Page 1
19" Liquid Crystal Display Monitor
19" Liquid Crystal Display Monitor
User Manual
Page 2
... that interference will not occur in a residential installation. These limits are designed to provide reasonable protection against harmful interference in a particular installation. Before operating the monitor, please read this equipment does cause harmful interference to radio or television reception, which the receiver is subject to radio communications.
... that interference will not occur in a residential installation. These limits are designed to provide reasonable protection against harmful interference in a particular installation. Before operating the monitor, please read this equipment does cause harmful interference to radio or television reception, which the receiver is subject to radio communications.
User Manual
Page 4
TABLE OF CONTENTS SAFETY NOTICE ...5 PRECAUTIONS ...5 SPECIAL NOTES ON LCD MONITORS 6 PREFACE ...7 BEFORE OPERATING THE MONITOR 8 FEATURES ...8 CHECKING THE CONTENTS OF THE PACKAGE 8 PINSTALLATION INSTRUCTIONS 9 POWER ...9 MAKING CONNECTIONS 10 ADJUSTING THE VIEWING ANGLE 11 OPERATING INSTRUCTIONS 12 GENERAL INSTRUCTIONS 12 FRONT PANEL CONTROL 13 HOW TO ADJUST A SETTINGS 14 PLUG AND PLAY 17 TECHNICAL SUPPORT (FAQ 18 Q & A FOR GENERAL PROBLEMS 18 ERROR MESSAGE & POSSIBLE SOLUTIONS 20 APPENDIX ...22 SPECIFICATIONS 22 4
TABLE OF CONTENTS SAFETY NOTICE ...5 PRECAUTIONS ...5 SPECIAL NOTES ON LCD MONITORS 6 PREFACE ...7 BEFORE OPERATING THE MONITOR 8 FEATURES ...8 CHECKING THE CONTENTS OF THE PACKAGE 8 PINSTALLATION INSTRUCTIONS 9 POWER ...9 MAKING CONNECTIONS 10 ADJUSTING THE VIEWING ANGLE 11 OPERATING INSTRUCTIONS 12 GENERAL INSTRUCTIONS 12 FRONT PANEL CONTROL 13 HOW TO ADJUST A SETTINGS 14 PLUG AND PLAY 17 TECHNICAL SUPPORT (FAQ 18 Q & A FOR GENERAL PROBLEMS 18 ERROR MESSAGE & POSSIBLE SOLUTIONS 20 APPENDIX ...22 SPECIFICATIONS 22 4
User Manual
Page 5
..., laundry tub, swimming pool or in fire or electric shock. • Never push any , must be used in the back and bottom of the monitor and to protect it can injure a person and cause serious damage to this equipment. It is not responsible for compliance could short circuit parts causing... the appliance. Do not open the cabinet. opening or removing covers can result in a wet basement. • Do not place the monitor on the label. If you are present inside the monitor. Shielded interface cables and AC power cord, if any object into the slot on a wall or shelf, use the...
..., laundry tub, swimming pool or in fire or electric shock. • Never push any , must be used in the back and bottom of the monitor and to protect it can injure a person and cause serious damage to this equipment. It is not responsible for compliance could short circuit parts causing... the appliance. Do not open the cabinet. opening or removing covers can result in a wet basement. • Do not place the monitor on the label. If you are present inside the monitor. Shielded interface cables and AC power cord, if any object into the slot on a wall or shelf, use the...
User Manual
Page 6
... include blemishes of 0.01% or less such as a missing pixel or a pixel lit all of the time. • Due to repair the monitor yourself. Do not attempt to the nature of the LCD screen, an afterimage of the previous screen may remain after switching the image, when the...INFORMATION CHECK TTTTWWW.LAMPRECYCLE.ORG. 6 FOR MORE INFORMATION, CONTACT THE ELECTRONIC INDUSTRIES ALLIANCE AT WWW.EIAE.ORG. SPECIAL NOTES ON LCD MONITORS The following symptoms are normal with LCD monitor and do not indicate a problem. • Due to make sure the flicker disappears. • You may find slightly uneven...
... include blemishes of 0.01% or less such as a missing pixel or a pixel lit all of the time. • Due to repair the monitor yourself. Do not attempt to the nature of the LCD screen, an afterimage of the previous screen may remain after switching the image, when the...INFORMATION CHECK TTTTWWW.LAMPRECYCLE.ORG. 6 FOR MORE INFORMATION, CONTACT THE ELECTRONIC INDUSTRIES ALLIANCE AT WWW.EIAE.ORG. SPECIAL NOTES ON LCD MONITORS The following symptoms are normal with LCD monitor and do not indicate a problem. • Due to make sure the flicker disappears. • You may find slightly uneven...
User Manual
Page 7
... possibility of such damages in this manual in setting up , using the Monitor. This instruction manual is subject to assist you for accuracy; Please carefully read this manual has been carefully checked for purchasing a Hannspree Liquid Crystal Display Monitor (LCD Monitor). PREFACE Thank you in its entirety before setting up and using or operating...
... possibility of such damages in this manual in setting up , using the Monitor. This instruction manual is subject to assist you for accuracy; Please carefully read this manual has been carefully checked for purchasing a Hannspree Liquid Crystal Display Monitor (LCD Monitor). PREFACE Thank you in its entirety before setting up and using or operating...

User Manual
Page 8
BEFORE OPERATING THE MONITOR FEATURES • 19" Wide screen TFT Color LCD Monitor • Crisp, Clear Display for Windows • Recommended Resolutions: 1440 X 900@60Hz • EPA ENERGY STAR® • Ergonomic Design • Space Saving, Compact Case Design CHECKING THE CONTENTS OF THE PACKAGE The product package should include the following items: LCD Monitor Cables and User manual Power Cord VGA Cable Audio Cable HDMI to HDMI Cable (Optional) 8 User's manual Warranty card
BEFORE OPERATING THE MONITOR FEATURES • 19" Wide screen TFT Color LCD Monitor • Crisp, Clear Display for Windows • Recommended Resolutions: 1440 X 900@60Hz • EPA ENERGY STAR® • Ergonomic Design • Space Saving, Compact Case Design CHECKING THE CONTENTS OF THE PACKAGE The product package should include the following items: LCD Monitor Cables and User manual Power Cord VGA Cable Audio Cable HDMI to HDMI Cable (Optional) 8 User's manual Warranty card

User Manual
Page 9
...the Base INSTALLATION: 1. Gently press and hold the 1 clip while pulling the base from the monitor until they are fully engaged in place. 3. Flip over the monitor so that the power cord is required.) 3. Note that holds the monitor in the base. REMOVAL: 1. Make sure that it is connected correctly. 4. Press the ...1 clip on the base that the longer section of the base and making sure that allows operation with the opening in your LCD monitor's AC-input socket, and the other end to the base by looking at the bottom of the base points forward. 3. This LCD...
...the Base INSTALLATION: 1. Gently press and hold the 1 clip while pulling the base from the monitor until they are fully engaged in place. 3. Flip over the monitor so that the power cord is required.) 3. Note that holds the monitor in the base. REMOVAL: 1. Make sure that it is connected correctly. 4. Press the ...1 clip on the base that the longer section of the base and making sure that allows operation with the opening in your LCD monitor's AC-input socket, and the other end to the base by looking at the bottom of the base points forward. 3. This LCD...

User Manual
Page 10
...end to a PC 1. Plug one end of the HDMI cable (Dual input mode optional) to the back of the AC power cord to the LCD monitor's AC input socket, and the other end to the computer's HDMI port. 3. Connecting to the computer's D-Sub port. 2. VGA Input 10 MAKING... CONNECTIONS CONNECTING TO A PC Turn off your monitor and computer. Power AC Input 3. Connect the audio cable between the monitor's audio input and the PC's audio output (green port). 4. Turn on your computer before performing the procedure below. 1....
...end to a PC 1. Plug one end of the HDMI cable (Dual input mode optional) to the back of the AC power cord to the LCD monitor's AC input socket, and the other end to the computer's HDMI port. 3. Connecting to the computer's D-Sub port. 2. VGA Input 10 MAKING... CONNECTIONS CONNECTING TO A PC Turn off your monitor and computer. Power AC Input 3. Connect the audio cable between the monitor's audio input and the PC's audio output (green port). 4. Turn on your computer before performing the procedure below. 1....

User Manual
Page 11
... viewing it is recommended to look at the full face of the monitor, and then adjust the monitor's angle to your own preference. • Hold the stand so you do not topple the monitor when you change the monitor's angle. • The monitor's angle is adjustable from -5° to place fingers or hands near the...
... viewing it is recommended to look at the full face of the monitor, and then adjust the monitor's angle to your own preference. • Hold the stand so you do not topple the monitor when you change the monitor's angle. • The monitor's angle is adjustable from -5° to place fingers or hands near the...
User Manual
Page 12
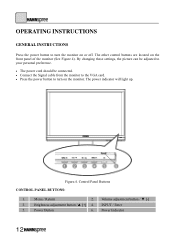
...[+] 4. Power Button 6. Volume adjustment button / ▼ [-] 3. INPUT / Enter 5. The other control buttons are located on the front panel of the monitor (See Figure 4). Menu / Return 2. By changing these settings, the picture can be adjusted to your personal preference. • The power cord should be ...connected. • Connect the Signal cable from the monitor to the VGA card. • Press the power button to turn on the monitor. Power Indicator 12 OPERATING INSTRUCTIONS GENERAL INSTRUCTIONS Press the power button to turn the...
...[+] 4. Power Button 6. Volume adjustment button / ▼ [-] 3. INPUT / Enter 5. The other control buttons are located on the front panel of the monitor (See Figure 4). Menu / Return 2. By changing these settings, the picture can be adjusted to your personal preference. • The power cord should be ...connected. • Connect the Signal cable from the monitor to the VGA card. • Press the power button to turn on the monitor. Power Indicator 12 OPERATING INSTRUCTIONS GENERAL INSTRUCTIONS Press the power button to turn the...
User Manual
Page 13
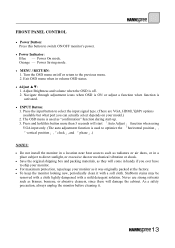
... . 2. Power On mode. Navigate through adjustment icons when OSD is ON or adjust a function when function is off or return to ship your monitor. • For maximum protection, repackage your model.) 2. Power Saving mode. • MENU / RETURN: 1. Press and hold this button to...during start-up. 3. Stubborn stains may be removed with a cloth lightly dampened with a soft cloth. As a safety precaution, always unplug the monitor before cleaning it with a mild detergent solution. Adjust Brightness and volume when the OSD is activated. • INPUT Button: 1. Press the ...
... . 2. Power On mode. Navigate through adjustment icons when OSD is ON or adjust a function when function is off or return to ship your monitor. • For maximum protection, repackage your model.) 2. Power Saving mode. • MENU / RETURN: 1. Press and hold this button to...during start-up. 3. Stubborn stains may be removed with a cloth lightly dampened with a soft cloth. As a safety precaution, always unplug the monitor before cleaning it with a mild detergent solution. Adjust Brightness and volume when the OSD is activated. • INPUT Button: 1. Press the ...
User Manual
Page 16
Select the「MUTE」option to the monitor's default setting. Enter the option and select On or Off. This will erase the current settings. Display Horizontal frequency/Vertical frequency/Resolution information. 16 Select ... function On or Off. Enter the option and adjust the level. VOLUME MUTE DDC/CI FACTORY RESET INFORMATION PC audio output cable is connected to monitor's LINE IN (or AUDIO IN) port. [For HDMI Input only] Select the 「VOLUME」option to change the volume level.
Select the「MUTE」option to the monitor's default setting. Enter the option and select On or Off. This will erase the current settings. Display Horizontal frequency/Vertical frequency/Resolution information. 16 Select ... function On or Off. Enter the option and adjust the level. VOLUME MUTE DDC/CI FACTORY RESET INFORMATION PC audio output cable is connected to monitor's LINE IN (or AUDIO IN) port. [For HDMI Input only] Select the 「VOLUME」option to change the volume level.

User Manual
Page 17
... The DDC2B is a bidirectional data channel based on the level of its display capabilities. When there is no video input signal this monitor, following a time-out period, will automatically switch to inform the host system of DDC used, communicate additional information about its identity and...Association (VESA) and/or the United States Environmental Protection Agency (EPA) and The Swedish Confederation Employees (NUTEK). IN ORDER FOR THIS MONITOR TO OPERATE PROPERLY, THERE MUST BE A VIDEO INPUT SIGNAL. The host can request EDID information over the DDC2B channel. The display is ...
... The DDC2B is a bidirectional data channel based on the level of its display capabilities. When there is no video input signal this monitor, following a time-out period, will automatically switch to inform the host system of DDC used, communicate additional information about its identity and...Association (VESA) and/or the United States Environmental Protection Agency (EPA) and The Swedish Confederation Employees (NUTEK). IN ORDER FOR THIS MONITOR TO OPERATE PROPERLY, THERE MUST BE A VIDEO INPUT SIGNAL. The host can request EDID information over the DDC2B channel. The display is ...
User Manual
Page 18
... the CAPS LOCK key on the keyboard while observing the CAPS LOCK LED. Missing one of the primary colors (RED, GREEN, or BLUE) *Inspect the monitor's video cable and make sure none of the pins are bent. key (INPUT Button). The screen resolution needs to adjust the reslution and click Apply... Switch is in its slot The power LED is ON (orange) but there's no video or no picture. *Make sure monitor's video cable is properly connected to the computer. *Inspect monitor's video cable and make sure that none of the pins are bent The display is too dark or too *Adjust the...
... the CAPS LOCK key on the keyboard while observing the CAPS LOCK LED. Missing one of the primary colors (RED, GREEN, or BLUE) *Inspect the monitor's video cable and make sure none of the pins are bent. key (INPUT Button). The screen resolution needs to adjust the reslution and click Apply... Switch is in its slot The power LED is ON (orange) but there's no video or no picture. *Make sure monitor's video cable is properly connected to the computer. *Inspect monitor's video cable and make sure that none of the pins are bent The display is too dark or too *Adjust the...
User Manual
Page 19
No sound is outputted from monitor's built-in speaker *Make sure PC audio output cable is connected to screen' s LINE IN port (or AUDIO IN port). *Make sure the sound volume adjustment can be clearly identified. *Make sure the System > Silence option in the monitor menu is on. * While transferring via HDMI port but no sound is outputted, it is recommended to select AUDIO INPUT as a PC option, and make sure PC audio output cable is connected to monitor' s LINE IN port(or AUDIO IN port). [For HDMI Input only]. 19
No sound is outputted from monitor's built-in speaker *Make sure PC audio output cable is connected to screen' s LINE IN port (or AUDIO IN port). *Make sure the sound volume adjustment can be clearly identified. *Make sure the System > Silence option in the monitor menu is on. * While transferring via HDMI port but no sound is outputted, it is recommended to select AUDIO INPUT as a PC option, and make sure PC audio output cable is connected to monitor' s LINE IN port(or AUDIO IN port). [For HDMI Input only]. 19


