

Product Manual
Page 1
MODELS: LE32C13200 LE40C13800 LED TV OWNER'S MANUAL Please READ this manual carefully before operating your TV, and keep it for future reference.
MODELS: LE32C13200 LE40C13800 LED TV OWNER'S MANUAL Please READ this manual carefully before operating your TV, and keep it for future reference.

Product Manual
Page 5
....This equipment generates, uses and can be determined by the party responsible for future reference. Consult the dealer or an experienced radio/TV technician for a Class B digital device, pursuant to Part 15 of the FCC Rules.These limits are designed to the following measures... It is encouraged to try to correct the interference by unauthorized modification to correct such interference. FOR YOUR SAFETY Before operating the TV please read this manual thoroughly.This manual should be used in a particular installation. If this apparatus to operate the equipment. 2....
....This equipment generates, uses and can be determined by the party responsible for future reference. Consult the dealer or an experienced radio/TV technician for a Class B digital device, pursuant to Part 15 of the FCC Rules.These limits are designed to the following measures... It is encouraged to try to correct the interference by unauthorized modification to correct such interference. FOR YOUR SAFETY Before operating the TV please read this manual thoroughly.This manual should be used in a particular installation. If this apparatus to operate the equipment. 2....

Product Manual
Page 6
.... Unplug immediately if other flammable materials. Unplug immediately if there is a malfunction like metals or other foreign materials are put inside the TV box like no picture, no video/audio, smoke and bad odor from the AC outlet before cleaning. Call service personnel to unplug the... AC cord from TV. Prohibit/Avoid opening TV cabinet. Do not place the display near water, such as bathtub, washbasin, kitchen sink laundry tub, swimming pool or in...
.... Unplug immediately if other flammable materials. Unplug immediately if there is a malfunction like metals or other foreign materials are put inside the TV box like no picture, no video/audio, smoke and bad odor from the AC outlet before cleaning. Call service personnel to unplug the... AC cord from TV. Prohibit/Avoid opening TV cabinet. Do not place the display near water, such as bathtub, washbasin, kitchen sink laundry tub, swimming pool or in...
Product Manual
Page 7
... only.To reduce the risk of the obsolete outlet. 10. Refer all servicing to your home, consult your dealer or local power company. 16. The TV should be operated only from the type of the polarized or grounding-type plug. CAUTION - Follow all warnings. 4. Servicing is required when the apparatus has...
... only.To reduce the risk of the obsolete outlet. 10. Refer all servicing to your home, consult your dealer or local power company. 16. The TV should be operated only from the type of the polarized or grounding-type plug. CAUTION - Follow all warnings. 4. Servicing is required when the apparatus has...
Product Manual
Page 8
... broadcast tuner will require a converter box after June 12 2009, to receive full power over -the-air broadcasts with cable and satellite TV services, gaming consoles,VCRs, DVD players, and similar products. Information about the DTV transition is available from http://www.DTV.gov or ...electronic equipment/toys on the top of the Nation's transition to -analog converter boxed. 20. CONSUMER ALERT - air broadcasts with cable and satellite TV services, gaming consoles,VCRs, DVD players, and similar products, For more information about the DTV transition -after June 12 2009, a television ...
... broadcast tuner will require a converter box after June 12 2009, to receive full power over -the-air broadcasts with cable and satellite TV services, gaming consoles,VCRs, DVD players, and similar products. Information about the DTV transition is available from http://www.DTV.gov or ...electronic equipment/toys on the top of the Nation's transition to -analog converter boxed. 20. CONSUMER ALERT - air broadcasts with cable and satellite TV services, gaming consoles,VCRs, DVD players, and similar products, For more information about the DTV transition -after June 12 2009, a television ...
Product Manual
Page 9
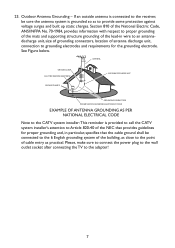
... system installer:This reminder is grounded so as practical. Please, make sure to connect the power plug to the wall outlet socket after connecting the TV to provide some protection against voltage surges and built up static charges.
... system installer:This reminder is grounded so as practical. Please, make sure to connect the power plug to the wall outlet socket after connecting the TV to provide some protection against voltage surges and built up static charges.

Product Manual
Page 11
TABLE OF CONTENTS DIGITAL TELEVISION TRANSITION NOTICE 1 FOR YOUR SAFETY...3 PRECAUTIONS AND REMINDERS 4 IMPORTANT SAFETY INSTRUCTIONS 5 PREPARATION...10 ATTACHING THE BASE 10 PREPARING YOUR LCD HDTV FOR WALL MOUNTING 10 PERIPHERAL CONNECTION GUIDE 12 OPERATING INSTRUCTIONS 13 TO USE THE FRONT PANEL CONTROLS 13 TO USE THE REMOTE CONTROL 14 TO USE THE MENUS...16 TV MENU...16 VIDEO MENU...16 AUDIO MENU...17 SETUP MENU...18 VGA MENU...22 TIPS...22 PRODUCT SPECIFICATIONS 24 TROUBLESHOOTING...26 GLOSSARY...27 WARRANTY...28 9
TABLE OF CONTENTS DIGITAL TELEVISION TRANSITION NOTICE 1 FOR YOUR SAFETY...3 PRECAUTIONS AND REMINDERS 4 IMPORTANT SAFETY INSTRUCTIONS 5 PREPARATION...10 ATTACHING THE BASE 10 PREPARING YOUR LCD HDTV FOR WALL MOUNTING 10 PERIPHERAL CONNECTION GUIDE 12 OPERATING INSTRUCTIONS 13 TO USE THE FRONT PANEL CONTROLS 13 TO USE THE REMOTE CONTROL 14 TO USE THE MENUS...16 TV MENU...16 VIDEO MENU...16 AUDIO MENU...17 SETUP MENU...18 VGA MENU...22 TIPS...22 PRODUCT SPECIFICATIONS 24 TROUBLESHOOTING...26 GLOSSARY...27 WARRANTY...28 9

Product Manual
Page 12
... face down on the bottom of your safety, please use only with UL listed wall mount brackets with minimum weight of the TV. 3. For your TV using four screws, as indicated in the illustration. 200 mm 100 mm 1 2 NOTE The cover plate, wall mount bracket, and the screws are optional ..., not included in the package. 10 Use the screws left from removing the base to secure an optional cover plate to the bottom of the TV without stand. (Please see page 25.) To attach a wall mount bracket to remove the base. Carefully align and insert the base to the stand and...
... face down on the bottom of your safety, please use only with UL listed wall mount brackets with minimum weight of the TV. 3. For your TV using four screws, as indicated in the illustration. 200 mm 100 mm 1 2 NOTE The cover plate, wall mount bracket, and the screws are optional ..., not included in the package. 10 Use the screws left from removing the base to secure an optional cover plate to the bottom of the TV without stand. (Please see page 25.) To attach a wall mount bracket to remove the base. Carefully align and insert the base to the stand and...

Product Manual
Page 13
... turn on the back cover. Please make sure to connect the power plug to the wall outlet socket after connecting the TV to allow free flow of the TV set. 4. Do not cover the ventilation openings on within a few seconds. Power: Insert the power cord in the vicinity. Install the base stand...; place the TV on or in the wall socket with AC power supply. 5. HTR-D11 Min 1 m HTR-D11 Ensure that the TV is placed in a position to the power cord! 1. Remote control: Remove the cover of the battery...
... turn on the back cover. Please make sure to connect the power plug to the wall outlet socket after connecting the TV to allow free flow of the TV set. 4. Do not cover the ventilation openings on within a few seconds. Power: Insert the power cord in the vicinity. Install the base stand...; place the TV on or in the wall socket with AC power supply. 5. HTR-D11 Min 1 m HTR-D11 Ensure that the TV is placed in a position to the power cord! 1. Remote control: Remove the cover of the battery...

Product Manual
Page 14
...Press INPUT button to select "Component" if you have connected a video recorder to the plug, the integrated speakers will be muted. Output the TV audio to MP3 music. • EARPHONE - Insert USB storage device to the USB port to view JPEG photos, or listen to your home ...output.When the headphone is connected, press the INPUT button on this all digital connector. • VGA/AUDIO IN - Connect the primary source for Digital TV. • SPDIF (Optical Digital Audio Out) - Connect to your stereo amplifier. • USB PORT - Connect the primary source for digital video ...
...Press INPUT button to select "Component" if you have connected a video recorder to the plug, the integrated speakers will be muted. Output the TV audio to MP3 music. • EARPHONE - Insert USB storage device to the USB port to view JPEG photos, or listen to your home ...output.When the headphone is connected, press the INPUT button on this all digital connector. • VGA/AUDIO IN - Connect the primary source for Digital TV. • SPDIF (Optical Digital Audio Out) - Connect to your stereo amplifier. • USB PORT - Connect the primary source for digital video ...

Product Manual
Page 15
.... Simply touch the icon with your finger. • Power on/off (standby) the TV set. • Menu displayed: Navigate up. • Menu not displayed: Browse the TV channels. • Menu displayed: Navigate down. • Menu not displayed: Browse the TV channels. • Menu displayed: Navigate right or confirm/change a selection. • Menu not...
.... Simply touch the icon with your finger. • Power on/off (standby) the TV set. • Menu displayed: Navigate up. • Menu not displayed: Browse the TV channels. • Menu displayed: Navigate down. • Menu not displayed: Browse the TV channels. • Menu displayed: Navigate right or confirm/change a selection. • Menu not...

Product Manual
Page 16
... the ENTER key. Use the up and down arrow keys to show the input source list. Note:The TV is HDMI. 0 ~ 9 / • number Press to enter a TV channel number (Press "•" to PC mode. TV, DVD, STB, CABLE,VCR,AUD Select one of the system modes in which the remote control can be...: Standard, Music, Speech, Personal. PICTURE Press to change the picture mode: Standard, Eco, Movie, Personal,Vivid. CHΛ / CH V Press to power ON/OFF (standby) TV. TO USE THE REMOTE CONTROL Power Press to browse through the...
... the ENTER key. Use the up and down arrow keys to show the input source list. Note:The TV is HDMI. 0 ~ 9 / • number Press to enter a TV channel number (Press "•" to PC mode. TV, DVD, STB, CABLE,VCR,AUD Select one of the system modes in which the remote control can be...: Standard, Music, Speech, Personal. PICTURE Press to change the picture mode: Standard, Eco, Movie, Personal,Vivid. CHΛ / CH V Press to power ON/OFF (standby) TV. TO USE THE REMOTE CONTROL Power Press to browse through the...

Product Manual
Page 17
...as Stereo, SAP or Mono. REV S Press to change the closed caption type: CC On / CC Off / CC On With Mute. MTS/SAP For analog TV, press to toggle MP3/JPEG mode. ARC Press to focus/view on -screen menus and adjust the system settings. NEXT L Press to play previous MP3... the Electronic Program Guide. GUIDE Press to focus/view on the first item in JPEGViewer. For digital TV, press to show the information about the input source,TV channel, display resolution and current time. The TV will automatically turn off / 5 / 10 / 15 / 30 / 60 / 90 / 120 / 180 / 240 mins). FAVORITE Press to...
...as Stereo, SAP or Mono. REV S Press to change the closed caption type: CC On / CC Off / CC On With Mute. MTS/SAP For analog TV, press to toggle MP3/JPEG mode. ARC Press to focus/view on -screen menus and adjust the system settings. NEXT L Press to play previous MP3... the Electronic Program Guide. GUIDE Press to focus/view on the first item in JPEGViewer. For digital TV, press to show the information about the input source,TV channel, display resolution and current time. The TV will automatically turn off / 5 / 10 / 15 / 30 / 60 / 90 / 120 / 180 / 240 mins). FAVORITE Press to...
Product Manual
Page 18
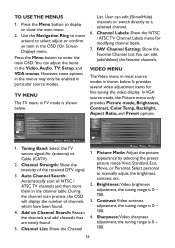
...the OSD will display the number of the received DTV signal. 3. It provides several video adjustment items for modifying channel labels. 7. Video Audio TV Setup VGA Video Picture Mode Brightness Contrast Sharpness Color Tint Color Temp. Brightness: Video brightness adjustment, the tuning range is 0 ~ 100. ... directly to a selected channel. 6. However, some options in the menus may only be enabled in the channel table. Video Audio TV Setup VGA TV Tuning Band Channel Strength Auto Channel Search Add on Channel Search: Rescan the channels and add channels that are newly found . 4. ...
...the OSD will display the number of the received DTV signal. 3. It provides several video adjustment items for modifying channel labels. 7. Video Audio TV Setup VGA Video Picture Mode Brightness Contrast Sharpness Color Tint Color Temp. Brightness: Video brightness adjustment, the tuning range is 0 ~ 100. ... directly to a selected channel. 6. However, some options in the menus may only be enabled in the channel table. Video Audio TV Setup VGA TV Tuning Band Channel Strength Auto Channel Search Add on Channel Search: Rescan the channels and add channels that are newly found . 4. ...
Product Manual
Page 19
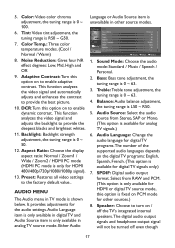
... On hello Move ENTER Select 1. Audio Source: Select the audio source from RAW and PCM. (This option is only available for HDMI or digital TV source mode, thie option is shown below. Noise Reduction: Gives four NR effect degrees: Low, Mid, High and Off. 9. DCR:Turn this ...option on to turn on the digital TV programs: English, Spanish, French. (This option is unavailable in other sources.) 8. Speaker: Choose to enable dynamic contrast. Color: Video color chroma adjustment, ...
... On hello Move ENTER Select 1. Audio Source: Select the audio source from RAW and PCM. (This option is only available for HDMI or digital TV source mode, thie option is shown below. Noise Reduction: Gives four NR effect degrees: Low, Mid, High and Off. 9. DCR:Turn this ...option on to turn on the digital TV programs: English, Spanish, French. (This option is unavailable in other sources.) 8. Speaker: Choose to enable dynamic contrast. Color: Video color chroma adjustment, ...
Product Manual
Page 20
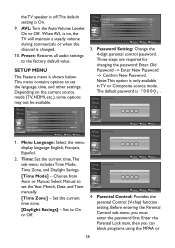
...password. Three steps are required for changing the password: Enter Old Password -> Enter New Password -> Confirm New Password. Video Audio TV Setup VGA Setup Menu Language Time Passowrd Setting Parental Control Closed Captions Analog Captions Digital Captions Digital Captions Setup English Off CC1 SERVICE1... Return Move ENTER Select 1. Video Audio TV Setup VGA Time Time Mode Time Zone Daylight Savings Year Month Day Time Auto HST On 2011 Jan 1 2:31 AM Return...
...password. Three steps are required for changing the password: Enter Old Password -> Enter New Password -> Confirm New Password. Video Audio TV Setup VGA Setup Menu Language Time Passowrd Setting Parental Control Closed Captions Analog Captions Digital Captions Digital Captions Setup English Off CC1 SERVICE1... Return Move ENTER Select 1. Video Audio TV Setup VGA Time Time Mode Time Zone Daylight Savings Year Month Day Time Auto HST On 2011 Jan 1 2:31 AM Return...
Product Manual
Page 21
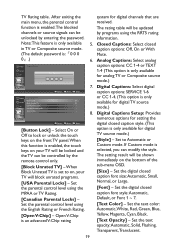
....The blocked channels or source signals can modify the style. Note:This feature is only available in TV or Composite source mode. (The default password is only available for digital TV source mode.) [Style] - Set the parental control level using the English Rating or French Rating.... or TEXT 1-4 (This option is :『0 0 0 0』.) Video Parental Control Audio TV Enter Password Setup VGA Return Move ENTER Select Video Audio TV Parental Control Button Lock Block Unrated TV USA Parental Locks Canada Parental Locks Open V-Chip Setup VGA Off Off Return Move ENTER Select [...
....The blocked channels or source signals can modify the style. Note:This feature is only available in TV or Composite source mode. (The default password is only available for digital TV source mode.) [Style] - Set the parental control level using the English Rating or French Rating.... or TEXT 1-4 (This option is :『0 0 0 0』.) Video Parental Control Audio TV Enter Password Setup VGA Return Move ENTER Select Video Audio TV Parental Control Button Lock Block Unrated TV USA Parental Locks Canada Parental Locks Open V-Chip Setup VGA Off Off Return Move ENTER Select [...
Product Manual
Page 22
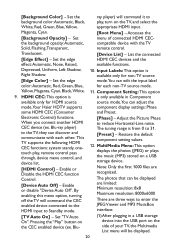
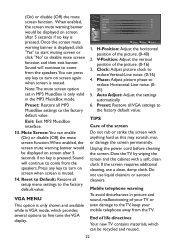
...Maximum resolution: 8000x6000 There are recognized. List the connected [Edge Effect] - Set the edge mode.You can discover and communicate with the TV Solid, Flashing,Transparent, remote control. Pressing the "Play" button on a USB storage device. The tuning range is Right Shadow. The photos... that can adjust the mode.Your Haier HDTV supports component display settings: Phase some HDMI CEC (Consumer and Preset. Set the edge HDMI CEC devices and the effect:Automatic, ...
...Maximum resolution: 8000x6000 There are recognized. List the connected [Edge Effect] - Set the edge mode.You can discover and communicate with the TV Solid, Flashing,Transparent, remote control. Pressing the "Play" button on a USB storage device. The tuning range is Right Shadow. The photos... that can adjust the mode.Your Haier HDTV supports component display settings: Phase some HDMI CEC (Consumer and Preset. Set the edge HDMI CEC devices and the effect:Automatic, ...
Product Manual
Page 23
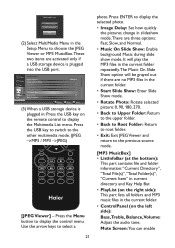
... MultiMedia Menu in the current folder. • ControlPanel (on the remote control to the other multimedia mode. (JPEG ->MP3 / MP3 ->JPEG) [JPEG Viewer] - Video Audio TV Setup VGA MultiMedia Menu Digital Captions Digital Captions Setup HDMI CEC Input Labels Component Setting MultiMedia Menu Mute Screen Reset To Default SERVICE1 Off Return...
... MultiMedia Menu in the current folder. • ControlPanel (on the remote control to the other multimedia mode. (JPEG ->MP3 / MP3 ->JPEG) [JPEG Viewer] - Video Audio TV Setup VGA MultiMedia Menu Digital Captions Digital Captions Setup HDMI CEC Input Labels Component Setting MultiMedia Menu Mute Screen Reset To Default SERVICE1 Off Return...
Product Manual
Page 24
...is only valid in VGA mode, which can press any key to the factory default value. Exit: Exit MP3 MusicBox interface. 13. Dust the TV by wiping the screen and the cabinet with anything hard as this may scratch, mar, or damage the screen permanently. Once the screen mute ... muting screen or click "No" to come from the speakers. (On) or disable (Off) the mute screen function. End of life directives Your new TV contains materials, which provides several options to reduce Vertical-Line noise. (0-16) 4. Phase: Adjust picture phase to the factory default value. Clock: Adjust picture...
...is only valid in VGA mode, which can press any key to the factory default value. Exit: Exit MP3 MusicBox interface. 13. Dust the TV by wiping the screen and the cabinet with anything hard as this may scratch, mar, or damage the screen permanently. Once the screen mute ... muting screen or click "No" to come from the speakers. (On) or disable (Off) the mute screen function. End of life directives Your new TV contains materials, which provides several options to reduce Vertical-Line noise. (0-16) 4. Phase: Adjust picture phase to the factory default value. Clock: Adjust picture...


