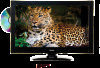
User Manual
Page 3
... of material resources. WARNING: The excessive sound pressure from the Television. 11) Only use the return and collection systems or contact the retailer where the product was purchased. power-supply cord or plug is committed to safely recycling electronic products and product materials. IMPORTANT SAFETY INSTRUCTION 1) Read these instructions. 2) Keep these instructions. 3) Heed all warnings. 4) Follow all servicing to qualified service personnel.
... of material resources. WARNING: The excessive sound pressure from the Television. 11) Only use the return and collection systems or contact the retailer where the product was purchased. power-supply cord or plug is committed to safely recycling electronic products and product materials. IMPORTANT SAFETY INSTRUCTION 1) Read these instructions. 2) Keep these instructions. 3) Heed all warnings. 4) Follow all servicing to qualified service personnel.
User Manual
Page 5
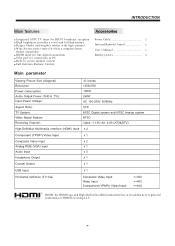
... ATSC TV tuner for HDTV broadcast reception ■ High brightness provides a vivid and brilliant picture ■ Deeper blacks and brighter whites with high contrast ■ Wide Screen aspect ratio (16:9) for a complete home theater experience ■ HDMI input for true digital connection ■ VGA port for connection to PC ■ Built-in stereo speaker system ■ Full-function Remote Control Power Cable 1 Infrared Remote Control 1 User's Manual 1 Battery(AAA 2 Input Power Voltage: 120W...
... ATSC TV tuner for HDTV broadcast reception ■ High brightness provides a vivid and brilliant picture ■ Deeper blacks and brighter whites with high contrast ■ Wide Screen aspect ratio (16:9) for a complete home theater experience ■ HDMI input for true digital connection ■ VGA port for connection to PC ■ Built-in stereo speaker system ■ Full-function Remote Control Power Cable 1 Infrared Remote Control 1 User's Manual 1 Battery(AAA 2 Input Power Voltage: 120W...

User Manual
Page 7
...a DVI source then the audio input signal must be connected to the PC audio input. 3. PC Audio Input 4. HDMI2 Input 10. 3 1 2 BLUE 9 R 8 AV2 L 7 VIDEO 6 USB 1 2 3 4 5 AC INPUT 100-240V~50/60Hz 11 1. Component Video (YPbPr) Input 8. Audio Input RF INPUT COAXIAL PC AUDIO INPUT HEADPHONE 1 2 34 VGA INPUT R AUDIO INPUT L Y AV1 COMPONENT INPUT Pb Pr HDMI2 INPUT HDMI1 INPUT 5 6 7 89 10 7. HDMI1 Input 11. Composite video input and component video input share the audio input. 2. Headphone Output 5. Coaxial 3. Composite Video Input 9. VGA Port (PC Input...
...a DVI source then the audio input signal must be connected to the PC audio input. 3. PC Audio Input 4. HDMI2 Input 10. 3 1 2 BLUE 9 R 8 AV2 L 7 VIDEO 6 USB 1 2 3 4 5 AC INPUT 100-240V~50/60Hz 11 1. Component Video (YPbPr) Input 8. Audio Input RF INPUT COAXIAL PC AUDIO INPUT HEADPHONE 1 2 34 VGA INPUT R AUDIO INPUT L Y AV1 COMPONENT INPUT Pb Pr HDMI2 INPUT HDMI1 INPUT 5 6 7 89 10 7. HDMI1 Input 11. Composite video input and component video input share the audio input. 2. Headphone Output 5. Coaxial 3. Composite Video Input 9. VGA Port (PC Input...

User Manual
Page 10
VIDEO EQUIPMENT with YPbPr GBR WR AC INPUT 100-240V~50/60Hz Y Yellow (video) W White(audio L) R Red(audio R or Pr) B Blue(Pb) G Green(Y) RF INPUT COAXIAL PC AUDIO INPUT HEADPHONE VGA INPUT WR GB R R AUDIO INPUT L Y AV1 COMPONENT INPUT Pb Pr HDMI2 INPUT HDMI1 INPUT W R HDMI VIDEO EQUIPMENT W R TO VIDEO output To audio outputs R AV2 L VIDEO USB
VIDEO EQUIPMENT with YPbPr GBR WR AC INPUT 100-240V~50/60Hz Y Yellow (video) W White(audio L) R Red(audio R or Pr) B Blue(Pb) G Green(Y) RF INPUT COAXIAL PC AUDIO INPUT HEADPHONE VGA INPUT WR GB R R AUDIO INPUT L Y AV1 COMPONENT INPUT Pb Pr HDMI2 INPUT HDMI1 INPUT W R HDMI VIDEO EQUIPMENT W R TO VIDEO output To audio outputs R AV2 L VIDEO USB
User Manual
Page 11
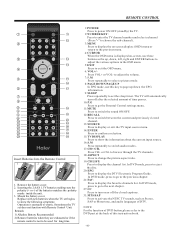
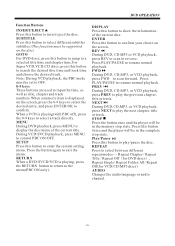
... the TV channels. 18:ASPECT Press to change the picture aspect ratio. 19:CH LIST: Press to display the DTV Electronic Program Guide. In DVD mode, press to go to the next chapter. 27:CC Press to turn off the closed captions. 31:MTS/SAP Press to activate the NTSC TV sounds, such as the up /down , left, right and ENTER buttons to adjust the...
... the TV channels. 18:ASPECT Press to change the picture aspect ratio. 19:CH LIST: Press to display the DTV Electronic Program Guide. In DVD mode, press to go to the next chapter. 27:CC Press to turn off the closed captions. 31:MTS/SAP Press to activate the NTSC TV sounds, such as the up /down , left, right and ENTER buttons to adjust the...
User Manual
Page 12
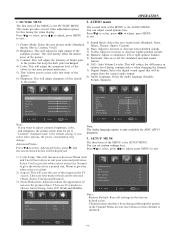
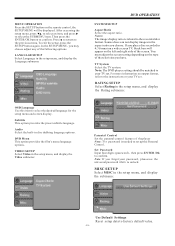
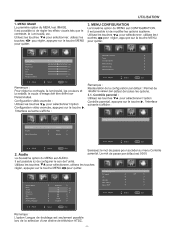
... decrease lower-pitched sounds. 2). This menu provides several video adjustment options for ATSC (DTV) programs. 3. Brightness: This will mainly affect the darker 4). colors to give the white colors a red tint. 2). Tint: Allows you select other options, the power consumption may change. SETUP MENU The third item of the volume level during commercials or when changing the channel. Parental Controls Timer Closed Caption Menu Settings VGA Settings Restore Default Adjust > > > > > > Select Menu Exit Color Temp. Sound Mode: Select the user sound mode (Standard, News...
... decrease lower-pitched sounds. 2). This menu provides several video adjustment options for ATSC (DTV) programs. 3. Brightness: This will mainly affect the darker 4). colors to give the white colors a red tint. 2). Tint: Allows you select other options, the power consumption may change. SETUP MENU The third item of the volume level during commercials or when changing the channel. Parental Controls Timer Closed Caption Menu Settings VGA Settings Restore Default Adjust > > > > > > Select Menu Exit Color Temp. Sound Mode: Select the user sound mode (Standard, News...
User Manual
Page 13
... be adjusted. Under 17 requires accompanying parent or adult R guardian (age varies in the data of older movies. New password: Input the new password 3). Confirm password: Input the new password again NC-17 No one 17 and under 13. FV V S L D Adjust Select Menu Exit Input the password, and you will be displayed. Change password P.G switch US Canada RRT setting Reset RRT > < Off > < > < > < > < > Adjust Select Menu Exit Change Password: Press , and the screen shown...
... be adjusted. Under 17 requires accompanying parent or adult R guardian (age varies in the data of older movies. New password: Input the new password 3). Confirm password: Input the new password again NC-17 No one 17 and under 13. FV V S L D Adjust Select Menu Exit Input the password, and you will be displayed. Change password P.G switch US Canada RRT setting Reset RRT > < Off > < > < > < > < > Adjust Select Menu Exit Change Password: Press , and the screen shown...
User Manual
Page 14
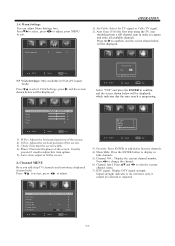
... preferred, acceptable, or only way to exit. Press , and the screen shown below will be adjusted. 3.3 Closed Caption: switch the closed caption options. Sleep timer Time zone DST Clock < Off > < Pacific > < Off > 1999/12/31 04:03PM Adjust Select Menu Exit Sleep Timer: You can adjust the sleep timer and time related settings here. Adjust Select Menu Exit RRT setting: in ATSC mode. nor encourage children to imitate dangerous acts which while related...
... preferred, acceptable, or only way to exit. Press , and the screen shown below will be adjusted. 3.3 Closed Caption: switch the closed caption options. Sleep timer Time zone DST Clock < Off > < Pacific > < Off > 1999/12/31 04:03PM Adjust Select Menu Exit Sleep Timer: You can adjust the sleep timer and time related settings here. Adjust Select Menu Exit RRT setting: in ATSC mode. nor encourage children to imitate dangerous acts which while related...
User Manual
Page 15
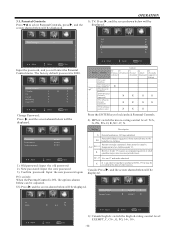
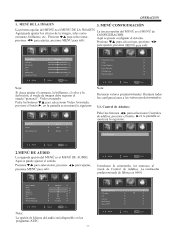
... channels. Channel MENU Here you should perform a full channel scan in VGA (PC input) mode. Signal strength indicator is progressing. Menu Language < English > OPERATION 1). Favorite: Press ENTER to display or hide channels. 5). Air/Cable: Select Air TV signal or Cable TV signal. 2). Show/Hide: Press the ENTER button to add/delete favorite channels. 4). Channel label: Press and to adjust. Press to exit. Phase: Fine tune the phase of the screen. Air/cable Auto Scan...
... channels. Channel MENU Here you should perform a full channel scan in VGA (PC input) mode. Signal strength indicator is progressing. Menu Language < English > OPERATION 1). Favorite: Press ENTER to display or hide channels. 5). Air/Cable: Select Air TV signal or Cable TV signal. 2). Show/Hide: Press the ENTER button to add/delete favorite channels. 4). Channel label: Press and to adjust. Press to exit. Phase: Fine tune the phase of the screen. Air/cable Auto Scan...
User Manual
Page 16
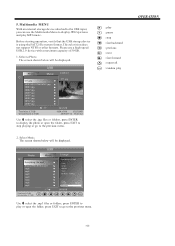
This television does not support NTFS or other formats. Multimedia MENU With an external storage device attached to the USB input, you can use a high-speed USB 2.0 device with a maximum capacity of 50GB. 1. Before starting operation, verify that the USB storage device is using the FAT32 file system format. USB Photo C: .. 011.jpg Music C:\photo\ 011.jpg 200812222178878787.jpg 20081.jpg 20087.jpg 20287.jpg...
This television does not support NTFS or other formats. Multimedia MENU With an external storage device attached to the USB input, you can use a high-speed USB 2.0 device with a maximum capacity of 50GB. 1. Before starting operation, verify that the USB storage device is using the FAT32 file system format. USB Photo C: .. 011.jpg Music C:\photo\ 011.jpg 200812222178878787.jpg 20081.jpg 20087.jpg 20287.jpg...

User Manual
Page 17
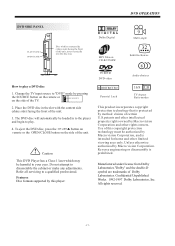
Please note this does not affect the performance of red, green, blue, black or white. Occasionally, a few non-active pixels may appear on the screen as a fixed point of the product. microwave, Component (Y Pb Pr) connections The LCD TV panel is built with very high precision technology giving you fine picture details in vibrant color.
Please note this does not affect the performance of red, green, blue, black or white. Occasionally, a few non-active pixels may appear on the screen as a fixed point of the product. microwave, Component (Y Pb Pr) connections The LCD TV panel is built with very high precision technology giving you fine picture details in vibrant color.
User Manual
Page 18
... U.S.patents and other rights owners. Unless otherwise authorized by Macro vision Corporation and other intellectual property rights owned by Macro vision Corporation. Use of this player: DVD video Audio choices R RESTRICTED Parental Lock 16:9 LB TV Aspect Ratio modes This product incorporates copyright protection technology that is prohibited. DVD OPERATION DVD SIDE PANEL Dolby Digital 9 Multi-angle PLAY/PAUSE OPEN/CLOSE Disc with the content side...
... U.S.patents and other rights owners. Unless otherwise authorized by Macro vision Corporation and other intellectual property rights owned by Macro vision Corporation. Use of this player: DVD video Audio choices R RESTRICTED Parental Lock 16:9 LB TV Aspect Ratio modes This product incorporates copyright protection technology that is prohibited. DVD OPERATION DVD SIDE PANEL Dolby Digital 9 Multi-angle PLAY/PAUSE OPEN/CLOSE Disc with the content side...
User Manual
Page 19
... instructions or your password, please use the universal password 6666 to the recorded disc format. Note: The DVD player setting should be displayed. VIDEO SETUP Select Video in disc dubbing language options. DVD Menu This option provides the film's menu language options. Notes: The image display ratio is needed to select the desired language for the setup menu and screen display. For more information on a wide screen TV, black bars will be matched to factory default...
... instructions or your password, please use the universal password 6666 to the recorded disc format. Note: The DVD player setting should be displayed. VIDEO SETUP Select Video in disc dubbing language options. DVD Menu This option provides the film's menu language options. Notes: The image display ratio is needed to select the desired language for the setup menu and screen display. For more information on a wide screen TV, black bars will be matched to factory default...
User Manual
Page 21
.../MP3 discs) AUDIO Changes the audio language or audio channel. -20- Note: During VCD playback, the PBC mode must be in reverse. SETUP Press this button twice and the player will be supported on the screen, press the 0-9 keys to select the desired entry, and press ENTER/OK to resume normal playback. Press this button to enter the system setting menu. Press PLAY/PAUSE to...
.../MP3 discs) AUDIO Changes the audio language or audio channel. -20- Note: During VCD playback, the PBC mode must be in reverse. SETUP Press this button twice and the player will be supported on the screen, press the 0-9 keys to select the desired entry, and press ENTER/OK to resume normal playback. Press this button to enter the system setting menu. Press PLAY/PAUSE to...
User Manual
Page 22
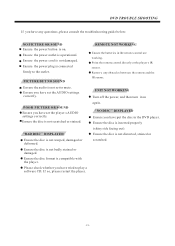
... power plug is compatible with the player. Ensure the power outlet is not scratched or stained. PICTURE BUT NO SOUND Ensure the audio is not badly stained or damaged. Ensure the disc is not set the player s AUDIO settings correctly Ensure the disc is operational. REMOTE NOT WORKING Ensure the batteries in the DVD player. Ensure the disc format is connected firmly to play a software CD. Point the remote control directly at the player...
... power plug is compatible with the player. Ensure the power outlet is not scratched or stained. PICTURE BUT NO SOUND Ensure the audio is not badly stained or damaged. Ensure the disc is not set the player s AUDIO settings correctly Ensure the disc is operational. REMOTE NOT WORKING Ensure the batteries in the DVD player. Ensure the disc format is connected firmly to play a software CD. Point the remote control directly at the player...
User Manual
Page 33
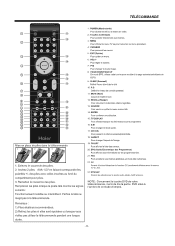
POWER MUTE 1 11 RECALL 123 12 2 456 7890 MENU 3 SOURCE 13 14 4 ENTER 5 15 EXIT TV DISPLAY 16 + S.M + 6 VOL 17 CH _ _ P.M 7 PAGE UP PAGE DOWN 8 SLEEP EPG .P G ASPECT 9 18 10 CH LIST EPG FAV 19 21 20 REPEAT GOTO MENU SETUP 22 24 23 25 CC MTS/SAP 30 26 31 27 RETURN DISPLAY AUDIO SUBTITLE 28 32 29 33 1 2 3 -10-
POWER MUTE 1 11 RECALL 123 12 2 456 7890 MENU 3 SOURCE 13 14 4 ENTER 5 15 EXIT TV DISPLAY 16 + S.M + 6 VOL 17 CH _ _ P.M 7 PAGE UP PAGE DOWN 8 SLEEP EPG .P G ASPECT 9 18 10 CH LIST EPG FAV 19 21 20 REPEAT GOTO MENU SETUP 22 24 23 25 CC MTS/SAP 30 26 31 27 RETURN DISPLAY AUDIO SUBTITLE 28 32 29 33 1 2 3 -10-
User Manual
Page 34
Adjust Select Menu Exit 0000 Change password P.G switch US Canada RRT setting Reset RRT Adjust > < Off > < > < > < > < > Select Menu Exit -11- Picture Mode Contrast Brightness Color Tint Sharpness Advanced Video Adjust < Standard > 50 50 50 0 50 > Select Menu Exit Parental Controls Timer Closed Caption Menu Settings VGA Settings Restore Default Adjust > > > > > > Select Menu Exit Color Temp. Aspect Noise Reduction < Normal > < Wide > < Middle > Adjust Select Menu Exit Sound Mode Bass Treble Balance Surround AVL Digital Output Audio Language ...
Adjust Select Menu Exit 0000 Change password P.G switch US Canada RRT setting Reset RRT Adjust > < Off > < > < > < > < > Select Menu Exit -11- Picture Mode Contrast Brightness Color Tint Sharpness Advanced Video Adjust < Standard > 50 50 50 0 50 > Select Menu Exit Parental Controls Timer Closed Caption Menu Settings VGA Settings Restore Default Adjust > > > > > > Select Menu Exit Color Temp. Aspect Noise Reduction < Normal > < Wide > < Middle > Adjust Select Menu Exit Sound Mode Bass Treble Balance Surround AVL Digital Output Audio Language ...

User Manual
Page 36
NO YES Press ENTER Key To Select Adjust Select Menu Exit Mode Font style Font size Font Edge style Font Edge color FG color BG color FG opacity BG opacity Adjust Select Custom > Default > Default > Default > Default Default > Default > Default > Default > Menu Exit -13- Sleep timer Time zone DST Clock Adjust < Off > < Pacific > < Off > 1999/12/31 04:03PM Select Menu Exit CC Mode Basic Selection Advanced Selection Option < Off > < CC1 > < Service 1 > > Adjust Select Menu Exit Are you sure?
NO YES Press ENTER Key To Select Adjust Select Menu Exit Mode Font style Font size Font Edge style Font Edge color FG color BG color FG opacity BG opacity Adjust Select Custom > Default > Default > Default > Default Default > Default > Default > Default > Menu Exit -13- Sleep timer Time zone DST Clock Adjust < Off > < Pacific > < Off > 1999/12/31 04:03PM Select Menu Exit CC Mode Basic Selection Advanced Selection Option < Off > < CC1 > < Service 1 > > Adjust Select Menu Exit Are you sure?
User Manual
Page 56
Adjust Select Menu Exit Sound Mode Bass Treble Balance Surround AVL Digital Output Audio Language Adjust < Standard > 50 50 0 < Off > < Off > < PCM > < English > Select Menu Exit 0000 Change password P.G switch US Canada RRT setting Reset RRT Adjust > < Off > < > < > < > < > Select Menu Exit -11- Picture Mode Contrast Brightness Color Tint Sharpness Advanced Video Adjust < Standard > 50 50 50 0 50 > Select Menu Exit Parental Controls Timer Closed Caption Menu Settings VGA Settings Restore Default Adjust > > > > > > Select Menu Exit Color ...
Adjust Select Menu Exit Sound Mode Bass Treble Balance Surround AVL Digital Output Audio Language Adjust < Standard > 50 50 0 < Off > < Off > < PCM > < English > Select Menu Exit 0000 Change password P.G switch US Canada RRT setting Reset RRT Adjust > < Off > < > < > < > < > Select Menu Exit -11- Picture Mode Contrast Brightness Color Tint Sharpness Advanced Video Adjust < Standard > 50 50 50 0 50 > Select Menu Exit Parental Controls Timer Closed Caption Menu Settings VGA Settings Restore Default Adjust > > > > > > Select Menu Exit Color ...

User Manual
Page 58
Sleep timer Time zone DST Clock Adjust < Off > < Pacific > < Off > 1999/12/31 04:03PM Select Menu Exit CC Mode Basic Selection Advanced Selection Option < Off > < CC1 > < Service 1 > > Adjust Select Menu Exit Are you sure? NO YES P res s"ENTE R"Key To S e l ec t Adjust Select Menu Exit Mode Font style Font size Font Edge style Font Edge color FG color BG color FG opacity BG opacity Adjust Select Custom > Default > Default > Default > Default Default > Default > Default > Default > Menu Exit -13-
Sleep timer Time zone DST Clock Adjust < Off > < Pacific > < Off > 1999/12/31 04:03PM Select Menu Exit CC Mode Basic Selection Advanced Selection Option < Off > < CC1 > < Service 1 > > Adjust Select Menu Exit Are you sure? NO YES P res s"ENTE R"Key To S e l ec t Adjust Select Menu Exit Mode Font style Font size Font Edge style Font Edge color FG color BG color FG opacity BG opacity Adjust Select Custom > Default > Default > Default > Default Default > Default > Default > Default > Menu Exit -13-


