User Manual
Page 1
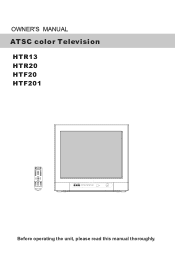
VOL+ CH- CH+ MENU CH- VOL - VOL + CC SLEEP S.MODE GUIDE ARC CH.LIST FAV.LIST AUDIOLIST EXIT VIDEO L-AUDIO-R TV/AV MENU VOL- CH+ Before operating the unit, please read this manual thoroughly. OWNER'S MANUAL ATSC color Television HTR13 HTR20 HTF20 HTF201 MUTE Q.VIEW INPUT INFO TV/DTV 1 2 3 4 5 6 7 8 9 SAP P.MODE 0 OK -
VOL+ CH- CH+ MENU CH- VOL - VOL + CC SLEEP S.MODE GUIDE ARC CH.LIST FAV.LIST AUDIOLIST EXIT VIDEO L-AUDIO-R TV/AV MENU VOL- CH+ Before operating the unit, please read this manual thoroughly. OWNER'S MANUAL ATSC color Television HTR13 HTR20 HTF20 HTF201 MUTE Q.VIEW INPUT INFO TV/DTV 1 2 3 4 5 6 7 8 9 SAP P.MODE 0 OK -
User Manual
Page 2
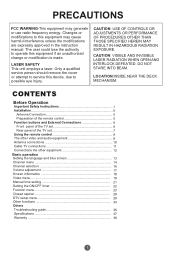
... control 5 Function buttons and External Connections 6 Front panel of the TV set 6 Rear panel of the TV set 7 Using the remote control 8 The other video and audio equipment 9 Antenna connections 10 Cable TV connections 11 Connections the other equipment 12 Basic operation Setting the language and blue screen 13 Channel menu 14 Channel selection 16 Volume adjustment 17 Screen information 18 Video menu 19 Manual time setting 21 Setting the ON/OFF timer 22 Function menu 23 Closed caption 28 DTV setup menu 29 Other functions 34 Others Troubleshooting guide 36 Specifications...
... control 5 Function buttons and External Connections 6 Front panel of the TV set 6 Rear panel of the TV set 7 Using the remote control 8 The other video and audio equipment 9 Antenna connections 10 Cable TV connections 11 Connections the other equipment 12 Basic operation Setting the language and blue screen 13 Channel menu 14 Channel selection 16 Volume adjustment 17 Screen information 18 Video menu 19 Manual time setting 21 Setting the ON/OFF timer 22 Function menu 23 Closed caption 28 DTV setup menu 29 Other functions 34 Others Troubleshooting guide 36 Specifications...
User Manual
Page 4
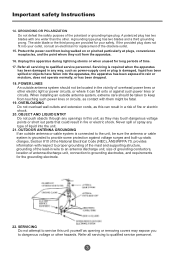
... for your outlet, consult an electrician for replacement of time. 17. Servicing is required when the apparatus has been damaged in the vicinity of overhead power lines or other electric light or power circuits, or where it can result in wire to an antenna discharge unit, size of grounding conductors, location of antenna discharge unit, connection to keep from the apparatus. 16...
... for your outlet, consult an electrician for replacement of time. 17. Servicing is required when the apparatus has been damaged in the vicinity of overhead power lines or other electric light or power circuits, or where it can result in wire to an antenna discharge unit, size of grounding conductors, location of antenna discharge unit, connection to keep from the apparatus. 16...
User Manual
Page 5
... replacement parts are required, be sure the service technician uses replacement parts specified by the operating instructions, as practical. 4 DISC SLOT Keep your fingers well clear of the NEC that the unit is provided to call the Cable TV system installer's attention to its normal operation. It may cause sight damage. 32. Important safety Instructions 23. When the power-supply cord or plug is closing...
... replacement parts are required, be sure the service technician uses replacement parts specified by the operating instructions, as practical. 4 DISC SLOT Keep your fingers well clear of the NEC that the unit is provided to call the Cable TV system installer's attention to its normal operation. It may cause sight damage. 32. Important safety Instructions 23. When the power-supply cord or plug is closing...
User Manual
Page 7
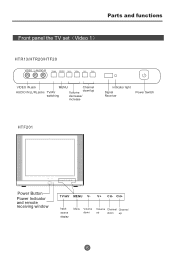
Parts and functions Front panel the TV set Video 1 HTR13/HTR20/HTF20 VIDEO L-AUDIO-R TV/AV MENU VOL- CH+ Input source display Menu Volume Volume Channel Channel down up down /up 6 CH+ Power Button Power Indicator and remote receiving window TV/AV MENU V- V+ CH- VOL+ CH- CH+ VIDEO IN jack MENU Channel AUDIO IN (L/R) jacks TV/AV down up Volume switching decrease/ increase Indicator light Signal Receiver Power Switch HTF201 TV/AV MENU V- V+ CH-
Parts and functions Front panel the TV set Video 1 HTR13/HTR20/HTF20 VIDEO L-AUDIO-R TV/AV MENU VOL- CH+ Input source display Menu Volume Volume Channel Channel down up down /up 6 CH+ Power Button Power Indicator and remote receiving window TV/AV MENU V- V+ CH- VOL+ CH- CH+ VIDEO IN jack MENU Channel AUDIO IN (L/R) jacks TV/AV down up Volume switching decrease/ increase Indicator light Signal Receiver Power Switch HTF201 TV/AV MENU V- V+ CH-
User Manual
Page 12
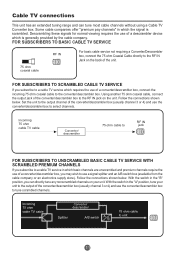
... cable service not requiring a Converter/Descrambler box, connect the 75 ohm Coaxial Cable directly to select channels. With the switch in which basic channels are unscrambled and premium channels require the use of a converter/descrambler box, you subscribe to a cable TV service which requires the use of a converter/descrambler box, connect the incoming 75 ohm coaxial cable to the converter/descrambler box. Set the unit to the output channel of the converter/descrambler box (usually channel 3 or 4) and use the converter...
... cable service not requiring a Converter/Descrambler box, connect the 75 ohm Coaxial Cable directly to select channels. With the switch in which basic channels are unscrambled and premium channels require the use of a converter/descrambler box, you subscribe to a cable TV service which requires the use of a converter/descrambler box, connect the incoming 75 ohm coaxial cable to the converter/descrambler box. Set the unit to the output channel of the converter/descrambler box (usually channel 3 or 4) and use the converter...
User Manual
Page 13
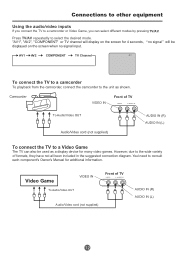
... connection diagram. "AV1", "AV2", "COMPONENT" or TV channel will be used as shown. However, due to the unit as a display device for many video games. Video Game VIDEO IN To Audio/Video OUT Front of TV To Audio/Video OUT Audio/Video cord (not supplied) AUDIO IN (R) AUDIO IN (L) To connect the TV to a Video Game The TV can select different modes by pressing TV/AV. Camcorder VIDEO IN Front of TV Audio/Video cord (not supplied) AUDIO IN (R) AUDIO IN (L) 12 Connections to other equipment Using...
... connection diagram. "AV1", "AV2", "COMPONENT" or TV channel will be used as shown. However, due to the unit as a display device for many video games. Video Game VIDEO IN To Audio/Video OUT Front of TV To Audio/Video OUT Audio/Video cord (not supplied) AUDIO IN (R) AUDIO IN (L) To connect the TV to a Video Game The TV can select different modes by pressing TV/AV. Camcorder VIDEO IN Front of TV Audio/Video cord (not supplied) AUDIO IN (R) AUDIO IN (L) 12 Connections to other equipment Using...
User Manual
Page 14
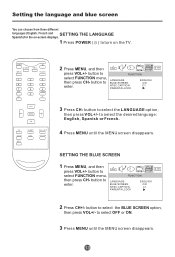
... POWER ( ) to enter. VOL - button to turn on the TV. SETTING THE BLUE SCREEN 1 Press MENU, and then 0101 press VOL+/- MUTE Q.VIEW INPUT INFO TV/DTV 1 2 3 4 5 6 7 8 9 SAP P.MODE 0 OK - CH+ MENU CH- button to select FUNCTION menu, FUNCTION then press CH- button to select FUNCTION menu, then press CH- to select OFF or ON. 3 Press MENU until the MENU screen disappears. button to select the LANGUAGE option, then press VOL+/- VOL + CC GUIDE EXIT...
... POWER ( ) to enter. VOL - button to turn on the TV. SETTING THE BLUE SCREEN 1 Press MENU, and then 0101 press VOL+/- MUTE Q.VIEW INPUT INFO TV/DTV 1 2 3 4 5 6 7 8 9 SAP P.MODE 0 OK - CH+ MENU CH- button to select FUNCTION menu, FUNCTION then press CH- button to select FUNCTION menu, then press CH- to select OFF or ON. 3 Press MENU until the MENU screen disappears. button to select the LANGUAGE option, then press VOL+/- VOL + CC GUIDE EXIT...
User Manual
Page 15
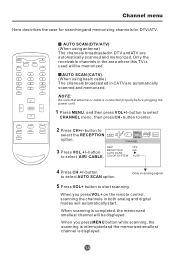
....LIST CH.LIST AUTO SCAN (DTV/ATV) (When using basic cable) The channels broadcasted in CATV are automatically scanned and memorized. COLOR SYSTEM OFF AIR AUTO 4 Press CH +/- Only the receivable channels in analog signal 5 Press VOL+ button to select the RECEPTION option. Only in the area where this TV is displayed. 14 When you press VOL+ on the remote control, scanning the channels...
....LIST CH.LIST AUTO SCAN (DTV/ATV) (When using basic cable) The channels broadcasted in CATV are automatically scanned and memorized. COLOR SYSTEM OFF AIR AUTO 4 Press CH +/- Only the receivable channels in analog signal 5 Press VOL+ button to select the RECEPTION option. Only in the area where this TV is displayed. 14 When you press VOL+ on the remote control, scanning the channels...
User Manual
Page 16
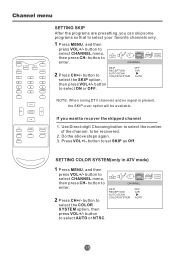
Channel menu MUTE Q.VIEW INPUT INFO TV/DTV 1 2 3 4 5 6 7 8 9 SAP P.MODE 0 OK - button to select ON or OFF. button to select CHANNEL menu, then press CH- SETTING COLOR SYSTEM(only in ATV mode) 1 Press MENU, and then press VOL+/- button to select your favorite channels only. 1 Press MENU, and then press VOL+/- VOL + CC GUIDE EXIT SLEEP ARC FAV.LIST CH.LIST SETTING SKIP After the programs are presetting, you want to be available. button to set SKIP as...
Channel menu MUTE Q.VIEW INPUT INFO TV/DTV 1 2 3 4 5 6 7 8 9 SAP P.MODE 0 OK - button to select ON or OFF. button to select CHANNEL menu, then press CH- SETTING COLOR SYSTEM(only in ATV mode) 1 Press MENU, and then press VOL+/- button to select your favorite channels only. 1 Press MENU, and then press VOL+/- VOL + CC GUIDE EXIT SLEEP ARC FAV.LIST CH.LIST SETTING SKIP After the programs are presetting, you want to be available. button to set SKIP as...
User Manual
Page 17
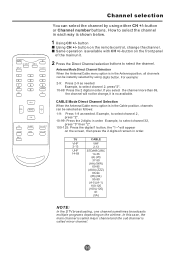
...: In the DTV broadcasting, one channel sometimes broadcasts multiple programs depending on the remote control, change , it is in the Antenna position, all channels can be instantly selected by using digits button. VOL + CC GUIDE EXIT SLEEP ARC FAV.LIST CH.LIST CABLE Mode Direct Channel Selection When the Antenna/Cable menu option is no available. Example, to select channel 2, press "2". 10-99: Press the 2 digits in order. button or Channel number buttons. Same operation is called major...
...: In the DTV broadcasting, one channel sometimes broadcasts multiple programs depending on the remote control, change , it is in the Antenna position, all channels can be instantly selected by using digits button. VOL + CC GUIDE EXIT SLEEP ARC FAV.LIST CH.LIST CABLE Mode Direct Channel Selection When the Antenna/Cable menu option is no available. Example, to select channel 2, press "2". 10-99: Press the 2 digits in order. button or Channel number buttons. Same operation is called major...
User Manual
Page 18
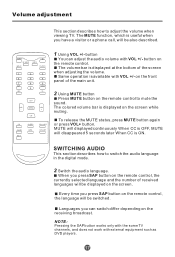
... TV channels, and does not work with VOL +/- MUTE Q.VIEW INPUT INFO TV/DTV 1 2 3 4 5 6 7 8 9 SAP P.MODE 0 OK - Languages you press SAP button on the receiving broadcast. Same operation is displayed on the remote control. When you can adjust the audio volume with VOL +/- The colored volume bar is available with external equipment such as DVD players. 17 VOL + CC GUIDE EXIT SLEEP ARC FAV.LIST CH.LIST 1 Using VOL +/- on the front panel...
... TV channels, and does not work with VOL +/- MUTE Q.VIEW INPUT INFO TV/DTV 1 2 3 4 5 6 7 8 9 SAP P.MODE 0 OK - Languages you press SAP button on the receiving broadcast. Same operation is displayed on the remote control. When you can adjust the audio volume with VOL +/- The colored volume bar is available with external equipment such as DVD players. 17 VOL + CC GUIDE EXIT SLEEP ARC FAV.LIST CH.LIST 1 Using VOL +/- on the front panel...
User Manual
Page 19
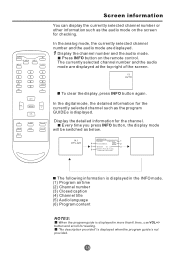
... the digital mode, the detailed information for reading. CH+ MENU CH- Display the detailed information for checking. MUTE Q.VIEW INPUT INFO TV/DTV 1 2 3 4 5 6 7 8 9 SAP P.MODE 0 OK - Press INFO button on the screen for the channel. "No description provided" is displayed when the program guide is not provided. 18 Screen information You can display the currently selected channel number or other information such as the audio mode on the remote control.
... the digital mode, the detailed information for reading. CH+ MENU CH- Display the detailed information for checking. MUTE Q.VIEW INPUT INFO TV/DTV 1 2 3 4 5 6 7 8 9 SAP P.MODE 0 OK - Press INFO button on the screen for the channel. "No description provided" is displayed when the program guide is not provided. 18 Screen information You can display the currently selected channel number or other information such as the audio mode on the remote control.

User Manual
Page 20
... adjust. Color This will adjust the intensity of fine details in the picture but keep the dark parts unchanged. CH+ MENU CH- Tint Allows you to suit your personal preference. Video menu SETTING VIDEO MUTE Q.VIEW INPUT INFO TV/DTV 1 2 3 4 5 6 7 8 9 SAP P.MODE 0 OK - Brightness This will adjust the light output of the complete picture, which will appear. 2 Press VOL+/- VOL + CC GUIDE EXIT SLEEP ARC FAV.LIST CH.LIST 1 Press MENU button...
... adjust. Color This will adjust the intensity of fine details in the picture but keep the dark parts unchanged. CH+ MENU CH- Tint Allows you to suit your personal preference. Video menu SETTING VIDEO MUTE Q.VIEW INPUT INFO TV/DTV 1 2 3 4 5 6 7 8 9 SAP P.MODE 0 OK - Brightness This will adjust the light output of the complete picture, which will appear. 2 Press VOL+/- VOL + CC GUIDE EXIT SLEEP ARC FAV.LIST CH.LIST 1 Press MENU button...

User Manual
Page 25
... you forget the password, you must register a password. 0101 FUNCTION, then press CH- LANGUAGE BLUE SCREEN NTSC CAPTION PARENTAL LOCK ENGLISH ON C1 4 5 6 7 8 9 SAP P.MODE 0 OK - PLEASE ENTER PASSWORD #### CH- CC GUIDE EXIT SLEEP ARC FAV.LIST CH.LIST 0101 5 After inputting password PARENTAL LOCK accurately, Press CH+/- The main menu screen will appear. to select the desired item. PARENTALLOCK PARENTAL GUIDE to use thepare ntal control function, 2 Press VOL...
... you forget the password, you must register a password. 0101 FUNCTION, then press CH- LANGUAGE BLUE SCREEN NTSC CAPTION PARENTAL LOCK ENGLISH ON C1 4 5 6 7 8 9 SAP P.MODE 0 OK - PLEASE ENTER PASSWORD #### CH- CC GUIDE EXIT SLEEP ARC FAV.LIST CH.LIST 0101 5 After inputting password PARENTAL LOCK accurately, Press CH+/- The main menu screen will appear. to select the desired item. PARENTALLOCK PARENTAL GUIDE to use thepare ntal control function, 2 Press VOL...

User Manual
Page 26
... cannot set the Parent Control. MUTE Q.VIEW INPUT INFO TV/DTV 1 2 3 4 5 6 7 8 9 SAP P.MODE 0 OK - Function menu TO CHANGE PASSWORD 1 Press MENU. To avoid forgetting the password, write it down and keep it in a safe place. The main menu screen will appear. VOL - to enter the submenu. PARENTAL LOCK 0101 PARENTAL GUIDE MPAA RATING NO RATING VIDEO CHANGE PASSWORD UNBLOCK UNBLOCK 6 Enter the new password using the number buttons(0-9). PLEASE INPUT AGAIN #### 8 Press MENU until the MENU screen...
... cannot set the Parent Control. MUTE Q.VIEW INPUT INFO TV/DTV 1 2 3 4 5 6 7 8 9 SAP P.MODE 0 OK - Function menu TO CHANGE PASSWORD 1 Press MENU. To avoid forgetting the password, write it down and keep it in a safe place. The main menu screen will appear. VOL - to enter the submenu. PARENTAL LOCK 0101 PARENTAL GUIDE MPAA RATING NO RATING VIDEO CHANGE PASSWORD UNBLOCK UNBLOCK 6 Enter the new password using the number buttons(0-9). PLEASE INPUT AGAIN #### 8 Press MENU until the MENU screen...
User Manual
Page 29
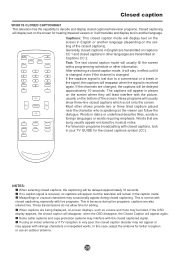
... displayed, on-screen displays, such as volume and mute may appear with the closed captions). CH+ MENU CH- After selecting a closed caption mode, it will reappear when the signal is received again. News programs will usually show three-line closed captions, the captioning will be hided. When captions are transmitted on captions CC 1 and closed captioning. MUTE Q.VIEW INPUT INFO TV/DTV 1 2 3 4 5 6 7 8 9 SAP P.MODE 0 OK - Generally, closed captions in English are changed . If the channels are transmitted...
... displayed, on-screen displays, such as volume and mute may appear with the closed captions). CH+ MENU CH- After selecting a closed caption mode, it will reappear when the signal is received again. News programs will usually show three-line closed captions, the captioning will be hided. When captions are transmitted on captions CC 1 and closed captioning. MUTE Q.VIEW INPUT INFO TV/DTV 1 2 3 4 5 6 7 8 9 SAP P.MODE 0 OK - Generally, closed captions in English are changed . If the channels are transmitted...

User Manual
Page 34
... password (4 digits) using the number buttons(0-9). The TV is set up with the initial password 0000 and enter next submenu. Clear RRT CLEAR Rating Table (RRT) information: This will appear. 2 Press VOL+/- then press CH- VOL - ENTER CODE #### DTV SETUP VERSION DIMENSION CLEAR RRT [RRT0] 0101 Version V-chip broadcast source version. DTV setup menu SETTING ATSC PARENTAL LOCK MUTE Q.VIEW INPUT INFO TV/DTV 1 2 3 4 5 6 7 8 9 SAP P.MODE 0 OK - button to 0101 select DTV SETUP...
... password (4 digits) using the number buttons(0-9). The TV is set up with the initial password 0000 and enter next submenu. Clear RRT CLEAR Rating Table (RRT) information: This will appear. 2 Press VOL+/- then press CH- VOL - ENTER CODE #### DTV SETUP VERSION DIMENSION CLEAR RRT [RRT0] 0101 Version V-chip broadcast source version. DTV setup menu SETTING ATSC PARENTAL LOCK MUTE Q.VIEW INPUT INFO TV/DTV 1 2 3 4 5 6 7 8 9 SAP P.MODE 0 OK - button to 0101 select DTV SETUP...

User Manual
Page 37
... main power switch for 15 minutes. Never attempt to the TV set and turned on again the TV set . No color Adjust color control Normal volume Scramble Color Spot Adjust channel again Normal or Weak Volume Normal volume Color Purity is connected to remove the back cover as vacuum cleaners near the TV set will automatically degauss the picture. Troubleshooting guide To assist in the cabinet expanding with room temperature changes. 36 BREAKDOWN PHENOMENON PICTURE SOUND CHECKING Picture with...
... main power switch for 15 minutes. Never attempt to the TV set and turned on again the TV set . No color Adjust color control Normal volume Scramble Color Spot Adjust channel again Normal or Weak Volume Normal volume Color Purity is connected to remove the back cover as vacuum cleaners near the TV set will automatically degauss the picture. Troubleshooting guide To assist in the cabinet expanding with room temperature changes. 36 BREAKDOWN PHENOMENON PICTURE SOUND CHECKING Picture with...

User Manual
Page 39
... the purchaser, for parts or labor for the periods set forth below : This warranty does not apply to the appearance of the product or the exterior of the product, which were caused by repairs or attempted repairs performed by anyone other than an authorized service center or dealer; THIS WARRANTY GIVES YOU SPECIFIC LEGAL RIGHTS. ALL...
... the purchaser, for parts or labor for the periods set forth below : This warranty does not apply to the appearance of the product or the exterior of the product, which were caused by repairs or attempted repairs performed by anyone other than an authorized service center or dealer; THIS WARRANTY GIVES YOU SPECIFIC LEGAL RIGHTS. ALL...


