User Manual
Page 1
HLH15BB/15HL25S/HLE20BB/20AL25S LCD TV USER MANUAL Please read this manual carefully before using this TV set and keep it for future reference.
HLH15BB/15HL25S/HLE20BB/20AL25S LCD TV USER MANUAL Please read this manual carefully before using this TV set and keep it for future reference.
User Manual
Page 2
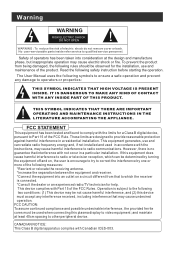
...digital device, pursuant to Part 15 of the product. However ,there is no guarantee that to which can radiate radio frequency energy and, if not installed and used when connecting this device must be observed for help. and maintain at the design and manufacture phase, but inappropriate operation...harmful interference to radio or television reception, which the receiver is connected. *Consult the dealer or an experienced radio/TV technician for the installation, use and can be not cause harmful interference, and (2) this plasma display to video equipment; FCC STATEMENT This ...
...digital device, pursuant to Part 15 of the product. However ,there is no guarantee that to which can radiate radio frequency energy and, if not installed and used when connecting this device must be observed for help. and maintain at the design and manufacture phase, but inappropriate operation...harmful interference to radio or television reception, which the receiver is connected. *Consult the dealer or an experienced radio/TV technician for the installation, use and can be not cause harmful interference, and (2) this plasma display to video equipment; FCC STATEMENT This ...
User Manual
Page 3
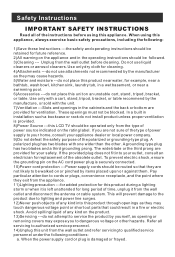
... for replacement of time, unplug it from the appliance. 11)Lighting precaution ---for added protection for future reference. 2)All warning on an unstable cart, stand, tripod, bracket, or table. To prevent electric shock, ensure the grounding pin on the AC cord power plug is provided. 8)Power Source ---this LCD TV should be retained for this unit from the wall outlet before using...
... for replacement of time, unplug it from the appliance. 11)Lighting precaution ---for added protection for future reference. 2)All warning on an unstable cart, stand, tripod, bracket, or table. To prevent electric shock, ensure the grounding pin on the AC cord power plug is provided. 8)Power Source ---this LCD TV should be retained for this unit from the wall outlet before using...
User Manual
Page 5
... turn it back on the LCD-TV 10 Audio Control 10 Mute...10 Select the TV Channel You Want 11 Picture Mode 11 Program Scan 11 Sleep...1. 1 Menu Operations 12 Picture Menu Options 12 Picture Menu Options Continued 13 Sound Menu Options 13 Sound Menu Options Continued 14 Function Menu Options 15 Function Menu Options Continued 16 Adjust Menu Options 16 Tuning Menu Options 17 Tuning Menu Options Continued 18 Parental Menu Options 18 Parental Menu Options Continued 19-21 Troubleshooting Guide 22 Specifications...
... turn it back on the LCD-TV 10 Audio Control 10 Mute...10 Select the TV Channel You Want 11 Picture Mode 11 Program Scan 11 Sleep...1. 1 Menu Operations 12 Picture Menu Options 12 Picture Menu Options Continued 13 Sound Menu Options 13 Sound Menu Options Continued 14 Function Menu Options 15 Function Menu Options Continued 16 Adjust Menu Options 16 Tuning Menu Options 17 Tuning Menu Options Continued 18 Parental Menu Options 18 Parental Menu Options Continued 19-21 Troubleshooting Guide 22 Specifications...
User Manual
Page 7
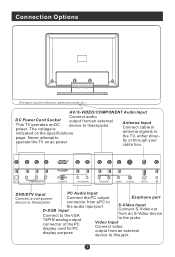
... specifications page. DC IN Y Pb Pr COMPONENT IN D-SUB IN PC AUDIO IN L R AUDIO IN V VIDEO S-VIDEO ANT IN DVD/DTV Input Connect a component PC Audio Input Connect the PC output Earphone port device to these jacks indicated on ac power Antenna Input Connect cable or antenna signals to the jacks. Connection Options (The figure is Connect audio output from an external device to these jacks connector from a PC to the audio input port D-SUB Input S-Video Input Connect S-Video out Connect to the VGA 15PIN analog output connector of the PC display...
... specifications page. DC IN Y Pb Pr COMPONENT IN D-SUB IN PC AUDIO IN L R AUDIO IN V VIDEO S-VIDEO ANT IN DVD/DTV Input Connect a component PC Audio Input Connect the PC output Earphone port device to these jacks indicated on ac power Antenna Input Connect cable or antenna signals to the jacks. Connection Options (The figure is Connect audio output from an external device to these jacks connector from a PC to the audio input port D-SUB Input S-Video Input Connect S-Video out Connect to the VGA 15PIN analog output connector of the PC display...

User Manual
Page 8
... keys on /off Channel scan TV sleep button EXIT Menu exit 5. MENU 10. CH+/CH12. VOL+ VOL13. SLEEP Display current input signal information TV channel number select Select MONO,STEREO, SAP in NTSC system Select picture mode: PERSONAL/STANDARD/MILD/FRESH To display/exit the main menu Select PC/COMPONENT/AV/SV/TV TV channel up/down / to select the main menu/ to enter the submenu. CCD 14. SCAN 15. DISPLAY 6. 0-9 7. Remote Control Key Functions When using the remote control, aim it...
... keys on /off Channel scan TV sleep button EXIT Menu exit 5. MENU 10. CH+/CH12. VOL+ VOL13. SLEEP Display current input signal information TV channel number select Select MONO,STEREO, SAP in NTSC system Select picture mode: PERSONAL/STANDARD/MILD/FRESH To display/exit the main menu Select PC/COMPONENT/AV/SV/TV TV channel up/down / to select the main menu/ to enter the submenu. CCD 14. SCAN 15. DISPLAY 6. 0-9 7. Remote Control Key Functions When using the remote control, aim it...
User Manual
Page 10
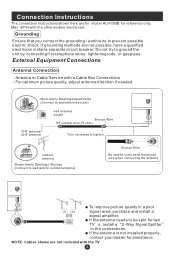
... electric shock. Connection Instructions The connection instructions shown here are for model HLH15BB for two TV s, install a 2-Way Signal Splitter in a poor signal area, purchase and install a signal amplifier. Multi-family Dwellings/Apartments (Connect to wall antenna socket) VHF antenna UHF antenna wall antenna socket Bronze Wire RF coaxial wire (75 ohm) Turn clockwise to be split for reference only. External Equipment Connections Antenna Connection - If the antenna needs to tighten. NOTE: Cables shown are not...
... electric shock. Connection Instructions The connection instructions shown here are for model HLH15BB for two TV s, install a 2-Way Signal Splitter in a poor signal area, purchase and install a signal amplifier. Multi-family Dwellings/Apartments (Connect to wall antenna socket) VHF antenna UHF antenna wall antenna socket Bronze Wire RF coaxial wire (75 ohm) Turn clockwise to be split for reference only. External Equipment Connections Antenna Connection - If the antenna needs to tighten. NOTE: Cables shown are not...
User Manual
Page 11
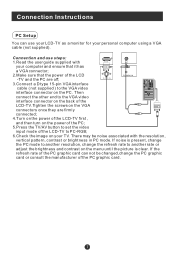
... turn on the power of the PC; 5.Press the TV/AV button to set the video input mode of the LCD-TV to PC-RGB; 6.Check the image on your personal computer using a VGA cable (not supplied). Then connect the other end to another resolution, change the PC graphic card or consult the manufacturer of the LCD-TV.Tighten the screws on the PC. Connection and use your LCD-TV as a monitor...
... turn on the power of the PC; 5.Press the TV/AV button to set the video input mode of the LCD-TV to PC-RGB; 6.Check the image on your personal computer using a VGA cable (not supplied). Then connect the other end to another resolution, change the PC graphic card or consult the manufacturer of the LCD-TV.Tighten the screws on the PC. Connection and use your LCD-TV as a monitor...
User Manual
Page 12
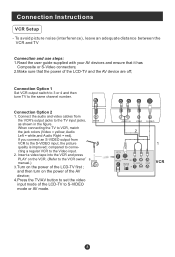
... improved; Connection Instructions VCR Setup - When connecting the TV to VCR, match the jack colors (Video = yellow, Audio Left = white,and Audio Right = red). To avoid picture noise (interference), leave an adequate distance between the VCR and TV Connection and use steps: 1.Read the user guide supplied with your AV devices and ensure that it has Composite or S-Video connectors; 2.Make sure that the power of the LCD-TV to the same channel number.
... improved; Connection Instructions VCR Setup - When connecting the TV to VCR, match the jack colors (Video = yellow, Audio Left = white,and Audio Right = red). To avoid picture noise (interference), leave an adequate distance between the VCR and TV Connection and use steps: 1.Read the user guide supplied with your AV devices and ensure that it has Composite or S-Video connectors; 2.Make sure that the power of the LCD-TV to the same channel number.
User Manual
Page 13
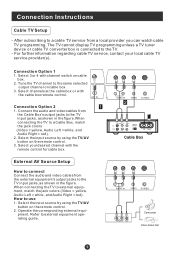
... input source by using the TV/AV button on cable box. 2. V IN V IN Select your local cable TV service provider(s). When connecting the TV to the TV. - pment. The TV cannot display TV programming unless a TV tuner device or cable TV converter box is connected to external equipment, match the jack colors (Video = yellow, Audio Left = white, and Audio Right = red). For further information regarding cable TV service, contact your desired channel with the remote control for cable box. Connection...
... input source by using the TV/AV button on cable box. 2. V IN V IN Select your local cable TV service provider(s). When connecting the TV to the TV. - pment. The TV cannot display TV programming unless a TV tuner device or cable TV converter box is connected to external equipment, match the jack colors (Video = yellow, Audio Left = white, and Audio Right = red). For further information regarding cable TV service, contact your desired channel with the remote control for cable box. Connection...
User Manual
Page 14
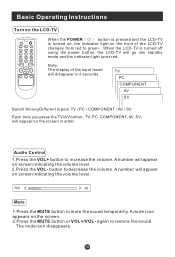
... MTS/SAP 0 9 P.STD MENU TV/AV VOL - When the LCD-TV is turned on, the indicator light on screen indicating the volume level. 2.Press the VOL- VOL + CCD SLEEP SCAN When the POWER button is pressed and the LCD-TV is turned off using the power button, the LCD-TV will appear on the front of the input mode will disappear in order. Audio Control 1.Press the VOL+ button to mute the sound...
... MTS/SAP 0 9 P.STD MENU TV/AV VOL - When the LCD-TV is turned on, the indicator light on screen indicating the volume level. 2.Press the VOL- VOL + CCD SLEEP SCAN When the POWER button is pressed and the LCD-TV is turned off using the power button, the LCD-TV will appear on the front of the input mode will disappear in order. Audio Control 1.Press the VOL+ button to mute the sound...
User Manual
Page 15
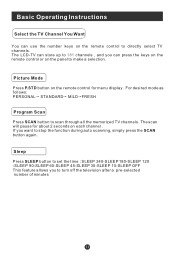
... use the number keys on each channel . The scan will pause for menu display . Picture Mode Press P.STD button on the remote control for about 2 seconds on the remote control to directly select TV channels. Sleep Press SLEEP button to set the time : SLEEP 240-SLEEP 180-SLEEP 120 -SLEEP 90-SLEEP 60-SLEEP 45-SLEEP 30-SLEEP 15-SLEEP OFF This feature allows you want to scan through all the memorized TV channels. For desired mode as follows: PERSONAL STANDARD MILD FRESH Program Scan...
... use the number keys on each channel . The scan will pause for menu display . Picture Mode Press P.STD button on the remote control for about 2 seconds on the remote control to directly select TV channels. Sleep Press SLEEP button to set the time : SLEEP 240-SLEEP 180-SLEEP 120 -SLEEP 90-SLEEP 60-SLEEP 45-SLEEP 30-SLEEP 15-SLEEP OFF This feature allows you want to scan through all the memorized TV channels. For desired mode as follows: PERSONAL STANDARD MILD FRESH Program Scan...
User Manual
Page 16
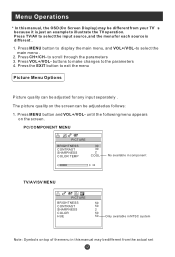
buttons to make changes to scroll through the parameters 3. until the following menu appears on the screen can be adjusted for each source is just an example to exit the menu Picture Menu Options Picture quality can be adjusted as follows: 1. to the parameters 4. The picture quality on the screen. Press MENU button and VOL+/VOL- PC/COMPONENT MENU PICTURE BRIGHTNESS CONTRAST SHARPNESS COLOR TEMP 30 30 2 COOL 30...
buttons to make changes to scroll through the parameters 3. until the following menu appears on the screen can be adjusted for each source is just an example to exit the menu Picture Menu Options Picture quality can be adjusted as follows: 1. to the parameters 4. The picture quality on the screen. Press MENU button and VOL+/VOL- PC/COMPONENT MENU PICTURE BRIGHTNESS CONTRAST SHARPNESS COLOR TEMP 30 30 2 COOL 30...
User Manual
Page 17
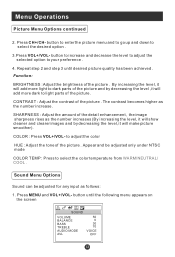
... menu appears on the screen SOUND VOLUME BALANCE BASS TREBLE AUDIO MODE AVL 50 0 30 70 VOICE OFF Sound Menu Options Sound can be adjusted only under NTSC mode COLOR TEMP : Press to light parts of the picture . button to increase and decrease the level to adjust the selected option to your preference . 4. Function: BRIGHTNESS :Adjust the brightness of the picture . The contrast becomes higher as the number increase. button until desired picture...
... menu appears on the screen SOUND VOLUME BALANCE BASS TREBLE AUDIO MODE AVL 50 0 30 70 VOICE OFF Sound Menu Options Sound can be adjusted only under NTSC mode COLOR TEMP : Press to light parts of the picture . button to increase and decrease the level to adjust the selected option to your preference . 4. Function: BRIGHTNESS :Adjust the brightness of the picture . The contrast becomes higher as the number increase. button until desired picture...

User Manual
Page 19
... adjust the selected option to read. Closed Captioning helps the hearing impaired with the broadcast program, as well as text on the screen. OFF: When OFF is displayed onTV, it means CC MODE is turned on TV means CC MODE is turned off. CC2 to TT4 :For other modes of the picture on the screen in decoder displays the audio portion of the picture on broadcasters supplying the signal. IMPORTANT: Closed captioning...
... adjust the selected option to read. Closed Captioning helps the hearing impaired with the broadcast program, as well as text on the screen. OFF: When OFF is displayed onTV, it means CC MODE is turned on TV means CC MODE is turned off. CC2 to TT4 :For other modes of the picture on the screen in decoder displays the audio portion of the picture on broadcasters supplying the signal. IMPORTANT: Closed captioning...
User Manual
Page 21
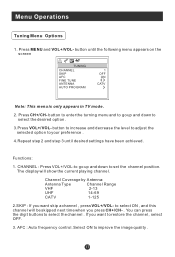
... your preference . 4.Repeat step 2 and step 3 until the following menu appears on the screen TUNING CHANNEL SKIP AFC FINE TUNE ANTENNA AUTO PROGRAM 1 OFF ON CATV Note: This menu is only appears in TV mode . 2. You can press the digit buttons to improve the image quality . button to increase and decrease the level to adjust the selected option to restore the channel , select OFF. 3. Menu Operations Tuning Menu Options 1.
... your preference . 4.Repeat step 2 and step 3 until the following menu appears on the screen TUNING CHANNEL SKIP AFC FINE TUNE ANTENNA AUTO PROGRAM 1 OFF ON CATV Note: This menu is only appears in TV mode . 2. You can press the digit buttons to improve the image quality . button to increase and decrease the level to adjust the selected option to restore the channel , select OFF. 3. Menu Operations Tuning Menu Options 1.

User Manual
Page 22
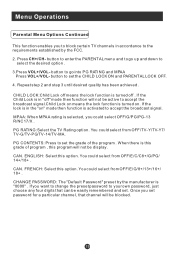
... program number will bring parental menu display on the screen. It deletes any channels on the screen . 2. Press the MENU and VOL+/VOL- If the TV is no broadcast or a poor signal. CAN. This search automatically adds only the active channels in the menu . button to the TV's memory. FRENCH 8+ CHANGE PASSWORD to start automatic search function operation. AUTO PROGRAM : Auto search and save the channel .Press the VOL+ button to select...
... program number will bring parental menu display on the screen. It deletes any channels on the screen . 2. Press the MENU and VOL+/VOL- If the TV is no broadcast or a poor signal. CAN. This search automatically adds only the active channels in the menu . button to the TV's memory. FRENCH 8+ CHANGE PASSWORD to start automatic search function operation. AUTO PROGRAM : Auto search and save the channel .Press the VOL+ button to select...
User Manual
Page 23
... the program . button to accept the broadcast signal.Child Lock on means the lock function is turned on " mode then function is turned off " mode then function will be easily remembered and set the CHILD LOCK ON and PARENTAL LOCK OFF. 4. CHILD LOCK:Child Lock off means the lock function is activated to your own password, just choose any four digits that channel will not be display . PG RATING:Select the...
... the program . button to accept the broadcast signal.Child Lock on means the lock function is turned on " mode then function is turned off " mode then function will be easily remembered and set the CHILD LOCK ON and PARENTAL LOCK OFF. 4. CHILD LOCK:Child Lock off means the lock function is activated to your own password, just choose any four digits that channel will not be display . PG RATING:Select the...
User Manual
Page 26
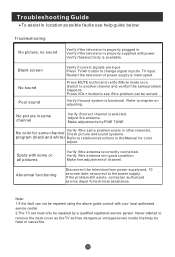
... screen No sound Poor sound Verify if correct signals are input. Switch to TV input. No picture in the Manual for color adjust. Adjust the antenna. Press TV/AV button to change signal input to another channel and verify if the same problem happens. Make adjustments by a qualified registered service person. Abnormal functioning Disconnect the television from power supply and, 10 seconds later, reconnect to relative instructions in some channel Verify if correct channel is properly supplied with power...
... screen No sound Poor sound Verify if correct signals are input. Switch to TV input. No picture in the Manual for color adjust. Adjust the antenna. Press TV/AV button to change signal input to another channel and verify if the same problem happens. Make adjustments by a qualified registered service person. Abnormal functioning Disconnect the television from power supply and, 10 seconds later, reconnect to relative instructions in some channel Verify if correct channel is properly supplied with power...
User Manual
Page 27
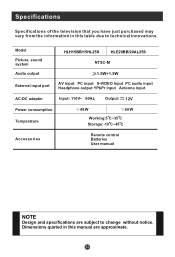
... Picture, sound system Audio output HLH15BB/15HL25S HLE20BB/20AL25S NTSC-M 1.5W+1.5W External input port AV input PC input S-VIDEO input PC audio input Headphone output YPbPr input Antenna input AC-DC adapter Input: 110V~ 60Hz, Output: --- 12V Power consumption Temperature 48W 60W Working:5 C~35 C Storage:-10 C~45 C Accessories Remote control Batteries User manual NOTE Design and specifications are approximate. Specifications Specifications of the television that you have just purchased may vary from the information in this table due to change without notice. Dimensions...
... Picture, sound system Audio output HLH15BB/15HL25S HLE20BB/20AL25S NTSC-M 1.5W+1.5W External input port AV input PC input S-VIDEO input PC audio input Headphone output YPbPr input Antenna input AC-DC adapter Input: 110V~ 60Hz, Output: --- 12V Power consumption Temperature 48W 60W Working:5 C~35 C Storage:-10 C~45 C Accessories Remote control Batteries User manual NOTE Design and specifications are approximate. Specifications Specifications of the television that you have just purchased may vary from the information in this table due to change without notice. Dimensions...


