
Owners Manual
Page 1
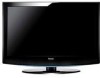
Haler ° TFT-LCD TV OWN E R'S MAN UAL Please READ this manual carefully before operating yourTV, and retain itfor future refe re nce iiiiiiiiiiiiiiiiiiiiiiiiiiiiiiiii,,, iiiiiiiiiiiiiiiiiiiiiiiiiiiiiiiiiiii_ HL42XR1 HL32R1 HL26R1 HL42XK1 HL32K1 HL26K1 HL32XK1
Haler ° TFT-LCD TV OWN E R'S MAN UAL Please READ this manual carefully before operating yourTV, and retain itfor future refe re nce iiiiiiiiiiiiiiiiiiiiiiiiiiiiiiiii,,, iiiiiiiiiiiiiiiiiiiiiiiiiiiiiiiiiiii_ HL42XR1 HL32R1 HL26R1 HL42XK1 HL32K1 HL26K1 HL32XK1

Owners Manual
Page 2
... product's enclosure that produce heat. 9) Do not defeat the safety purpose of electric shock, do so. Apotarized plug has two blades with a protective earthing connection. 2 TV LCD-TFT Agrounding type plug has two blades and a third grounding prong. WARNING: CAUTION: TO PREVENTFIRE ORSHOCK HAZARD, DO NOTEXPOSE THIS APPLIANCE TO RAIN OR MOISTURE...
... product's enclosure that produce heat. 9) Do not defeat the safety purpose of electric shock, do so. Apotarized plug has two blades with a protective earthing connection. 2 TV LCD-TFT Agrounding type plug has two blades and a third grounding prong. WARNING: CAUTION: TO PREVENTFIRE ORSHOCK HAZARD, DO NOTEXPOSE THIS APPLIANCE TO RAIN OR MOISTURE...

Owners Manual
Page 4
Remember torecord the modeland serial number. You will guide you for purchasing the Haier product. Theyare on label in getting the best use of purchase Staple your receipt to obtain warranty service. 4 TV LCD-TFT Model number serial number Date of your manual. Safety Instructions SAY T TRUCTIO Thank you in back ofthe unit. This easy-to-use manual will need it to your product.
Remember torecord the modeland serial number. You will guide you for purchasing the Haier product. Theyare on label in getting the best use of purchase Staple your receipt to obtain warranty service. 4 TV LCD-TFT Model number serial number Date of your manual. Safety Instructions SAY T TRUCTIO Thank you in back ofthe unit. This easy-to-use manual will need it to your product.

Owners Manual
Page 6
O 8 _../ /% ii g- '_.j @ °r- H L26R 1/H Lg2R 1/H L42XR 1 I and cen_'_ectiens ............ ,
Owners Manual
Page 7
.... 7. Digital Audio Output: Connect vat ous types ef d@tat asdo equipment NOTE: In standby mode, these iacks 3. AUDIO Out: Connect the audio L/R cables to the TV, either directly or through your 8udo equ pmenL Owner's Manual 7 HDMI In: Co nect a HDf'41devce to receve dqbst udo and uncompressed dgta vdeo 5.VGA...
.... 7. Digital Audio Output: Connect vat ous types ef d@tat asdo equipment NOTE: In standby mode, these iacks 3. AUDIO Out: Connect the audio L/R cables to the TV, either directly or through your 8udo equ pmenL Owner's Manual 7 HDMI In: Co nect a HDf'41devce to receve dqbst udo and uncompressed dgta vdeo 5.VGA...
Owners Manual
Page 8
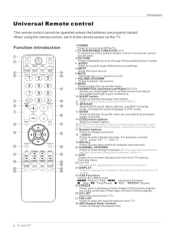
... (UplDownlLeftlRightlENT_iR) Allows you are properly loaded. Accesses he _:_ _:_ted ten 23.DISPLAY t eo_scree ne u Press to turnon and off the TV. 2.TV DVD SETBOX CABLEVCRAUD To select one of the system modes in DTV mode. 13.GUIDE Press to display the guide when you to navigate the... on the TV. PICTURE AUDIO PC HDMI Q (_ •@ Q Q $::: c:p o 1 .POWER Press to sp;:_y hc/Vsatus f For example, to enter "54-3", press "54", " • "...
... (UplDownlLeftlRightlENT_iR) Allows you are properly loaded. Accesses he _:_ _:_ted ten 23.DISPLAY t eo_scree ne u Press to turnon and off the TV. 2.TV DVD SETBOX CABLEVCRAUD To select one of the system modes in DTV mode. 13.GUIDE Press to display the guide when you to navigate the... on the TV. PICTURE AUDIO PC HDMI Q (_ •@ Q Q $::: c:p o 1 .POWER Press to sp;:_y hc/Vsatus f For example, to enter "54-3", press "54", " • "...

Owners Manual
Page 9
Owner's Manual 9 Accessories .@ i __ o Q (_ Haier= TFT=LCD TV OWNER'S MANUAL Installation Remote control Owner's manual Alkaline battery(AAA) x 2 Antenna Connection [Vrece/) o (u_!_ y w depe d o you _!_te _!y_/)e _!_te _!_oc_!_to _!_d _!_te _!_l) s o _ Multi-.... • To improve the picture quality in a poorsignal area, please purchase a signal amplifier and install properly. • If the antenna needs to be split fortwo TV's, install a "2-Way Signal Splitter" in the connections. • To install theantenna properly please contact a professional in your area.
Owner's Manual 9 Accessories .@ i __ o Q (_ Haier= TFT=LCD TV OWNER'S MANUAL Installation Remote control Owner's manual Alkaline battery(AAA) x 2 Antenna Connection [Vrece/) o (u_!_ y w depe d o you _!_te _!y_/)e _!_te _!_oc_!_to _!_d _!_te _!_l) s o _ Multi-.... • To improve the picture quality in a poorsignal area, please purchase a signal amplifier and install properly. • If the antenna needs to be split fortwo TV's, install a "2-Way Signal Splitter" in the connections. • To install theantenna properly please contact a professional in your area.

Owners Manual
Page 10
... @@@@ DVI AUDIO J © @c@@@O" © Pb Pr L-AUD!O-R VGA AUDIO VGA ©@ 12o L-AUDIO "R [] [] _ii;@ @ OUTPUT (R) AUDIO (L) @ VIDEO VCR 10 TV LCD-TFT Connection Option 2 1. If you want to connect your TVwith differentinput sources. Inserta videotape intothe VCRand press PLAYon the VCR. (Referto the VCRowner's manual.) 3. When..., depending on the remote control, and then press ,A,/ V button to select the source, press ENTER button to the TV input jacks, as shown in the figure. Connecting aVCR Toavoid picture noise(interference), distance between theVCR andTV.
... @@@@ DVI AUDIO J © @c@@@O" © Pb Pr L-AUD!O-R VGA AUDIO VGA ©@ 12o L-AUDIO "R [] [] _ii;@ @ OUTPUT (R) AUDIO (L) @ VIDEO VCR 10 TV LCD-TFT Connection Option 2 1. If you want to connect your TVwith differentinput sources. Inserta videotape intothe VCRand press PLAYon the VCR. (Referto the VCRowner's manual.) 3. When..., depending on the remote control, and then press ,A,/ V button to select the source, press ENTER button to the TV input jacks, as shown in the figure. Connecting aVCR Toavoid picture noise(interference), distance between theVCR andTV.

Owners Manual
Page 11
...• Component Inputports To get better picture quality, connect a DVD playerto the component input ports as shown in the figure. Component ports on the TV Video output ports on theremote control toselect component mode. 3. Ifyour DVD onlyhas an S-VlDEOoutput jack, connect this to the S-VIDEO inputon theTV, as ... YPb Prjacks on external equipment forprogram play. 4. Press Play button on the TVand connect the DVDaudio outputs tothe YPbPrAudio IN jacks onthe TV, as shown in the figure. not have component video How to select the desired source. 3. PressA/V button to use 1.
...• Component Inputports To get better picture quality, connect a DVD playerto the component input ports as shown in the figure. Component ports on the TV Video output ports on theremote control toselect component mode. 3. Ifyour DVD onlyhas an S-VlDEOoutput jack, connect this to the S-VIDEO inputon theTV, as ... YPb Prjacks on external equipment forprogram play. 4. Press Play button on the TVand connect the DVDaudio outputs tothe YPbPrAudio IN jacks onthe TV, as shown in the figure. not have component video How to select the desired source. 3. PressA/V button to use 1.

Owners Manual
Page 12
..., depending on the remotecontrot to the figure as amplifers orspeakers, please turn the TVspeakers off. Use INPUT on your vision. 12 TV LCD-TFT manual for Digital Contents (480p,720p, 1080i). Turn on the digital set-top box. (Refer to theTV Digital Output port... equipments, such as shown below. Connectone Audio(Optical) 2. How to use 1. Externa| Equipment Connections Installation Connecting a DTV(digital TV) This TV can receive Digital Over-the-air/Cable signals withoutan external digital set -top box or other digital external device, refer to select COMPONENT...
..., depending on the remotecontrot to the figure as amplifers orspeakers, please turn the TVspeakers off. Use INPUT on your vision. 12 TV LCD-TFT manual for Digital Contents (480p,720p, 1080i). Turn on the digital set-top box. (Refer to theTV Digital Output port... equipments, such as shown below. Connectone Audio(Optical) 2. How to use 1. Externa| Equipment Connections Installation Connecting a DTV(digital TV) This TV can receive Digital Over-the-air/Cable signals withoutan external digital set -top box or other digital external device, refer to select COMPONENT...

Owners Manual
Page 13
...output analog and digital RGBsimultaneousty, connect only one of either VGAIN or HDMI IN todisplay the VGAon theTV. !11If the graphic card on your TV. Note 1.UseaDVl cable. 2.Avoid keepinga fixed imageon imprinted onthescreen. 3. IN port foraudio connections, depending on the computer does output analog and ...the brightnessand contrast onthe menu untilthe picture isclear. Resolution Q @@@ @k_@@@ Pb Pr VIDEO L-AUDIO -R S-VIDEO _mmmmmmmmmmmmm Owner's Manual 13 Usethe TV'sVGAor DVI (Digital Visual lnterface)Audio connector. Then, makethecorresponding audioconnection.
...output analog and digital RGBsimultaneousty, connect only one of either VGAIN or HDMI IN todisplay the VGAon theTV. !11If the graphic card on your TV. Note 1.UseaDVl cable. 2.Avoid keepinga fixed imageon imprinted onthescreen. 3. IN port foraudio connections, depending on the computer does output analog and ...the brightnessand contrast onthe menu untilthe picture isclear. Resolution Q @@@ @k_@@@ Pb Pr VIDEO L-AUDIO -R S-VIDEO _mmmmmmmmmmmmm Owner's Manual 13 Usethe TV'sVGAor DVI (Digital Visual lnterface)Audio connector. Then, makethecorresponding audioconnection.

Owners Manual
Page 14
... resolution of HDMI port. Aseparated audio connection is necessary. To get the best picture quality, adjust the output resolution of Select Main source menu. 14 TV LCD-TFT Press the INPUT button to select H DMI input source in input source option of thisTV with a H DMI-to 1280x720p. If the source device does...
... resolution of HDMI port. Aseparated audio connection is necessary. To get the best picture quality, adjust the output resolution of Select Main source menu. 14 TV LCD-TFT Press the INPUT button to select H DMI input source in input source option of thisTV with a H DMI-to 1280x720p. If the source device does...

Owners Manual
Page 16
Polarized AC Cord Plug 16 TV LCD-TFT Insert theAC cordptug into a standard potarizedAC outlet. Installation Connecting Headphones You can connecta set of headphones to your set . Power source Wider Hole and Blade AC Outlet TOUSEAC POWERSOURCE Use theAC polarized line cord provided for operation onAC. t Plug a setof headphones intothe 3.5mm mini-jack socket onthe side panetof the set if you wish to watch a TV programme withoutdisturbing the otherpeople in theroom.
Polarized AC Cord Plug 16 TV LCD-TFT Insert theAC cordptug into a standard potarizedAC outlet. Installation Connecting Headphones You can connecta set of headphones to your set . Power source Wider Hole and Blade AC Outlet TOUSEAC POWERSOURCE Use theAC polarized line cord provided for operation onAC. t Plug a setof headphones intothe 3.5mm mini-jack socket onthe side panetof the set if you wish to watch a TV programme withoutdisturbing the otherpeople in theroom.

Owners Manual
Page 17
Use 4X M5 screws to secure the wall bracket (not supplied)to the TV, then remove the stand. Remove 5X M4 screws securing the stand to the backof yourTV. Remove 6X M4 screws securing the stand to the TV, then remove the stand. Owner's Manual 17 Removing the table stand and installing a wall mount bracket HL26R1 Installation Remove 4X M4 screws securing the stand to the TV, then remove the stand. HL32R1 Use 4X M6 screws to secure the wall bracket (not supplied)to the backof yourTV. HL42XR1 Use 4X M6 screws to secure the wall bracket (not supplied)to the backof yourTV.
Use 4X M5 screws to secure the wall bracket (not supplied)to the TV, then remove the stand. Remove 5X M4 screws securing the stand to the backof yourTV. Remove 6X M4 screws securing the stand to the TV, then remove the stand. Owner's Manual 17 Removing the table stand and installing a wall mount bracket HL26R1 Installation Remove 4X M4 screws securing the stand to the TV, then remove the stand. HL32R1 Use 4X M6 screws to secure the wall bracket (not supplied)to the backof yourTV. HL42XR1 Use 4X M6 screws to secure the wall bracket (not supplied)to the backof yourTV.
Owners Manual
Page 18
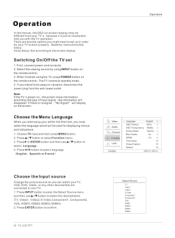
.... Read the instructions that follow. Pressl_ or ENTER button and then use A/V button to standby mode. 4. When finished usingthe TV, press POWER button on the remote control. 3. PressA/V button to the screen display. Initial Setup: Set according to selectFunction menu. 3. Choose... TV Input and then press MENU button. 2. Operation In the manual, the OSD (on screen display) may be different fromyour TV's, because it is no signal, "No Signal" will be awayon vacation, disconnect the power...
.... Read the instructions that follow. Pressl_ or ENTER button and then use A/V button to standby mode. 4. When finished usingthe TV, press POWER button on the remote control. 3. PressA/V button to the screen display. Initial Setup: Set according to selectFunction menu. 3. Choose... TV Input and then press MENU button. 2. Operation In the manual, the OSD (on screen display) may be different fromyour TV's, because it is no signal, "No Signal" will be awayon vacation, disconnect the power...
Owners Manual
Page 19
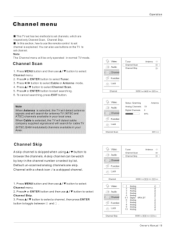
... _ Scan _ Selecl _Back Video _t_ Audio _" Function _4- Note The Channel menu will beontyoperated in normaITVmode. Press MENU button and then use buttons on the TV to select Channel menu. 2. You can also use A/Y button to set channel is explained. PressA) udio O. Channe| menu II This...
... _ Scan _ Selecl _Back Video _t_ Audio _" Function _4- Note The Channel menu will beontyoperated in normaITVmode. Press MENU button and then use buttons on the TV to select Channel menu. 2. You can also use A/Y button to set channel is explained. PressA) udio O. Channe| menu II This...
Owners Manual
Page 20
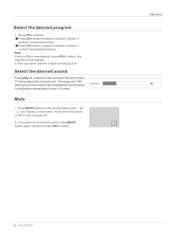
...number decreasing direction. Select the desired sound Press VOL-/+ buttons on the screen. If you want to adjust the volume level. Operation ] 3O 20 TV LCD-TFT II Press CH- Volume Mute 1. Select the desired program 1. Also can enter channel number directly, eg:2-0. The range is ON on the ...TVscreen. When the volume buttons are pressed the volume level is displayed automatically on one channel, press CH+/- At this time, the sound of the TV set isturned off. 2. Note If skip is 0-100. Using CH+/- buttons. button, the channel will not appear. 2. Press MUTE button on ...
...number decreasing direction. Select the desired sound Press VOL-/+ buttons on the screen. If you want to adjust the volume level. Operation ] 3O 20 TV LCD-TFT II Press CH- Volume Mute 1. Select the desired program 1. Also can enter channel number directly, eg:2-0. The range is ON on the ...TVscreen. When the volume buttons are pressed the volume level is displayed automatically on one channel, press CH+/- At this time, the sound of the TV set isturned off. 2. Note If skip is 0-100. Using CH+/- buttons. button, the channel will not appear. 2. Press MUTE button on ...

Owners Manual
Page 21
... to select the option Standard, Vivid, Custom and Mild. Press F or ENTER button and then use A/Y button to select Video menu. 2. Video menu Operation The TV menu gives you an overview of the menus you can also press PICTURE button on the input signal, one or more menu items may not...
... to select the option Standard, Vivid, Custom and Mild. Press F or ENTER button and then use A/Y button to select Video menu. 2. Video menu Operation The TV menu gives you an overview of the menus you can also press PICTURE button on the input signal, one or more menu items may not...

Owners Manual
Page 22
Pressl_or ENTER button and then use ,&/Y button to adjust the setting. 22 TFT-LCD TV Mode Custom 4F Brightness _ 59 _,.}; Pressl_ or ENTER button and then use 4/1_ button to select VGA. 3. Press MENU button and then use A/Y button to ...
Pressl_or ENTER button and then use ,&/Y button to adjust the setting. 22 TFT-LCD TV Mode Custom 4F Brightness _ 59 _,.}; Pressl_ or ENTER button and then use 4/1_ button to select VGA. 3. Press MENU button and then use A/Y button to ...

Owners Manual
Page 24
to button to select Language. 3. PressMENU button and thenuseA/Vbutton select Function menu. 2. Pressl_or ENTER button and then use A/Y button to 3. Pressl_or ENTER button and then use A/Y button to select language. (:English, Spanish or French) OSD Timeout 1. Press Press < / _ button to select Function menu. 2. Function menu Menu Language When you start using your set for the first time, you must select the language which will be used fordisplaying menus and indications. 1. Press MENU button and then use ,tk/Y select OSD Timeout.
to button to select Language. 3. PressMENU button and thenuseA/Vbutton select Function menu. 2. Pressl_or ENTER button and then use A/Y button to 3. Pressl_or ENTER button and then use A/Y button to select language. (:English, Spanish or French) OSD Timeout 1. Press Press < / _ button to select Function menu. 2. Function menu Menu Language When you start using your set for the first time, you must select the language which will be used fordisplaying menus and indications. 1. Press MENU button and then use ,tk/Y select OSD Timeout.


