User Manual
Page 1
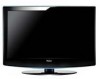
TFT-LCD TV OWNER'S MANUAL Please READ this manual carefully before operating your TV, and retain it for future reference. MODELS: HL26R HL37T HL32R HL42T HL40R HL47T HL42R HL52T
TFT-LCD TV OWNER'S MANUAL Please READ this manual carefully before operating your TV, and retain it for future reference. MODELS: HL26R HL37T HL32R HL42T HL40R HL47T HL42R HL52T
User Manual
Page 3
Operation is no guarantee that interference will not occur in particular installation. Owner s Manual 3 However there is subject to the following measures: *Reorient or relocate the receiving antenna. *Increase the separation between the equipment and receiver. *...ferrite cores must accept any interference received, including interference that to which the receiver is connected. *Consult the dealer or an experienced radio/TV technician for a Class B digital device, pursuant to video equipment; CANADIAN NOTICE: This Class B digital apparatus compiles with Canadian ICES-003. If this...
Operation is no guarantee that interference will not occur in particular installation. Owner s Manual 3 However there is subject to the following measures: *Reorient or relocate the receiving antenna. *Increase the separation between the equipment and receiver. *...ferrite cores must accept any interference received, including interference that to which the receiver is connected. *Consult the dealer or an experienced radio/TV technician for a Class B digital device, pursuant to video equipment; CANADIAN NOTICE: This Class B digital apparatus compiles with Canadian ICES-003. If this...
User Manual
Page 4
Remember to obtain warranty service. 4 TV LCD-TFT You will guide you for purchasing the Haier product. Safety Instructions SAVE THESE INSTRUCTIONS Thank you in back of purchase Staple your receipt to your product. Model number serial number Date of the unit. This easy-to-use of your manual. They are on label in getting the best use manual will need it to record the model and serial number.
Remember to obtain warranty service. 4 TV LCD-TFT You will guide you for purchasing the Haier product. Safety Instructions SAVE THESE INSTRUCTIONS Thank you in back of purchase Staple your receipt to your product. Model number serial number Date of the unit. This easy-to-use of your manual. They are on label in getting the best use manual will need it to record the model and serial number.
User Manual
Page 5
...ti ng a V CR 10 External A/V Source Setup 11 Co nn ec ti ng a D VD p la ye r 11 Connecting a DTV(digital TV 12 Connecting digital audio output 12 Co nn ec ti ng a c om pu te r 13 Monitor Out Setup 14 HD MI a nd D VI...Headphones 16 Power source 16 Removing the table stand and installing a wall mount bracket 17 Operation Switching On/Off the TV set 18 Choose the Menu Language 18 Choose the input source 18 Channel Menu Channel Scan 19 Ch an ne ... Setting up your remote control Remote Control Codes Maintenance Product Specifications Troubleshooting Warranty Owner s Manual 5
...ti ng a V CR 10 External A/V Source Setup 11 Co nn ec ti ng a D VD p la ye r 11 Connecting a DTV(digital TV 12 Connecting digital audio output 12 Co nn ec ti ng a c om pu te r 13 Monitor Out Setup 14 HD MI a nd D VI...Headphones 16 Power source 16 Removing the table stand and installing a wall mount bracket 17 Operation Switching On/Off the TV set 18 Choose the Menu Language 18 Choose the input source 18 Channel Menu Channel Scan 19 Ch an ne ... Setting up your remote control Remote Control Codes Maintenance Product Specifications Troubleshooting Warranty Owner s Manual 5
User Manual
Page 7
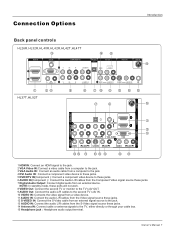
...R S-VIDEO L-AUDIO- Connection Options Introduction Back panel controls HL26R,HL32R,HL40R,HL42R,HL42T,HL47T HDMI IN 2 1 VGA IN... signal source these jacks. 7 Digital Audio Output: Connect digital audio from an external signal source to the TV, either directly or through your cable box. 15 Headphone jack : Headphone audio output terminal. R VIDEO L-AUDIO...TV`s AV IN. 10 VIDEO IN: Connects the video signal from a video device. 11 AUDIO IN: Connect the audio L/R cables from the Video signal source these jacks. 12 S-VIDEO IN: Connect the S-Video cable from an external device. Owner s Manual...
...R S-VIDEO L-AUDIO- Connection Options Introduction Back panel controls HL26R,HL32R,HL40R,HL42R,HL42T,HL47T HDMI IN 2 1 VGA IN... signal source these jacks. 7 Digital Audio Output: Connect digital audio from an external signal source to the TV, either directly or through your cable box. 15 Headphone jack : Headphone audio output terminal. R VIDEO L-AUDIO...TV`s AV IN. 10 VIDEO IN: Connects the video signal from a video device. 11 AUDIO IN: Connect the audio L/R cables from the Video signal source these jacks. 12 S-VIDEO IN: Connect the S-Video cable from an external device. Owner s Manual...
User Manual
Page 9
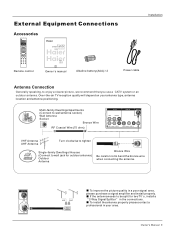
... the picture quality in a poor signal area, please purchase a signal amplifier and install properly. MODELS: HL26R HL37T HL32R HL42T HL40R HL47T HL42R HL52T Owner`s manual Alkaline battery(AAA) 2 Power cable Installation Antenna Connection Generally speaking, to wall antenna socket) Wall Antenna...LIST ADD/ERASE TODAY NEXT DAY PAGE- R S-VIDEO L-AUDIO- Q.VIEW Remote control TFT-LCD TV OWNER'S MANUAL Please READ this manual carefully before operating your TV, and retain it for two TV`s, install a 2-Way Signal Splitter in your antenna type, antenna location and antenna positioning....
... the picture quality in a poor signal area, please purchase a signal amplifier and install properly. MODELS: HL26R HL37T HL32R HL42T HL40R HL47T HL42R HL52T Owner`s manual Alkaline battery(AAA) 2 Power cable Installation Antenna Connection Generally speaking, to wall antenna socket) Wall Antenna...LIST ADD/ERASE TODAY NEXT DAY PAGE- R S-VIDEO L-AUDIO- Q.VIEW Remote control TFT-LCD TV OWNER'S MANUAL Please READ this manual carefully before operating your TV, and retain it for two TV`s, install a 2-Way Signal Splitter in your antenna type, antenna location and antenna positioning....
User Manual
Page 10
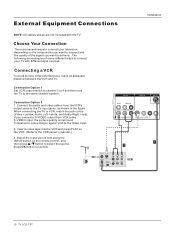
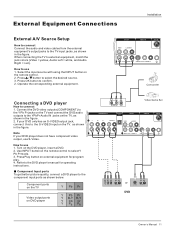
...press OK button to confirm. Select the input source with using the INPUT button on the components you want to connect your TV with the TV. R 10 TV LCD-TFT Choose Your Connection There are several ways to achieve. Connection Option 1 Set VCR output switch to channel 3 or 4...TV to the same channel number. Insert a video tape into the VCR and press PLAY on the VCR. (Refer to the Video input. 2. External Equipment Connections Installation NOTE: All cables shown are not included with different input sources. compared to connecting a regular VCR to the VCR owner`s manual...
...press OK button to confirm. Select the input source with using the INPUT button on the components you want to connect your TV with the TV. R 10 TV LCD-TFT Choose Your Connection There are several ways to achieve. Connection Option 1 Set VCR output switch to channel 3 or 4...TV to the same channel number. Insert a video tape into the VCR and press PLAY on the VCR. (Refer to the Video input. 2. External Equipment Connections Installation NOTE: All cables shown are not included with different input sources. compared to connecting a regular VCR to the VCR owner`s manual...
User Manual
Page 11
...to connect Connect the audio and video cables from the external equipment's output jacks to the TV input jacks, as shown below. R Camcorder Connecting a DVD player How to the DVD player's manual for program play. 4. Refer to connect 1. Press OK button to the component input ports... figure. COMPONENT IN OPTICAL OUT AV OUT Pb Pr L-AUDIO- R How to use 1. Turn on the TV. Press Play button on DVD player Y Pb Pr Y B-Y R-Y Y Cb Cr Y PB PR Owner s Manual 11 R 1 VIDEO L-AUDIO- Component Input ports To get better picture quality, connect a DVD player to confirm...
...to connect Connect the audio and video cables from the external equipment's output jacks to the TV input jacks, as shown below. R Camcorder Connecting a DVD player How to the DVD player's manual for program play. 4. Refer to connect 1. Press OK button to the component input ports... figure. COMPONENT IN OPTICAL OUT AV OUT Pb Pr L-AUDIO- R How to use 1. Turn on the TV. Press Play button on DVD player Y Pb Pr Y B-Y R-Y Y Cb Cr Y PB PR Owner s Manual 11 R 1 VIDEO L-AUDIO- Component Input ports To get better picture quality, connect a DVD player to confirm...
User Manual
Page 12
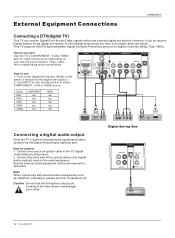
... HDMI IN 2 VGA IN VGA AUDIO COMPONENT IN OPTICAL OUT VGA 2 Y Pb Pr L-AUDIO- Caution: Do not look into the optical output port. R 1 VIDEO 12 TV LCD-TFT Connect one end of the optical cable to the digital audio (optical) input on the digital set -top box or other end of an... optical cable to select COMPONENT , VGA or HDMI source. See the external audio equipment instruction manual for Digital Contents (480p,720p,1080i). R How to connect 1. R VIDEO OUT L-AUDIO- R HDMI Connecting a digital audio output Send the...
... HDMI IN 2 VGA IN VGA AUDIO COMPONENT IN OPTICAL OUT VGA 2 Y Pb Pr L-AUDIO- Caution: Do not look into the optical output port. R 1 VIDEO 12 TV LCD-TFT Connect one end of the optical cable to the digital audio (optical) input on the digital set -top box or other end of an... optical cable to select COMPONENT , VGA or HDMI source. See the external audio equipment instruction manual for Digital Contents (480p,720p,1080i). R How to connect 1. R VIDEO OUT L-AUDIO- R HDMI Connecting a digital audio output Send the...

User Manual
Page 13
... 3. R 1 Y Pb Pr AUDIO L-AUDIO- Use theTV`s VGAor DVI (DigitalVisual Interface)AudioIN port foraudio connections, dependingon your TV. How touse 1. If the refresh rate of either VGAor HDMI ; (theother mode isset to 1024x768 . 2. There may becomepermanently...quality, adjust the VGAgraphics card to Plugand Play automaticallyby theTV.) 3. Check the image on your computer connector. R Owner s Manual 13 Turnon the computer a nd theTV. 2. Thesynchronization input formfor Horizontal andVertical frequenciesis separate. Then,make thecorresponding audioconnection. R L-...
... 3. R 1 Y Pb Pr AUDIO L-AUDIO- Use theTV`s VGAor DVI (DigitalVisual Interface)AudioIN port foraudio connections, dependingon your TV. How touse 1. If the refresh rate of either VGAor HDMI ; (theother mode isset to 1024x768 . 2. There may becomepermanently...quality, adjust the VGAgraphics card to Plugand Play automaticallyby theTV.) 3. Check the image on your computer connector. R Owner s Manual 13 Turnon the computer a nd theTV. 2. Thesynchronization input formfor Horizontal andVertical frequenciesis separate. Then,make thecorresponding audioconnection. R L-...
User Manual
Page 14
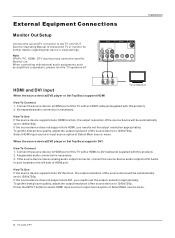
...Manual of the second TV or monitor for Monitor out. AV OUT VIDEO L-AUDIO-R VIDEO IN ANT IN 1 VIDEO L-AUDIO- If the source device does not support Auto HDMI, you need to set the output resolution appropriately. Select HDMI input source in input source option of Select Main source menu. 14 TV LCD... port located on the left side of HDMI port. No separated audio connection is necessary. 3. Connect the source device to HDMI port of this TV with a HDMI-to HDMI port of Select Main source menu. A separated audio connection is necessary. When the source device(DVD player or Set...
...Manual of the second TV or monitor for Monitor out. AV OUT VIDEO L-AUDIO-R VIDEO IN ANT IN 1 VIDEO L-AUDIO- If the source device does not support Auto HDMI, you need to set the output resolution appropriately. Select HDMI input source in input source option of Select Main source menu. 14 TV LCD... port located on the left side of HDMI port. No separated audio connection is necessary. 3. Connect the source device to HDMI port of this TV with a HDMI-to HDMI port of Select Main source menu. A separated audio connection is necessary. When the source device(DVD player or Set...

User Manual
Page 15
Cable sample Installation HDMI Cable (not supplied with the product) HDMI to DVI Cable (not supplied with the product) Analog Audio Cable (Stereo to RCA type) (not supplied with the product) Owner s Manual 15
Cable sample Installation HDMI Cable (not supplied with the product) HDMI to DVI Cable (not supplied with the product) Analog Audio Cable (Stereo to RCA type) (not supplied with the product) Owner s Manual 15
User Manual
Page 17
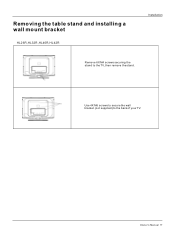
Use 4X M6 screws to secure the wall bracket (not supplied) to the TV, then remove the stand. Owner s Manual 17 Removing the table stand and installing a wall mount bracket HL26R,HL32R,HL40R,HL42R Installation Remove 6X M4 screws securing the stand to the back of your TV.
Use 4X M6 screws to secure the wall bracket (not supplied) to the TV, then remove the stand. Owner s Manual 17 Removing the table stand and installing a wall mount bracket HL26R,HL32R,HL40R,HL42R Installation Remove 6X M4 screws securing the stand to the back of your TV.
User Manual
Page 18
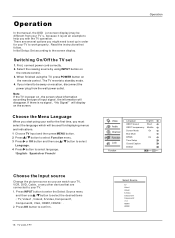
...information according the type of input signal . Press OK button to the screen display. Initial Setup: Set according to confirm . 18 TV LCD-TFT Select Source TV Video1 Video2 S-Video Component1 Component2 VGA HDMI1 HDMI2 Choose the Menu Language When you start using INPUT button on vacation, disconnect the power...there is just an example to select language. Operation In the manual, the OSD (on the screen. Select the viewing source by using your set for the first time, you must select the language which will be used for your TV, VCR, DVD, Cable , or any other devices that ...
...information according the type of input signal . Press OK button to the screen display. Initial Setup: Set according to confirm . 18 TV LCD-TFT Select Source TV Video1 Video2 S-Video Component1 Component2 VGA HDMI1 HDMI2 Choose the Menu Language When you start using INPUT button on vacation, disconnect the power...there is just an example to select language. Operation In the manual, the OSD (on the screen. Select the viewing source by using your set for the first time, you must select the language which will be used for your TV, VCR, DVD, Cable , or any other devices that ...

User Manual
Page 19
...OK button and then use the remote control to set channel. Channel Skip A skip channel is selected, the TV will detect antenna signals and will search for cable TV (NTSC,QAM modulated) channels available in the channel number or select by key-in your local area. Channel...Analog 3 Analog 4 Analog 5 Analog 5-1 Digital KPIX-DT 6 Analog 7 Analog 8 Analog 9 Analog 10 Analog Channel Skip OK Set / Select EXIT Back Owner s Manual 19 Channel with a check icon is a skipped channel. 1 Press MENU button and then use / button to select Channel menu. 2 Press button and then use buttons...
...OK button and then use the remote control to set channel. Channel Skip A skip channel is selected, the TV will detect antenna signals and will search for cable TV (NTSC,QAM modulated) channels available in the channel number or select by key-in your local area. Channel...Analog 3 Analog 4 Analog 5 Analog 5-1 Digital KPIX-DT 6 Analog 7 Analog 8 Analog 9 Analog 10 Analog Channel Skip OK Set / Select EXIT Back Owner s Manual 19 Channel with a check icon is a skipped channel. 1 Press MENU button and then use / button to select Channel menu. 2 Press button and then use buttons...
User Manual
Page 21
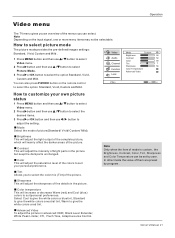
... and Color Temperature can also press P.MODE button on the input signal, one or more menu items may not be set by program . Owner s Manual 21 Color temperature This will adjust the sharpness of fine details in advanced: DNR, Black Level Extender, White Peak Limiter, CTI, Flech Tone, Adaptive ...Luma Control. Operation Video menu The TV menu gives you an overview of the menus you to select the color mix (Tint) of the picture. Note Depending on the remote control to...
... and Color Temperature can also press P.MODE button on the input signal, one or more menu items may not be set by program . Owner s Manual 21 Color temperature This will adjust the sharpness of fine details in advanced: DNR, Black Level Extender, White Peak Limiter, CTI, Flech Tone, Adaptive ...Luma Control. Operation Video menu The TV menu gives you an overview of the menus you to select the color mix (Tint) of the picture. Note Depending on the remote control to...

User Manual
Page 23
... in Mono; Sound Surround To turn the simulated surround sound on the remote control, this TV can only receive the signal when the TV station transmits the proper signals. SAP Broadcasts Setup This TV can be used for the first time, you start using your desired MTS mode in a... English OSD Timeout Short OSD Transparency Middle Screen Mode On Blue Screen On DPMS On Time Setup Closed Caption Default / Select EXIT Back Owner s Manual 23 Mode To adjust the audio mode: Off, Concert, Living Room, Hall, Bathroom, Cave, Arena and Church. SPDIF Type To Adjust the SPDIF...
... in Mono; Sound Surround To turn the simulated surround sound on the remote control, this TV can only receive the signal when the TV station transmits the proper signals. SAP Broadcasts Setup This TV can be used for the first time, you start using your desired MTS mode in a... English OSD Timeout Short OSD Transparency Middle Screen Mode On Blue Screen On DPMS On Time Setup Closed Caption Default / Select EXIT Back Owner s Manual 23 Mode To adjust the audio mode: Off, Concert, Living Room, Hall, Bathroom, Cave, Arena and Church. SPDIF Type To Adjust the SPDIF...

User Manual
Page 25
.../ button to select Time Setup. 3 Press button and then use / button to select Time Zone. 4 Press button to use the various timer features of the TV. Date /Time setting Setting the clock is necessary in order to select your local time zone. Select Off,5Min,10Min, 15Min, 30Min, 45Min,60Min, 90Min... 12:00 AM / Select EXIT Back Video Audio Channel Function Lock Time Zone Date/Time Sleep Timer Pacific Off Time Setup / Select EXIT Back Owner s Manual 25 The time begins to count down from 5 to 240 minutes). 1 Press MENU button and then use / button to select Time menu. 2 Press button ...
.../ button to select Time Setup. 3 Press button and then use / button to select Time Zone. 4 Press button to use the various timer features of the TV. Date /Time setting Setting the clock is necessary in order to select your local time zone. Select Off,5Min,10Min, 15Min, 30Min, 45Min,60Min, 90Min... 12:00 AM / Select EXIT Back Video Audio Channel Function Lock Time Zone Date/Time Sleep Timer Pacific Off Time Setup / Select EXIT Back Owner s Manual 25 The time begins to count down from 5 to 240 minutes). 1 Press MENU button and then use / button to select Time menu. 2 Press button ...

User Manual
Page 27
...viewed. sexual situations) V (Violence) FV (Fantasy Violence) (applies to TV-Y, TV-Y7,TV-G,TV-PG,TV-14, TV-MA) (applies to TV-PG, TV-14) (applies to TV-PG, TV-14, TV-MA) (applies to TV-PG, TV-14, TV-MA) (applies to TV-PG, TV-14, TV-MA) (applies to -video movies use the Movie Rating System (MPAA...) only. Movies that have been shown at the theaters or direct-to TV-Y7) Owner s Manual...
...viewed. sexual situations) V (Violence) FV (Fantasy Violence) (applies to TV-Y, TV-Y7,TV-G,TV-PG,TV-14, TV-MA) (applies to TV-PG, TV-14) (applies to TV-PG, TV-14, TV-MA) (applies to TV-PG, TV-14, TV-MA) (applies to TV-PG, TV-14, TV-MA) (applies to -video movies use the Movie Rating System (MPAA...) only. Movies that have been shown at the theaters or direct-to TV-Y7) Owner s Manual...

User Manual
Page 29
... The V-chip will automatically block certain categories that the movie ratings limit only applies to movies shown on TV, not TV programs, such as soap operas. 1 Press / button to select MPAA Rating item. 2 Press button .... 3 Press OK button to confirm. Operation Video Audio Channel Function Lock A D L S V FV TV-Y TV-Y7 TV-G TV-PG TV-14 TV-MA Allowed Rating Blocked Rating Parental Guide OK Set / Select EXIT Back Video Audio Channel Function Lock MPAA Rating...Rating Blocked Rating OK Set / Select EXIT Back Owner s Manual 29 While is selected, press OK button to go to a sub rating.
... The V-chip will automatically block certain categories that the movie ratings limit only applies to movies shown on TV, not TV programs, such as soap operas. 1 Press / button to select MPAA Rating item. 2 Press button .... 3 Press OK button to confirm. Operation Video Audio Channel Function Lock A D L S V FV TV-Y TV-Y7 TV-G TV-PG TV-14 TV-MA Allowed Rating Blocked Rating Parental Guide OK Set / Select EXIT Back Video Audio Channel Function Lock MPAA Rating...Rating Blocked Rating OK Set / Select EXIT Back Owner s Manual 29 While is selected, press OK button to go to a sub rating.


