
User Manual
Page 1
R HL19R1/HL19K1/HLC19R1/HLC19K1/HL22R1/HL22K1/HLC22R1 HLC22K1/HL22F1 LCD TV & LCD TV/DVD Combo USER MANUAL Please read this manual carefully before using this TV set and keep it for future reference.
R HL19R1/HL19K1/HLC19R1/HLC19K1/HL22R1/HL22K1/HLC22R1 HLC22K1/HL22F1 LCD TV & LCD TV/DVD Combo USER MANUAL Please read this manual carefully before using this TV set and keep it for future reference.

User Manual
Page 4
.... LOCATION:INSIDE,NEAR THE DECK MECHANISM. CAUTION:VISIBLE AND INVISIBLE LASER RADIATION WHEN OPEN AND INTERLOCK DEFEATED.DO NOT STARE INTO BEAM. Safety Instructions(for TV with DVD) PRECAUTIONS FCC WARNING-This equipment may cause harmful interference unless the modifications are expressly approved in the instruction...
.... LOCATION:INSIDE,NEAR THE DECK MECHANISM. CAUTION:VISIBLE AND INVISIBLE LASER RADIATION WHEN OPEN AND INTERLOCK DEFEATED.DO NOT STARE INTO BEAM. Safety Instructions(for TV with DVD) PRECAUTIONS FCC WARNING-This equipment may cause harmful interference unless the modifications are expressly approved in the instruction...

User Manual
Page 6
...the warning instructions on unstable, dusty and humid places; l Never put the unit in contact with the LCD-TV, disconnect the power cord from the LCD-TV . l Please comply strictly with the instructions provided; l Do not remove the back cover. l Please ...l Before operation, please make sure that the operating voltage of your safety and extend the life-span of LCD-TV, please read the following items carefully before using and cleaning this book; l Allow enough space for later ... contact an Authorized service technician. To prevent this manual for proper ventilation;
...the warning instructions on unstable, dusty and humid places; l Never put the unit in contact with the LCD-TV, disconnect the power cord from the LCD-TV . l Please comply strictly with the instructions provided; l Do not remove the back cover. l Please ...l Before operation, please make sure that the operating voltage of your safety and extend the life-span of LCD-TV, please read the following items carefully before using and cleaning this book; l Allow enough space for later ... contact an Authorized service technician. To prevent this manual for proper ventilation;

User Manual
Page 11
... 24.DVD STOP 25.DVD Next Chapter 26.DVD Previous Chapter 27.Open the channel list in TV 28.Open the favorite channel list in TV Note: the instruction on this manual takes remote of the TV screen 13.Shows program schedule in 9.DVD PLAY/PAUSE 10.DVD fast reverse 11.DVD fast forward... 12.Press to display the TV status information on the top of TV with DVD for example. RECALL 7 22 USB PLAY/PAUSE STOP...
... 24.DVD STOP 25.DVD Next Chapter 26.DVD Previous Chapter 27.Open the channel list in TV 28.Open the favorite channel list in TV Note: the instruction on this manual takes remote of the TV screen 13.Shows program schedule in 9.DVD PLAY/PAUSE 10.DVD fast reverse 11.DVD fast forward... 12.Press to display the TV status information on the top of TV with DVD for example. RECALL 7 22 USB PLAY/PAUSE STOP...
User Manual
Page 14
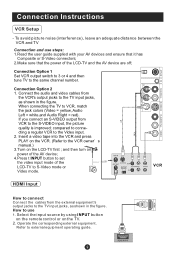
...Composite or S-Video connectors; 2.Make sure that the power of the LCD-TV to external equipment operating guide. ATN IN Connection Option 1 Set VCR output switch to 3 or 4 and then tune TV to the VCR owner s manual.) 3.T.urn on the TV. 2. Refer to S-Video mode or Video mode. Pr R-AUDIO...-L S-VIDEO IN R-AUDIO IN-L VIDEO Connection Option 2 1. Select the input source by using INPUT button on the remote control or on the LCD-TV first ; HDMI
...Composite or S-Video connectors; 2.Make sure that the power of the LCD-TV to external equipment operating guide. ATN IN Connection Option 1 Set VCR output switch to 3 or 4 and then tune TV to the VCR owner s manual.) 3.T.urn on the TV. 2. Refer to S-Video mode or Video mode. Pr R-AUDIO...-L S-VIDEO IN R-AUDIO IN-L VIDEO Connection Option 2 1. Select the input source by using INPUT button on the remote control or on the LCD-TV first ; HDMI
User Manual
Page 19
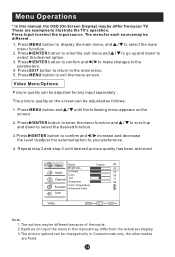
...2. Press MENU button and / until desired picture quality has been achieved . The picture quality on the screen can be changed only in this manual, the OSD (On Screen Display) may be differ from the actual set display. 3.The picture options can be different . 1. Press /ENTER...button to confirm and / to make changes to select the input source. Menu Operations * In this manual may differ from your preference . 4. Press Input to the parameters. 4. Press MENU button to your TV These are fixed. Note: 1.The options may be different because of the inputs. 2.Symbols on the...
...2. Press MENU button and / until desired picture quality has been achieved . The picture quality on the screen can be changed only in this manual, the OSD (On Screen Display) may be differ from the actual set display. 3.The picture options can be different . 1. Press /ENTER...button to confirm and / to make changes to select the input source. Menu Operations * In this manual may differ from your preference . 4. Press Input to the parameters. 4. Press MENU button to your TV These are fixed. Note: 1.The options may be different because of the inputs. 2.Symbols on the...
User Manual
Page 20
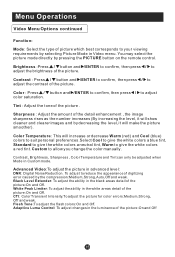
... directly by the compression:Medium,Strong,Auto,Off and weak. Custom to give the white colors a neutral tint, Warm to allow you change the color manually. White Peak Limiter: To adjust the ability in the luminance of the picture:On and Off. Adaptive Luma Control: To adjust changes in the white...
... directly by the compression:Medium,Strong,Auto,Off and weak. Custom to give the white colors a neutral tint, Warm to allow you change the color manually. White Peak Limiter: To adjust the ability in the luminance of the picture:On and Off. Adaptive Luma Control: To adjust changes in the white...

User Manual
Page 26
... Caption CH+/- When Auto mode on , the time can not be adjusted. Time: Press / to select the position and digits button to set the time manually. On Time/Off Time: Press / to select the position and digits button to set the date. Date/Time: Press /ENTER to select On or Off...
... Caption CH+/- When Auto mode on , the time can not be adjusted. Time: Press / to select the position and digits button to set the time manually. On Time/Off Time: Press / to select the position and digits button to set the date. Date/Time: Press /ENTER to select On or Off...

User Manual
Page 46
...button to see if the problem can not be repaired using the above guide consult with power. Refer to remove the back cover as the TV set must only be solved. If the problem still exists, contact an authorized service depot for color adjust. Troubleshooting No picture, no sound...if the television is in some or all pictures Verify if the antenna is correctly connected. Verify if the antenna is properly plugged in the Manual for technical assistance. Never attempt to chapter on . Blank screen No sound Poor sound Verify if correct signals are input. Press MUTE button...
...button to see if the problem can not be repaired using the above guide consult with power. Refer to remove the back cover as the TV set must only be solved. If the problem still exists, contact an authorized service depot for color adjust. Troubleshooting No picture, no sound...if the television is in some or all pictures Verify if the antenna is correctly connected. Verify if the antenna is properly plugged in the Manual for technical assistance. Never attempt to chapter on . Blank screen No sound Poor sound Verify if correct signals are input. Press MUTE button...

User Manual
Page 47
Dimensions quoted in this manual are subject to change without notice. Specifications Model Picture, sound system Audio output External input port 19 without DVD 19 with DVD NTSC, ATSC, Clear QAM 1.5W+1.5W AV input PC input S-VIDEO input PC audio input YPbPr input Antenna input HDMI input Power requirements ~120V 60Hz Power consumption Temperature Humidity Accessories 60W 80W Working:+5 ~+35 Storage:-15 ~+45 Working:20% ~ 80% Storage: 5% ~ 90% Remote control Batteries User manual Warranty card NOTE Design and specifications are approximate.
Dimensions quoted in this manual are subject to change without notice. Specifications Model Picture, sound system Audio output External input port 19 without DVD 19 with DVD NTSC, ATSC, Clear QAM 1.5W+1.5W AV input PC input S-VIDEO input PC audio input YPbPr input Antenna input HDMI input Power requirements ~120V 60Hz Power consumption Temperature Humidity Accessories 60W 80W Working:+5 ~+35 Storage:-15 ~+45 Working:20% ~ 80% Storage: 5% ~ 90% Remote control Batteries User manual Warranty card NOTE Design and specifications are approximate.


