
User Manual
Page 2
... CONTROLS, ADJUSTMENTS, OR PROCEDURES OTHER THAN THOSE SPECIFIED HEREIN MAY RESULT IN HAZARDOUS RADIATION EXPOSURE. (This item is intended to alert the user to constitute a risk of important operating and maintenance (servicing) instructions in the operating instructions unless you are qualified to do so. NO USER SERVICEABLE PARTS INSIDE. CAUTION: TO PREVENT ELECTRIC SHOCK DO NOT USE THIS POLARIZED PLUG WITH AN EXTENSION CORD...
... CONTROLS, ADJUSTMENTS, OR PROCEDURES OTHER THAN THOSE SPECIFIED HEREIN MAY RESULT IN HAZARDOUS RADIATION EXPOSURE. (This item is intended to alert the user to constitute a risk of important operating and maintenance (servicing) instructions in the operating instructions unless you are qualified to do so. NO USER SERVICEABLE PARTS INSIDE. CAUTION: TO PREVENT ELECTRIC SHOCK DO NOT USE THIS POLARIZED PLUG WITH AN EXTENSION CORD...
User Manual
Page 3
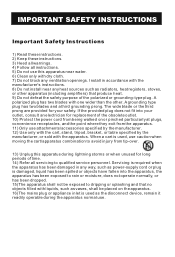
... cart, stand, tripod, bracket, or table specified by the manufacturer, or sold with the apparatus. When a cart is used as the disconnect device, remain it readily operable during lightning storms or when unused for replacement of the obsolete outlet. 10) Protect the power cord from being walked on the apparatus. 16)The mains plug or appliance inlet is used, use caution...
... cart, stand, tripod, bracket, or table specified by the manufacturer, or sold with the apparatus. When a cart is used as the disconnect device, remain it readily operable during lightning storms or when unused for replacement of the obsolete outlet. 10) Protect the power cord from being walked on the apparatus. 16)The mains plug or appliance inlet is used, use caution...

User Manual
Page 5
...External equipment Connections 7 Antenna Connection 7 VGA Setup 8.. Component Setup 8 VCR Setup 9 HDMI Input 9 Cable TV Setup 10 External Component Source Setup 10 Basic Operating Instructions 11 Switch On/Off the TV set for specific details. Please refer to your original set 11 Choose the input source 11 Audio Control 11 Mute...11 INFO...11 Select the TV Channel You Want 12 Picture Mode 12 Audio Mode 12 Sleep...12 GUIDE 12 ARC button 12 -button 13 CH.LIST button 13 FAV.LIST button 13 Menu Operations 14 Video Menu Options 14 Video Menu Options Continued 15 Audio Menu...
...External equipment Connections 7 Antenna Connection 7 VGA Setup 8.. Component Setup 8 VCR Setup 9 HDMI Input 9 Cable TV Setup 10 External Component Source Setup 10 Basic Operating Instructions 11 Switch On/Off the TV set for specific details. Please refer to your original set 11 Choose the input source 11 Audio Control 11 Mute...11 INFO...11 Select the TV Channel You Want 12 Picture Mode 12 Audio Mode 12 Sleep...12 GUIDE 12 ARC button 12 -button 13 CH.LIST button 13 FAV.LIST button 13 Menu Operations 14 Video Menu Options 14 Video Menu Options Continued 15 Audio Menu...

User Manual
Page 6
...power source, then wipe the set with the LCD-TV, disconnect the power cord from the LCD-TV . l Never put the unit in this , please do not use ; l Do not remove the back cover. If service is correct; l Please do as required when you are not recommended by manufacturer: l Before operation, please make sure that the operating...heat sources; l Please keep this machine. If water comes in contact with a dry soft cloth; l Allow enough space for later use additional devices that are installing, using : l Please read and understand all the instructions before operation; ...
...power source, then wipe the set with the LCD-TV, disconnect the power cord from the LCD-TV . l Never put the unit in this , please do not use ; l Do not remove the back cover. If service is correct; l Please do as required when you are not recommended by manufacturer: l Before operation, please make sure that the operating...heat sources; l Please keep this machine. If water comes in contact with a dry soft cloth; l Allow enough space for later use additional devices that are installing, using : l Please read and understand all the instructions before operation; ...

User Manual
Page 8
... PC audio input port ANT IN R AUDIO IN L VIDEO IN S-VIDEO Pr Pb Y R AUDIO L VGA IN PC AUDIO IN HDMI Headphone Audio in Connect audio output from an external device to these PC audio in antenna signals to the TV, either directly or through your cable box. S-VIDEO jacks Connect S-Video out from an S-Video device to the jacks. L R AUDIO Connection Options DVD STOP PLAY/PAUSE OPEN/CLOSE HDMI PC AUDIO IN VGA IN Y Pb PREV NEXT DVD insert Pr S-VIDEO VIDEO IN R AUDIO IN...
... PC audio input port ANT IN R AUDIO IN L VIDEO IN S-VIDEO Pr Pb Y R AUDIO L VGA IN PC AUDIO IN HDMI Headphone Audio in Connect audio output from an external device to these PC audio in antenna signals to the TV, either directly or through your cable box. S-VIDEO jacks Connect S-Video out from an S-Video device to the jacks. L R AUDIO Connection Options DVD STOP PLAY/PAUSE OPEN/CLOSE HDMI PC AUDIO IN VGA IN Y Pb PREV NEXT DVD insert Pr S-VIDEO VIDEO IN R AUDIO IN...

User Manual
Page 9
Remove the battery cover. ! Insert two size AAA batteries matching the +/-polarities of the battery to the +/marks inside the battery compartment (see image 2-for remote of the same type, must be inserted properly, and must be of TV with the signals, change your position to operate the remote control if the television cannot be rechargeable. Keep the remote control away from heat sources or...
Remove the battery cover. ! Insert two size AAA batteries matching the +/-polarities of the battery to the +/marks inside the battery compartment (see image 2-for remote of the same type, must be inserted properly, and must be of TV with the signals, change your position to operate the remote control if the television cannot be rechargeable. Keep the remote control away from heat sources or...
User Manual
Page 10
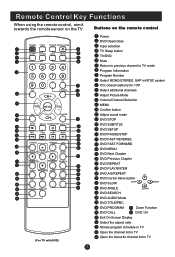
... remote control POWER TV/AV TV/DVD OPEN/CLOSE SLEEP Q.VIEW INFO MUTE 1234 5678 CC 90 SAP P.MODE CH+ VOL - PREV NEXT D.MENU REPEAT A-B PLAY/ENTER SLOW ANGLE TITLE/PBC SEARCH AUDIO PROGRAM ZOOM D.CALL 10+ EXIT ARC GUIDE CH.LIST FAV.LIST (For TV with DVD) Power DVD Open/close Input selection TV Sleep button TV/DVD Mute Return to previous channel in TV mode Program Infromation Program Number Select MONO,STEREO, SAP in NTSC system CC( closed caption) On / Off Select additional channels Adjust Picture Mode Volume/Channel Selection MENU Confirm button Adjust...
... remote control POWER TV/AV TV/DVD OPEN/CLOSE SLEEP Q.VIEW INFO MUTE 1234 5678 CC 90 SAP P.MODE CH+ VOL - PREV NEXT D.MENU REPEAT A-B PLAY/ENTER SLOW ANGLE TITLE/PBC SEARCH AUDIO PROGRAM ZOOM D.CALL 10+ EXIT ARC GUIDE CH.LIST FAV.LIST (For TV with DVD) Power DVD Open/close Input selection TV Sleep button TV/DVD Mute Return to previous channel in TV mode Program Infromation Program Number Select MONO,STEREO, SAP in NTSC system CC( closed caption) On / Off Select additional channels Adjust Picture Mode Volume/Channel Selection MENU Confirm button Adjust...

User Manual
Page 13
... DVD player does not have component video output,use steps: 1.Read the user guide supplied with the resolution, vertical pattern, contrast or brightness in the figure. There may be changed, change the refresh rate to use your LCD-TV as shown in PC mode. Resolution Mode Resolution Line frequency(KHz) Frame frequency(Hz) VGA 640x480 31.5 60 SVGA 800x600 37.9 60 XGA 1024x768 48.4 60 Note: All above listed are firmly connected; 4.Turn...
... DVD player does not have component video output,use steps: 1.Read the user guide supplied with the resolution, vertical pattern, contrast or brightness in the figure. There may be changed, change the refresh rate to use your LCD-TV as shown in PC mode. Resolution Mode Resolution Line frequency(KHz) Frame frequency(Hz) VGA 640x480 31.5 60 SVGA 800x600 37.9 60 XGA 1024x768 48.4 60 Note: All above listed are firmly connected; 4.Turn...

User Manual
Page 14
... power of the LCD-TV to set the video input mode of the LCD-TV and the AV device are off; HDMI Connection Option 2 1. Connection Instructions VCR Setup - When connecting the TV to the same channel number. Connection Option 1 Set VCR output switch to 3 or 4 and then tune TV to VCR, match the jack colors (Video = yellow, Audio Left = white,and Audio Right = red). Operate the corresponding external equipment. If you connect an S-VIDEO output from the VCR's output jacks to external equipment operating guide. Refer to the TV input...
... power of the LCD-TV to set the video input mode of the LCD-TV and the AV device are off; HDMI Connection Option 2 1. Connection Instructions VCR Setup - When connecting the TV to the same channel number. Connection Option 1 Set VCR output switch to 3 or 4 and then tune TV to VCR, match the jack colors (Video = yellow, Audio Left = white,and Audio Right = red). Operate the corresponding external equipment. If you connect an S-VIDEO output from the VCR's output jacks to external equipment operating guide. Refer to the TV input...
User Manual
Page 15
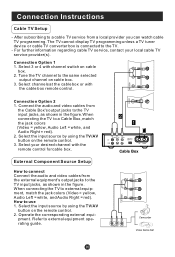
... the input source by using the TV/AV button on the remote control. 3. Operate the corresponding external equi- Connection Instructions Cable TV Setup - Connect the audio and video cables from a local provider you can watch cable TV programming. Refer to use 1. Tune the TV channel to external equipment, match the jack colors (Video = yellow, Audio Left = white, and Audio Right = red). After subscribing to the TV. - The TV cannot display TV programming unless a TV tuner device or cable TV converter box is connected to a cable TV service from the Cable Box's output...
... the input source by using the TV/AV button on the remote control. 3. Operate the corresponding external equi- Connection Instructions Cable TV Setup - Connect the audio and video cables from a local provider you can watch cable TV programming. Refer to use 1. Tune the TV channel to external equipment, match the jack colors (Video = yellow, Audio Left = white, and Audio Right = red). After subscribing to the TV. - The TV cannot display TV programming unless a TV tuner device or cable TV converter box is connected to a cable TV service from the Cable Box's output...

User Manual
Page 16
... color of the LCD-TV changes from red to green. INFO Press INFO button to confirm . A mute icon Appears on the front of the indicator light may differ based upon the model purchased. Basic Operating Instructions Switch On/Off the TV set When the POWER button is pressed and the LCD-TV is turned off using the power button, the LCD-TV will appear On screen indicating the volume level. Press the OK button to display current program information. button to...
... color of the LCD-TV changes from red to green. INFO Press INFO button to confirm . A mute icon Appears on the front of the indicator light may differ based upon the model purchased. Basic Operating Instructions Switch On/Off the TV set When the POWER button is pressed and the LCD-TV is turned off using the power button, the LCD-TV will appear On screen indicating the volume level. Press the OK button to display current program information. button to...
User Manual
Page 17
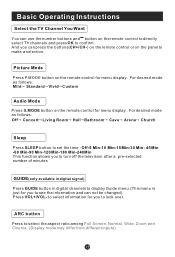
... This function allows you to turn off the television after a pre-selected number of minutes GUIDE(only available in digital signal) Press GUIDE button in digital channels to display Guide menu.(This menu is just for menu display . to select information for menu display . And you to look over. Basic Operating Instructions Select the TV Channel You Want You can press the buttons(CH+/CH-) on the remote control or on the panel to make a selection.
... This function allows you to turn off the television after a pre-selected number of minutes GUIDE(only available in digital signal) Press GUIDE button in digital channels to display Guide menu.(This menu is just for menu display . to select information for menu display . And you to look over. Basic Operating Instructions Select the TV Channel You Want You can press the buttons(CH+/CH-) on the remote control or on the panel to make a selection.
User Manual
Page 18
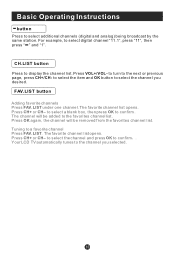
... LCD TV automatically tunes to the favorites channel list. FAV.LIST button Adding favorite channels Press FAV.LIST under one channel. to select a blank box, then press OK to select digital channel "11.1", press "11", then press " " and "1". The channel will be added to the channel you desired. Press CH+ or CH- Press VOL+/VOL- to turn to confirm . Press OK again, the channel will be removed...
... LCD TV automatically tunes to the favorites channel list. FAV.LIST button Adding favorite channels Press FAV.LIST under one channel. to select a blank box, then press OK to select digital channel "11.1", press "11", then press " " and "1". The channel will be added to the channel you desired. Press CH+ or CH- Press VOL+/VOL- to turn to confirm . Press OK again, the channel will be removed...
User Manual
Page 21
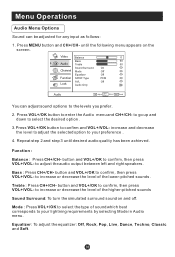
... select the type of the lower-pitched sounds . Press VOL+/OK button to the levels you prefer. 2. increase and decrease the level to adjust the selected option to your preference . 4. Video Balance 0 Bass 50 Audio Treble 50 Sound Surround On Channel Mode Off Equalizer Off Function SPDIF Type PCM AVL Off Lock Audio Only Audio OK Adjust CH+/- You can be adjusted for any input as...
... select the type of the lower-pitched sounds . Press VOL+/OK button to the levels you prefer. 2. increase and decrease the level to adjust the selected option to your preference . 4. Video Balance 0 Bass 50 Audio Treble 50 Sound Surround On Channel Mode Off Equalizer Off Function SPDIF Type PCM AVL Off Lock Audio Only Audio OK Adjust CH+/- You can be adjusted for any input as...
User Manual
Page 24
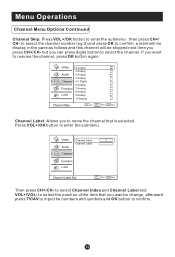
.... to enter the submenu then press CH+/ CH- Menu Operations Channel Menu Options Continued Channel Skip: Press VOL+/OK button to select Channel Index and Channel Label and VOL+/VOL- Press VOL+/OK button to resume the channel, press OK button again. Video Channel Index 1 Channel Label Audio Channel Function Lock Channel Label Set CH+/- to confirm. Video Audio Channel Function Lock 2 Analog 3 Analog 4 Analog 5 Analog 5-1 Digital 6 Analog 7 Analog 8 Analog 9 Analog 10 Analog Channel Skip OK Set CH+/- but you want to enter the submenu.
.... to enter the submenu then press CH+/ CH- Menu Operations Channel Menu Options Continued Channel Skip: Press VOL+/OK button to select Channel Index and Channel Label and VOL+/VOL- Press VOL+/OK button to resume the channel, press OK button again. Video Channel Index 1 Channel Label Audio Channel Function Lock Channel Label Set CH+/- to confirm. Video Audio Channel Function Lock 2 Analog 3 Analog 4 Analog 5 Analog 5-1 Digital 6 Analog 7 Analog 8 Analog 9 Analog 10 Analog Channel Skip OK Set CH+/- but you want to enter the submenu.
User Manual
Page 25
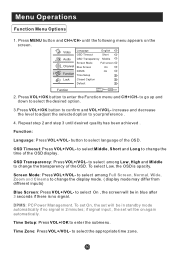
... select among Low, High and Middle to change the display mode. ( display mode may differ from different inputs) Blue Screen: Press VOL+/VOL- DPMS: PC Power Management. Time Zone: Press VOL+/VOL- Video Language OSD Timeout English Short Audio OSD Transparency Middle Screen Mode Channel Blue Screen Full screen On DPMS On Function Time Setup Lock Closed Caption Default Function CH+/- Press VOL+/OK button to select language of the OSD. Function: Language...
... select among Low, High and Middle to change the display mode. ( display mode may differ from different inputs) Blue Screen: Press VOL+/VOL- DPMS: PC Power Management. Time Zone: Press VOL+/VOL- Video Language OSD Timeout English Short Audio OSD Transparency Middle Screen Mode Channel Blue Screen Full screen On DPMS On Function Time Setup Lock Closed Caption Default Function CH+/- Press VOL+/OK button to select language of the OSD. Function: Language...

User Manual
Page 29
... lock, then press OK to unlock the channel, repeat the operation above again. Video Parental Lock On Audio Parental Guide MPAA Rating CA Eng Rating Channel CA Fren Rating Block Unrated On Function Lock Program Block CH+/- To clearly understand TV program rating codes, read the following . Video Audio Channel Function Lock 10-1 Digital WCAU-DT 11 Analog 11-1 Digital MBC DTV 12 Analog 13 Analog 14 Analog 14-1 Digital ATSC-1 14-2 Digital ATSC-2 14-3 Digital ATSC-3 15 Analog Channel Lock OK Set...
... lock, then press OK to unlock the channel, repeat the operation above again. Video Parental Lock On Audio Parental Guide MPAA Rating CA Eng Rating Channel CA Fren Rating Block Unrated On Function Lock Program Block CH+/- To clearly understand TV program rating codes, read the following . Video Audio Channel Function Lock 10-1 Digital WCAU-DT 11 Analog 11-1 Digital MBC DTV 12 Analog 13 Analog 14 Analog 14-1 Digital ATSC-1 14-2 Digital ATSC-2 14-3 Digital ATSC-3 15 Analog Channel Lock OK Set...
User Manual
Page 38
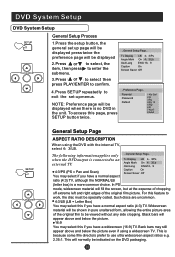
... the setup button, the general set -up page will be displayed press twice the preference page will be displayed when there is connected to work, the disc must be indicated on the DVD packaging. Parental Password Default 1 Kid Saf 2 G 3 Pg 4 Pg 13 5 Pgr 6 R 7 Nc17 8 Adult SETUP PLAY/ENTER General Setup Page ASPECT RATIO DESCRIPTION When using a widescreen TV. Such discs are uncommon. 4:3/LB (LB = Letter Box) You...
... the setup button, the general set -up page will be displayed press twice the preference page will be displayed when there is connected to work, the disc must be indicated on the DVD packaging. Parental Password Default 1 Kid Saf 2 G 3 Pg 4 Pg 13 5 Pgr 6 R 7 Nc17 8 Adult SETUP PLAY/ENTER General Setup Page ASPECT RATIO DESCRIPTION When using a widescreen TV. Such discs are uncommon. 4:3/LB (LB = Letter Box) You...

User Manual
Page 41
DVD System Setup(Continued) DVD System Setup SETUP PLAY/ENTER DEFAULT: Resets all settings (except password and parental lock status) for this DVD player back to perform the reset. ..Preference Page.. Press ENTER to the manufacturers original settings. Parental Password Default Reset Note: Some functions may not be available depending on the type of disc.
DVD System Setup(Continued) DVD System Setup SETUP PLAY/ENTER DEFAULT: Resets all settings (except password and parental lock status) for this DVD player back to perform the reset. ..Preference Page.. Press ENTER to the manufacturers original settings. Parental Password Default Reset Note: Some functions may not be available depending on the type of disc.

User Manual
Page 44
... location possible faults use help guide below. Press TV/AV button to change signal input to another channel and verify if the same problem happens. Restart the television of channel. Verify if sound system is correctly connected. Spots with power. Verify if the antenna is properly plugged in good condition. Troubleshooting No picture, no sound Verify if the television is in . Press MUTE button and verify if Mute mode is available. Switch to TV input. If the problem...
... location possible faults use help guide below. Press TV/AV button to change signal input to another channel and verify if the same problem happens. Restart the television of channel. Verify if sound system is correctly connected. Spots with power. Verify if the antenna is properly plugged in good condition. Troubleshooting No picture, no sound Verify if the television is in . Press MUTE button and verify if Mute mode is available. Switch to TV input. If the problem...


