User Manual
Page 2
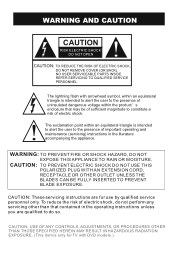
... ! The lightning flash with DVD models.) CAUTION: TO PREVENT ELECTRIC SHOCK DO NOT USE THIS POLARIZED PLUG WITH AN EXTENSION CORD, RECEPTACLE OR OTHER OUTLET UNLESS THE BLADES CAN BE FULLY INSERTED TO PREVENT BLADE EXPOSURE. CAUTION: These servicing instructions are qualified to the presence of important operating and maintenance (servicing) instructions in the operating instructions unless you are for TV with arrowhead symbol...
... ! The lightning flash with DVD models.) CAUTION: TO PREVENT ELECTRIC SHOCK DO NOT USE THIS POLARIZED PLUG WITH AN EXTENSION CORD, RECEPTACLE OR OTHER OUTLET UNLESS THE BLADES CAN BE FULLY INSERTED TO PREVENT BLADE EXPOSURE. CAUTION: These servicing instructions are qualified to the presence of important operating and maintenance (servicing) instructions in the operating instructions unless you are for TV with arrowhead symbol...
User Manual
Page 3
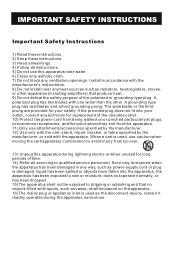
... an electrician for your safety. Install in any ventilation openings. The wide blade or the third prong are provided for replacement of the obsolete outlet. 10) Protect the power cord from the apparatus. 11) Only use attachments/accessories specified by the manufacturer. 12) Use only with the cart, stand, tripod, bracket, or table specified by the manufacturer, or sold...
... an electrician for your safety. Install in any ventilation openings. The wide blade or the third prong are provided for replacement of the obsolete outlet. 10) Protect the power cord from the apparatus. 11) Only use attachments/accessories specified by the manufacturer. 12) Use only with the cart, stand, tripod, bracket, or table specified by the manufacturer, or sold...
User Manual
Page 5
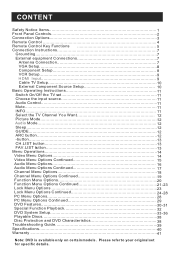
... 28 PC Menu Options Continued 29 DVD Features 30-31 Special Function Playback 32 DVD System Setup 33-36 Playable Discs 38 Disc Protection and DVD Characteristics 38 Troubleshooting Guide 39 Specifications 40 Warranty 41 Note: DVD is available only on certain models. Component Setup 8 VCR Setup 9 HDMI Input 9 Cable TV Setup 10 External Component Source Setup 10 Basic Operating Instructions 11 Switch On/Off the TV set for specific details. CONTENT Safety Notice Items 1 Front Panel Controls 2 Connection Options 3 Remote Control 4 Remote Control Key Functions...
... 28 PC Menu Options Continued 29 DVD Features 30-31 Special Function Playback 32 DVD System Setup 33-36 Playable Discs 38 Disc Protection and DVD Characteristics 38 Troubleshooting Guide 39 Specifications 40 Warranty 41 Note: DVD is available only on certain models. Component Setup 8 VCR Setup 9 HDMI Input 9 Cable TV Setup 10 External Component Source Setup 10 Basic Operating Instructions 11 Switch On/Off the TV set for specific details. CONTENT Safety Notice Items 1 Front Panel Controls 2 Connection Options 3 Remote Control 4 Remote Control Key Functions...

User Manual
Page 6
... contact with the LCD-TV, disconnect the power cord from the LCD-TV . If service is correct; l Please keep water away from the power source, then wipe the set with the warning instructions on unstable, dusty and humid places; To ensure your unit is needed, please contact an Authorized service technician. l Allow enough space for later use additional devices that are installing, using : l Please read and...
... contact with the LCD-TV, disconnect the power cord from the LCD-TV . If service is correct; l Please keep water away from the power source, then wipe the set with the warning instructions on unstable, dusty and humid places; To ensure your unit is needed, please contact an Authorized service technician. l Allow enough space for later use additional devices that are installing, using : l Please read and...
User Manual
Page 8
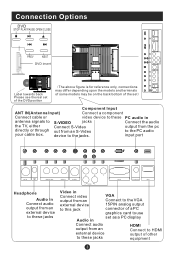
... the back bottom of the set Component Input ANT IN(Antenna Input) Connect a component Connect cable or video device to these PC audio in antenna signals to HDMI output of a PC graphics card to use Audio in Connect video output from an external device to this jack VGA Connect to the VGA 15PIN analog output connector of other equipment S-VIDEO jacks Connect S-Video out from an external device to these jacks HDMI Connect to the TV, either directly or through your cable box.
... the back bottom of the set Component Input ANT IN(Antenna Input) Connect a component Connect cable or video device to these PC audio in antenna signals to HDMI output of a PC graphics card to use Audio in Connect video output from an external device to this jack VGA Connect to the VGA 15PIN analog output connector of other equipment S-VIDEO jacks Connect S-Video out from an external device to these jacks HDMI Connect to the TV, either directly or through your cable box.
User Manual
Page 9
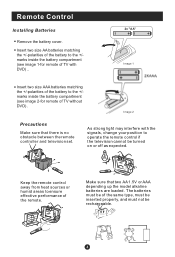
... size AAA batteries matching the +/-polarities of the battery to operate the remote control if the television cannot be rechargeable. As strong light may interfere with DVD) .. Image 1 ! Keep the remote control away from heat sources or humid areas to ensure effective performance of TV with the signals, change your position to the +/marks inside the battery compartment (see image 2-for remote of the remote. Remote Control Installing...
... size AAA batteries matching the +/-polarities of the battery to operate the remote control if the television cannot be rechargeable. As strong light may interfere with DVD) .. Image 1 ! Keep the remote control away from heat sources or humid areas to ensure effective performance of TV with the signals, change your position to the +/marks inside the battery compartment (see image 2-for remote of the remote. Remote Control Installing...

User Manual
Page 10
... ARC GUIDE CH.LIST FAV.LIST (For TV with DVD) Power DVD Open/close Input selection TV Sleep button TV/DVD Mute Return to previous channel in TV mode Program Infromation Program Number Select MONO,STEREO, SAP in NTSC system CC( closed caption) On / Off Select additional channels Adjust Picture Mode Volume/Channel Selection MENU Confirm button Adjust sound mode DVD STOP DVD SUBTITLE DVD SETUP DVD PAUSE/STEP DVD FAST REVERSE DVD FAST FORWARD DVD MENU DVD Next Chapter DVD Previous Chapter DVD REPEAT DVD PLAY/ENTER DVD A-B REPEAT UP DVD Cursor Move button LEFT DVD...
... ARC GUIDE CH.LIST FAV.LIST (For TV with DVD) Power DVD Open/close Input selection TV Sleep button TV/DVD Mute Return to previous channel in TV mode Program Infromation Program Number Select MONO,STEREO, SAP in NTSC system CC( closed caption) On / Off Select additional channels Adjust Picture Mode Volume/Channel Selection MENU Confirm button Adjust sound mode DVD STOP DVD SUBTITLE DVD SETUP DVD PAUSE/STEP DVD FAST REVERSE DVD FAST FORWARD DVD MENU DVD Next Chapter DVD Previous Chapter DVD REPEAT DVD PLAY/ENTER DVD A-B REPEAT UP DVD Cursor Move button LEFT DVD...

User Manual
Page 13
... can use your LCD-TV as a monitor for PC is clear. Turn on the remote control to set the video input mode of the PC graphic card. Use the TV/AV button on the DVD player, insert a DVD. 2. Then connect the other end to the PC video interface connector on the back of the LCD-TV.Tighten the screws on the PC connectors once they are off; 3.Connect a D type 15-pin PC interface cable ( not supplied...
... can use your LCD-TV as a monitor for PC is clear. Turn on the remote control to set the video input mode of the PC graphic card. Use the TV/AV button on the DVD player, insert a DVD. 2. Then connect the other end to the PC video interface connector on the back of the LCD-TV.Tighten the screws on the PC connectors once they are off; 3.Connect a D type 15-pin PC interface cable ( not supplied...

User Manual
Page 14
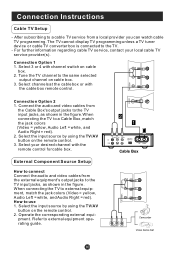
... channel number. HDMI Operate the corresponding external equipment. Connection Instructions VCR Setup - compared to use steps: 1.Read the user guide supplied with your AV devices and ensure that it has Composite or S-Video connectors; 2.Make sure that the power of the LCD-TV to the TV input jacks, as shown in the figure. How to conne- Refer to VCR, match the jack colors (Video = yellow, Audio Left = white,and Audio Right = red). To avoid picture...
... channel number. HDMI Operate the corresponding external equipment. Connection Instructions VCR Setup - compared to use steps: 1.Read the user guide supplied with your AV devices and ensure that it has Composite or S-Video connectors; 2.Make sure that the power of the LCD-TV to the TV input jacks, as shown in the figure. How to conne- Refer to VCR, match the jack colors (Video = yellow, Audio Left = white,and Audio Right = red). To avoid picture...
User Manual
Page 15
...output jacks to external equipment operating guide. Select the input source by using the TV/AV button on cable box. 3. Refer to the TV input jacks, as shown in the figure. For further information regarding cable TV service, contact your desired channel with the cable box remote control. Select channels at the cable box or with the remote control for cable box. The TV cannot display TV programming unless a TV tuner device or cable TV converter box is connected to a Cable Box, match the jack colors (Video = yellow, Audio Left = white, and Audio Right = red). 2. Connect the audio...
...output jacks to external equipment operating guide. Select the input source by using the TV/AV button on cable box. 3. Refer to the TV input jacks, as shown in the figure. For further information regarding cable TV service, contact your desired channel with the cable box remote control. Select channels at the cable box or with the remote control for cable box. The TV cannot display TV programming unless a TV tuner device or cable TV converter box is connected to a Cable Box, match the jack colors (Video = yellow, Audio Left = white, and Audio Right = red). 2. Connect the audio...
User Manual
Page 16
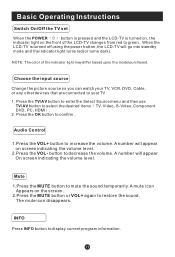
... Select Source menu and then use TV/AV button to display current program information. A number will appear On screen indicating the volume level. INFO Press INFO button to select the desired items TV, Video, S-Video, Component DVD, PC, HDMI . 2. Audio Control 1.Press the VOL+ button to your TV. 1. A number will appear on the front of the indicator light may differ based upon the model purchased. Choose the input source Change the picture source so you can watch your TV, VCR, DVD, Cable , or...
... Select Source menu and then use TV/AV button to display current program information. A number will appear On screen indicating the volume level. INFO Press INFO button to select the desired items TV, Video, S-Video, Component DVD, PC, HDMI . 2. Audio Control 1.Press the VOL+ button to your TV. 1. A number will appear on the front of the indicator light may differ based upon the model purchased. Choose the input source Change the picture source so you can watch your TV, VCR, DVD, Cable , or...

User Manual
Page 17
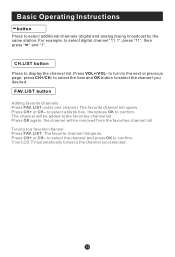
... television after a pre-selected number of minutes GUIDE(only available in digital signal) Press GUIDE button in digital channels to display Guide menu.(This menu is just for you to select the aspect ratio among Full Screen, Normal, Wide, Zoom and Cinema. (Display mode may differ from different inputs) ARC button Press to look over. Basic Operating Instructions Select the TV Channel You Want You can use the number buttons and button on the remote control to directly select TV channels...
... television after a pre-selected number of minutes GUIDE(only available in digital signal) Press GUIDE button in digital channels to display Guide menu.(This menu is just for you to select the aspect ratio among Full Screen, Normal, Wide, Zoom and Cinema. (Display mode may differ from different inputs) ARC button Press to look over. Basic Operating Instructions Select the TV Channel You Want You can use the number buttons and button on the remote control to directly select TV channels...
User Manual
Page 18
... additional channels (digital and analog) being broadcast by the same station. Press OK again, the channel will be removed from the favorites channel list. Press CH+ or CH- Press CH+ or CH- The favorite channel list opens. to select the channel and press OK to the channel you desired. Press VOL+/VOL- Your LCD TV automatically tunes to confirm . CH.LIST button Press to select digital channel...
... additional channels (digital and analog) being broadcast by the same station. Press OK again, the channel will be removed from the favorites channel list. Press CH+ or CH- Press CH+ or CH- The favorite channel list opens. to select the channel and press OK to the channel you desired. Press VOL+/VOL- Your LCD TV automatically tunes to confirm . CH.LIST button Press to select digital channel...
User Manual
Page 21
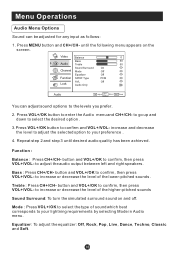
... turn the simulated surround sound on the screen. Equalizer: To adjust the equalizer: Off, Rock, Pop, Live, Dance, Techno, Classic and Soft. Video Balance 0 Bass 50 Audio Treble 50 Sound Surround On Channel Mode Off Equalizer Off Function SPDIF Type PCM AVL Off Lock Audio Only Audio OK Adjust CH+/- to go up and down to select the desired option . 3.Press VOL+/OK button to...
... turn the simulated surround sound on the screen. Equalizer: To adjust the equalizer: Off, Rock, Pop, Live, Dance, Techno, Classic and Soft. Video Balance 0 Bass 50 Audio Treble 50 Sound Surround On Channel Mode Off Equalizer Off Function SPDIF Type PCM AVL Off Lock Audio Only Audio OK Adjust CH+/- to go up and down to select the desired option . 3.Press VOL+/OK button to...
User Manual
Page 24
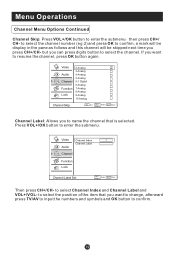
...- Video Channel Index 1 Channel Label Audio Channel Function Lock Channel Label Set CH+/- Menu Operations Channel Menu Options Continued Channel Skip: Press VOL+/OK button to name the channel that you can press digits button to select the channel. to select the channel number (eg.2) and press OK to confirm, a mark will be display in the pane as follows and this channel will be skipped next time you want to change, afterward press TV/AV...
...- Video Channel Index 1 Channel Label Audio Channel Function Lock Channel Label Set CH+/- Menu Operations Channel Menu Options Continued Channel Skip: Press VOL+/OK button to name the channel that you can press digits button to select the channel. to select the channel number (eg.2) and press OK to confirm, a mark will be display in the pane as follows and this channel will be skipped next time you want to change, afterward press TV/AV...
User Manual
Page 25
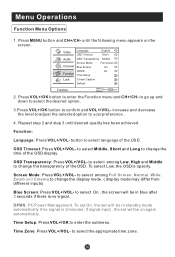
Menu Operations Function Menu Options 1. Press MENU button and CH+/CH- Video Language OSD Timeout English Short Audio OSD Transparency Middle Screen Mode Channel Blue Screen Full screen On DPMS On Function Time Setup Lock Closed Caption Default Function CH+/- Repeat step 2 and step 3 until the following menu appears on again automatically. To select Low, the OSD is no signal. until desired quality has been achieved . to select among Full Screen, Normal...
Menu Operations Function Menu Options 1. Press MENU button and CH+/CH- Video Language OSD Timeout English Short Audio OSD Transparency Middle Screen Mode Channel Blue Screen Full screen On DPMS On Function Time Setup Lock Closed Caption Default Function CH+/- Repeat step 2 and step 3 until the following menu appears on again automatically. To select Low, the OSD is no signal. until desired quality has been achieved . to select among Full Screen, Normal...
User Manual
Page 29
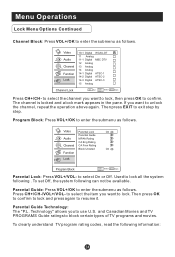
... can not be available. Menu Operations Lock Menu Options Continued Channel Block: Press VOL+/OK to enter the submenu as follows. Video Audio Channel Function Lock 10-1 Digital WCAU-DT 11 Analog 11-1 Digital MBC DTV 12 Analog 13 Analog 14 Analog 14-1 Digital ATSC-1 14-2 Digital ATSC-2 14-3 Digital ATSC-3 15 Analog Channel Lock OK Set CH+/- Parental Lock: Press VOL+/VOL- The channel is locked and a lock mark appears in the pane. Parental Guide: Press VOL+/OK...
... can not be available. Menu Operations Lock Menu Options Continued Channel Block: Press VOL+/OK to enter the submenu as follows. Video Audio Channel Function Lock 10-1 Digital WCAU-DT 11 Analog 11-1 Digital MBC DTV 12 Analog 13 Analog 14 Analog 14-1 Digital ATSC-1 14-2 Digital ATSC-2 14-3 Digital ATSC-3 15 Analog Channel Lock OK Set CH+/- Parental Lock: Press VOL+/VOL- The channel is locked and a lock mark appears in the pane. Parental Guide: Press VOL+/OK...

User Manual
Page 38
...:1. The following information applies only when the DVD output is because some film directors prefer to work, the disc must be indicated on the DVD packaging. Parental Password Default 1 Kid Saf 2 G 3 Pg 4 Pg 13 5 Pgr 6 R 7 Nc17 8 Adult SETUP PLAY/ENTER General Setup Page ASPECT RATIO DESCRIPTION When using a widescreen TV. NOTE: Preference page will fill the screen, but at the expense of chopping...
...:1. The following information applies only when the DVD output is because some film directors prefer to work, the disc must be indicated on the DVD packaging. Parental Password Default 1 Kid Saf 2 G 3 Pg 4 Pg 13 5 Pgr 6 R 7 Nc17 8 Adult SETUP PLAY/ENTER General Setup Page ASPECT RATIO DESCRIPTION When using a widescreen TV. NOTE: Preference page will fill the screen, but at the expense of chopping...
User Manual
Page 41
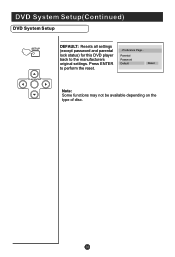
Press ENTER to the manufacturers original settings. Parental Password Default Reset Note: Some functions may not be available depending on the type of disc. DVD System Setup(Continued) DVD System Setup SETUP PLAY/ENTER DEFAULT: Resets all settings (except password and parental lock status) for this DVD player back to perform the reset. ..Preference Page..
Press ENTER to the manufacturers original settings. Parental Password Default Reset Note: Some functions may not be available depending on the type of disc. DVD System Setup(Continued) DVD System Setup SETUP PLAY/ENTER DEFAULT: Resets all settings (except password and parental lock status) for this DVD player back to perform the reset. ..Preference Page..

User Manual
Page 44
... be repaired using the above guide consult with your local authorized service center. 2.The TV set has dangerous voltages levels inside that electricity is correctly connected. Restart the television of channel. Press VOL+ button to relative instructions in some or all pictures Verify if the antenna is available. Refer to TV input. No color for some channel Check picture and sound systems. program (black and white) Refer to see if the problem can...
... be repaired using the above guide consult with your local authorized service center. 2.The TV set has dangerous voltages levels inside that electricity is correctly connected. Restart the television of channel. Press VOL+ button to relative instructions in some or all pictures Verify if the antenna is available. Refer to TV input. No color for some channel Check picture and sound systems. program (black and white) Refer to see if the problem can...


