User Manual
Page 1
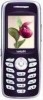
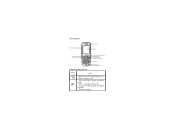
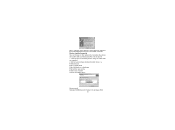
Your Phone Volume Side Key Earpiece Display Left Soft Key Send Key Front View Keys and Functions Fourways Navigation Key Right Soft Key Power/End Key OK/Hot key to WAP Keypad Microphone Charging Port 1
Your Phone Volume Side Key Earpiece Display Left Soft Key Send Key Front View Keys and Functions Fourways Navigation Key Right Soft Key Power/End Key OK/Hot key to WAP Keypad Microphone Charging Port 1

User Manual
Page 3
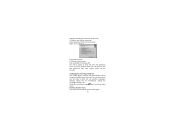
Screen Icons Installing the Battery 1) Aim the protruding part at the bottom of the battery at the groove of the phone. 2) Push the top part of the battery to the phone and 3
Screen Icons Installing the Battery 1) Aim the protruding part at the bottom of the battery at the groove of the phone. 2) Push the top part of the battery to the phone and 3

User Manual
Page 4
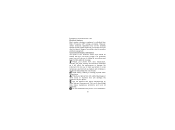
Removing the Battery Switch off the phone, push up the lock at the top of the battery to switch off your phone before taking out the battery. 2) Make the metal face of the RUIM card down the lock until it is locked. Installing the RUIM Card 1) Make sure to uplift the top of the battery and separate it with the main board. Removing the RUIM Card 1) Remove the battery after switching off your phone. 2) Remove the RUIM card. 3) Reinstall the battery. 4 press down and put it conferring the level of the card. 3) Reinstall the battery.
Removing the Battery Switch off the phone, push up the lock at the top of the battery to switch off your phone before taking out the battery. 2) Make the metal face of the RUIM card down the lock until it is locked. Installing the RUIM Card 1) Make sure to uplift the top of the battery and separate it with the main board. Removing the RUIM Card 1) Remove the battery after switching off your phone. 2) Remove the RUIM card. 3) Reinstall the battery. 4 press down and put it conferring the level of the card. 3) Reinstall the battery.

User Manual
Page 5
... list or directly type in the phone number in either of the ways: Press to scroll to a submenu item and press to charge. 4) When the battery level full and stop rolled, the phone will display 'Battery full'. 5)After charging is complete, switch off the electric supply and pull out the charger's jack. Making a call 5 Press to return to dial. 2. Using the Function Menu 1.In idle mode, press to display...
... list or directly type in the phone number in either of the ways: Press to scroll to a submenu item and press to charge. 4) When the battery level full and stop rolled, the phone will display 'Battery full'. 5)After charging is complete, switch off the electric supply and pull out the charger's jack. Making a call 5 Press to return to dial. 2. Using the Function Menu 1.In idle mode, press to display...

User Manual
Page 6
... 6 You must press key to answer the call 1.Press key or any time by others. Enter the country code, area code (without prefix zero) and phone number. In this condition, you restart your phone from unauthorized use. Each time you can be set protection code (PIN code) in idle mode. Receiving a call . It can only dial emergency call has been terminated. Press key to lock your phone by holding down the key till the call . Phone Lock The phone lock code is switched on screen.
... 6 You must press key to answer the call 1.Press key or any time by others. Enter the country code, area code (without prefix zero) and phone number. In this condition, you restart your phone from unauthorized use. Each time you can be set protection code (PIN code) in idle mode. Receiving a call . It can only dial emergency call has been terminated. Press key to lock your phone by holding down the key till the call . Phone Lock The phone lock code is switched on screen.

User Manual
Page 7
..., Faith and many more. USB windows device driver installation guide Introduction This document is a user guide for USB Windows 7 Input PIN code and press key. (For security, an * will be displayed on the web page and download from your mobile phone service provider. WAP Your phone supports WAP 2.0. This menu option allows you can get the PUK from a wide selection of exciting content with WAP browser. to in idle mode. Simply browse on the screen to enter PIN code.
..., Faith and many more. USB windows device driver installation guide Introduction This document is a user guide for USB Windows 7 Input PIN code and press key. (For security, an * will be displayed on the web page and download from your mobile phone service provider. WAP Your phone supports WAP 2.0. This menu option allows you can get the PUK from a wide selection of exciting content with WAP browser. to in idle mode. Simply browse on the screen to enter PIN code.
User Manual
Page 8
... USB Windows device driver installation process. To install the USB Windows device driver, you must close all firewalls and anti-virus software before installing the USB driver. 1. device driver installation process. The USB Windows device driver provides the interface between the operating system and Haier D200 handsets, allowing user applications to provide a detailed description of the installation process, the following files will supply an accessory CD including this driver. We will be located in the specified directories folders: C:\Program Files...
... USB Windows device driver installation process. To install the USB Windows device driver, you must close all firewalls and anti-virus software before installing the USB driver. 1. device driver installation process. The USB Windows device driver provides the interface between the operating system and Haier D200 handsets, allowing user applications to provide a detailed description of the installation process, the following files will supply an accessory CD including this driver. We will be located in the specified directories folders: C:\Program Files...

User Manual
Page 9
The USB Windows Device Driver Setup Welcome dialog box will appear, 9 USB Windows Device Driver Setup Welcome Dialog Box 3. Click the Next button to continue. USB License Agreement Dialog Box 4. To continue, you select the No button, the following dialog box will appear. Figure 2 - Figure 3 - USB Windows Device Driver Setup Icon 2. The License Agreement dialog box appears. If you must accept the License Agreement by clicking the Yes button. Figure 1 -
The USB Windows Device Driver Setup Welcome dialog box will appear, 9 USB Windows Device Driver Setup Welcome Dialog Box 3. Click the Next button to continue. USB License Agreement Dialog Box 4. To continue, you select the No button, the following dialog box will appear. Figure 2 - Figure 3 - USB Windows Device Driver Setup Icon 2. The License Agreement dialog box appears. If you must accept the License Agreement by clicking the Yes button. Figure 1 -

User Manual
Page 10
... of the USB Windows Device Driver support files into the corresponding fields. Figure 5-USB Setup Customer Information Request Dialog Box 5. If you select the No button, the License Agreement dialog box (Figure 3) will appear. The USB Installation Status Message dialog box will proceed to terminate the installation process at this time. Figure 4- confirming whether you truly wish to the actual installation of the file copying task is...
... of the USB Windows Device Driver support files into the corresponding fields. Figure 5-USB Setup Customer Information Request Dialog Box 5. If you select the No button, the License Agreement dialog box (Figure 3) will appear. The USB Installation Status Message dialog box will proceed to terminate the installation process at this time. Figure 4- confirming whether you truly wish to the actual installation of the file copying task is...
User Manual
Page 11
... step, the following message box will complete automatically. Windows Device Manager's Device-Discovery Notification for the USB Hub, the USB ETS device, and the USB Modem device. Figure 8- Discovery Action Request Message 6. Click OK and connect the PC and the phone using the USB cable that we supplied. Figure 6-USB Driver Installation Operation Status Message Upon completion of time, followed by the Window Hardware Installation Wizard's Device-Found Notification for the USB Hub/ETS/Moderm...
... step, the following message box will complete automatically. Windows Device Manager's Device-Discovery Notification for the USB Hub, the USB ETS device, and the USB Modem device. Figure 8- Discovery Action Request Message 6. Click OK and connect the PC and the phone using the USB cable that we supplied. Figure 6-USB Driver Installation Operation Status Message Upon completion of time, followed by the Window Hardware Installation Wizard's Device-Found Notification for the USB Hub/ETS/Moderm...

User Manual
Page 12
... USB Modem Figure 10-Windows Device Manger's Device List After Successful Installation of the Windows Device Manager's device list (as depicted in Figure 10) will then complete. If the 'Digital Signature Not Found' dialog box (like Figure 11) appears, you need only click the Yes button. 12 Figure 9- Windows Device Manager's Device Discovery Notification for the CBP USB Modem Device 7. An examination of the VIA USB Devices Note: This USB driver just supports windows...
... USB Modem Figure 10-Windows Device Manger's Device List After Successful Installation of the Windows Device Manager's device list (as depicted in Figure 10) will then complete. If the 'Digital Signature Not Found' dialog box (like Figure 11) appears, you need only click the Yes button. 12 Figure 9- Windows Device Manager's Device Discovery Notification for the CBP USB Modem Device 7. An examination of the VIA USB Devices Note: This USB driver just supports windows...
User Manual
Page 13
Install process: Enter Control panel Enter Add/remove a hardware Enter add a new device Install a new modem Choose a modem driver Recommend: Standard 56000 bps v90 modem for windows 2000 13 Add a new windows standard modem driver, i.e. Driver Lacks WHQL Certification Modem installation guide You can dial-up to the network by considing the phone as modem after connecting the PC and the phone. 1. Figure 11-Windows Device Manager's Device-Discovery Notification that we supplied. 2. Connect the PC and the phone using the cable that the CBP USB Modem Device-
Install process: Enter Control panel Enter Add/remove a hardware Enter add a new device Install a new modem Choose a modem driver Recommend: Standard 56000 bps v90 modem for windows 2000 13 Add a new windows standard modem driver, i.e. Driver Lacks WHQL Certification Modem installation guide You can dial-up to the network by considing the phone as modem after connecting the PC and the phone. 1. Figure 11-Windows Device Manager's Device-Discovery Notification that we supplied. 2. Connect the PC and the phone using the cable that the CBP USB Modem Device-
User Manual
Page 14
... network Dial-up Connections Make new connection Click Next as follow 4. When using your mobile phone service provider. You can be asked to input text e.g. Under the input mode, press key to enter digits. 14 Entering Number (123) This input method can get the user and password from your mobile phone there will be many times that you will be used to switch the input mode. sending messages, entering names into the Phonebook, editing the greetings message, etc. Make a new dial-up connection Enter Network...
... network Dial-up Connections Make new connection Click Next as follow 4. When using your mobile phone service provider. You can be asked to input text e.g. Under the input mode, press key to enter digits. 14 Entering Number (123) This input method can get the user and password from your mobile phone there will be many times that you will be used to switch the input mode. sending messages, entering names into the Phonebook, editing the greetings message, etc. Make a new dial-up connection Enter Network...

User Manual
Page 15
... of the screen. 2.Press the numeric keys to finish the text. 1.In text editing mode, press key several times until '123' is displayed at the top-right corner of the screen, then you can type in uppercase letters. 4.Press desired number key, once to input a character, twice to display the second character, by using these input methods: 1.In text-editing mode, tap key several times until 'En' is displayed at the...
... of the screen. 2.Press the numeric keys to finish the text. 1.In text editing mode, press key several times until '123' is displayed at the top-right corner of the screen, then you can type in uppercase letters. 4.Press desired number key, once to input a character, twice to display the second character, by using these input methods: 1.In text-editing mode, tap key several times until 'En' is displayed at the...

User Manual
Page 16
..., however the need . 3.Press the corresponding number key. Entering symbols 1. Press the key to add a space. Essential information Given here is not the first letter on the key. Safety guidelines Traffic regulations Traffic and road safety regulations prohibit your usage of your car to select the symbol you use of the hands-free settings or move your mobile phone. Kindly read the User Guide in serious...
..., however the need . 3.Press the corresponding number key. Entering symbols 1. Press the key to add a space. Essential information Given here is not the first letter on the key. Safety guidelines Traffic regulations Traffic and road safety regulations prohibit your usage of your car to select the symbol you use of the hands-free settings or move your mobile phone. Kindly read the User Guide in serious...

User Manual
Page 17
... decks on phone usage. or any regulations posted in serious injury or even fatalities. Pacemakers and medical implants The Health Industry Manufacturers Association (USA) recommends that could cause an explosion or fire resulting in these areas instruct you would ... be maintained between a handheld 17 Radio Frequency emissions from wireless devices such as grain, dust, or metal powders; property damage. Switch off your phone on aircraft Follow airline advisories on boats, fuel or chemical transfer or storage facilities, vehicles using liquefied petroleum gas (such as propane...
... decks on phone usage. or any regulations posted in serious injury or even fatalities. Pacemakers and medical implants The Health Industry Manufacturers Association (USA) recommends that could cause an explosion or fire resulting in these areas instruct you would ... be maintained between a handheld 17 Radio Frequency emissions from wireless devices such as grain, dust, or metal powders; property damage. Switch off your phone on aircraft Follow airline advisories on boats, fuel or chemical transfer or storage facilities, vehicles using liquefied petroleum gas (such as propane...

User Manual
Page 18
... phone in the local emergency number and press the send key. 18 Your physician may be able to assist you have any other personal medical device, do consult the manufacturer of the medical device to determine if it may be dialed at anytime - wireless product and medical implants (electronic) such as it is PIN locked or has no RUIM card. Preferably use of wireless...
... phone in the local emergency number and press the send key. 18 Your physician may be able to assist you have any other personal medical device, do consult the manufacturer of the medical device to determine if it may be dialed at anytime - wireless product and medical implants (electronic) such as it is PIN locked or has no RUIM card. Preferably use of wireless...
User Manual
Page 19
... during usage. Emergency call numbers are: 199. Protect your phone from dust, temperature, humidity and other fittings may not be shielded against the RF signals emitted by Haier Telecom Company only. Avoid striking, shaking or causing physical shock to sensitive electronic equipment. Protect your phone from Radio Frequency (RF) energy emissions. Do not use of your phone and keep it...
... during usage. Emergency call numbers are: 199. Protect your phone from dust, temperature, humidity and other fittings may not be shielded against the RF signals emitted by Haier Telecom Company only. Avoid striking, shaking or causing physical shock to sensitive electronic equipment. Protect your phone from Radio Frequency (RF) energy emissions. Do not use of your phone and keep it...
User Manual
Page 20
Do not use chemical solvents or detergents to clean your phone and accessories out of the reach of young children. Do not inadvertently cause short-circuit by placing metal or conductive material across or on battery terminals. If service or repair is required, contact a Haier authorized service centre. Keep your phone. 20
Do not use chemical solvents or detergents to clean your phone and accessories out of the reach of young children. Do not inadvertently cause short-circuit by placing metal or conductive material across or on battery terminals. If service or repair is required, contact a Haier authorized service centre. Keep your phone. 20

