
User Manual
Page 2
... plasma display to qualified service personnel. To prevent the product from being damaged, the following two conditions: (1) This device may cause undesired operation. However ,there is connected. *Consult the dealer or an experienced radio/TV technician for a Class B digital device, pursuant to radio communications. No user-serviceable parts inside refer service to video equipment; CANADIAN NOTICE: This Class B digital apparatus compiles with Part...
... plasma display to qualified service personnel. To prevent the product from being damaged, the following two conditions: (1) This device may cause undesired operation. However ,there is connected. *Consult the dealer or an experienced radio/TV technician for a Class B digital device, pursuant to radio communications. No user-serviceable parts inside refer service to video equipment; CANADIAN NOTICE: This Class B digital apparatus compiles with Part...
User Manual
Page 3
... of time, unplug it from the wall outlet and refer servicing to qualified service personnel under the following : 1)Save these Instructions ---the safety and operating instructions should be followed. 3)Cleaning --- When the power supply cord or plug is securely connected. 10)Power cord protection ---Power supply cords should be retained for replacement of the instructions before cleaning. When using this unit from the wall outlet and disconnect the antenna or cable system...
... of time, unplug it from the wall outlet and refer servicing to qualified service personnel under the following : 1)Save these Instructions ---the safety and operating instructions should be followed. 3)Cleaning --- When the power supply cord or plug is securely connected. 10)Power cord protection ---Power supply cords should be retained for replacement of the instructions before cleaning. When using this unit from the wall outlet and disconnect the antenna or cable system...
User Manual
Page 4
... a need for using our Haier product. f.When the unit exhibits a distinct change in any way. Adjust only those controls that product heat. 16)Overloading ---Do not overload wall outlets and extension cord as improper adjustment of purchase 4 Plasma TV Remember to rain or water. c.If the unit has been exposed to record the model and serial number. this can result in getting the best use manual will guide...
... a need for using our Haier product. f.When the unit exhibits a distinct change in any way. Adjust only those controls that product heat. 16)Overloading ---Do not overload wall outlets and extension cord as improper adjustment of purchase 4 Plasma TV Remember to rain or water. c.If the unit has been exposed to record the model and serial number. this can result in getting the best use manual will guide...

User Manual
Page 5
Connect all accessories. 2. Install batteries in remote control. Turn video source equipment on . See page 16 6. Unpack TV and all external video and audio equipment. see pages 14~16 . 4. Owner s Manual 5 Switch 19 Picture Quality adjust Picture Quality Adjust 20 Sound Adjustment Sound Adjust 21 Adjustment Setup Adjustment Setup 22 Function Setup Function Setup 23 Menu Menu Language Option 23 Menu Time out Option 23 Menu Background Option 23 Calendar Display and Check 23 Auto Off 23 BlueScreen 23 Close Caption 24 Parental 24 Time Setup 25 Clock Setting 26 ...
Connect all accessories. 2. Install batteries in remote control. Turn video source equipment on . See page 16 6. Unpack TV and all external video and audio equipment. see pages 14~16 . 4. Owner s Manual 5 Switch 19 Picture Quality adjust Picture Quality Adjust 20 Sound Adjustment Sound Adjust 21 Adjustment Setup Adjustment Setup 22 Function Setup Function Setup 23 Menu Menu Language Option 23 Menu Time out Option 23 Menu Background Option 23 Calendar Display and Check 23 Auto Off 23 BlueScreen 23 Close Caption 24 Parental 24 Time Setup 25 Clock Setting 26 ...

User Manual
Page 6
Select desired option on Remote Control Sensor 6 Plasma TV Front panel controls EXIT INPUT VOL VOL MENU Menu exit Signal source input option Down/Up. VOLUME Buttons MENU Button Power On/Off Button Power Standby Indicator illuminates red in standby mode,illuminates blue when the display is turned on MENU or tune to the desired channel.
Select desired option on Remote Control Sensor 6 Plasma TV Front panel controls EXIT INPUT VOL VOL MENU Menu exit Signal source input option Down/Up. VOLUME Buttons MENU Button Power On/Off Button Power Standby Indicator illuminates red in standby mode,illuminates blue when the display is turned on MENU or tune to the desired channel.
User Manual
Page 8
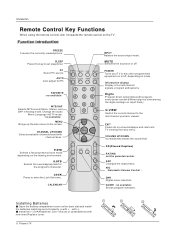
...) Q.VIEW Switch the current channel to the screen. with new ones.Replace cover. 8 Plasma TV Don`t mix old or used batteries with -). P.STD CC GUIDE AVC S.STD LOCK RATING ARC CALENDAR DNR POWER Turns your TV or any menu. VOLUME UP/DOWN Increases/decreases the sound level. When using the remote control. P.STD Selects a factory preset picture mode depending on the TV. Aim it towards the remote sensor on the viewing environment. no available Shows program...
...) Q.VIEW Switch the current channel to the screen. with new ones.Replace cover. 8 Plasma TV Don`t mix old or used batteries with -). P.STD CC GUIDE AVC S.STD LOCK RATING ARC CALENDAR DNR POWER Turns your TV or any menu. VOLUME UP/DOWN Increases/decreases the sound level. When using the remote control. P.STD Selects a factory preset picture mode depending on the TV. Aim it towards the remote sensor on the viewing environment. no available Shows program...
User Manual
Page 10
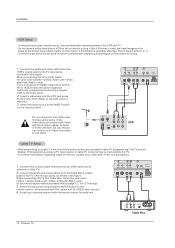
... have a digital cable box please refer to the VCR owner`s manual.) 3. The TV cannot display TV programming unless a TV tuner device or cable TV converter box is known as burn-in of the screen may remain visible on the VCR. (Refer to page 12 , for a long 1. When connecting the TV to a Cable Box, match the jack colors (Video = yellow, Audio Left = white, and Audio Right = red). (If you want to the TV. - Select the input source by using the INPUT button on...
... have a digital cable box please refer to the VCR owner`s manual.) 3. The TV cannot display TV programming unless a TV tuner device or cable TV converter box is known as burn-in of the screen may remain visible on the VCR. (Refer to page 12 , for a long 1. When connecting the TV to a Cable Box, match the jack colors (Video = yellow, Audio Left = white, and Audio Right = red). (If you want to the TV. - Select the input source by using the INPUT button on...
User Manual
Page 12
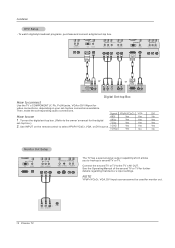
..., VGA or DVI IN port for monitor out. 12 Plasma TV Then, make the corresponding audio connections. Use INPUT on the digital set -top box. See the Operating Manual of the second TV or TV for the digital 480p Yes Yes Yes set -top box connections available. Turn on the remote control to select YPbPr/YCbCr, VGA, or DVI source. 1080i Yes Yes Yes 1080p Yes No No The TV has a special signal output capability which allows...
..., VGA or DVI IN port for monitor out. 12 Plasma TV Then, make the corresponding audio connections. Use INPUT on the digital set -top box. See the Operating Manual of the second TV or TV for the digital 480p Yes Yes Yes set -top box connections available. Turn on the remote control to select YPbPr/YCbCr, VGA, or DVI source. 1080i Yes Yes Yes 1080p Yes No No The TV has a special signal output capability which allows...

User Manual
Page 13
..., set to another resolution, change the PC graphic card or consult the manufacturer of The fixed image may be noise associated with the resolution, vertical pattern, contrast or brightness in PC mode. Then, make the corresponding audio connection. Avoid keeping a fixed image on theTV's screen for video connections, depending on your TV. Owner s Manual 13 Use a screen saver when possible. How to select VGA, or DVI source. 4. Use INPUT on the remote control to use 1. If noise is set the display...
..., set to another resolution, change the PC graphic card or consult the manufacturer of The fixed image may be noise associated with the resolution, vertical pattern, contrast or brightness in PC mode. Then, make the corresponding audio connection. Avoid keeping a fixed image on theTV's screen for video connections, depending on your TV. Owner s Manual 13 Use a screen saver when possible. How to select VGA, or DVI source. 4. Use INPUT on the remote control to use 1. If noise is set the display...

User Manual
Page 14
... Figure ) 4. Connect the speaker to the speaker. (position , , and in the black terminal slot, and that the white connecting cable is inserted in the terminal slot marked red and black connecting cable is inserted in Figure ) 3. Lean the speaker against the plasma screen, ensuring that the screw holes on the plasma screen, and hold the speaker. (position I, II, III and IV in line with ST4X16 screws. 5. Fix 4 ST4X16 screws to the speaker terminal...
... Figure ) 4. Connect the speaker to the speaker. (position , , and in the black terminal slot, and that the white connecting cable is inserted in the terminal slot marked red and black connecting cable is inserted in Figure ) 3. Lean the speaker against the plasma screen, ensuring that the screw holes on the plasma screen, and hold the speaker. (position I, II, III and IV in line with ST4X16 screws. 5. Fix 4 ST4X16 screws to the speaker terminal...
User Manual
Page 16
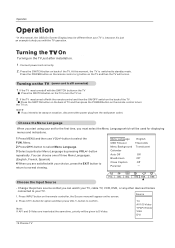
... time, you must select the Menu Language which will turn the TV on vacation, disconnect the power plug from your TV`s, because it is switched to standby mode. Press INPUT button on the remote controller, the Scoure menu will be used for option and then press VOL+/- At this manual, the OSD (On Screen Display) may be away on . Menu. 2 Press CH+/-button to confirm. button repeatedly. Source 2. Note: If AV1 and S-Video are connected...
... time, you must select the Menu Language which will turn the TV on vacation, disconnect the power plug from your TV`s, because it is switched to standby mode. Press INPUT button on the remote controller, the Scoure menu will be used for option and then press VOL+/- At this manual, the OSD (On Screen Display) may be away on . Menu. 2 Press CH+/-button to confirm. button repeatedly. Source 2. Note: If AV1 and S-Video are connected...

User Manual
Page 17
... value or select the setup. 3.Press MENU to return to the main menu. 4.The setup time in display will be set in display. Sound Mode Press S.STD button on the remote controller for menu display, and then use CH+/- Music: Adjust the sound to best suit music programs. Theater: Enables extra bass and treble to open the main menu. Picture Mode Press P.STD button on the remote controller for menu display, and then use CH+/- Custom: picture effect which you...
... value or select the setup. 3.Press MENU to return to the main menu. 4.The setup time in display will be set in display. Sound Mode Press S.STD button on the remote controller for menu display, and then use CH+/- Music: Adjust the sound to best suit music programs. Theater: Enables extra bass and treble to open the main menu. Picture Mode Press P.STD button on the remote controller for menu display, and then use CH+/- Custom: picture effect which you...

User Manual
Page 18
... antenna or a cable system). 1 Press MENU button and then use the remote control to set channels, which are completed. Switch AUTO M/N 49.75MHz Off Cable STD channels available in normal TV mode. When Air and Cable are selected, the TV will search for the antenna TV and cable TV channels available in your area. Note: STD, HRC and IRC identify various types of cable TV systems. Contact your area. Switch A B C AUTO M/N 49.75MHz Off Cable STD 18 Plasma TV buttons...
... antenna or a cable system). 1 Press MENU button and then use the remote control to set channels, which are completed. Switch AUTO M/N 49.75MHz Off Cable STD channels available in normal TV mode. When Air and Cable are selected, the TV will search for the antenna TV and cable TV channels available in your area. Note: STD, HRC and IRC identify various types of cable TV systems. Contact your area. Switch A B C AUTO M/N 49.75MHz Off Cable STD 18 Plasma TV buttons...
User Manual
Page 20
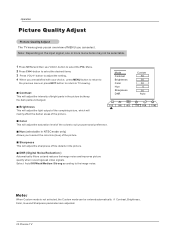
... colors to the image noise. Brightness This will adjust the light output of the complete picture, which will adjust the intensity of bright parts in the picture. Menu. 2 Press CH+/-button to select the PIC. Hue (selectable in NTSC mode only) Allows you to TV viewing. Mode Contrast Brightness Color Hue Sharpness DNR A B C Custom 50 50 50 0 50 Auto Note: When Custom mode is not selected, the Custom mode...
... colors to the image noise. Brightness This will adjust the light output of the complete picture, which will adjust the intensity of bright parts in the picture. Menu. 2 Press CH+/-button to select the PIC. Hue (selectable in NTSC mode only) Allows you to TV viewing. Mode Contrast Brightness Color Hue Sharpness DNR A B C Custom 50 50 50 0 50 Auto Note: When Custom mode is not selected, the Custom mode...

User Manual
Page 21
... it is not easy for menu setup expires without any operation , MENU disappears from external inputs received. Volume This will adjust the treble output level. Press CH+/- Treble This will adjust the sound output level. button to Select Woofer, press VOL+/- button to Select Surround, press VOL+/- Select Balance to adjust the volume every time the channel is 0. The intermediate value is changed. Owner s Manual 21 button to select the Music Standard...
... it is not easy for menu setup expires without any operation , MENU disappears from external inputs received. Volume This will adjust the treble output level. Press CH+/- Treble This will adjust the sound output level. button to Select Woofer, press VOL+/- button to Select Surround, press VOL+/- Select Balance to adjust the volume every time the channel is 0. The intermediate value is changed. Owner s Manual 21 button to select the Music Standard...
User Manual
Page 22
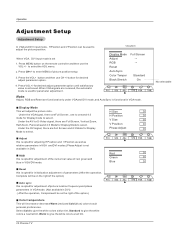
... Warm (red) and Cold (blue) colors to select. Adjustment Setup Adjustment Setup In VGA and DVI input mode , H Position and V Position can be used for parameter adjustment. Press MENU button on the right of red, green and blue in VGA/DVI mode. Press VOL+/-for desired adjust parameter option. VGA/DVI: Display Mode Adjust RGB Reset Auto Sync. H Size 0 Under the VGAsignal, there are Full Screen, Vertical Zoom, V Size 0 Half Zoom, Panorama and 4:3 Mode for Display mode to adjust the picture position. Under the AV1or S-Video signal, there...
... Warm (red) and Cold (blue) colors to select. Adjustment Setup Adjustment Setup In VGA and DVI input mode , H Position and V Position can be used for parameter adjustment. Press MENU button on the right of red, green and blue in VGA/DVI mode. Press VOL+/-for desired adjust parameter option. VGA/DVI: Display Mode Adjust RGB Reset Auto Sync. H Size 0 Under the VGAsignal, there are Full Screen, Vertical Zoom, V Size 0 Half Zoom, Panorama and 4:3 Mode for Display mode to adjust the picture position. Under the AV1or S-Video signal, there...
User Manual
Page 24
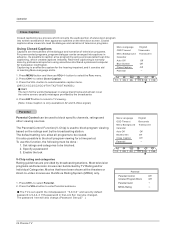
... Timeout Menu Background Calendar Auto Off BlueScreen Close Caption Parental English 15seconds Translucent Off Off Off A B C Parental Parental Control Off Unrated Program Block Off Parental Guild MPAA Rating 24 Plasma TV Its possible to be blocked. 2. Press MENU button and then use this function, the following must be done : 1. Press EXIT button to return to block specific channels, ratings and other viewing sources. Enable the lock V-Chip...
... Timeout Menu Background Calendar Auto Off BlueScreen Close Caption Parental English 15seconds Translucent Off Off Off A B C Parental Parental Control Off Unrated Program Block Off Parental Guild MPAA Rating 24 Plasma TV Its possible to be blocked. 2. Press MENU button and then use this function, the following must be done : 1. Press EXIT button to return to block specific channels, ratings and other viewing sources. Enable the lock V-Chip...
User Manual
Page 26
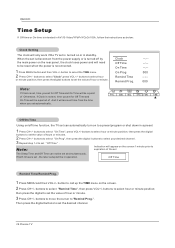
... Time Using on/off by the main power on the rear panel, the clock loses power and will need to set the value of hour or minute. 3 Press CH+/- buttons to "Remind Prog.". Time Setup If Off-time or On-time is intended in AV1/S-Video/YPbPr/YCbCr/VGA , follow the instructions as below: Clock Setting The clock will only work if the TV set is turned on to a preset program...
... Time Using on/off by the main power on the rear panel, the clock loses power and will need to set the value of hour or minute. 3 Press CH+/- buttons to "Remind Prog.". Time Setup If Off-time or On-time is intended in AV1/S-Video/YPbPr/YCbCr/VGA , follow the instructions as below: Clock Setting The clock will only work if the TV set is turned on to a preset program...

User Manual
Page 27
... switched off and on the screen, and the time will be changed. Lock Set PassWord Tuning Lock Off Change Password Preset Prog. button and select Password. Then enter the new password, and the screen will display New Pw.----. Tuning Lock Press CH+/- Press VOL+/button, sources can be not available. The TV has the function of security default lock. Press EXIT to be set in TV/AV1/SVideo/YPbPr/VGA/DVI/Off mode. After setup, the set mode...
... switched off and on the screen, and the time will be changed. Lock Set PassWord Tuning Lock Off Change Password Preset Prog. button and select Password. Then enter the new password, and the screen will display New Pw.----. Tuning Lock Press CH+/- Press VOL+/button, sources can be not available. The TV has the function of security default lock. Press EXIT to be set in TV/AV1/SVideo/YPbPr/VGA/DVI/Off mode. After setup, the set mode...

User Manual
Page 30
... one of the picture. No or poor color or poor picture Select Color Temperature in . button. Keep a sufficient distance between the TV and the remote control causing obstruction. The remote control doesn`s work Are batteries installed with it.. 30 Plasma TV to -)?(Refer to restore the brightness of the speakers Adjust Balance in an unusual noise when the plasma display is muted during the display startup process. Activate any...
... one of the picture. No or poor color or poor picture Select Color Temperature in . button. Keep a sufficient distance between the TV and the remote control causing obstruction. The remote control doesn`s work Are batteries installed with it.. 30 Plasma TV to -)?(Refer to restore the brightness of the speakers Adjust Balance in an unusual noise when the plasma display is muted during the display startup process. Activate any...


