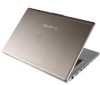
Manual
Page 2
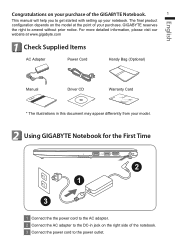
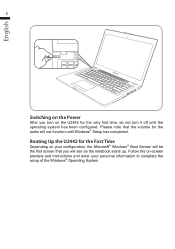
... get started with setting up your model. 2 Using GIGABYTE Notebook for the First Time 2 1 3 1 Connect the the power cord to the AC adapter. 2 Connect the AC adapter to the DC-in this document may appear differently from your notebook. For more detailed information, please visit our website at... www.gigabyte.com 1 Check Supplied Items AC Adapter Power Cord Handy Bag (Optional) Manual Driver CD Warranty Card * The...
... get started with setting up your model. 2 Using GIGABYTE Notebook for the First Time 2 1 3 1 Connect the the power cord to the AC adapter. 2 Connect the AC adapter to the DC-in this document may appear differently from your notebook. For more detailed information, please visit our website at... www.gigabyte.com 1 Check Supplied Items AC Adapter Power Cord Handy Bag (Optional) Manual Driver CD Warranty Card * The...
Manual
Page 3
... enter your configuration, the Microsoft® Windows® Boot Screen will be the first screen that the volume for the audio will see as the notebook starts up. English 2 Switching on the Power After you will not function until the operating system has been configured.
... enter your configuration, the Microsoft® Windows® Boot Screen will be the first screen that the volume for the audio will see as the notebook starts up. English 2 Switching on the Power After you will not function until the operating system has been configured.
Manual
Page 4
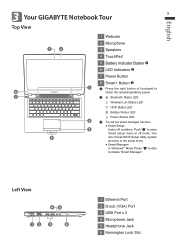
... setup menu. ● Smart Manager- Left View 45 12 3 6 1 Ethernet Port 2 D-sub (VGA) Port 3 USB Port x 2 4 Microphone Jack 5 Headphone Jack 6 Kensington Lock Slot English 3 Your GIGABYTE Notebook Tour 3 Top View 1 Webcam 1 2 2 Microphone 3 Speakers 4 TouchPad 5 Battery Indicator Button 6 LED Indicators 7 Power Button 8 7 6 8 Smart+ Button 3 Press the right button of...
... setup menu. ● Smart Manager- Left View 45 12 3 6 1 Ethernet Port 2 D-sub (VGA) Port 3 USB Port x 2 4 Microphone Jack 5 Headphone Jack 6 Kensington Lock Slot English 3 Your GIGABYTE Notebook Tour 3 Top View 1 Webcam 1 2 2 Microphone 3 Speakers 4 TouchPad 5 Battery Indicator Button 6 LED Indicators 7 Power Button 8 7 6 8 Smart+ Button 3 Press the right button of...

