
Manual
Page 1
Board Layout ...2 2. HYDRAVISION Installation ...6 4. BIOS Flash Utility ...7 4.2. Driver Installation (Windows® XP/2000/ME/98 5 3.3. Appendix ...7 4.1. How to Reflash BIOS in MS-DOS mode 7 12MD-R925128VH-104 - 1 - V-Tuner Installation ...6 3.4. Hardware Installation 4 3. Introduction ...2 1.1. Features ...2 1.2. DirectX Installation ...5 3.2. Software Installation 5 3.1. English Minimum System Requirement • IBM® or 100% PC compatible with Pentium® III 650MHz or AMD Athlon 650MHz class processor or higher • One available AGP3.0 compliant ...
Board Layout ...2 2. HYDRAVISION Installation ...6 4. BIOS Flash Utility ...7 4.2. Driver Installation (Windows® XP/2000/ME/98 5 3.3. Appendix ...7 4.1. How to Reflash BIOS in MS-DOS mode 7 12MD-R925128VH-104 - 1 - V-Tuner Installation ...6 3.4. Hardware Installation 4 3. Introduction ...2 1.1. Features ...2 1.2. DirectX Installation ...5 3.2. Software Installation 5 3.1. English Minimum System Requirement • IBM® or 100% PC compatible with Pentium® III 650MHz or AMD Athlon 650MHz class processor or higher • One available AGP3.0 compliant ...
Manual
Page 2
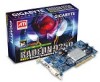
Board Layout 1) GV-R925128D VGA Monitor Connector (15 pins) S-Video DVI-I Connector OR VGA Output Analog LCD Monitor Analog Monitor NTSC / PAL TV AV Output Projector DVI Output Digital LCD Monitor DVI-I (For GV-R925128D/GV-R925128VH only) and D-Sub connectors Dual display supports with HYDRAVISION 1.2. Introduction 1.1. • • Features Powered by ATi RADEON 9250 Graphics Processing Unit (GPU) Supports the new AGP 8X and latest DirectX 8.1 Integrated with 128MB DDR memory Supports video capture for video editing (VIVO)(For GV-R925128VH only) Supports TV-Out ...
Board Layout 1) GV-R925128D VGA Monitor Connector (15 pins) S-Video DVI-I Connector OR VGA Output Analog LCD Monitor Analog Monitor NTSC / PAL TV AV Output Projector DVI Output Digital LCD Monitor DVI-I (For GV-R925128D/GV-R925128VH only) and D-Sub connectors Dual display supports with HYDRAVISION 1.2. Introduction 1.1. • • Features Powered by ATi RADEON 9250 Graphics Processing Unit (GPU) Supports the new AGP 8X and latest DirectX 8.1 Integrated with 128MB DDR memory Supports video capture for video editing (VIVO)(For GV-R925128VH only) Supports TV-Out ...
Manual
Page 3
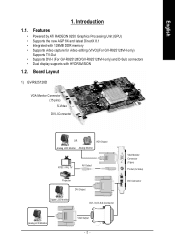
English 2) GV-R925128VH VGA Monitor Connector (15 pins) VIVO DVI-I Connector OR VGA Output Analog LCD Monitor Analog Monitor NTSC / PAL TV Projector S-Video Input AV Input AV Output S-Video Output DVI Output Digital LCD Monitor DVI-I to D-Sub Connector Analog LCD Monitor VGA Output VGA Monitor Connector (15pin) VIVO DVI Connector - 3 -
English 2) GV-R925128VH VGA Monitor Connector (15 pins) VIVO DVI-I Connector OR VGA Output Analog LCD Monitor Analog Monitor NTSC / PAL TV Projector S-Video Input AV Input AV Output S-Video Output DVI Output Digital LCD Monitor DVI-I to D-Sub Connector Analog LCD Monitor VGA Output VGA Monitor Connector (15pin) VIVO DVI Connector - 3 -
Manual
Page 4
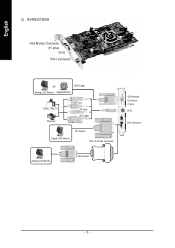
... graphics card. 1. English 3) GV-R925128T/GV-R92564T S-Video VGA Monitor Connector (15 pins) NTSC / PAL TV Projector AV Output TV-Out (S-Video) VGA Monitor Connector (15-pin) OR VGA Output Analog LCD Monitor Analog Monitor 2. Replace the screw to install your graphics card with the AGP slot, and press it in place, and replace the computer cover. - 4 - Locate the AGP slot. Now that you have prepared your computer, you are ready to fasten the card in firmly until the card is fully seated. 2. Hardware Installation Installing...
... graphics card. 1. English 3) GV-R925128T/GV-R92564T S-Video VGA Monitor Connector (15 pins) NTSC / PAL TV Projector AV Output TV-Out (S-Video) VGA Monitor Connector (15-pin) OR VGA Output Analog LCD Monitor Analog Monitor 2. Replace the screw to install your graphics card with the AGP slot, and press it in place, and replace the computer cover. - 4 - Locate the AGP slot. Now that you have prepared your computer, you are ready to fasten the card in firmly until the card is fully seated. 2. Hardware Installation Installing...

Manual
Page 5
... not show up, please run "D:\setup.exe". (We assume that your CD-ROM, and then you must install DirectX first. Click Install Display Drivers (Radeon 9200 Series). - 5 - then turn on the computer and monitor. 3. When the Autorun window appears, click Install DirectX. 3.2. English 3. Driver Installation (Windows® XP/2000/ME/98) Insert the driver CD disk into your card; Software Installation 3.1. Plug the display cable into your CD-ROM drive letter to achieve better...
... not show up, please run "D:\setup.exe". (We assume that your CD-ROM, and then you must install DirectX first. Click Install Display Drivers (Radeon 9200 Series). - 5 - then turn on the computer and monitor. 3. When the Autorun window appears, click Install DirectX. 3.2. English 3. Driver Installation (Windows® XP/2000/ME/98) Insert the driver CD disk into your card; Software Installation 3.1. Plug the display cable into your CD-ROM drive letter to achieve better...
Manual
Page 6
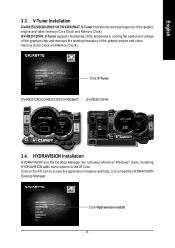
V-Tuner Installation GV-R925128D/GV-R925128T/GV-R92564T: V-Tuner monitors the working frequency of the graphic engine and video memory (Core Clock and Memory Clock). GV-R925128D/GV-R925128T/GV-R92564T: GV-R925128VH: 3.4. Click Hydravision Install. - 6 - English 3.3. Click V-Tuner. Click on the ATI icon to access the application's features and help, or to the ATI Icon. GV-R925128VH: V-Tuner supports monitoring of the temperature, cooling fan speed and voltage of the graphics chip and monitors the working frequency of...
V-Tuner Installation GV-R925128D/GV-R925128T/GV-R92564T: V-Tuner monitors the working frequency of the graphic engine and video memory (Core Clock and Memory Clock). GV-R925128D/GV-R925128T/GV-R92564T: GV-R925128VH: 3.4. Click Hydravision Install. - 6 - English 3.3. Click V-Tuner. Click on the ATI icon to access the application's features and help, or to the ATI Icon. GV-R925128VH: V-Tuner supports monitoring of the temperature, cooling fan speed and voltage of the graphics chip and monitors the working frequency of...
Manual
Page 7
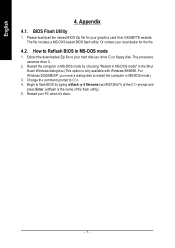
The file includes a MS-DOS-based BIOS flash utility. Change the command prompt to flash BIOS by choosing "Restart in MS-DOS mode" in MS-DOS mode.) 3. Begin to C:\>. 4. Extract the downloaded Zip file to Reflash BIOS in MS-DOS mode 1. Appendix 4.1. This procedure assumes drive C. 2. Restart your graphics card from GIGABYTE website. Restart the computer in MS-DOS mode by typing atiflash -p 0 filename (ex:r955128d.f1...
The file includes a MS-DOS-based BIOS flash utility. Change the command prompt to flash BIOS by choosing "Restart in MS-DOS mode" in MS-DOS mode.) 3. Begin to C:\>. 4. Extract the downloaded Zip file to Reflash BIOS in MS-DOS mode 1. Appendix 4.1. This procedure assumes drive C. 2. Restart your graphics card from GIGABYTE website. Restart the computer in MS-DOS mode by typing atiflash -p 0 filename (ex:r955128d.f1...


