Manual
Page 1
GV-R687SO-1GD AMD RadeonTM HD6870 Graphics Accelerator User's Manual Rev. 101 12MM-R6870SO-101R Copyright © 2011 GIGABYTE TECHNOLOGY CO., LTD Copyright by U.S. No part of this manual may be reproduced or transmitted in any form without the expressed, written permission of this card. The author assumes no responsibility for any labels on this copyright protection technology must be out of date before publication of their...
GV-R687SO-1GD AMD RadeonTM HD6870 Graphics Accelerator User's Manual Rev. 101 12MM-R6870SO-101R Copyright © 2011 GIGABYTE TECHNOLOGY CO., LTD Copyright by U.S. No part of this manual may be reproduced or transmitted in any form without the expressed, written permission of this card. The author assumes no responsibility for any labels on this copyright protection technology must be out of date before publication of their...
Manual
Page 4
... system memory for software installation (CD-ROM or DVD-ROM drive) - Windows® Vista - The power supply should be with 1 GB GDDR5 memory • Supports DirectX 11 • Supports CrossFireXTM • Supports DVI-I / DVI-D / HDMI / mini Display portx2 • Supports Dual-Link DVI-I connector • Supports D-Sub connectors (by AMD RadeonTMHD 6870 Graphics Processing Unit (GPU) • Supports PCI Express 2.1 • Integrated with a known brand and certified to conform to http://ati.amd.com/certifiedpsu.) • Operating System - Two GV-R687SO-1GD - Windows®...
... system memory for software installation (CD-ROM or DVD-ROM drive) - Windows® Vista - The power supply should be with 1 GB GDDR5 memory • Supports DirectX 11 • Supports CrossFireXTM • Supports DVI-I / DVI-D / HDMI / mini Display portx2 • Supports Dual-Link DVI-I connector • Supports D-Sub connectors (by AMD RadeonTMHD 6870 Graphics Processing Unit (GPU) • Supports PCI Express 2.1 • Integrated with a known brand and certified to conform to http://ati.amd.com/certifiedpsu.) • Operating System - Two GV-R687SO-1GD - Windows®...
Manual
Page 6
... IF THE GRAPHICS CARD IS DAMAGED. In order to obtain audio output from the onboard audio controller or the external sound card will be disabled when HDMI output is installed. The entire Radeon HD 6870 series support HDMI output which can be easily damaged by static electricity, so the card should be left in its original packing until it is activated. If you work correctly, please use official GIGABYTE BIOS only. Unpacking...
... IF THE GRAPHICS CARD IS DAMAGED. In order to obtain audio output from the onboard audio controller or the external sound card will be disabled when HDMI output is installed. The entire Radeon HD 6870 series support HDMI output which can be easily damaged by static electricity, so the card should be left in its original packing until it is activated. If you work correctly, please use official GIGABYTE BIOS only. Unpacking...
Manual
Page 7
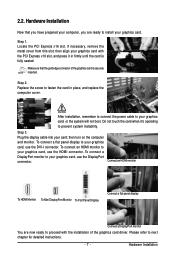
... refer to prevent system instability. Hardware Installation Hardware Installation Now that the gold edge connector of the graphics card driver. Plug the display cable into your graphics card. If necessary, remove the metal cover from this slot; then align your graphics card, use the HDMI connector. Step 3. Step 1. Replace the screw to install your card; To connect a flat panel display to your graphics card, use the DVI-I connector. After installation, remember to connect the power cable to your graphics card, or the system will...
... refer to prevent system instability. Hardware Installation Hardware Installation Now that the gold edge connector of the graphics card driver. Plug the display cable into your graphics card. If necessary, remove the metal cover from this slot; then align your graphics card, use the HDMI connector. Step 3. Step 1. Replace the screw to install your card; To connect a flat panel display to your graphics card, use the DVI-I connector. After installation, remember to connect the power cable to your graphics card, or the system will...
Manual
Page 8
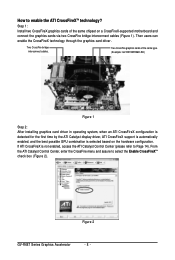
... on the hardware configuration. If ATI CrossFireX is selected based on a CrossFireX-supported motherboard and connect the graphics cards via two CrossFire bridge interconnect cables (Figure 1). Then users can enable the CrossFireX technology through the graphics card driver. Two CrossFire bridge interconnect cables. From the ATI Catalyst Control Center, enter the CrossFire menu and assure to enable the ATI CrossFireXTM technology? Step 1: Install two CrossFireX graphics cards of the same type. (Example: GV-RX195P256D-RH) Figure 1 Step 2: After installing graphics card driver in...
... on the hardware configuration. If ATI CrossFireX is selected based on a CrossFireX-supported motherboard and connect the graphics cards via two CrossFire bridge interconnect cables (Figure 1). Then users can enable the CrossFireX technology through the graphics card driver. Two CrossFire bridge interconnect cables. From the ATI Catalyst Control Center, enter the CrossFire menu and assure to enable the ATI CrossFireXTM technology? Step 1: Install two CrossFireX graphics cards of the same type. (Example: GV-RX195P256D-RH) Figure 1 Step 2: After installing graphics card driver in...
Manual
Page 9
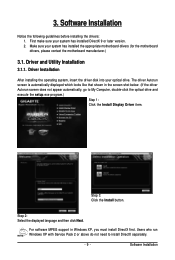
... optical drive and execute the setup.exe program.) Step 1: Click the Install Display Driver item. Driver Installation After installing the operating system, insert the driver disk into your system has installed the appropriate motherboard drivers (for the motherboard drivers, please contact the motherboard manufacturer.) 3.1. The driver Autorun screen is automatically displayed which looks like that shown in Windows XP, you must install DirectX first. 3. Software Installation Notice the following guidelines before installing the drivers: 1. Driver and Utility Installation 3.1.1. Step...
... optical drive and execute the setup.exe program.) Step 1: Click the Install Display Driver item. Driver Installation After installing the operating system, insert the driver disk into your system has installed the appropriate motherboard drivers (for the motherboard drivers, please contact the motherboard manufacturer.) 3.1. The driver Autorun screen is automatically displayed which looks like that shown in Windows XP, you must install DirectX first. 3. Software Installation Notice the following guidelines before installing the drivers: 1. Driver and Utility Installation 3.1.1. Step...
Manual
Page 10
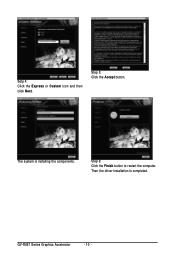
Then the driver installation is installing the components. Step 5: Click the Accept button. Step 6: Click the Finish button to restart the computer. GV-R687 Series Graphics Accelerator - 10 - Setp 4: Click the Express or Custom icon and then click Next. The system is completed.
Then the driver installation is installing the components. Step 5: Click the Accept button. Step 6: Click the Finish button to restart the computer. GV-R687 Series Graphics Accelerator - 10 - Setp 4: Click the Express or Custom icon and then click Next. The system is completed.
Manual
Page 11
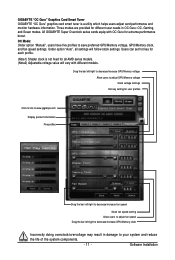
... left /right to decrease/increase GPU/Memory voltage Allow users to adjust GPU/Memory voltage Stock voltage settings Hot-key setting for all settings will vary with OC Guru for different user needs in damage to save preferred GPU/Memory voltage, GPU/Memory clock, and fan speed settings. Users can set hot key for each profile. (Note1) Shader clock is a utility which helps users adjust card performance and monitor hardware information. Software Installation Three modes are provided for extreme performance boost. All GIGABYTE Super Overclock series cards equip with different models.
... left /right to decrease/increase GPU/Memory voltage Allow users to adjust GPU/Memory voltage Stock voltage settings Hot-key setting for all settings will vary with OC Guru for different user needs in damage to save preferred GPU/Memory voltage, GPU/Memory clock, and fan speed settings. Users can set hot key for each profile. (Note1) Shader clock is a utility which helps users adjust card performance and monitor hardware information. Software Installation Three modes are provided for extreme performance boost. All GIGABYTE Super Overclock series cards equip with different models.
Manual
Page 12
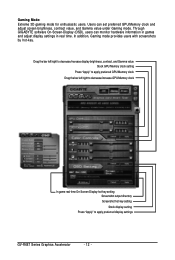
... decrease/increase GPU/Memory clock In game real-time On-Screen-Display hot-key setting Screenshot output directory Screenshot hot-key setting Stock display setting Press "Apply" to apply preferred display settings GV-R687 Series Graphics Accelerator - 12 - Through GIGABYTE software On-Screen-Display (OSD), users can set preferred GPU/Memory clock and adjust screen brightness, contract value, and Gamma value under Gaming mode. In addition, Gaming mode provides users with screenshots by hot-key. Users can monitor hardware information in games and adjust display settings in...
... decrease/increase GPU/Memory clock In game real-time On-Screen-Display hot-key setting Screenshot output directory Screenshot hot-key setting Stock display setting Press "Apply" to apply preferred display settings GV-R687 Series Graphics Accelerator - 12 - Through GIGABYTE software On-Screen-Display (OSD), users can set preferred GPU/Memory clock and adjust screen brightness, contract value, and Gamma value under Gaming mode. In addition, Gaming mode provides users with screenshots by hot-key. Users can monitor hardware information in games and adjust display settings in...
Manual
Page 17
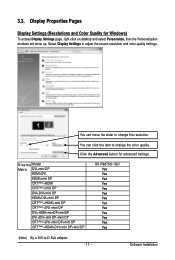
... on desktop and select Personalize, then the Personalization windows will show up. Software Installation Display Properties Pages Display Settings (Resolutions and Color Quality for advanced settings. D i s p l a y Model Matrix DVI+mini DP HDMI+DVI HDMI+mini DP CRT(Note)+HDMI CRT(Note)+mini DP DVI+DVI+mini DP HDMI+DVI+mini DP CRT(Note)+HDMI+mini DP CRT(Note)+DVI+mini DP DVI+HDMI+miniDP+miniDP DVI+DVI+mini DP+mini DP CRT(Note)+DVI+mini DP+mini DP CRT(Note)+HDMI+DVI+mini DP+mini DP GV-R687SO-1GD...
... on desktop and select Personalize, then the Personalization windows will show up. Software Installation Display Properties Pages Display Settings (Resolutions and Color Quality for advanced settings. D i s p l a y Model Matrix DVI+mini DP HDMI+DVI HDMI+mini DP CRT(Note)+HDMI CRT(Note)+mini DP DVI+DVI+mini DP HDMI+DVI+mini DP CRT(Note)+HDMI+mini DP CRT(Note)+DVI+mini DP DVI+HDMI+miniDP+miniDP DVI+DVI+mini DP+mini DP CRT(Note)+DVI+mini DP+mini DP CRT(Note)+HDMI+DVI+mini DP+mini DP GV-R687SO-1GD...
Manual
Page 19
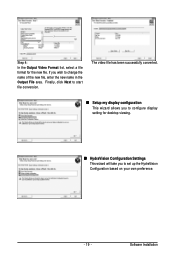
Step 4: In the Output Video Format list, select a file format for desktop viewing. „ HydraVision Configuration Settings This wizard will take you wish to start file conversion. Software Installation If you to set up the HydraVision Configuration based on your own preference. - 19 - Finally, click Next to change the name of the new file, enter the new name in the Output File area. The video file has been successfully converted. „ Setup my display configuration This wizard allows you to configure display setting for the new file.
Step 4: In the Output Video Format list, select a file format for desktop viewing. „ HydraVision Configuration Settings This wizard will take you wish to start file conversion. Software Installation If you to set up the HydraVision Configuration based on your own preference. - 19 - Finally, click Next to change the name of the new file, enter the new name in the Output File area. The video file has been successfully converted. „ Setup my display configuration This wizard allows you to configure display setting for the new file.
Manual
Page 20
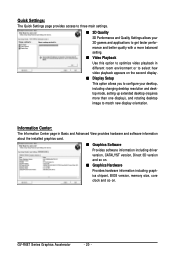
... new display orientation. GV-R687 Series Graphics Accelerator - 20 - Quick Settings: The Quick Settings page provides access to three main settings. „ 3D Quality 3D Performance and Quality Settings allows your desktop, including changing desktop resolution and desktop mode, setting up extended desktop (requires more balanced setting. „ Video Playback Use this option to optimize video playback in Basic and Advanced View provides hardware and software information about the installed graphics card. „ Graphics Software Provides software information including driver version...
... new display orientation. GV-R687 Series Graphics Accelerator - 20 - Quick Settings: The Quick Settings page provides access to three main settings. „ 3D Quality 3D Performance and Quality Settings allows your desktop, including changing desktop resolution and desktop mode, setting up extended desktop (requires more balanced setting. „ Video Playback Use this option to optimize video playback in Basic and Advanced View provides hardware and software information about the installed graphics card. „ Graphics Software Provides software information including driver version...
Manual
Page 21
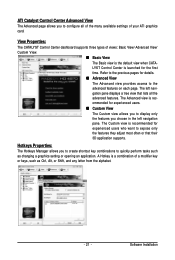
... - Software Installation ATI Catalyst Control Center Advanced View The Advanced page allows you to configure all the advanced features. View Properties: The CATALYST Control Center dashboard supports three types of a modifier key or keys, such as changing a graphics setting or opening an application. gation pane displays a tree view that their 3D application supports. A Hotkey is rec- ommended for the first time. LYST Control Center is the default view when CATA- The Advanced view is...
... - Software Installation ATI Catalyst Control Center Advanced View The Advanced page allows you to configure all the advanced features. View Properties: The CATALYST Control Center dashboard supports three types of a modifier key or keys, such as changing a graphics setting or opening an application. gation pane displays a tree view that their 3D application supports. A Hotkey is rec- ommended for the first time. LYST Control Center is the default view when CATA- The Advanced view is...
Manual
Page 22
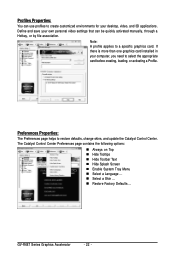
... Factory Defaults ... If there is more than one graphics card installed in your computer, you need to create customized environments for your own personal video settings that can use profiles to select the appropriate card before creating, loading, or activating a Profile. Preferences Properties: The Preferences page helps to a specific graphics card. Define and save your desktop, video, and 3D applications. Note: A profile applies to restore defaults, change skins, and update the Catalyst Control Center.
... Factory Defaults ... If there is more than one graphics card installed in your computer, you need to create customized environments for your own personal video settings that can use profiles to select the appropriate card before creating, loading, or activating a Profile. Preferences Properties: The Preferences page helps to a specific graphics card. Define and save your desktop, video, and 3D applications. Note: A profile applies to restore defaults, change skins, and update the Catalyst Control Center.
Manual
Page 24
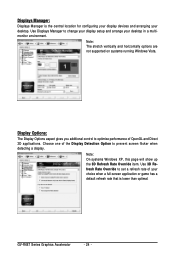
... Series Graphics Accelerator - 24 - Note: The stretch vertically and horizontally options are not supported on systems running Windows Vista. Note: On systems Windows XP, this page will show up the 3D Refresh Rate Override item. Use 3D Refresh Rate Override to change your display setup and arrange your choice when a full-screen application or game has a default refresh rate that is the central location for configuring your display devices and arranging your desktop...
... Series Graphics Accelerator - 24 - Note: The stretch vertically and horizontally options are not supported on systems running Windows Vista. Note: On systems Windows XP, this page will show up the 3D Refresh Rate Override item. Use 3D Refresh Rate Override to change your display setup and arrange your choice when a full-screen application or game has a default refresh rate that is the central location for configuring your display devices and arranging your desktop...
Manual
Page 25
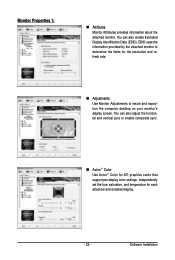
... enable composite sync. „ AvivoTM Color Use AvivoTM Color for ATI graphics cards that support per-display color settings. EDID uses the information provided by the attached monitor to resize and reposition the computer desktop on your monitor's display screen. Independently set the hue, saturation, and temperature for the resolution and refresh rate. „ Adjustments Use Monitor Adjustments to determine the limits for each attached and enabled display. - 25 - You can also enable Extended Display Identification Data (EDID). Monitor Properties 1: „ Attributes Monitor...
... enable composite sync. „ AvivoTM Color Use AvivoTM Color for ATI graphics cards that support per-display color settings. EDID uses the information provided by the attached monitor to resize and reposition the computer desktop on your monitor's display screen. Independently set the hue, saturation, and temperature for the resolution and refresh rate. „ Adjustments Use Monitor Adjustments to determine the limits for each attached and enabled display. - 25 - You can also enable Extended Display Identification Data (EDID). Monitor Properties 1: „ Attributes Monitor...
Manual
Page 28
...-specific feature. This setting corrected a corruption problem that occurred with some older games that use the Contrast control. Note: The Alternate Pixel center Direct 3D setting is already known or understood. „ More Settings Use the More Settings dialog to preview the adjusted settings because the effect is not supported on systems running Windows Vista. These settings are not sure which API your 3D application uses, consult the documentation...
...-specific feature. This setting corrected a corruption problem that occurred with some older games that use the Contrast control. Note: The Alternate Pixel center Direct 3D setting is already known or understood. „ More Settings Use the More Settings dialog to preview the adjusted settings because the effect is not supported on systems running Windows Vista. These settings are not sure which API your 3D application uses, consult the documentation...

Manual
Page 30
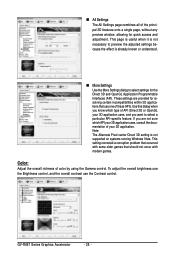
... adjusted settings because the effect is not supported on systems running Windows Vista. • This item will only affect applications with video overlay support. „ Basic Quality You can control the deinterlacing settings by checking the Use automatic deinterlacing item. Extended Desktop Mode is already known or understood. This page is useful when it is not necessary to change the way you connect two monitors. „ All Settings...
... adjusted settings because the effect is not supported on systems running Windows Vista. • This item will only affect applications with video overlay support. „ Basic Quality You can control the deinterlacing settings by checking the Use automatic deinterlacing item. Extended Desktop Mode is already known or understood. This page is useful when it is not necessary to change the way you connect two monitors. „ All Settings...
Manual
Page 31
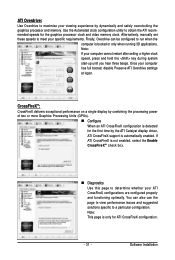
... is only for ATI CrossFireX configuration. - 31 - Note: If your specific requirements. Alternatively, manually set these speeds to a particular configuration. Software Installation Note: This page is booted or only when running 3D applications. ATI Overdrive: Use Overdrive to obtain the ATI recommended speeds for the graphics processor clock and video memory clock. Finally, Overdrive can also use the page to view performance issues and suggested solutions specific to meet your...
... is only for ATI CrossFireX configuration. - 31 - Note: If your specific requirements. Alternatively, manually set these speeds to a particular configuration. Software Installation Note: This page is booted or only when running 3D applications. ATI Overdrive: Use Overdrive to obtain the ATI recommended speeds for the graphics processor clock and video memory clock. Finally, Overdrive can also use the page to view performance issues and suggested solutions specific to meet your...
Manual
Page 32
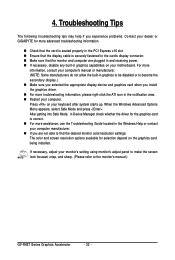
..., use the Troubleshooting Guide located in the Windows Help or contact your computer manufacturer. „ If you install the graphics driver. „ For more advanced troubleshooting information. „ Check that the card is seated properly in the notification area. „ Restart your monitor's setting using monitor's adjust panel to make the screen look focused, crisp, and sharp. (Please refer to find the desired monitor color/resolution settings: The color and screen resolution options...
..., use the Troubleshooting Guide located in the Windows Help or contact your computer manufacturer. „ If you install the graphics driver. „ For more advanced troubleshooting information. „ Check that the card is seated properly in the notification area. „ Restart your monitor's setting using monitor's adjust panel to make the screen look focused, crisp, and sharp. (Please refer to find the desired monitor color/resolution settings: The color and screen resolution options...


