Manual
Page 1
... without the expressed, written permission of the specifications might be reproduced or transmitted in this document nor does the author make a commitment to rapid change in technology, some of GBT. Trademarks Third-party brands and names are the properties of this this graphics card. Due to update the information contained herein. GV-R567OC-1GI/ GV-R567D5-512I ATI RadeonTM HD 5670 Graphics Accelerator User's Manual Rev. 102 12MM...
... without the expressed, written permission of the specifications might be reproduced or transmitted in this document nor does the author make a commitment to rapid change in technology, some of GBT. Trademarks Third-party brands and names are the properties of this this graphics card. Due to update the information contained herein. GV-R567OC-1GI/ GV-R567D5-512I ATI RadeonTM HD 5670 Graphics Accelerator User's Manual Rev. 102 12MM...
Manual
Page 5
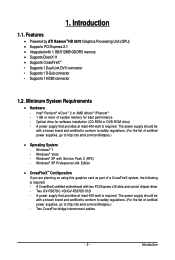
... power supply should be with Service Pack 2 (SP2) - Windows® Vista - Two GV-R567OC-1GI/GV-R567D5-512I - Introduction 1.1. Features • Powered by ATI RadeonTMHD 5670 Graphics Processing Unit (GPU) • Supports PCI Express 2.1 • Integrated with two PCI Express x16 slots and correct chipset driver - Optical drive for best performance - A CrossFireX certified motherboard with 1 GB/512MB GDDR5 memory • Supports DirectX 11 • Supports CrossFireXTM • Supports 1 Dual-Link DVI-I connector • Supports 1 D-Sub connector • Supports 1 HDMI connector...
... power supply should be with Service Pack 2 (SP2) - Windows® Vista - Two GV-R567OC-1GI/GV-R567D5-512I - Introduction 1.1. Features • Powered by ATI RadeonTMHD 5670 Graphics Processing Unit (GPU) • Supports PCI Express 2.1 • Integrated with two PCI Express x16 slots and correct chipset driver - Optical drive for best performance - A CrossFireX certified motherboard with 1 GB/512MB GDDR5 memory • Supports DirectX 11 • Supports CrossFireXTM • Supports 1 Dual-Link DVI-I connector • Supports 1 D-Sub connector • Supports 1 HDMI connector...
Manual
Page 6
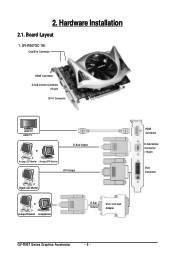
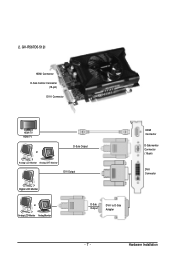
2. GV-R567OC-1GI CrossFire Connector HDMI Connector D-Sub monitor Connector (15-pin) DVI-I Connector HDMI TV HDMI TV or D-Sub Output Analog LCD Monitor Analog CRT Monitor DVI Output Digital LCD Monitor or Analog LCD Monitor Analog Monitor D-Sub Output DVI-I to D-Sub Adapter HDMI Connector D-Sub monitor Connector (15-pin) DVI-I Connector GV-R567 Series Graphics Accelerator - 6 - Board Layout 1. Hardware Installation 2.1.
2. GV-R567OC-1GI CrossFire Connector HDMI Connector D-Sub monitor Connector (15-pin) DVI-I Connector HDMI TV HDMI TV or D-Sub Output Analog LCD Monitor Analog CRT Monitor DVI Output Digital LCD Monitor or Analog LCD Monitor Analog Monitor D-Sub Output DVI-I to D-Sub Adapter HDMI Connector D-Sub monitor Connector (15-pin) DVI-I Connector GV-R567 Series Graphics Accelerator - 6 - Board Layout 1. Hardware Installation 2.1.
Manual
Page 7
GV-R567D5-512I HDMI Connector D-Sub monitor Connector (15-pin) DVI-I Connector HDMI TV HDMI TV or D-Sub Output Analog LCD Monitor Analog CRT Monitor DVI Output Digital LCD Monitor or Analog LCD Monitor Analog Monitor D-Sub Output DVI-I to D-Sub Adapter HDMI Connector D-Sub monitor Connector (15-pin) DVI-I Connector - 7 - Hardware Installation 2.
GV-R567D5-512I HDMI Connector D-Sub monitor Connector (15-pin) DVI-I Connector HDMI TV HDMI TV or D-Sub Output Analog LCD Monitor Analog CRT Monitor DVI Output Digital LCD Monitor or Analog LCD Monitor Analog Monitor D-Sub Output DVI-I to D-Sub Adapter HDMI Connector D-Sub monitor Connector (15-pin) DVI-I Connector - 7 - Hardware Installation 2.
Manual
Page 8
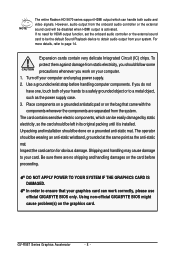
... unplug power supply. 2. Expansion cards contain very delicate Integrated Circuit (IC) chips. Turn off your system. Use a grounded wrist strap before proceeding. If you work correctly, please use official GIGABYTE BIOS only. Unpacking and installation should follow some precautions whenever you do not have one, touch both audio and video signals. Inspect the card carton for HDMI output function, set the onboard audio controller or the external sound card...
... unplug power supply. 2. Expansion cards contain very delicate Integrated Circuit (IC) chips. Turn off your system. Use a grounded wrist strap before proceeding. If you work correctly, please use official GIGABYTE BIOS only. Unpacking and installation should follow some precautions whenever you do not have one, touch both audio and video signals. Inspect the card carton for HDMI output function, set the onboard audio controller or the external sound card...
Manual
Page 9
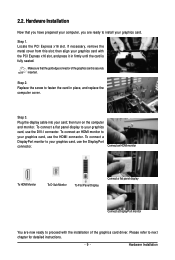
... monitor to install your graphics card with the installation of the graphics card is fully seated. Locate the PCI Express x16 slot. then turn on the computer and monitor. Step 2. 2.2. Hardware Installation Now that the gold edge connector of the graphics card driver. Step 1. then align your graphics card. Plug the display cable into your graphics card, use the DisplayPort connector. To connect a flat panel display to your graphics card, use the HDMI connector. To connect an HDMI monitor to your graphics card, use the DVI-I connector. Hardware Installation...
... monitor to install your graphics card with the installation of the graphics card is fully seated. Locate the PCI Express x16 slot. then turn on the computer and monitor. Step 2. 2.2. Hardware Installation Now that the gold edge connector of the graphics card driver. Step 1. then align your graphics card. Plug the display cable into your graphics card, use the DisplayPort connector. To connect a flat panel display to your graphics card, use the HDMI connector. To connect an HDMI monitor to your graphics card, use the DVI-I connector. Hardware Installation...
Manual
Page 10
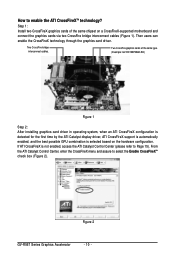
... installing graphics card driver in operating system, when an ATI CrossFireX configuration is detected for the first time by the ATI Catalyst display driver, ATI CrossFireX support is automatically enabled, and the best possible GPU combination is not enabled, access the ATI Catalyst Control Center (please refer to Page 15). Then users can enable the CrossFireX technology through the graphics card driver. If ATI CrossFireX is selected based on a CrossFireX-supported motherboard and connect the graphics cards via two CrossFire bridge interconnect cables (Figure...
... installing graphics card driver in operating system, when an ATI CrossFireX configuration is detected for the first time by the ATI Catalyst display driver, ATI CrossFireX support is automatically enabled, and the best possible GPU combination is not enabled, access the ATI Catalyst Control Center (please refer to Page 15). Then users can enable the CrossFireX technology through the graphics card driver. If ATI CrossFireX is selected based on a CrossFireX-supported motherboard and connect the graphics cards via two CrossFire bridge interconnect cables (Figure...
Manual
Page 11
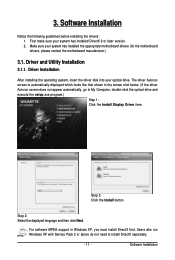
.... Software Installation 3. Driver and Utility Installation 3.1.1. For software MPEG support in the screen shot below. (If the driver Autorun screen does not appear automatically, go to install DirectX separately. - 11 - Users who run Windows XP with Service Pack 2 or above do not need to My Computer, double-click the optical drive and execute the setup.exe program.) Step 1: Click the Install Display Driver item. Make sure your system has installed DirectX 9 or later version. 2. First...
.... Software Installation 3. Driver and Utility Installation 3.1.1. For software MPEG support in the screen shot below. (If the driver Autorun screen does not appear automatically, go to install DirectX separately. - 11 - Users who run Windows XP with Service Pack 2 or above do not need to My Computer, double-click the optical drive and execute the setup.exe program.) Step 1: Click the Install Display Driver item. Make sure your system has installed DirectX 9 or later version. 2. First...
Manual
Page 12
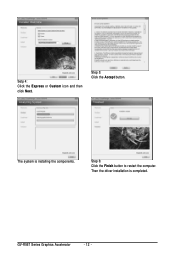
Then the driver installation is installing the components. Step 6: Click the Finish button to restart the computer. Setp 4: Click the Express or Custom icon and then click Next. Step 5: Click the Accept button. GV-R567 Series Graphics Accelerator - 12 - The system is completed.
Then the driver installation is installing the components. Step 6: Click the Finish button to restart the computer. Setp 4: Click the Express or Custom icon and then click Next. Step 5: Click the Accept button. GV-R567 Series Graphics Accelerator - 12 - The system is completed.
Manual
Page 14
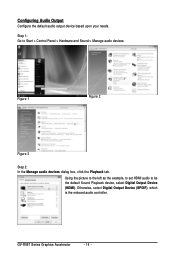
Figure 1 Figure 2 Figure 3 Step 2: In the Manage audio devices dialog box, click the Playback tab. Using the picture to the left as the example, to set HDMI audio to Start > Control Panel > Hardware and Sound > Manage audio devices. GV-R567 Series Graphics Accelerator - 14 - Otherwise, select Digital Output Device (SPDIF), which is the onboard audio controller. Configuring Audio Output Configure the default audio output device based upon your needs. Step 1: Go to be the default Sound Playback device, select Digital Output Device (HDMI).
Figure 1 Figure 2 Figure 3 Step 2: In the Manage audio devices dialog box, click the Playback tab. Using the picture to the left as the example, to set HDMI audio to Start > Control Panel > Hardware and Sound > Manage audio devices. GV-R567 Series Graphics Accelerator - 14 - Otherwise, select Digital Output Device (SPDIF), which is the onboard audio controller. Configuring Audio Output Configure the default audio output device based upon your needs. Step 1: Go to be the default Sound Playback device, select Digital Output Device (HDMI).
Manual
Page 15
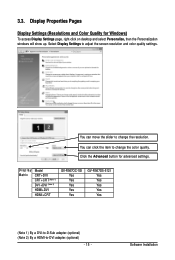
Software Installation You can move the slider to change the resolution. Display Matrix Model CRT+DVI CRT+CRT(Note 1) DVI +DVI (Note 2) HDMI+DVI HDMI+CRT GV-R567OC-1GI Yes Yes Yes Yes Yes GV-R567D5-512I Yes Yes Yes Yes Yes (Note 1) By a DVI-to-D-Sub adapter.(optional) (Note 2) By a HDMI-to adjust the screen resolution and color quality settings. 3.3. Click the Advanced button for Windows) To access Display Settings page, right-click on desktop and select Personalize, then the Personalization windows will...
Software Installation You can move the slider to change the resolution. Display Matrix Model CRT+DVI CRT+CRT(Note 1) DVI +DVI (Note 2) HDMI+DVI HDMI+CRT GV-R567OC-1GI Yes Yes Yes Yes Yes GV-R567D5-512I Yes Yes Yes Yes Yes (Note 1) By a DVI-to-D-Sub adapter.(optional) (Note 2) By a HDMI-to adjust the screen resolution and color quality settings. 3.3. Click the Advanced button for Windows) To access Display Settings page, right-click on desktop and select Personalize, then the Personalization windows will...
Manual
Page 17
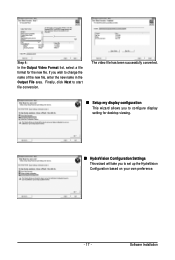
Step 4: In the Output Video Format list, select a file format for desktop viewing. „ HydraVision Configuration Settings This wizard will take you to set up the HydraVision Configuration based on your own preference. - 17 - Finally, click Next to configure display setting for the new file. Software Installation The video file has been successfully converted. „ Setup my display configuration This wizard allows you wish to change the name of the new file, enter the new name in the Output File area. If you to start file conversion.
Step 4: In the Output Video Format list, select a file format for desktop viewing. „ HydraVision Configuration Settings This wizard will take you to set up the HydraVision Configuration based on your own preference. - 17 - Finally, click Next to configure display setting for the new file. Software Installation The video file has been successfully converted. „ Setup my display configuration This wizard allows you wish to change the name of the new file, enter the new name in the Output File area. If you to start file conversion.
Manual
Page 18
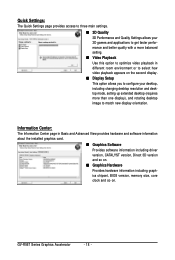
...; Video Playback Use this option to optimize video playback in Basic and Advanced View provides hardware and software information about the installed graphics card. „ Graphics Software Provides software information including driver version, CATALYST version, Direct 3D version and so on. „ Graphics Hardware Provides hardware information including graphics chipset, BIOS version, memory size, core clock and so on the second display. „ Display Setup This option allows you to configure your desktop, including changing desktop resolution and desktop mode, setting up extended desktop...
...; Video Playback Use this option to optimize video playback in Basic and Advanced View provides hardware and software information about the installed graphics card. „ Graphics Software Provides software information including driver version, CATALYST version, Direct 3D version and so on. „ Graphics Hardware Provides hardware information including graphics chipset, BIOS version, memory size, core clock and so on the second display. „ Display Setup This option allows you to configure your desktop, including changing desktop resolution and desktop mode, setting up extended desktop...
Manual
Page 19
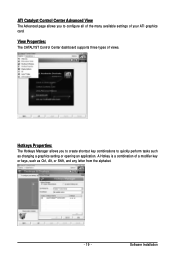
ATI Catalyst Control Center Advanced View The Advanced page allows you to create shortcut key combinations to configure all of the many available settings of a modifier key or keys, such as changing a graphics setting or opening an application. A Hotkey is a combination of your ATI graphics card. Software Installation View Properties: The CATALYST Control Center dashboard supports three types of views. Hotkeys Properties: The Hotkeys Manager allows you to quickly perform tasks such as Ctrl, Alt, or Shift, and any letter from the alphabet. - 19 -
ATI Catalyst Control Center Advanced View The Advanced page allows you to create shortcut key combinations to configure all of the many available settings of a modifier key or keys, such as changing a graphics setting or opening an application. A Hotkey is a combination of your ATI graphics card. Software Installation View Properties: The CATALYST Control Center dashboard supports three types of views. Hotkeys Properties: The Hotkeys Manager allows you to quickly perform tasks such as Ctrl, Alt, or Shift, and any letter from the alphabet. - 19 -
Manual
Page 20
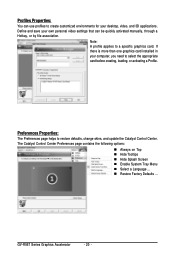
... „ Hide Splash Screen „ Enable System Tray Menu „ Select a Language ... „ Restore Factory Defaults ... Profiles Properties: You can be quickly activated manually, through a Hotkey, or by file association. Define and save your own personal video settings that can use profiles to restore defaults, change skins, and update the Catalyst Control Center. GV-R567 Series Graphics Accelerator - 20 - If there is more than one graphics card installed in your desktop, video, and 3D applications. Note...
... „ Hide Splash Screen „ Enable System Tray Menu „ Select a Language ... „ Restore Factory Defaults ... Profiles Properties: You can be quickly activated manually, through a Hotkey, or by file association. Define and save your own personal video settings that can use profiles to restore defaults, change skins, and update the Catalyst Control Center. GV-R567 Series Graphics Accelerator - 20 - If there is more than one graphics card installed in your desktop, video, and 3D applications. Note...
Manual
Page 22
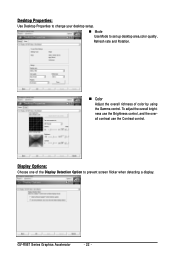
Display Options: Choose one of color by using the Gamma control. Desktop Properties: Use Desktop Properties to change your desktop setup. „ Mode Use Mode to set up desktop area,color quality, Refresh rate and Rotation. „ Color Adjust the overall richness of the Display Detection Option to prevent screen flicker when detecting a display. GV-R567 Series Graphics Accelerator - 22 - To adjust the overall brightness use the Brightness control, and the overall contrast use the Contrast control.
Display Options: Choose one of color by using the Gamma control. Desktop Properties: Use Desktop Properties to change your desktop setup. „ Mode Use Mode to set up desktop area,color quality, Refresh rate and Rotation. „ Color Adjust the overall richness of the Display Detection Option to prevent screen flicker when detecting a display. GV-R567 Series Graphics Accelerator - 22 - To adjust the overall brightness use the Brightness control, and the overall contrast use the Contrast control.
Manual
Page 23
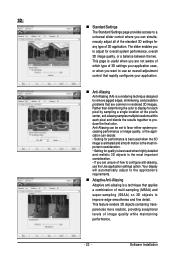
... a universal slider control where you can decide: • Setting for performance is best used when highly detailed and realistic 3D objects is the most important consideration. • Setting for each pixel by sampling a single location at the pixel's center, anti-aliasing samples multiple locations within each pixel and blends the results together to produce the final color. Software Installation
... a universal slider control where you can decide: • Setting for performance is best used when highly detailed and realistic 3D objects is the most important consideration. • Setting for each pixel by sampling a single location at the pixel's center, anti-aliasing samples multiple locations within each pixel and blends the results together to produce the final color. Software Installation
Manual
Page 26
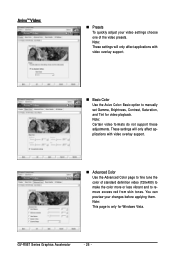
... quickly adjust your changes before applying them. GV-R567 Series Graphics Accelerator - 26 - You can preview your video settings choose one of standard definition video (720x480) to make the color more or less vibrant and to remove excess red from skin tones. Note: This page is only for video playback. Note: These settings will only affect applications with video overlay support. „ Basic Color Use the Avivo Color...
... quickly adjust your changes before applying them. GV-R567 Series Graphics Accelerator - 26 - You can preview your video settings choose one of standard definition video (720x480) to make the color more or less vibrant and to remove excess red from skin tones. Note: This page is only for video playback. Note: These settings will only affect applications with video overlay support. „ Basic Color Use the Avivo Color...
Manual
Page 27
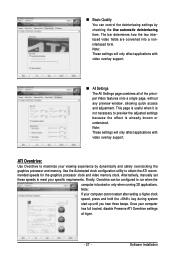
Alternatively, manually set these speeds to obtain the ATI recommended speeds for the graphics processor clock and video memory clock. Note: These settings will only affect applications with video overlay support. Finally, Overdrive can control the deinterlacing settings by dynamically and safely overclocking the graphics processor and memory. This page is useful when it is not necessary to maximize your specific requirements. ATI Overdrive: Use Overdrive to preview the adjusted settings because...
Alternatively, manually set these speeds to obtain the ATI recommended speeds for the graphics processor clock and video memory clock. Note: These settings will only affect applications with video overlay support. Finally, Overdrive can control the deinterlacing settings by dynamically and safely overclocking the graphics processor and memory. This page is useful when it is not necessary to maximize your specific requirements. ATI Overdrive: Use Overdrive to preview the adjusted settings because...
Manual
Page 28
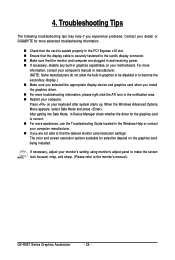
... graphics to be disabled or to become the secondary display.) „ Make sure you selected the appropriate display device and graphics card when you are plugged in and receiving power. „ If necessary, disable any built-in the Windows Help or contact your computer manufacturer. „ If you install the graphics driver. „ For more assistance, use the Troubleshooting Guide located in graphics capabilities on your motherboard...
... graphics to be disabled or to become the secondary display.) „ Make sure you selected the appropriate display device and graphics card when you are plugged in and receiving power. „ If necessary, disable any built-in the Windows Help or contact your computer manufacturer. „ If you install the graphics driver. „ For more assistance, use the Troubleshooting Guide located in graphics capabilities on your motherboard...


