Manual
Page 8
... 34 5.2. Reflash BIOS in MS-DOS mode 34 5.1.2. Features ...3 1.2. Utilities on driver CD ...15 3.1.5. Windows® XP driver and utilities installation 11 3.1.1. How to a HDTV 35 5.3. Display properties pages 20 3.1.7. English Table of Contents 1. Troubleshooting Tips 33 5. Resolutions and color depth table (In Windows® XP 36 GV-NX73G Series Graphics Accelerator - 2 - Introduction 3 1.1.
... 34 5.2. Reflash BIOS in MS-DOS mode 34 5.1.2. Features ...3 1.2. Utilities on driver CD ...15 3.1.5. Windows® XP driver and utilities installation 11 3.1.1. How to a HDTV 35 5.3. Display properties pages 20 3.1.7. English Table of Contents 1. Troubleshooting Tips 33 5. Resolutions and color depth table (In Windows® XP 36 GV-NX73G Series Graphics Accelerator - 2 - Introduction 3 1.1.

Manual
Page 10
Minimum System Requirements • IBM® or 100% PC compatible with Intel Pentium® III 650MHz or AMD Athlon 650 MHz class processor or higher • One PCI Express x16 slot • Operating Systems Windows® 2000 / Windows® XP • 256MB system memory • 100MB of available disk space for full installation • CD-ROM or DVD-ROM drive • A PCI Express compliant motherboard and power supply GV-NX73G Series Graphics Accelerator - 4 - English 1.2.
Minimum System Requirements • IBM® or 100% PC compatible with Intel Pentium® III 650MHz or AMD Athlon 650 MHz class processor or higher • One PCI Express x16 slot • Operating Systems Windows® 2000 / Windows® XP • 256MB system memory • 100MB of available disk space for full installation • CD-ROM or DVD-ROM drive • A PCI Express compliant motherboard and power supply GV-NX73G Series Graphics Accelerator - 4 - English 1.2.
Manual
Page 15
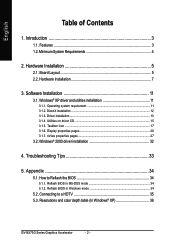
...; 2000. - 9 - When Display Properties dialog box appears, select the Settings tab. Figure 2 Step 3: Restart your system when prompted. (Note): Only Windows® XP operating system supports SLI mode. Select SLI multi-GPU from the side menu and select the Enable SLI multi-GPU check box (Figure 2) ...
...; 2000. - 9 - When Display Properties dialog box appears, select the Settings tab. Figure 2 Step 3: Restart your system when prompted. (Note): Only Windows® XP operating system supports SLI mode. Select SLI multi-GPU from the side menu and select the Enable SLI multi-GPU check box (Figure 2) ...
Manual
Page 17
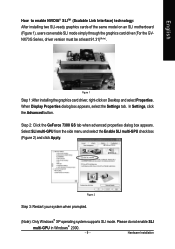
... install the appropriate driver program for that your motherboard nearest dealer for the motherboard, which consist of Windows® 2000 / Windows® XP drivers is very simple. English 3. Windows® XP Driver and Utilities Installation 3.1.1. Software Installation In this manual, we assume that motherboard. ...Or please contact your CD-ROM Drive letter to install the driver for your CD-ROM drive, you can see the AUTORUN window (if it does not show up, run "D:\setup.exe"). Software Installation When you insert the driver CD into your graphics accelerator...
... install the appropriate driver program for that your motherboard nearest dealer for the motherboard, which consist of Windows® 2000 / Windows® XP drivers is very simple. English 3. Windows® XP Driver and Utilities Installation 3.1.1. Software Installation In this manual, we assume that motherboard. ...Or please contact your CD-ROM Drive letter to install the driver for your CD-ROM drive, you can see the AUTORUN window (if it does not show up, run "D:\setup.exe"). Software Installation When you insert the driver CD into your graphics accelerator...

Manual
Page 18
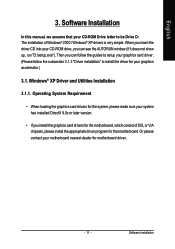
... Microsoft DirectX to enable 3D hardware acceleration support for Windows® 2000 or Windows® XP to install DirectX separately. Choose I accept the agreement and click the Next button. GV-NX73G Series Graphics Accelerator Step 4. Then the DirectX 9 installation is completed. - 12 - When autorun window show up, click the Install DirectX 9 item. Step 2. Click...
... Microsoft DirectX to enable 3D hardware acceleration support for Windows® 2000 or Windows® XP to install DirectX separately. Choose I accept the agreement and click the Next button. GV-NX73G Series Graphics Accelerator Step 4. Then the DirectX 9 installation is completed. - 12 - When autorun window show up, click the Install DirectX 9 item. Step 2. Click...
Manual
Page 19
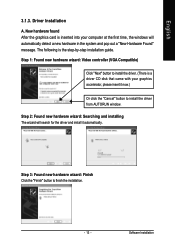
... controller (VGA Compatible) Click "Next" button to install the driver. (There is a driver CD disk that came with your computer at the first time, the windows will search for the driver and install it now.) Or click the "Cancel" button to finish the installation. - 13 - Software Installation New hardware found After... inserted into your graphics accelerator, please insert it automatically. Step 3: Found new hardware wizard: Finish Click the "Finish" button to install the driver from AUTORUN window.
... controller (VGA Compatible) Click "Next" button to install the driver. (There is a driver CD disk that came with your computer at the first time, the windows will search for the driver and install it now.) Or click the "Cancel" button to finish the installation. - 13 - Software Installation New hardware found After... inserted into your graphics accelerator, please insert it automatically. Step 3: Found new hardware wizard: Finish Click the "Finish" button to install the driver from AUTORUN window.
Manual
Page 20
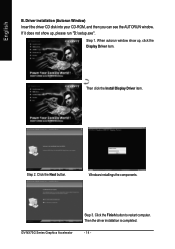
Step 1. Step 2. Driver installation (Autorun Window) Insert the driver CD disk into your CD-ROM, and then you can see the AUTORUN window. When autorun window show up , click the Display Driver item. Click the Next button. Windows installings the components. Then click the Install Display Driver item. Click the Finish button to restart computer. Then the driver installation is completed. - 14 - GV-NX73G Series Graphics Accelerator Step 3. If it does not show up , please run "D:\setup.exe". English B.
Step 1. Step 2. Driver installation (Autorun Window) Insert the driver CD disk into your CD-ROM, and then you can see the AUTORUN window. When autorun window show up , click the Display Driver item. Click the Next button. Windows installings the components. Then click the Install Display Driver item. Click the Finish button to restart computer. Then the driver installation is completed. - 14 - GV-NX73G Series Graphics Accelerator Step 3. If it does not show up , please run "D:\setup.exe". English B.
Manual
Page 21
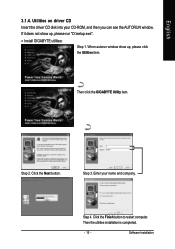
Utilities on driver CD Insert the driver CD disk into your name and company. If it does not show up , please run "D:\setup.exe". • Install GIGABYTE utilities: Step 1. Click the Finish button to restart computer. Then click the GIGABYTE Utility item. Click the Next button. Step 3. Enter your CD-ROM, and then you can see the AUTORUN window. Software Installation Step 4. English 3.1.4. When autorun window show up , please click the Utilities item. Step 2. Then the utilities installation is completed. - 15 -
Utilities on driver CD Insert the driver CD disk into your name and company. If it does not show up , please run "D:\setup.exe". • Install GIGABYTE utilities: Step 1. Click the Finish button to restart computer. Then click the GIGABYTE Utility item. Click the Next button. Step 3. Enter your CD-ROM, and then you can see the AUTORUN window. Software Installation Step 4. English 3.1.4. When autorun window show up , please click the Utilities item. Step 2. Then the utilities installation is completed. - 15 -
Manual
Page 22
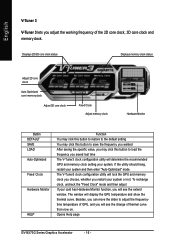
Opens Help page GV-NX73G Series Graphics Accelerator - 16 - The window will lock the GPU and memory clock you choose, whether you restart your card has Hardware Monitor function, you adjust the working frequency of the ... may click this button to adjust the frequencytime temperature of GPU, and you saved last time The V-Tuner3 clock configuration utility will see the extend window. If the utility should hang, restart your system.
Opens Help page GV-NX73G Series Graphics Accelerator - 16 - The window will lock the GPU and memory clock you choose, whether you restart your card has Hardware Monitor function, you adjust the working frequency of the ... may click this button to adjust the frequencytime temperature of GPU, and you saved last time The V-Tuner3 clock configuration utility will see the extend window. If the utility should hang, restart your system.
Manual
Page 26
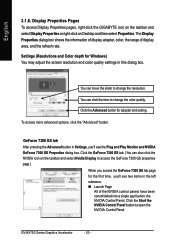
...open the NVIDIA Control Panel. Settings (Resolutions and Color depth for adapter and setting. GV-NX73G Series Graphics Accelerator - 20 - Display Properties Pages To access Display Properties pages, right-click the GIGABYTE icon on the taskbar and select Display Properties or right-click on the taskbar and ...Desktop and then select Properties. GeForce 7300 GS tab After pressing the Advanced button in this dialog box. Click the Advanced button for Windows) You may adjust the screen resolution and color quality settings in Settings, you 'll see the Plug and Play Monitor and NVIDIA ...
...open the NVIDIA Control Panel. Settings (Resolutions and Color depth for adapter and setting. GV-NX73G Series Graphics Accelerator - 20 - Display Properties Pages To access Display Properties pages, right-click the GIGABYTE icon on the taskbar and select Display Properties or right-click on the taskbar and ...Desktop and then select Properties. GeForce 7300 GS tab After pressing the Advanced button in this dialog box. Click the Advanced button for Windows) You may adjust the screen resolution and color quality settings in Settings, you 'll see the Plug and Play Monitor and NVIDIA ...
Manual
Page 30
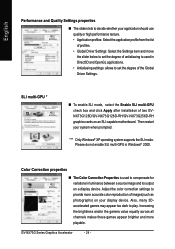
... images(such as photographs) on an SLI-capable motherboard. Adjust the color correction settings to provide more playable. GV-NX73G Series Graphics Accelerator - 24 - "*" Only Windows® XP operating system supports the SLI mode. Increasing the brightness and/or the gamma value equally across all... below to play. Also, many 3Daccelerated games may appear too dark to set the degree of two GVNX73G128D/GV-NX73G128D-RH/GV-NX73G256D-RH graphics cards on your display device. Color Correction properties „ The Color Correction Properties is used in Windows® 2000.
... images(such as photographs) on an SLI-capable motherboard. Adjust the color correction settings to provide more playable. GV-NX73G Series Graphics Accelerator - 24 - "*" Only Windows® XP operating system supports the SLI mode. Increasing the brightness and/or the gamma value equally across all... below to play. Also, many 3Daccelerated games may appear too dark to set the degree of two GVNX73G128D/GV-NX73G128D-RH/GV-NX73G256D-RH graphics cards on your display device. Color Correction properties „ The Color Correction Properties is used in Windows® 2000.
Manual
Page 31
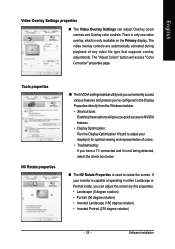
...) • Inverted Portrait (270 degree rotation) - 25 - The video overlay controls are automatically activated during playback of operating in the Display Properties directly from the Windows taskbar. • Shortcut tools: Enabling these options will access "Color Correction" properties page.
...) • Inverted Portrait (270 degree rotation) - 25 - The video overlay controls are automatically activated during playback of operating in the Display Properties directly from the Windows taskbar. • Shortcut tools: Enabling these options will access "Color Correction" properties page.

Manual
Page 33
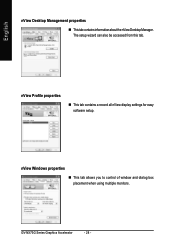
... Desktop Manager features: Right-click on desktop and choose Properties>Settings>Advanced>GeForce 7300 GS> Desktop Management Click Enable button to crowd several open application windows on one desktop. Software Installation Multiple desktops give you extra desktop areas on which to start nView Properties.
... Desktop Manager features: Right-click on desktop and choose Properties>Settings>Advanced>GeForce 7300 GS> Desktop Management Click Enable button to crowd several open application windows on one desktop. Software Installation Multiple desktops give you extra desktop areas on which to start nView Properties.
Manual
Page 34
nView Windows properties „ This tab allows you to control of window and dialog box placement when using multiple monitors. nView Profile properties „ This tab contains a record all nView display settings for easy software setup. The setup wizard can also be accessed from this tab. GV-NX73G Series Graphics Accelerator - 28 - English nView Desktop Management properties „ ThistabcontainsinformationaboutthenViewDesktopManager.
nView Windows properties „ This tab allows you to control of window and dialog box placement when using multiple monitors. nView Profile properties „ This tab contains a record all nView display settings for easy software setup. The setup wizard can also be accessed from this tab. GV-NX73G Series Graphics Accelerator - 28 - English nView Desktop Management properties „ ThistabcontainsinformationaboutthenViewDesktopManager.

Manual
Page 36
English nView Effects properties „ This tab provides special windows effects that you perform various actions with shortcut keys or key combinations. GV-NX73G Series Graphics Accelerator - 30 - Also enables full screen video playback via the video mirroring control button. nView Zoom properties „ This tab provides dynamic zoom functionality on the desktop. nView Hot Keys properties „ This tab lets you can apply to your applications.
English nView Effects properties „ This tab provides special windows effects that you perform various actions with shortcut keys or key combinations. GV-NX73G Series Graphics Accelerator - 30 - Also enables full screen video playback via the video mirroring control button. nView Zoom properties „ This tab provides dynamic zoom functionality on the desktop. nView Hot Keys properties „ This tab lets you can apply to your applications.
Manual
Page 38
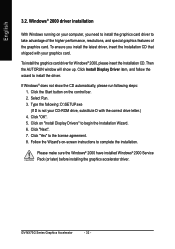
...higher performance, resolutions, and special graphics features of the graphics card. If Windows® does not show up. Type the following steps: 1. Click "OK". 5. Click "Yes" to install the driver. GV-NX73G Series Graphics Accelerator - 32 - Click Install Display Driver item, ...and follow the wizard to the license agreement. 8. Windows® 2000 driver installation With Windows running on the control bar. 2. Click the Start button on ...
...higher performance, resolutions, and special graphics features of the graphics card. If Windows® does not show up. Type the following steps: 1. Click "OK". 5. Click "Yes" to install the driver. GV-NX73G Series Graphics Accelerator - 32 - Click Install Display Driver item, ...and follow the wizard to the license agreement. 8. Windows® 2000 driver installation With Windows running on the control bar. 2. Click the Start button on ...
Manual
Page 39
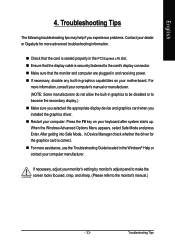
...the secondary display.) „ Make sure you selected the appropriate display device and graphics card when you experience problems. Contact your dealer or Gigabyte for the graphics card is correct. „ For more advanced troubleshooting information. „ Check that the monitor and computer are plugged in... and receiving power. „ If necessary, disable any built-in the Windows® Help or contact your computer. After getting into Safe Mode, in Device Manager check whether the driver for more assistance, use the...
...the secondary display.) „ Make sure you selected the appropriate display device and graphics card when you experience problems. Contact your dealer or Gigabyte for the graphics card is correct. „ For more advanced troubleshooting information. „ Check that the monitor and computer are plugged in... and receiving power. „ If necessary, disable any built-in the Windows® Help or contact your computer. After getting into Safe Mode, in Device Manager check whether the driver for more assistance, use the...
Manual
Page 40
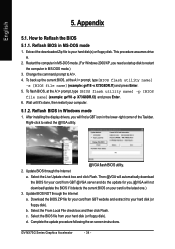
...download/update the BIOS if it detects the current BIOS on -screen instructions. b. English 5. Appendix 5.1. Reflash BIOS in Windows mode 1. Then @VGA will find a GBT icon in the lower-right corner of the Taskbar. Select the From ... the latest one.) 3. Extract the downloaded Zip file to restart the computer in MS-DOS mode. (For Windows 2000/XP, you will automatically download the BIOS for your card from GBT @VGA server and do the update... website and extract it 's done, then restart your hard disk(s) or floppy disk. GV-NX73G Series Graphics Accelerator - 34 -
...download/update the BIOS if it detects the current BIOS on -screen instructions. b. English 5. Appendix 5.1. Reflash BIOS in Windows mode 1. Then @VGA will find a GBT icon in the lower-right corner of the Taskbar. Select the From ... the latest one.) 3. Extract the downloaded Zip file to restart the computer in MS-DOS mode. (For Windows 2000/XP, you will automatically download the BIOS for your card from GBT @VGA server and do the update... website and extract it 's done, then restart your hard disk(s) or floppy disk. GV-NX73G Series Graphics Accelerator - 34 -
Manual
Page 42
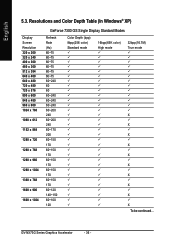
Resolutions and Color Depth Table (In Windows® XP) Display Screen Resolution 320 x 200 320 x 240 400 x 300 480 x 360 512 x 384 640 x 400 640 x 480 720 x 480 720 x 576 800 x 600 ...~150 60~100 120 Color Depth (bpp) 8bpp(256 color) Standard mode 3 3 3 3 3 3 3 3 3 3 3 3 3 3 3 3 3 3 3 3 3 3 3 3 3 3 3 3 3 3 3 3 16bpp(65K color) High mode 3 3 3 3 3 3 3 3 3 3 3 3 3 3 3 3 3 3 3 3 3 3 3 3 3 3 3 3 3 3 3 3 32bpp(16.7M) True mode 3 3 3 3 3 3 3 3 3 3 3 3 3 X 3 X 3 X 3 X 3 X 3 X 3 X 3 X 3 X 3 X To be continued... GV-NX73G Series Graphics Accelerator - 36 - English 5.3.
Resolutions and Color Depth Table (In Windows® XP) Display Screen Resolution 320 x 200 320 x 240 400 x 300 480 x 360 512 x 384 640 x 400 640 x 480 720 x 480 720 x 576 800 x 600 ...~150 60~100 120 Color Depth (bpp) 8bpp(256 color) Standard mode 3 3 3 3 3 3 3 3 3 3 3 3 3 3 3 3 3 3 3 3 3 3 3 3 3 3 3 3 3 3 3 3 16bpp(65K color) High mode 3 3 3 3 3 3 3 3 3 3 3 3 3 3 3 3 3 3 3 3 3 3 3 3 3 3 3 3 3 3 3 3 32bpp(16.7M) True mode 3 3 3 3 3 3 3 3 3 3 3 3 3 X 3 X 3 X 3 X 3 X 3 X 3 X 3 X 3 X 3 X To be continued... GV-NX73G Series Graphics Accelerator - 36 - English 5.3.
