

Manual
Page 1
... GMbH Ausschlager Weg 41, 1F, 20537 Hamburg, Germany declare that the product ( description of the apparatus, system, installation to which it refers) VGA Card GV-N595U256V / GV-N595U-GT is in conformity with (reference to the specification under which conformity is declared) in accordance with 89/336 EEC-EMC Directive Limits and methods of...
... GMbH Ausschlager Weg 41, 1F, 20537 Hamburg, Germany declare that the product ( description of the apparatus, system, installation to which it refers) VGA Card GV-N595U256V / GV-N595U-GT is in conformity with (reference to the specification under which conformity is declared) in accordance with 89/336 EEC-EMC Directive Limits and methods of...

Manual
Page 2
... hereby declares that may not cause harmful and (2) this device must accept any inference received, including that the product Product Name: VGA Card Model Number: GV-N595U256V / GV-N595U-GT Conforms to the following specifications: FCC Part 15, Subpart B, Section 15.107(a) and Section 15.109 (a),Class B Digital Device Supplementary Information: This device complies...
... hereby declares that may not cause harmful and (2) this device must accept any inference received, including that the product Product Name: VGA Card Model Number: GV-N595U256V / GV-N595U-GT Conforms to the following specifications: FCC Part 15, Subpart B, Section 15.107(a) and Section 15.109 (a),Class B Digital Device Supplementary Information: This device complies...

Manual
Page 3
Due to update the information contained herein. GV-N595U256V / GV-N595U-GT GeForce™ FX 5950 Ultra Graphics Accelerator User's Manual Rev. 101 12MD-N595U256-102 Copyright © 2003 GIGABYTE TECHNOLOGY CO., LTD Copyright by GIGA-BYTE TECHNOLOGY CO., LTD. ("GBT"). Trademarks Third-party brands and names are the property of this document nor does ...
Due to update the information contained herein. GV-N595U256V / GV-N595U-GT GeForce™ FX 5950 Ultra Graphics Accelerator User's Manual Rev. 101 12MD-N595U256-102 Copyright © 2003 GIGABYTE TECHNOLOGY CO., LTD Copyright by GIGA-BYTE TECHNOLOGY CO., LTD. ("GBT"). Trademarks Third-party brands and names are the property of this document nor does ...

Manual
Page 4
...; 98/98SE / Win® 2000 / Win® ME driver installation 30 3.3. BIOS flash utility 30 4. Resolutions and color depth table (In Windows® XP 33 GV-N595U256V Graphics Accelerator - 2 - Hardware Installation 4 2.1. Hardware installation 6 3. DirectX installation 9 3.1.3. Driver installation 11 3.1.4. Utilities on driver CD 15 3.1.5. Features ...3 1.2. Minimum system requirement 3 2. How to reflash the...
...; 98/98SE / Win® 2000 / Win® ME driver installation 30 3.3. BIOS flash utility 30 4. Resolutions and color depth table (In Windows® XP 33 GV-N595U256V Graphics Accelerator - 2 - Hardware Installation 4 2.1. Hardware installation 6 3. DirectX installation 9 3.1.3. Driver installation 11 3.1.4. Utilities on driver CD 15 3.1.5. Features ...3 1.2. Minimum system requirement 3 2. How to reflash the...

Manual
Page 6
... same point as the power supply case. 3. Use none official gigabyte BIOS might cause problem on a grounded anti-static mat. To protect them against damage from the system. Unpacking The GV-N595U256V / GV-N595U-GT package contains the following: The GV-N595U256V or GV-N595U-GT graphics accelerator GV-N595U256V / GV-N595U-GT user's manual NVIDIA Series driver and utility CD PowerDVD CD...
... same point as the power supply case. 3. Use none official gigabyte BIOS might cause problem on a grounded anti-static mat. To protect them against damage from the system. Unpacking The GV-N595U256V / GV-N595U-GT package contains the following: The GV-N595U256V or GV-N595U-GT graphics accelerator GV-N595U256V / GV-N595U-GT user's manual NVIDIA Series driver and utility CD PowerDVD CD...
Manual
Page 7
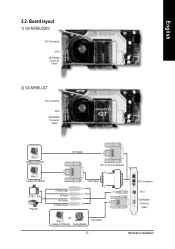
Board layout 1) GV-N595U256V DVI-I Connector VIVO VGA Monitor Connector (15pin) 2) GV-N595U-GT DVI-I Connector VIVO VGA Monitor Connector (15pin) Digital LCD Monitor DVI Output DVI-I Connector VIVO VGA Monitor Connector (15pin) Hardware Installation DVI-I to D-Sub Connector Analog LCD Monitor VGA Output NTSC / PAL Projector S-Video Input AV Input AV Output S-Video Output OR Analog LCD Monitor Analog Monitor VGA Output - 5 - English 2.2.
Board layout 1) GV-N595U256V DVI-I Connector VIVO VGA Monitor Connector (15pin) 2) GV-N595U-GT DVI-I Connector VIVO VGA Monitor Connector (15pin) Digital LCD Monitor DVI Output DVI-I Connector VIVO VGA Monitor Connector (15pin) Hardware Installation DVI-I to D-Sub Connector Analog LCD Monitor VGA Output NTSC / PAL Projector S-Video Input AV Input AV Output S-Video Output OR Analog LCD Monitor Analog Monitor VGA Output - 5 - English 2.2.
Manual
Page 8
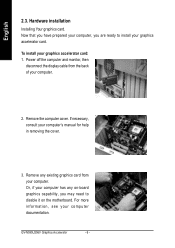
... disable it on -board graphics capability, you are ready to install your graphics accelerator card: 1. Hardware installation Installing Your graphics card. Remove the computer cover. GV-N595U256V Graphics Accelerator - 6 -
... disable it on -board graphics capability, you are ready to install your graphics accelerator card: 1. Hardware installation Installing Your graphics card. Remove the computer cover. GV-N595U256V Graphics Accelerator - 6 -
Manual
Page 9
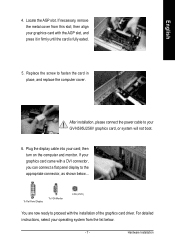
... graphics card with the installation of the graphics card driver. Replace the screw to your operating system from this slot; For detailed instructions, select your GV-N595U256V graphics card, or system will not boot. 6. English 4. Locate the AGP slot. After installation, please connect the power cable to fasten the card in...
... graphics card with the installation of the graphics card driver. Replace the screw to your operating system from this slot; For detailed instructions, select your GV-N595U256V graphics card, or system will not boot. 6. English 4. Locate the AGP slot. After installation, please connect the power cable to fasten the card in...

Manual
Page 10
... follow the subsection 3.1.3 "Driver installation" to be Drive D: The installation of SIS, ALI or VIA chipsets, please install the appropriate driver program for motherboard driver. GV-N595U256V Graphics Accelerator - 8 - Operating system requirement • When loading the graphics card drivers for the system, please make sure your CD-ROM Drive letter to...
... follow the subsection 3.1.3 "Driver installation" to be Drive D: The installation of SIS, ALI or VIA chipsets, please install the appropriate driver program for motherboard driver. GV-N595U256V Graphics Accelerator - 8 - Operating system requirement • When loading the graphics card drivers for the system, please make sure your CD-ROM Drive letter to...
Manual
Page 12
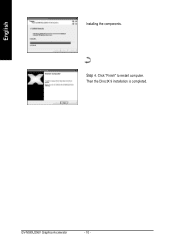
Click "Finish" to restart computer. English Installing the components. Then the DirectX 9 installation is completed. Step 4. GV-N595U256V Graphics Accelerator - 10 -
Click "Finish" to restart computer. English Installing the components. Then the DirectX 9 installation is completed. Step 4. GV-N595U256V Graphics Accelerator - 10 -

Manual
Page 14
Windows installings the components. When autorun window show up , click Install Display Driver item. Click "Install Display Driver" item. Step 1. If it does not show up , please run "D:\setup.exe". Step 2. Driver installation (Autorun Window) Insert the driver CD disk into your CD-ROM, and then you can see the AUTORUN window. Click "Install Display Driver" item. Click "Next" button. GV-N595U256V Graphics Accelerator - 12 - English B.
Windows installings the components. When autorun window show up , click Install Display Driver item. Click "Install Display Driver" item. Step 1. If it does not show up , please run "D:\setup.exe". Step 2. Driver installation (Autorun Window) Insert the driver CD disk into your CD-ROM, and then you can see the AUTORUN window. Click "Install Display Driver" item. Click "Next" button. GV-N595U256V Graphics Accelerator - 12 - English B.
Manual
Page 16
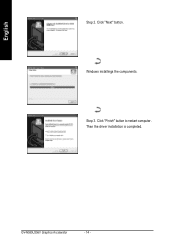
Windows installings the components. Then the driver installation is completed. Step 3. GV-N595U256V Graphics Accelerator - 14 - Click "Finish" button to restart computer. Click "Next" button. English Step 2.
Windows installings the components. Then the driver installation is completed. Step 3. GV-N595U256V Graphics Accelerator - 14 - Click "Finish" button to restart computer. Click "Next" button. English Step 2.

Manual
Page 18
English V-Tuner (Overclock Utility) V-Tuner lets you adjust the working frequency of Gigabyte Display & Adjust Memory Clock Help Description Close V-Tuner to System Tray GV-N595U256V Graphics Accelerator - 16 - Display & Adjust Min. V-Tuner Core Clock Display Core Clock Close V-Tuner Display Memory Clock Link to the Website of the graphic engine and video memory (Core Clock and Memory Clock).
English V-Tuner (Overclock Utility) V-Tuner lets you adjust the working frequency of Gigabyte Display & Adjust Memory Clock Help Description Close V-Tuner to System Tray GV-N595U256V Graphics Accelerator - 16 - Display & Adjust Min. V-Tuner Core Clock Display Core Clock Close V-Tuner Display Memory Clock Link to the Website of the graphic engine and video memory (Core Clock and Memory Clock).

Manual
Page 20
Color Adjust Color Adjust allows you to make color adjustments, such as brightness, contrast and gamma values for each or all of RGB colors. GV-N595U256V Graphics Accelerator - 18 - English VGA Information VGA Info lists the relevant information about your card.
Color Adjust Color Adjust allows you to make color adjustments, such as brightness, contrast and gamma values for each or all of RGB colors. GV-N595U256V Graphics Accelerator - 18 - English VGA Information VGA Info lists the relevant information about your card.

Manual
Page 22
... resolution and color quality settings. English 3.1.6. You can select other properties from the pop-out menu. You can move the slider to change the resolution. GV-N595U256V Graphics Accelerator - 20 - Display properties pages The screen shows the information of display adapter, color, the range of display area and the refresh rate...
... resolution and color quality settings. English 3.1.6. You can select other properties from the pop-out menu. You can move the slider to change the resolution. GV-N595U256V Graphics Accelerator - 20 - Display properties pages The screen shows the information of display adapter, color, the range of display area and the refresh rate...

Manual
Page 24
... texture clamp behavior. • Multi-Display Hardware Acceleration • Default Color Depth (for textures) • Buffer-Flipping Mode • Vertical Sync • Custom OpenGL settings GV-N595U256V Graphics Accelerator - 22 - English Performance and Quality Settings properties „ The sliders lets to decide whether your application should use qulity or high performance...
... texture clamp behavior. • Multi-Display Hardware Acceleration • Default Color Depth (for textures) • Buffer-Flipping Mode • Vertical Sync • Custom OpenGL settings GV-N595U256V Graphics Accelerator - 22 - English Performance and Quality Settings properties „ The sliders lets to decide whether your application should use qulity or high performance...

Manual
Page 26
... Overrides properties „ Click "Override refresh rates" to select refresh rate overrides to adjust the screen resolution, color quality and monitor settings (screen rdfresh rates). GV-N595U256V Graphics Accelerator - 24 -
... Overrides properties „ Click "Override refresh rates" to select refresh rate overrides to adjust the screen resolution, color quality and monitor settings (screen rdfresh rates). GV-N595U256V Graphics Accelerator - 24 -

Manual
Page 28
nView Profile properties „ This tab contains a record all nView display settings for easy software setup. GV-N595U256V Graphics Accelerator - 26 - You can also be accessed from the list below or create your own custom profile. The setup wizard can either select a profile from this tab. nView Windows properties „ This tab allows you to control of window and dialog box placement when using multiple monitors. English nView Desktop Management properties „ This tab contains information about the nView Desktop Manager.
nView Profile properties „ This tab contains a record all nView display settings for easy software setup. GV-N595U256V Graphics Accelerator - 26 - You can also be accessed from the list below or create your own custom profile. The setup wizard can either select a profile from this tab. nView Windows properties „ This tab allows you to control of window and dialog box placement when using multiple monitors. English nView Desktop Management properties „ This tab contains information about the nView Desktop Manager.

Manual
Page 30
English nView Effects properties „ This tab provides special windows effects that you perform various actions with shortcut keys or key combinations. nView Zoom properties „ This tab provides dynamic zoom functionality on the desktop. nView Hot Keys properties „ This tab lets you can apply to your applications. GV-N595U256V Graphics Accelerator - 28 - Also enables full screen video playback via the video mirroring control button.
English nView Effects properties „ This tab provides special windows effects that you perform various actions with shortcut keys or key combinations. nView Zoom properties „ This tab provides dynamic zoom functionality on the desktop. nView Hot Keys properties „ This tab lets you can apply to your applications. GV-N595U256V Graphics Accelerator - 28 - Also enables full screen video playback via the video mirroring control button.

Manual
Page 32
... on "Install Display Drivers" to reflash the BIOS". BIOS flash utility BIOS update procedure: 0Note: Please download the newest BIOS from our website (www.gigabyte.com.tw) or contact your local dealer for Win® 98/98SE / Win® 2000 / Win® ME, please insert the Installation CD.... "How to begin the Installation Wizard. 6. GV-N595U256V Graphics Accelerator - 30 - With Windows running on -screen instructions to the license agreement. 8. Click Install Display Driver item, and follow the wizard ...
... on "Install Display Drivers" to reflash the BIOS". BIOS flash utility BIOS update procedure: 0Note: Please download the newest BIOS from our website (www.gigabyte.com.tw) or contact your local dealer for Win® 98/98SE / Win® 2000 / Win® ME, please insert the Installation CD.... "How to begin the Installation Wizard. 6. GV-N595U256V Graphics Accelerator - 30 - With Windows running on -screen instructions to the license agreement. 8. Click Install Display Driver item, and follow the wizard ...


