
User Manual
Page 3
STATISTICS TAB ...18 3.5. PROFILE TAB ...7 3.2. LINK STATUS TAB...16 3.3. INSTALLING THE ADAPTER (HARDWARE INSTALLATION 3 2-2. Contents CHAPTER 1 PRODUCT OVERVIEW 1 1.1 INTRODUCTION TO THE WPKG WIRELESS PCI ADAPTER 1 1.2 FEATURES ...1 1.3 PHYSICAL DIMENSIONS & PACKAGING 1 1.4 LED INDICATOR ...2 1.5 SYSTEM REQUIREMENTS 2 CHAPTER 2 INSTALLING THE PCI ADAPTER 3 2-1. ABOUT TAB...19... ! INSTALLING THE DRIVER & UTILITY (WIN 98/ME 4 2-3. SITE SURVEY TAB 17 3.4. APPENDIX E WARRANTY 23 INSTALLING THE DRIVER & UTILITY (WINDOWS 2000/XP CHAPTER 3 USING THE UTILITY 7 3.1.
STATISTICS TAB ...18 3.5. PROFILE TAB ...7 3.2. LINK STATUS TAB...16 3.3. INSTALLING THE ADAPTER (HARDWARE INSTALLATION 3 2-2. Contents CHAPTER 1 PRODUCT OVERVIEW 1 1.1 INTRODUCTION TO THE WPKG WIRELESS PCI ADAPTER 1 1.2 FEATURES ...1 1.3 PHYSICAL DIMENSIONS & PACKAGING 1 1.4 LED INDICATOR ...2 1.5 SYSTEM REQUIREMENTS 2 CHAPTER 2 INSTALLING THE PCI ADAPTER 3 2-1. ABOUT TAB...19... ! INSTALLING THE DRIVER & UTILITY (WIN 98/ME 4 2-3. SITE SURVEY TAB 17 3.4. APPENDIX E WARRANTY 23 INSTALLING THE DRIVER & UTILITY (WINDOWS 2000/XP CHAPTER 3 USING THE UTILITY 7 3.1.

User Manual
Page 6
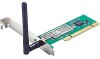
...an open PCI slot on the motherboard by screwing it on your PC. Step 3: Once inserted, attach the antenna on the mount of Windows, please refer to the appropriate sections as shown in the figure below. The following sections will assist you with proper installation of the... WPKG Adapter for your motherboards PCI slot. Installing the Adapter (Hardware Installation) Step 1: Power off your PC. 3 Chapter 2 Installation This chapter covers the ...
...an open PCI slot on the motherboard by screwing it on your PC. Step 3: Once inserted, attach the antenna on the mount of Windows, please refer to the appropriate sections as shown in the figure below. The following sections will assist you with proper installation of the... WPKG Adapter for your motherboards PCI slot. Installing the Adapter (Hardware Installation) Step 1: Power off your PC. 3 Chapter 2 Installation This chapter covers the ...
User Manual
Page 7
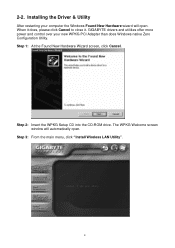
Step 1: At the Found New Hardware Wizard screen, click Cancel. 2-2. When it does, please click Cancel to close it. The WPKG Welcome screen window will open . Step 3: From the main menu, click "Install Wireless LAN Utility". 4 Step 2: Insert the WPKG Setup CD into the CD-ROM drive. Installing the Driver & Utility After restarting your new WPKG PCI Adapter than does Windows native Zero Configuration Utility. GIGABYTE drivers and utilities offer more power and control over your computer the Windows Found New Hardware wizard will automatically open .
Step 1: At the Found New Hardware Wizard screen, click Cancel. 2-2. When it does, please click Cancel to close it. The WPKG Welcome screen window will open . Step 3: From the main menu, click "Install Wireless LAN Utility". 4 Step 2: Insert the WPKG Setup CD into the CD-ROM drive. Installing the Driver & Utility After restarting your new WPKG PCI Adapter than does Windows native Zero Configuration Utility. GIGABYTE drivers and utilities offer more power and control over your computer the Windows Found New Hardware wizard will automatically open .
User Manual
Page 8
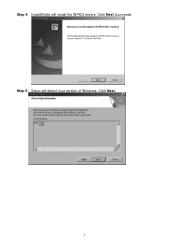
Step 5: Setup will install the WPKG drivers. Click Next. 5 Step 4: InstallShield will detect your version of Windows. Click Next to proceed.
Step 5: Setup will install the WPKG drivers. Click Next. 5 Step 4: InstallShield will detect your version of Windows. Click Next to proceed.
User Manual
Page 10
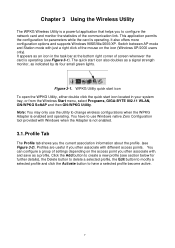
... Figure 3-1). It appears as a profile, Click the Add button to change wireless configurations when the WPKG Adapter is enabled and operating. Note: You may only use Windows native Zero Configuration tool provided with different access points. The quick start icon located in the task .../2000 users only). and save as an icon in your system tray, or from the Windows Start menu, select Programs, GIGA-BYTE 802.11 WLAN, GN-WPKG SoftAP and then GN-WPKG Utility. Figure 3-1. This application permits the configuration for further details), the Delete button to delete a selected profile...
... Figure 3-1). It appears as a profile, Click the Add button to change wireless configurations when the WPKG Adapter is enabled and operating. Note: You may only use Windows native Zero Configuration tool provided with different access points. The quick start icon located in the task .../2000 users only). and save as an icon in your system tray, or from the Windows Start menu, select Programs, GIGA-BYTE 802.11 WLAN, GN-WPKG SoftAP and then GN-WPKG Utility. Figure 3-1. This application permits the configuration for further details), the Delete button to delete a selected profile...

User Manual
Page 15
... it in. Remember this Passphrase. Certification Tab Clicking Use 802.1X Authentication and then Enter 802.1X configuration from the Authentication and Security Window will use WPA-PSK: 1. To use the Passphrase to do a hard reset of items in order to save these settings. 3-1-2-1. 802...forget the Passphrase, you may configure information about authentication, such as its often called) and the system will bring up the 802.1x Setting Window and the Certification Tab (see Figure 3-6 and 3-8) Figure 3-6. 802.1X Authentication Description of the Access Point in Figure 3-6 is as follows...
... it in. Remember this Passphrase. Certification Tab Clicking Use 802.1X Authentication and then Enter 802.1X configuration from the Authentication and Security Window will use WPA-PSK: 1. To use the Passphrase to do a hard reset of items in order to save these settings. 3-1-2-1. 802...forget the Passphrase, you may configure information about authentication, such as its often called) and the system will bring up the 802.1x Setting Window and the Certification Tab (see Figure 3-6 and 3-8) Figure 3-6. 802.1X Authentication Description of the Access Point in Figure 3-6 is as follows...

User Manual
Page 16
...: PEPA and TTLS use two-step authentication method. Client Certificate Selection List 13 Tunnel ID: Users' accounts. Clicking More will open the Client Certificate Selection Window (shown in the safe tunnel. Data needed for users' accounts. Identity: The Account's User ID.
...: PEPA and TTLS use two-step authentication method. Client Certificate Selection List 13 Tunnel ID: Users' accounts. Clicking More will open the Client Certificate Selection Window (shown in the safe tunnel. Data needed for users' accounts. Identity: The Account's User ID.
User Manual
Page 24
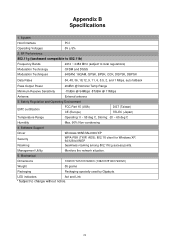
...Mechanical Monitors the network situation. Dimensions 134mm*121mm*22mm (134mm*81mm*22mm) Weight Packaging 55 grams Packaging specially used by Gigabyte. Management Utility 5. RF Performance 802.11g (backward compatible to 802.11b) Frequency Bands 2412 ~ 2484 MHz (subject to... Range Humidity Operating: 0 ~ 55 deg C, Storing: -20 ~ 65 deg C Max. 90% Non-condensing 4. Software Support Driver Security Roaming Windows 98SE/Me/2000/XP WPA-PSK (TKIP, AES); 802.1X client for Windows XP, 64/128 bit WEP Seamless roaming among 802.11b/g access points. Appendix B Specifications 1.
...Mechanical Monitors the network situation. Dimensions 134mm*121mm*22mm (134mm*81mm*22mm) Weight Packaging 55 grams Packaging specially used by Gigabyte. Management Utility 5. RF Performance 802.11g (backward compatible to 802.11b) Frequency Bands 2412 ~ 2484 MHz (subject to... Range Humidity Operating: 0 ~ 55 deg C, Storing: -20 ~ 65 deg C Max. 90% Non-condensing 4. Software Support Driver Security Roaming Windows 98SE/Me/2000/XP WPA-PSK (TKIP, AES); 802.1X client for Windows XP, 64/128 bit WEP Seamless roaming among 802.11b/g access points. Appendix B Specifications 1.