Manual
Page 2
......22 Inserting a disc...22 Using the touch screen (for select models 24 Using the Peripheral Devices 25 Quick Start Guide (QSG) of Monitor Mode for GB-AEGT-SI/GBAEGTN-SI 25 Functionalities...25 GB-AEGT-SI/GB-AEGTN-SI 2
......22 Inserting a disc...22 Using the touch screen (for select models 24 Using the Peripheral Devices 25 Quick Start Guide (QSG) of Monitor Mode for GB-AEGT-SI/GBAEGTN-SI 25 Functionalities...25 GB-AEGT-SI/GB-AEGTN-SI 2

Manual
Page 3
... Power problems...46 Internet access problems...47 Display problems...48 Keyboard and mouse problems 49 Sound and microphone problems 50 Miscellaneous problems...51 Specifications...53 GB-AEGT-SI/GB-AEGTN-SI 3
... Power problems...46 Internet access problems...47 Display problems...48 Keyboard and mouse problems 49 Sound and microphone problems 50 Miscellaneous problems...51 Specifications...53 GB-AEGT-SI/GB-AEGTN-SI 3
Manual
Page 4
... of electric shock and other accident such as opening or removing covers may encounter while using your computer. NOTE: Indicates additional information for completing a task. GB-AEGT-SI/GB-AEGTN-SI 4 Document Type • Quick Start Guide provides information about using your computer, cleaning and maintaining the monitor and the accessories, and the common solutions...
... of electric shock and other accident such as opening or removing covers may encounter while using your computer. NOTE: Indicates additional information for completing a task. GB-AEGT-SI/GB-AEGTN-SI 4 Document Type • Quick Start Guide provides information about using your computer, cleaning and maintaining the monitor and the accessories, and the common solutions...
Manual
Page 5
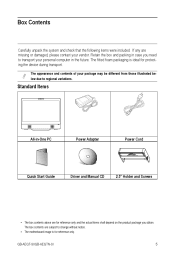
... Screws • The box contents above are for reference only and the actual items shall depend on the product package you need to regional variations. GB-AEGT-SI/GB-AEGTN-SI 5 The appearance and contents of your package may be different from those illustrated below due to transport your vendor. Retain the box and packing...
... Screws • The box contents above are for reference only and the actual items shall depend on the product package you need to regional variations. GB-AEGT-SI/GB-AEGTN-SI 5 The appearance and contents of your package may be different from those illustrated below due to transport your vendor. Retain the box and packing...
Manual
Page 6
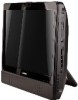
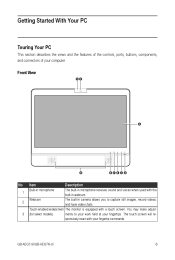
...-enabled widescreen The monitor is equipped with the built-in webcam. 2 Webcam The built-in microphone receives sound and voices when used with a touch screen. GB-AEGT-SI/GB-AEGTN-SI 6 Getting Started With Your PC Touring Your PC This section describes the views and the features of the controls, ports, buttons, components, and connectors...
...-enabled widescreen The monitor is equipped with the built-in webcam. 2 Webcam The built-in microphone receives sound and voices when used with a touch screen. GB-AEGT-SI/GB-AEGTN-SI 6 Getting Started With Your PC Touring Your PC This section describes the views and the features of the controls, ports, buttons, components, and connectors...

Manual
Page 7
Hotkey for LCD Brightness control. GB-AEGT-SI/GB-AEGTN-SI 7 Menu. For details about the OSD menu options, see "OSD (On Screen Display) Menu control". / 7 Brightness/Increase. Hotkey for Volume control. When OSD is activated, ...
Hotkey for LCD Brightness control. GB-AEGT-SI/GB-AEGTN-SI 7 Menu. For details about the OSD menu options, see "OSD (On Screen Display) Menu control". / 7 Brightness/Increase. Hotkey for Volume control. When OSD is activated, ...
Manual
Page 8
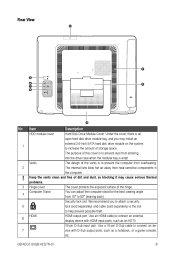
GB-AEGT-SI/GB-AEGTN-SI 8 The purpose of this cover is to prevent dust from entering into the drive case when the modular bay is empt Vents The design of ...
GB-AEGT-SI/GB-AEGTN-SI 8 The purpose of this cover is to prevent dust from entering into the drive case when the modular bay is empt Vents The design of ...

Manual
Page 9
Audio input jack. GB-AEGT-SI/GB-AEGTN-SI 9 Connect to an audio in jack on external 8 audio equipment for audio sound.
Audio input jack. GB-AEGT-SI/GB-AEGTN-SI 9 Connect to an audio in jack on external 8 audio equipment for audio sound.
Manual
Page 10
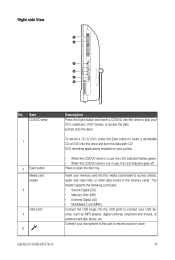
... microphone to this drive to play your CD's collections, DVD movies, or access the data burned onto the discs. Press to open the disc tray. GB-AEGT-SI/GB-AEGTN-SI 10 Right-side View 1 2 3 4 5 6 No Item CD/DVD drive 1 2 Eject button Media card reader 3 USB ports 4 5 Description Press the Eject button and insert a CD...
... microphone to this drive to play your CD's collections, DVD movies, or access the data burned onto the discs. Press to open the disc tray. GB-AEGT-SI/GB-AEGTN-SI 10 Right-side View 1 2 3 4 5 6 No Item CD/DVD drive 1 2 Eject button Media card reader 3 USB ports 4 5 Description Press the Eject button and insert a CD...

Manual
Page 11
Audio/Headphone Output Audio/Headphone output jack. GB-AEGT-SI/GB-AEGTN-SI 11 Connect your headphones or speakers 6 Jack to this jack to listen to the sound from your PC when watching videos and DVDs, listening to music, and playing games.
Audio/Headphone Output Audio/Headphone output jack. GB-AEGT-SI/GB-AEGTN-SI 11 Connect your headphones or speakers 6 Jack to this jack to listen to the sound from your PC when watching videos and DVDs, listening to music, and playing games.
Manual
Page 12
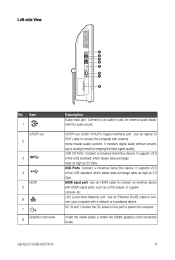
...an HDMI cable to an audio in jack on external audio equipment for keeping the best signal quality. LAN (Local Area Network) port. GB-AEGT-SI/GB-AEGTN-SI 12 Connect a Universal Serial Bus device. Use an optical S/ PDIF cable to connect the computer with external home theater audio systems. It...RJ45) cable to analog format for audio sound. It supports V2.0 of the USB standard, which allows data exchange rates as high as 5.0 Gb/s. S/PDIF-out (SONY-PHILIPS Digital Interface) port. HDMI input port. Under the medal plates is where the hidden graphics card connectors locate. ...
...an HDMI cable to an audio in jack on external audio equipment for keeping the best signal quality. LAN (Local Area Network) port. GB-AEGT-SI/GB-AEGTN-SI 12 Connect a Universal Serial Bus device. Use an optical S/ PDIF cable to connect the computer with external home theater audio systems. It...RJ45) cable to analog format for audio sound. It supports V2.0 of the USB standard, which allows data exchange rates as high as 5.0 Gb/s. S/PDIF-out (SONY-PHILIPS Digital Interface) port. HDMI input port. Under the medal plates is where the hidden graphics card connectors locate. ...
Manual
Page 13
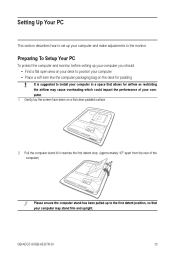
... been pulled up your computer. 1. Gently lay the screen face down on the desk for airflow as restricting the airflow may stand firm and upright. GB-AEGT-SI/GB-AEGTN-SI 13 Preparing To Setup Your PC To protect the computer and monitor, before setting up your computer you should: • Find a flat open area...
... been pulled up your computer. 1. Gently lay the screen face down on the desk for airflow as restricting the airflow may stand firm and upright. GB-AEGT-SI/GB-AEGTN-SI 13 Preparing To Setup Your PC To protect the computer and monitor, before setting up your computer you should: • Find a flat open area...

Manual
Page 14
Now you may stand firm and upright. GB-AEGT-SI/GB-AEGTN-SI 14 3. Then you are ready to access some strength to make cable connections. Carefully hold both sides of the computer with some ports on the side panel of the screen to meet your needs. 10 ~50 Please ensure the computer stand has been pulled up to the first detent position, so that your computer may adjust the angle of the computer to lift it upright.
Now you may stand firm and upright. GB-AEGT-SI/GB-AEGTN-SI 14 3. Then you are ready to access some strength to make cable connections. Carefully hold both sides of the computer with some ports on the side panel of the screen to meet your needs. 10 ~50 Please ensure the computer stand has been pulled up to the first detent position, so that your computer may adjust the angle of the computer to lift it upright.

Manual
Page 15
Connect the power cable to a nearby power outlet. GB-AEGT-SI/GB-AEGTN-SI 15 Do not plug in or turn on the left side of the computer. 3. Connect the power plug to the power jack on the power to the computer until instructed to do so. Connecting the power The illustrations may differ from product supplied for your region. 3 2 1 1. Connect the power adapter to the supplied power adapter. 2.
Connect the power cable to a nearby power outlet. GB-AEGT-SI/GB-AEGTN-SI 15 Do not plug in or turn on the left side of the computer. 3. Connect the power plug to the power jack on the power to the computer until instructed to do so. Connecting the power The illustrations may differ from product supplied for your region. 3 2 1 1. Connect the power adapter to the supplied power adapter. 2.
Manual
Page 16
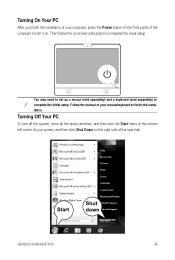
... the right side of your mouse/keyboard to finish the installation. Then follow the on-screen instructions to complete the initial setup. Start Shut down GB-AEGT-SI/GB-AEGTN-SI 16
... the right side of your mouse/keyboard to finish the installation. Then follow the on-screen instructions to complete the initial setup. Start Shut down GB-AEGT-SI/GB-AEGTN-SI 16
Manual
Page 17
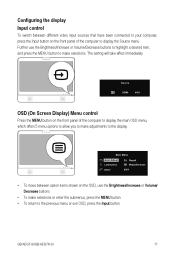
GB-AEGT-SI/GB-AEGTN-SI 17 Further use the Brightness/Increase or Volume/ Decrease buttons. • To make selections. Configuring the display Input control To switch between option items shown ...
GB-AEGT-SI/GB-AEGTN-SI 17 Further use the Brightness/Increase or Volume/ Decrease buttons. • To make selections. Configuring the display Input control To switch between option items shown ...

Manual
Page 18
.... • Aspect: Scales the input image to Mode be disabled. The default start setting is D-Sub. • Over Scan Slightly enlarges the input image. GB-AEGT-SI/GB-AEGTN-SI 18 There are three submenus available. • Display Displays the current monitor property settings. The function is available only when the input source is 50...
.... • Aspect: Scales the input image to Mode be disabled. The default start setting is D-Sub. • Over Scan Slightly enlarges the input image. GB-AEGT-SI/GB-AEGTN-SI 18 There are three submenus available. • Display Displays the current monitor property settings. The function is available only when the input source is 50...

Manual
Page 19
Volume control To adjust the sound level, press the Volume/Decrease button on the front panel of the computer to display the Volume indicator, and then press the Brightness/Increase button to increase the level or press the Volume/Decrease button to decrease the level. GB-AEGT-SI/GB-AEGTN-SI 19 Brightness control To adjust the brightness level of the monitor, press the Brightness/Increase button on the front panel of the computer to display the Brightness indicator, and then press the same button to increase the level or press the Volume/Decrease button to decrease the level.
Volume control To adjust the sound level, press the Volume/Decrease button on the front panel of the computer to display the Volume indicator, and then press the Brightness/Increase button to increase the level or press the Volume/Decrease button to decrease the level. GB-AEGT-SI/GB-AEGTN-SI 19 Brightness control To adjust the brightness level of the monitor, press the Brightness/Increase button on the front panel of the computer to display the Brightness indicator, and then press the same button to increase the level or press the Volume/Decrease button to decrease the level.
Manual
Page 20
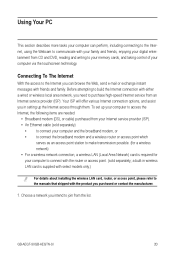
...; Your ISP will offer various Internet connection options, and assist you in wireless LAN card is required for your computer via the touchscreen technology. GB-AEGT-SI/GB-AEGTN-SI 20 To set up the Internet access through them. Connecting To The Internet With the access to the manuals that shipped with the product you...
...; Your ISP will offer various Internet connection options, and assist you in wireless LAN card is required for your computer via the touchscreen technology. GB-AEGT-SI/GB-AEGTN-SI 20 To set up the Internet access through them. Connecting To The Internet With the access to the manuals that shipped with the product you...

Manual
Page 21
... getting images that the connection has been established. 3. With this webcam, you can chat online in 2.0 megapixel webcam at the top center of the bezel. GB-AEGT-SI/GB-AEGTN-SI 21 If the selected network requires security authentication, please enter a user name and password. 2. If the selected network requires security authentication, please enter a user...
... getting images that the connection has been established. 3. With this webcam, you can chat online in 2.0 megapixel webcam at the top center of the bezel. GB-AEGT-SI/GB-AEGTN-SI 21 If the selected network requires security authentication, please enter a user name and password. 2. If the selected network requires security authentication, please enter a user...
