Manual
Page 2
... power 15 Turning On Your PC 16 Turning Off Your PC 16 Configuring the display 17 Input control...17 OSD (On Screen Display) Menu control 17 Brightness control...19 Volume control...19 Using Your PC...20 Connecting To The Internet 20 Using The Webcam...21 Using The Optical Disc Drive 22 CD-Writable Drives...22 DVD-Writable Drives...22 Inserting a disc...22 Using the touch screen (for select models 24 Using the Peripheral Devices 25 Quick Start Guide (QSG) of Monitor Mode for GB-AEGT...
... power 15 Turning On Your PC 16 Turning Off Your PC 16 Configuring the display 17 Input control...17 OSD (On Screen Display) Menu control 17 Brightness control...19 Volume control...19 Using Your PC...20 Connecting To The Internet 20 Using The Webcam...21 Using The Optical Disc Drive 22 CD-Writable Drives...22 DVD-Writable Drives...22 Inserting a disc...22 Using the touch screen (for select models 24 Using the Peripheral Devices 25 Quick Start Guide (QSG) of Monitor Mode for GB-AEGT...

Manual
Page 3
... Caution For Battery...31 Removing PC Cover 32 Removing VGA Metal Cover 34 Removing Motherboard Metal Cover 35 Replacing Hard Disk Drive 37 Installing CPU ...38 Installing Memory...39 Installing WiFi Module 40 Installing Heat Sink...41 Installing a Second disk drive module 42 Installing a Wall Mount 43 Installing a VGA card 45 Troubleshooting...46 Frequently Asked Questions (FAQ 46 Power problems...46 Internet access problems...47 Display problems...48 Keyboard and mouse problems 49 Sound and microphone problems 50 Miscellaneous problems...51 Specifications...53 GB-AEGT-SI/GB-AEGTN...
... Caution For Battery...31 Removing PC Cover 32 Removing VGA Metal Cover 34 Removing Motherboard Metal Cover 35 Replacing Hard Disk Drive 37 Installing CPU ...38 Installing Memory...39 Installing WiFi Module 40 Installing Heat Sink...41 Installing a Second disk drive module 42 Installing a Wall Mount 43 Installing a VGA card 45 Troubleshooting...46 Frequently Asked Questions (FAQ 46 Power problems...46 Internet access problems...47 Display problems...48 Keyboard and mouse problems 49 Sound and microphone problems 50 Miscellaneous problems...51 Specifications...53 GB-AEGT-SI/GB-AEGTN...
Manual
Page 4
... to the problems you may expose you to help you perform specific tasks properly, preventing unnecessary errors. CAUTION: Indicates important information to prevent potential damage to ensure that you perform various tasks. GB-AEGT-SI/GB-AEGTN-SI 4 TIP: Indicates useful information for completing a task. Overview Of Your Documentation Document Type Your documentation contains printed information and PDF user manuals to...
... to the problems you may expose you to help you perform specific tasks properly, preventing unnecessary errors. CAUTION: Indicates important information to prevent potential damage to ensure that you perform various tasks. GB-AEGT-SI/GB-AEGTN-SI 4 TIP: Indicates useful information for completing a task. Overview Of Your Documentation Document Type Your documentation contains printed information and PDF user manuals to...
Manual
Page 6
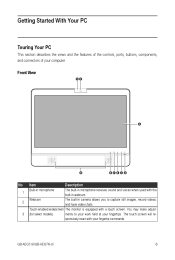
The touch screen will re- GB-AEGT-SI/GB-AEGTN-SI 6 Getting Started With Your PC Touring Your PC This section describes the views and the features of the controls, ports, buttons, components, and connectors of your fingertip commands. You may make adjust- 3 (for select models) ments to capture still images, record videos, and have video chats. Front View 12 3 9 8765 4 No Item Description 1 Built...
The touch screen will re- GB-AEGT-SI/GB-AEGTN-SI 6 Getting Started With Your PC Touring Your PC This section describes the views and the features of the controls, ports, buttons, components, and connectors of your fingertip commands. You may make adjust- 3 (for select models) ments to capture still images, record videos, and have video chats. Front View 12 3 9 8765 4 No Item Description 1 Built...
Manual
Page 8
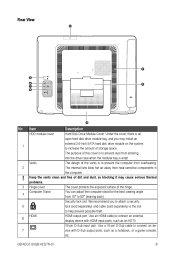
... the vents clean and free of the vents is an open hard disk drive module bay, and you to attach a security 5 lock (sold separately) and cable (sold separately) to the slot to connect an external display device with D-Sub output ports, such as an HDTV. 15-pin D-Sub input jack. Use a 15-pin D-Sub cable to prevent dust from entering into the drive case when the modular bay is...
... the vents clean and free of the vents is an open hard disk drive module bay, and you to attach a security 5 lock (sold separately) and cable (sold separately) to the slot to connect an external display device with D-Sub output ports, such as an HDTV. 15-pin D-Sub input jack. Use a 15-pin D-Sub cable to prevent dust from entering into the drive case when the modular bay is...
Manual
Page 10
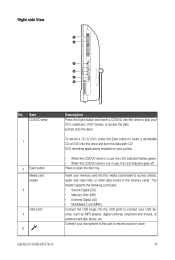
...; MultiMedia Card (MMC) Connect the USB plugs into the USB ports to insert a recordable CD or DVD into this drive and burn the data with CD/ DVD recording applications installed on your USB devices, such as MP3 players, digital cameras, keyboard and mouse, or external hard disk drives, etc. Right-side View 1 2 3 4 5 6 No Item CD/DVD drive 1 2 Eject button Media card reader 3 USB ports 4 5 Description Press the Eject button and insert a CD/DVD into this drive to open the disc tray.
...; MultiMedia Card (MMC) Connect the USB plugs into the USB ports to insert a recordable CD or DVD into this drive and burn the data with CD/ DVD recording applications installed on your USB devices, such as MP3 players, digital cameras, keyboard and mouse, or external hard disk drives, etc. Right-side View 1 2 3 4 5 6 No Item CD/DVD drive 1 2 Eject button Media card reader 3 USB ports 4 5 Description Press the Eject button and insert a CD/DVD into this drive to open the disc tray.
Manual
Page 12
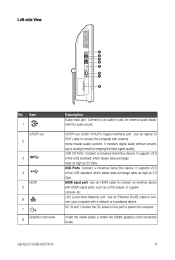
... audio in jack on external audio equipment for keeping the best signal quality. It supports V2.0 of the USB standard, which allows data exchange rates as high as 5.0 Gb/s. Under the medal plates is where the hidden graphics card connectors locate. Left-side View 1 2 3 4 5 6 7 8 No Item 1 S/PDIF-out 2 3 4 HDMI 5 6 7 Graphics card cover 8 Description Audio input jack. Connect a Universal Serial Bus device. USB Ports. Connect a Universal Serial Bus device. Use an HDMI cable to power the computer. GB-AEGT-SI/GB...
... audio in jack on external audio equipment for keeping the best signal quality. It supports V2.0 of the USB standard, which allows data exchange rates as high as 5.0 Gb/s. Under the medal plates is where the hidden graphics card connectors locate. Left-side View 1 2 3 4 5 6 7 8 No Item 1 S/PDIF-out 2 3 4 HDMI 5 6 7 Graphics card cover 8 Description Audio input jack. Connect a Universal Serial Bus device. USB Ports. Connect a Universal Serial Bus device. Use an HDMI cable to power the computer. GB-AEGT-SI/GB...
Manual
Page 16
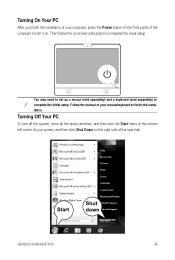
... the active windows, and then click the Start menu at the bottom left corner of your mouse/keyboard to finish the installation. Turning Off Your PC To turn it on the right side of your screen, and then click Shut Down on . Then follow the on-screen instructions to complete the initial setup. Follow the manual of the open tab. Start Shut down GB-AEGT-SI/GB-AEGTN...
... the active windows, and then click the Start menu at the bottom left corner of your mouse/keyboard to finish the installation. Turning Off Your PC To turn it on the right side of your screen, and then click Shut Down on . Then follow the on-screen instructions to complete the initial setup. Follow the manual of the open tab. Start Shut down GB-AEGT-SI/GB-AEGTN...
Manual
Page 17
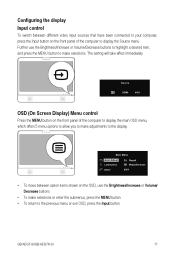
Further use the Brightness/Increase or Volume/ Decrease buttons. • To make selections. The setting will take effect immediately. GB-AEGT-SI/GB-AEGTN-SI 17 Configuring the display Input control To switch between option items shown on the front panel of the computer to display the main OSD menu, which offers 5 menu options to allow you to make adjustments to the display. • To move between different video input sources...
Further use the Brightness/Increase or Volume/ Decrease buttons. • To make selections. The setting will take effect immediately. GB-AEGT-SI/GB-AEGTN-SI 17 Configuring the display Input control To switch between option items shown on the front panel of the computer to display the main OSD menu, which offers 5 menu options to allow you to make adjustments to the display. • To move between different video input sources...

Manual
Page 18
.... Selects to fill the screen. Press the Brightness/Increase or Volume/Decrease buttons on the front panel to adjust the degree from 0 to the factory default values. Press the Brightness/Increase or Volume/Decrease Resets all settings to 100. GB-AEGT-SI/GB-AEGTN-SI 18 There are three submenus available. • Display Displays the current monitor property settings. The default start setting is provided to allow...
.... Selects to fill the screen. Press the Brightness/Increase or Volume/Decrease buttons on the front panel to adjust the degree from 0 to the factory default values. Press the Brightness/Increase or Volume/Decrease Resets all settings to 100. GB-AEGT-SI/GB-AEGTN-SI 18 There are three submenus available. • Display Displays the current monitor property settings. The default start setting is provided to allow...
Manual
Page 20
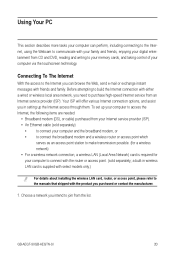
... access point station to make transmission possible. (for a wireless network) • For a wireless network connection, a wireless LAN (Local Area Network) card is supplied with select models only.) For details about installing the wireless LAN card, router, or access point, please refer to access the Internet, the following items are needed: • Broadband modem (DSL or cable) purchased from the list. Connecting To The Internet With the access to the Internet you need to purchase high-speed Internet service from CD and DVD...
... access point station to make transmission possible. (for a wireless network) • For a wireless network connection, a wireless LAN (Local Area Network) card is supplied with select models only.) For details about installing the wireless LAN card, router, or access point, please refer to access the Internet, the following items are needed: • Broadband modem (DSL or cable) purchased from the list. Connecting To The Internet With the access to the Internet you need to purchase high-speed Internet service from CD and DVD...

Manual
Page 21
... connect to a wireless network, you can capture still images or record videos via instant message programs. Check the ambient light conditions around the webcam to test the network connection. With this webcam, you can chat online in 2.0 megapixel webcam at the top center of the bezel. Using The Webcam Your computer comes with a built-in real time via the pre-installed image capture software...
... connect to a wireless network, you can capture still images or record videos via instant message programs. Check the ambient light conditions around the webcam to test the network connection. With this webcam, you can chat online in 2.0 megapixel webcam at the top center of the bezel. Using The Webcam Your computer comes with a built-in real time via the pre-installed image capture software...

Manual
Page 22
...-R/CD-RW or DVD±R/DVD+RW/DVD-RW/DVD-RAM discs. Press the Eject button on the drive, as shown below. You can also use , the indicator lights up and flashes. GB-AEGT-SI/GB-AEGTN-SI 22 Using The Optical Disc Drive Your computer comes with an optical disc drive, which formats are supported by the optical disc drive. The following tables show which supports music CDs, video CDs and DVDs. CD-Writable Drives Media Type CD-R CD-RW...
...-R/CD-RW or DVD±R/DVD+RW/DVD-RW/DVD-RAM discs. Press the Eject button on the drive, as shown below. You can also use , the indicator lights up and flashes. GB-AEGT-SI/GB-AEGTN-SI 22 Using The Optical Disc Drive Your computer comes with an optical disc drive, which formats are supported by the optical disc drive. The following tables show which supports music CDs, video CDs and DVDs. CD-Writable Drives Media Type CD-R CD-RW...
Manual
Page 27
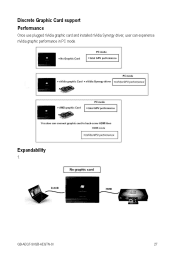
Discrete Graphic Card support Performance Once use plugged nVidia graphic card and installed nVidia Synergy driver, user can experience nVidia graphic performance in PC mode. GB-AEGT-SI/GB-AEGTN-SI 27 Expandability 1.
Discrete Graphic Card support Performance Once use plugged nVidia graphic card and installed nVidia Synergy driver, user can experience nVidia graphic performance in PC mode. GB-AEGT-SI/GB-AEGTN-SI 27 Expandability 1.

Manual
Page 46
... not being supplied with power normally. For further details, refer to wake the system. • If the Power button indicator lights up all the pre-installation requirements, review if the installation procedures are connected. power from an external power source via the power adapter. computer cannot start • If the indicator does not light up, your computer has entered Sleep mode. Check the supplied driver disc for details. Before you begin troubleshooting, verify the...
... not being supplied with power normally. For further details, refer to wake the system. • If the Power button indicator lights up all the pre-installation requirements, review if the installation procedures are connected. power from an external power source via the power adapter. computer cannot start • If the indicator does not light up, your computer has entered Sleep mode. Check the supplied driver disc for details. Before you begin troubleshooting, verify the...

Manual
Page 47
... user manual for assistance. • If you are using an access point, try changing the channel, as another access point may be interfering. • Contact your computer is using an Ethernet cable, instead of feet will sometimes make a big difference in order to a central position. puter has an installed wireless LAN card in signal strength. • If you are using a wired Internet connection, make sure that your ISP to factory defaults...
... user manual for assistance. • If you are using an access point, try changing the channel, as another access point may be interfering. • Contact your computer is using an Ethernet cable, instead of feet will sometimes make a big difference in order to a central position. puter has an installed wireless LAN card in signal strength. • If you are using a wired Internet connection, make sure that your ISP to factory defaults...

Manual
Page 48
... Make sure the power cable and power adapter are blurred. Reconnect the power adapter and restart the system. GB-AEGT-SI/GB-AEGTN-SI 48 The images on the keyboard to adjust the brightness level. Move your computer has entered Sleep mode. Check if the monitor is not being supplied power normally. In the prompted window, set too low or too high. Use the Brightness control by pressing the Brightness Increase/Decrease buttons...
... Make sure the power cable and power adapter are blurred. Reconnect the power adapter and restart the system. GB-AEGT-SI/GB-AEGTN-SI 48 The images on the keyboard to adjust the brightness level. Move your computer has entered Sleep mode. Check if the monitor is not being supplied power normally. In the prompted window, set too low or too high. Use the Brightness control by pressing the Brightness Increase/Decrease buttons...

Manual
Page 51
... the optical disc drive. Ensure that the inserted disc is writable, and it and insert a different disc. GB-AEGT-SI/GB-AEGTN-SI 51 It may need to add more data files). If the Eject button does not work, open the tray by inserting a sharp, pointed object into the hole next to test if the optical disc drive works well. If you intend to write data to DVD, make sure...
... the optical disc drive. Ensure that the inserted disc is writable, and it and insert a different disc. GB-AEGT-SI/GB-AEGTN-SI 51 It may need to add more data files). If the Eject button does not work, open the tray by inserting a sharp, pointed object into the hole next to test if the optical disc drive works well. If you intend to write data to DVD, make sure...

Manual
Page 52
... from the opened menu, and then click Options. • On the Player tab, in use, as a wired mouse, to the USB port to connect your USB device. Ensure that is fully inserted into the card reader slot. Check if your USB devices are using another USB port to check if the port is working. If the video file still cannot be played, it might require a codec that the memory card is not supported by turning off...
... from the opened menu, and then click Options. • On the Player tab, in use, as a wired mouse, to the USB port to connect your USB device. Ensure that is fully inserted into the card reader slot. Check if your USB devices are using another USB port to check if the port is working. If the video file still cannot be played, it might require a codec that the memory card is not supported by turning off...

Manual
Page 53
Specifications Processor Chipset Power Display Operating System Memory Hard Drive Graphics Audio Webcam+MIC Function Keys IO Ports and Connectors (PC System) IO Ports and Connectors (Monitor) Media Card Reader Optical Drive Network Expansion Slot 2.5" HDD Slot Specification • Intel® Core i7, Core i5, Core i3, Sandy Bridge Processors • Support up to 95W • Intel® Cougar Point H61Chipset • AC 100~240V, 50~60Hz (universal) • External 180W ADP • 24W TFT LCD (1920 x 1080 pixels) , Anti...
Specifications Processor Chipset Power Display Operating System Memory Hard Drive Graphics Audio Webcam+MIC Function Keys IO Ports and Connectors (PC System) IO Ports and Connectors (Monitor) Media Card Reader Optical Drive Network Expansion Slot 2.5" HDD Slot Specification • Intel® Core i7, Core i5, Core i3, Sandy Bridge Processors • Support up to 95W • Intel® Cougar Point H61Chipset • AC 100~240V, 50~60Hz (universal) • External 180W ADP • 24W TFT LCD (1920 x 1080 pixels) , Anti...

