
Manual
Page 1
GA-X58-USB3 LGA1366 socket motherboard for Intel® Core™ i7 processor family User's Manual Rev. 1001 12ME-X58USB3-1001R
GA-X58-USB3 LGA1366 socket motherboard for Intel® Core™ i7 processor family User's Manual Rev. 1001 12ME-X58USB3-1001R
Manual
Page 3
... in any form or by any means without prior notice. Check your motherboard looks like this manual may be made by copyright laws and is the property of this manual is 1.0. Changes to assist in this product, GIGABYTE provides the following types of documentations: For quick set-up of the motherboard is protected...
... in any form or by any means without prior notice. Check your motherboard looks like this manual may be made by copyright laws and is the property of this manual is 1.0. Changes to assist in this product, GIGABYTE provides the following types of documentations: For quick set-up of the motherboard is protected...
Manual
Page 5
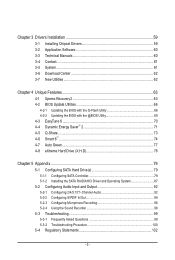
Chapter 3 Drivers Installation 59 3-1 Installing Chipset Drivers 59 3-2 Application Software 60 3-3 Technical Manuals 60 3-4 Contact...61 3-5 System...61 3-6 Download Center 62 3-7 New Utilities...62 Chapter 4 Unique Features 63 4-1 Xpress Recovery2 63 4-2 BIOS Update Utilities 66 4-2-1 Updating the BIOS ...
Chapter 3 Drivers Installation 59 3-1 Installing Chipset Drivers 59 3-2 Application Software 60 3-3 Technical Manuals 60 3-4 Contact...61 3-5 System...61 3-6 Download Center 62 3-7 New Utilities...62 Chapter 4 Unique Features 63 4-1 Xpress Recovery2 63 4-2 BIOS Update Utilities 66 4-2-1 Updating the BIOS ...
Manual
Page 6
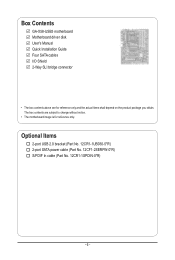
Optional Items 2-port USB 2.0 bracket (Part No. 12CR1-1UB030-5*R) 2-port SATA power cable (Part No. 12CF1-2SERPW-0*R) S/PDIF In cable (Part No. 12CR1-1SPDIN-0*R) - 6 - The box contents are for reference only. Box Contents GA-X58-USB3 motherboard Motherboard driver disk User's Manual Quick Installation Guide Four SATA cables I/O Shield 2-Way SLI bridge connector • The box contents above are subject to change without notice. • The motherboard image is for reference only and the actual items shall depend on the product package you obtain.
Optional Items 2-port USB 2.0 bracket (Part No. 12CR1-1UB030-5*R) 2-port SATA power cable (Part No. 12CF1-2SERPW-0*R) S/PDIF In cable (Part No. 12CR1-1SPDIN-0*R) - 6 - The box contents are for reference only. Box Contents GA-X58-USB3 motherboard Motherboard driver disk User's Manual Quick Installation Guide Four SATA cables I/O Shield 2-Way SLI bridge connector • The box contents above are subject to change without notice. • The motherboard image is for reference only and the actual items shall depend on the product package you obtain.

Manual
Page 9
... supply voltage has been set according to wear an electrostatic discharge (ESD) wrist strap when handling electronic com- Prior to installation, carefully read the user's manual and follow these procedures: • Prior to installation, do not have an ESD wrist strap, keep your hands dry and first touch a metal object to...
... supply voltage has been set according to wear an electrostatic discharge (ESD) wrist strap when handling electronic com- Prior to installation, carefully read the user's manual and follow these procedures: • Prior to installation, do not have an ESD wrist strap, keep your hands dry and first touch a metal object to...
Manual
Page 15
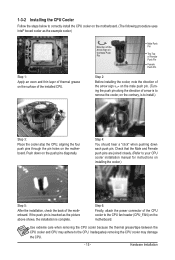
... cooler and CPU may damage the CPU. - 15 - Check that the Male and Female push pins are joined closely. (Refer to your CPU cooler installation manual for instructions on the motherboard. Hardware Installation Direction of the Arrow Sign on the Male Push Pin Male Push Pin The Top of Female Push...
... cooler and CPU may damage the CPU. - 15 - Check that the Male and Female push pins are joined closely. (Refer to your CPU cooler installation manual for instructions on the motherboard. Hardware Installation Direction of the Arrow Sign on the Male Push Pin Male Push Pin The Top of Female Push...
Manual
Page 18
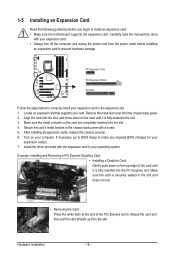
... Graphics Card: • Installing a Graphics Card: Gently push down on your expansion card(s). 7. After installing all expansion cards, replace the chassis cover(s). 6. Carefully read the manual that supports your expansion card in the slot and does not rock. • Removing the Card: Press the white latch at the end of the...
... Graphics Card: • Installing a Graphics Card: Gently push down on your expansion card(s). 7. After installing all expansion cards, replace the chassis cover(s). 6. Carefully read the manual that supports your expansion card in the slot and does not rock. • Removing the Card: Press the white latch at the end of the...
Manual
Page 19
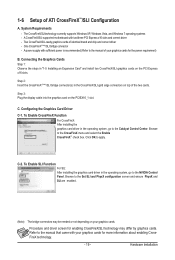
... For SLI: After installing the graphics card driver in the operating system, go to the Catalyst Control Center. Browse to the manual of the two cards. Refer to the manual that came with sufficient power is recommended (Refer to the Set SLI and PhysX configuration screen and ensure PhysX and SLI are...
... For SLI: After installing the graphics card driver in the operating system, go to the Catalyst Control Center. Browse to the manual of the two cards. Refer to the manual that came with sufficient power is recommended (Refer to the Set SLI and PhysX configuration screen and ensure PhysX and SLI are...
Manual
Page 28
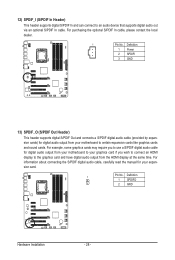
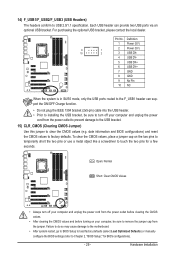
... graphics card and have digital audio output from your expansion card. 1 Pin No. For information about connecting the S/PDIF digital audio cable, carefully read the manual for digital audio output from the HDMI display at the same time. Definition 1 SPDIFO 2 GND Hardware Installation - 28 - For purchasing the optional S/PDIF In cable...
... graphics card and have digital audio output from your expansion card. 1 Pin No. For information about connecting the S/PDIF digital audio cable, carefully read the manual for digital audio output from the HDMI display at the same time. Definition 1 SPDIFO 2 GND Hardware Installation - 28 - For purchasing the optional S/PDIF In cable...
Manual
Page 29
... do so may cause damage to the motherboard. • After system restart, go to BIOS Setup to load factory defaults (select Load Optimized Defaults) or manually configure the BIOS settings (refer to Chapter 2, "BIOS Setup," for a few seconds. Hardware Installation To clear the CMOS values, place a jumper cap on your computer...
... do so may cause damage to the motherboard. • After system restart, go to BIOS Setup to load factory defaults (select Load Optimized Defaults) or manually configure the BIOS settings (refer to Chapter 2, "BIOS Setup," for a few seconds. Hardware Installation To clear the CMOS values, place a jumper cap on your computer...
Manual
Page 37
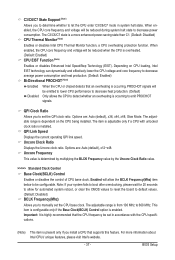
... wait for automated system reboot, or clear the CMOS values to reset the board to default values. (Default: Disabled) BCLK Frequency(Mhz) Allows you to manually set the CPU base clock.
... wait for automated system reboot, or clear the CMOS values to reset the board to default values. (Default: Disabled) BCLK Frequency(Mhz) Allows you to manually set the CPU base clock.
Manual
Page 38
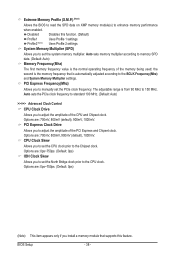
...), 1000mV. Auto sets memory multiplier according to memory SPD data. (Default: Auto) Memory Frequency(Mhz) The first memory frequency value is from 90 MHz to manually set the CPU clock prior to adjust the amplitude of the CPU and Chipset clock. The adjustable range is the normal operating frequency of the...
...), 1000mV. Auto sets memory multiplier according to memory SPD data. (Default: Auto) Memory Frequency(Mhz) The first memory frequency value is from 90 MHz to manually set the CPU clock prior to adjust the amplitude of the CPU and Chipset clock. The adjustable range is the normal operating frequency of the...
Manual
Page 45
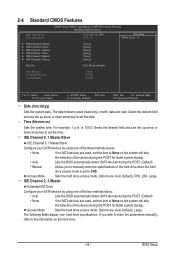
...field and use the up arrow or down arrow key to CHS. BIOS Setup Time (hh:mm:ss) Sets the system time. If you to manually enter the specifications of the hard drive when the hard drive access mode is set to set the time. is week (read-only), month, ... , set this item to None so the system will skip the detection of the device during the POST. (Default) • Manual Allows you wish to enter the parameters manually, refer to None so the system will skip the detection of the two methods below : • None If no SATA devices ...
...field and use the up arrow or down arrow key to CHS. BIOS Setup Time (hh:mm:ss) Sets the system time. If you to manually enter the specifications of the hard drive when the hard drive access mode is set to set the time. is week (read-only), month, ... , set this item to None so the system will skip the detection of the device during the POST. (Default) • Manual Allows you wish to enter the parameters manually, refer to None so the system will skip the detection of the two methods below : • None If no SATA devices ...
Manual
Page 59
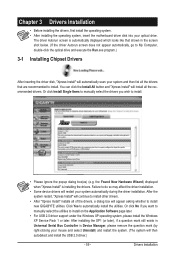
... Run.exe program.) 3-1 Installing Chipset Drivers After inserting the driver disk, "Xpress Install" will continue to install new GIGABYTE utilities. Or click Install Single Items to manually select the drivers you want to manually select the utilities to do so may affect the driver installation. • Some device drivers will then autodetect and...
... Run.exe program.) 3-1 Installing Chipset Drivers After inserting the driver disk, "Xpress Install" will continue to install new GIGABYTE utilities. Or click Install Single Items to manually select the drivers you want to manually select the utilities to do so may affect the driver installation. • Some device drivers will then autodetect and...

Manual
Page 60
Drivers Installation - 60 - 3-2 Application Software This page displays all the utilities and applications that GIGABYTE develops and some free software. You can click the Install button on the right of an item to install it. 3-3 Technical Manuals This page provides GIGABYTE's application guides, content descriptions for this driver disk, and the motherboard manuals.
Drivers Installation - 60 - 3-2 Application Software This page displays all the utilities and applications that GIGABYTE develops and some free software. You can click the Install button on the right of an item to install it. 3-3 Technical Manuals This page provides GIGABYTE's application guides, content descriptions for this driver disk, and the motherboard manuals.
Manual
Page 66
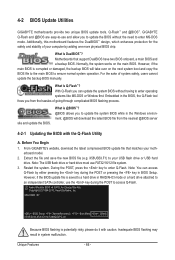
...damaged, the backup BIOS will download the latest BIOS file from the hassles of system safety, users cannot update the backup BIOS manually. What is DualBIOS™? Note: The USB flash drive or hard drive must use the key during the POST or pressing the... (C) 1984-2010, Award Software, Inc. From GIGABYTE's website, download the latest compressed BIOS update file that support DualBIOS have two BIOS onboard, a main BIOS and a backup BIOS. X58-USB3 E7 . . . . : BIOS Setup : XpressRecovery2 : Boot Menu : Qflash 07/05/2010-X58-ICH10-7A89QG0PC-00 Because BIOS flashing is @BIOS&#...
...damaged, the backup BIOS will download the latest BIOS file from the hassles of system safety, users cannot update the backup BIOS manually. What is DualBIOS™? Note: The USB flash drive or hard drive must use the key during the POST or pressing the... (C) 1984-2010, Award Software, Inc. From GIGABYTE's website, download the latest compressed BIOS update file that support DualBIOS have two BIOS onboard, a main BIOS and a backup BIOS. X58-USB3 E7 . . . . : BIOS Setup : XpressRecovery2 : Boot Menu : Qflash 07/05/2010-X58-ICH10-7A89QG0PC-00 Because BIOS flashing is @BIOS&#...
Manual
Page 69
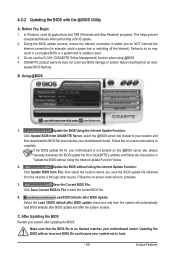
...function when using @BIOS. 4. B. Follow the on-screen instructions to complete. 3. Follow the on the @BIOS server site, please manually download the BIOS update file from GIGABYTE's website and follow the instructions in a corrupted BIOS or a system that matches your motherboard is unable to boot. - 69 - Save... example, avoid a power loss or switching off the Internet). Update the BIOS Using the Internet Update Function: Click Update BIOS from GIGABYTE Server, select the @BIOS server site closest to your location and then download the BIOS file that is not present on -screen ...
...function when using @BIOS. 4. B. Follow the on-screen instructions to complete. 3. Follow the on the @BIOS server site, please manually download the BIOS update file from GIGABYTE's website and follow the instructions in a corrupted BIOS or a system that matches your motherboard is unable to boot. - 69 - Save... example, avoid a power loss or switching off the Internet). Update the BIOS Using the Internet Update Function: Click Update BIOS from GIGABYTE Server, select the @BIOS server site closest to your location and then download the BIOS file that is not present on -screen ...

Manual
Page 78
... Enter the system BIOS Setup program, set up a RAID-ready system and configure it for complex and time-consuming configurations. To manually set eXtreme Hard Drive (X.H.D) under the Integrated Peripherals menu to Enabled to load the SATA controller driver first. Exits the X.H.D utility...you can build a RAID 0, RAID 1, or other supported RAID array depending on your needs and hardware components. 3. 4-8 eXtreme Hard Drive (X.H.D) With GIGABYTE eXtreme Hard Drive (X.H.D)(Note 1), users can use X.H.D to easily add a hard drive into a RAID 0 array that's been created earlier, make sure...
... Enter the system BIOS Setup program, set up a RAID-ready system and configure it for complex and time-consuming configurations. To manually set eXtreme Hard Drive (X.H.D) under the Integrated Peripherals menu to Enabled to load the SATA controller driver first. Exits the X.H.D utility...you can build a RAID 0, RAID 1, or other supported RAID array depending on your needs and hardware components. 3. 4-8 eXtreme Hard Drive (X.H.D) With GIGABYTE eXtreme Hard Drive (X.H.D)(Note 1), users can use X.H.D to easily add a hard drive into a RAID 0 array that's been created earlier, make sure...

Manual
Page 85
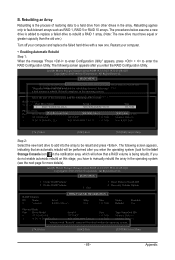
...Select Disks Strip Size : N/A Capacity : 0.0 GB Sync : Continuous Create Volume [ HELP ] Select a sync option: On Request: volume is updated manually Continuous: volume is updated automatically [hi]-Change [TAB]-Next [ESC]-Previous Menu Figure 11 [ENTER]-Select Step 5: Finally press on the hard drive you... drive. (Make sure the recovery drive has equal or larger capacity than the master drive.) Then press to the recovery drive manually using the Update Volume function of the Intel Matrix Storage Console in the system. e. All Rights Reserved. [ CREATE VOLUME MENU...
...Select Disks Strip Size : N/A Capacity : 0.0 GB Sync : Continuous Create Volume [ HELP ] Select a sync option: On Request: volume is updated manually Continuous: volume is updated automatically [hi]-Change [TAB]-Next [ESC]-Previous Menu Figure 11 [ENTER]-Select Step 5: Finally press on the hard drive you... drive. (Make sure the recovery drive has equal or larger capacity than the master drive.) Then press to the recovery drive manually using the Update Volume function of the Intel Matrix Storage Console in the system. e. All Rights Reserved. [ CREATE VOLUME MENU...
Manual
Page 89
... ID) Member Disk (0) Non-RAID Disk [hi]-Select [ESC]-Exit [ENTER]-Select Menu Step 2: Select the new hard drive to add into the array to manually rebuild the array in the operating system. All Rights Reserved. [ MAIN MENU ] 1. Intel(R) Matrix Storage Manager option ROM v8.9.0.1023 PCH-D wRAID5 Copyright(C) 2003-09...
... ID) Member Disk (0) Non-RAID Disk [hi]-Select [ESC]-Exit [ENTER]-Select Menu Step 2: Select the new hard drive to add into the array to manually rebuild the array in the operating system. All Rights Reserved. [ MAIN MENU ] 1. Intel(R) Matrix Storage Manager option ROM v8.9.0.1023 PCH-D wRAID5 Copyright(C) 2003-09...


