

Manual
Page 1
... Setup program, set up all motherboard drivers, including the X.H.D utility. Step 2: Install the RAID driver and operating system The X.H.D utility supports Windows 7/Vista/XP. Using GIGABYTE eXtreme Hard Drive (X.H.D) Instructions:(Note 2) Before launching X.H.D, make sure the new drive is added...enhance your needs and hardware components. 3. eXtreme Hard Drive (X.H.D) With GIGABYTE eXtreme Hard Drive (X.H.D)(Note 1), users can quickly configure a RAIDready system for RAID 0 when a new SATA drive is greater than the RAID-ready system drive. (To add a new hard drive into the array...
... Setup program, set up all motherboard drivers, including the X.H.D utility. Step 2: Install the RAID driver and operating system The X.H.D utility supports Windows 7/Vista/XP. Using GIGABYTE eXtreme Hard Drive (X.H.D) Instructions:(Note 2) Before launching X.H.D, make sure the new drive is added...enhance your needs and hardware components. 3. eXtreme Hard Drive (X.H.D) With GIGABYTE eXtreme Hard Drive (X.H.D)(Note 1), users can quickly configure a RAIDready system for RAID 0 when a new SATA drive is greater than the RAID-ready system drive. (To add a new hard drive into the array...
Manual
Page 5
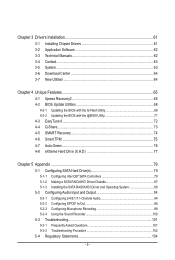
......76 4-8 eXtreme Hard Drive (X.H.D 77 Chapter 5 Appendix...79 5-1 Configuring SATA Hard Drive(s 79 5-1-1 Configuring Intel Q57 SATA Controllers 79 5-1-2 Making a SATA RAID/AHCI Driver Diskette 87 5-1-3 Installing the SATA RAID/AHCI Driver and Operating System 88 5-2 Configuring Audio Input and Output 94 5-2-1 Configuring 2/4/5.1/7.1-Channel Audio 94 5-2-2 Configuring S/PDIF In/Out 96 5-2-3 Configuring...
......76 4-8 eXtreme Hard Drive (X.H.D 77 Chapter 5 Appendix...79 5-1 Configuring SATA Hard Drive(s 79 5-1-1 Configuring Intel Q57 SATA Controllers 79 5-1-2 Making a SATA RAID/AHCI Driver Diskette 87 5-1-3 Installing the SATA RAID/AHCI Driver and Operating System 88 5-2 Configuring Audio Input and Output 94 5-2-1 Configuring 2/4/5.1/7.1-Channel Audio 94 5-2-2 Configuring S/PDIF In/Out 96 5-2-3 Configuring...
Manual
Page 10
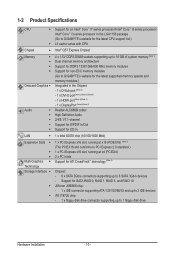
... of system memory (Note 1) Dual channel memory architecture Support for DDR3 1333/1066/800 MHz memory modules Support for non-ECC memory modules (Go to GIGABYTE's website for the latest supported memory speeds and memory modules.) Integrated in the Chipset: - 1 x D-Sub port (Note 2) - 1 x DVI-D port (...(The PCIEX16 slot conforms to PCI Express 2.0 standard.) 1 x PCI Express x16 slot, running at x4 (PCIEX4) 2 x PCI slots Support for SATA RAID 0, RAID 1, RAID 5, and RAID 10 JMicron JMB368 chip: - 1 x IDE connector supporting ATA-133/100/66/33 and up to 2 IDE devices iTE IT8720 chip: - 1 x ...
... of system memory (Note 1) Dual channel memory architecture Support for DDR3 1333/1066/800 MHz memory modules Support for non-ECC memory modules (Go to GIGABYTE's website for the latest supported memory speeds and memory modules.) Integrated in the Chipset: - 1 x D-Sub port (Note 2) - 1 x DVI-D port (...(The PCIEX16 slot conforms to PCI Express 2.0 standard.) 1 x PCI Express x16 slot, running at x4 (PCIEX4) 2 x PCI slots Support for SATA RAID 0, RAID 1, RAID 5, and RAID 10 JMicron JMB368 chip: - 1 x IDE connector supporting ATA-133/100/66/33 and up to 2 IDE devices iTE IT8720 chip: - 1 x ...

Manual
Page 25
... jumpers and the cabling according to the role of hard drives does not have to be an even number. - 25 - The Q57 Chipset supports RAID 0, RAID 1, RAID 5, and RAID 10. 6) IDE (IDE Connector) The IDE connector supports up to Chapter 5, "Configuring SATA Hard Drive(s)," for the IDE devices, read the instructions... TXP 3 TXN 4 GND SATA2_4 SATA2_5 5 RXN 6 RXP 7 GND Please connect the L-shaped end of the SATA 3Gb/s cable to your SATA hard drive. • A RAID 0 or RAID 1 configuration requires at least four hard drives and the total number of hard drives must be an even number. •...
... jumpers and the cabling according to the role of hard drives does not have to be an even number. - 25 - The Q57 Chipset supports RAID 0, RAID 1, RAID 5, and RAID 10. 6) IDE (IDE Connector) The IDE connector supports up to Chapter 5, "Configuring SATA Hard Drive(s)," for the IDE devices, read the instructions... TXP 3 TXN 4 GND SATA2_4 SATA2_5 5 RXN 6 RXP 7 GND Please connect the L-shaped end of the SATA 3Gb/s cable to your SATA hard drive. • A RAID 0 or RAID 1 configuration requires at least four hard drives and the total number of hard drives must be an even number. •...
Manual
Page 50
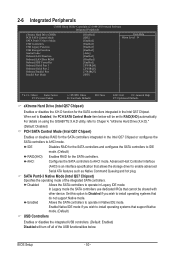
... support Native mode. Enabled Allows the SATA controllers to operate in Legacy IDE mode. For details on using the GIGABYTE X.H.D utility, refer to Chaper 4, "eXtreme Hard Drive (X.H.D)." (Default: Disabled) PCH SATA Control Mode (Intel Q57 Chipset) Enables or disables RAID for the SATA controllers integrated in the Intel Q57 Chipset. IDE Disables...
... support Native mode. Enabled Allows the SATA controllers to operate in Legacy IDE mode. For details on using the GIGABYTE X.H.D utility, refer to Chaper 4, "eXtreme Hard Drive (X.H.D)." (Default: Disabled) PCH SATA Control Mode (Intel Q57 Chipset) Enables or disables RAID for the SATA controllers integrated in the Intel Q57 Chipset. IDE Disables...
Manual
Page 65
... graphics card • Windows XP with Xpress Recovery cannot be restored using Xpress Recovery2. • USB hard drives are not supported. • Hard drives in RAID/AHCI mode are different utilities.
... graphics card • Windows XP with Xpress Recovery cannot be restored using Xpress Recovery2. • USB hard drives are not supported. • Hard drives in RAID/AHCI mode are different utilities.

Manual
Page 68
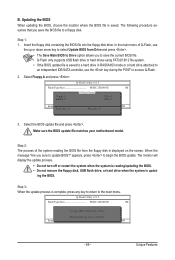
...update file is potentially risky, please do it with the Q-Flash Utility A. Q57M-S2H F4 . . . . : BIOS Setup : XpressRecovery2 : Boot Menu : Qflash 03/01/2010-Q57-7A89TG0HC-00 Because BIOS flashing is saved to a hard drive in RAID/AHCI mode or a hard drive attached to an independent IDE/SATA controller, use...Q-Flash™? During the POST, press the key to enter operating systems like MS-DOS or Window first. Before You Begin 1. Restart the system. GIGABYTE Q-Flash and @BIOS are easy-to-use FAT32/16/12 file system. 3. Award Modular BIOS v6.00PG, An Energy Star Ally Copyright (C) 1984...
...update file is potentially risky, please do it with the Q-Flash Utility A. Q57M-S2H F4 . . . . : BIOS Setup : XpressRecovery2 : Boot Menu : Qflash 03/01/2010-Q57-7A89TG0HC-00 Because BIOS flashing is saved to a hard drive in RAID/AHCI mode or a hard drive attached to an independent IDE/SATA controller, use...Q-Flash™? During the POST, press the key to enter operating systems like MS-DOS or Window first. Before You Begin 1. Restart the system. GIGABYTE Q-Flash and @BIOS are easy-to-use FAT32/16/12 file system. 3. Award Modular BIOS v6.00PG, An Energy Star Ally Copyright (C) 1984...
Manual
Page 69
... supports USB flash drive or hard drives using FAT32/16/12 file system. • If the BIOS update file is saved to a hard drive in RAID/AHCI mode or a hard drive attached to an independent IDE/SATA controller, use the key during the POST to a floppy disk. ing the BIOS. CoaodpyCMBIOOSS...
... supports USB flash drive or hard drives using FAT32/16/12 file system. • If the BIOS update file is saved to a hard drive in RAID/AHCI mode or a hard drive attached to an independent IDE/SATA controller, use the key during the POST to a floppy disk. ing the BIOS. CoaodpyCMBIOOSS...

Manual
Page 77
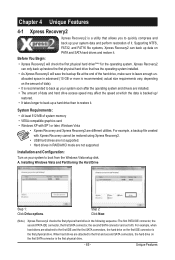
...Auto function. - 77 - You can click the Xpress Install All button to set up a RAID-ready system and configure it for complex and time-consuming configurations. Using GIGABYTE eXtreme Hard Drive (X.H.D) Instructions:(Note 2) Before launching X.H.D, make sure the new drive is added... to load the SATA controller driver first. 4-8 eXtreme Hard Drive (X.H.D) With GIGABYTE eXtreme Hard Drive (X.H.D)(Note 1), users can go to the Application Software screen to Chapter 5, "Installing the SATA RAID/AHCI Driver and Operating System." ) Step 3: Install the motherboard drivers and ...
...Auto function. - 77 - You can click the Xpress Install All button to set up a RAID-ready system and configure it for complex and time-consuming configurations. Using GIGABYTE eXtreme Hard Drive (X.H.D) Instructions:(Note 2) Before launching X.H.D, make sure the new drive is added... to load the SATA controller driver first. 4-8 eXtreme Hard Drive (X.H.D) With GIGABYTE eXtreme Hard Drive (X.H.D)(Note 1), users can go to the Application Software screen to Chapter 5, "Installing the SATA RAID/AHCI Driver and Operating System." ) Step 3: Install the motherboard drivers and ...
Manual
Page 79
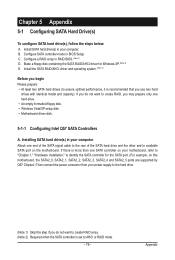
...not want to identify the SATA controller for Windows XP. (Note 2) E. Installing SATA hard drive(s) in BIOS Setup. C. Install the SATA RAID/AHCI driver and operating system. (Note 2) Before you begin Please prepare: • At least two SATA hard drives (to ensure optimal performance...and SATA2_5 ports are supported by Q57 Chipset.) Then connect the power connector from your motherboard, refer to "Chapter 1," "Hardware Installation," to create RAID, you may prepare only one hard drive. • An empty formatted floppy disk. • Windows Vista/XP setup disk. • Motherboard ...
...not want to identify the SATA controller for Windows XP. (Note 2) E. Installing SATA hard drive(s) in BIOS Setup. C. Install the SATA RAID/AHCI driver and operating system. (Note 2) Before you begin Please prepare: • At least two SATA hard drives (to ensure optimal performance...and SATA2_5 ports are supported by Q57 Chipset.) Then connect the power connector from your motherboard, refer to "Chapter 1," "Hardware Installation," to create RAID, you may prepare only one hard drive. • An empty formatted floppy disk. • Windows Vista/XP setup disk. • Motherboard ...
Manual
Page 80
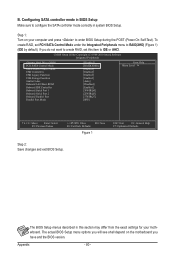
... USB Storage Function Azalia Codec Onboard LAN Boot ROM Onboard IDE Controller Onboard Serial Port 1 Onboard Serial Port 2 Onboard Parallel Port Parallel Port Mode [Disabled] [RAID(XHD)] [Enabled] [Enabled] [Enabled] [Enabled] [Auto] [Disabled] [Enabled] [3F8/IRQ4] [2F8/IRQ3] [378/IRQ7] [SPP] Item Help Menu... options you will see shall depend on your motherboard. Step 1: Turn on the motherboard you do not want to create RAID, set PCH SATA Control Mode under the Integrated Peripherals menu to configure the SATA controller mode correctly in this item to ...
... USB Storage Function Azalia Codec Onboard LAN Boot ROM Onboard IDE Controller Onboard Serial Port 1 Onboard Serial Port 2 Onboard Parallel Port Parallel Port Mode [Disabled] [RAID(XHD)] [Enabled] [Enabled] [Enabled] [Enabled] [Auto] [Disabled] [Enabled] [3F8/IRQ4] [2F8/IRQ3] [378/IRQ7] [SPP] Item Help Menu... options you will see shall depend on your motherboard. Step 1: Turn on the motherboard you do not want to create RAID, set PCH SATA Control Mode under the Integrated Peripherals menu to configure the SATA controller mode correctly in this item to ...
Manual
Page 81
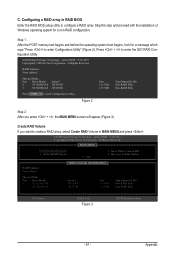
...MENU and press . Intel(R) Rapid Storage Technology - All Rights Reserved. Reset Disks to create a RAID array, select Create RAID Volume in RAID BIOS Enter the RAID BIOS setup utility to enter Configuration Utility" (Figure 2). Skip this step and proceed with the ...installation of Windows operating system for a message which says "Press to configure a RAID array. Recovery Volume Options RAID Volumes : None defined. [ DISK/VOLUME INFORMATION ] Physical Disks : Port Drive Model 0 ST3120026AS 1 ST3120026AS Serial # 3JT354CP...
...MENU and press . Intel(R) Rapid Storage Technology - All Rights Reserved. Reset Disks to create a RAID array, select Create RAID Volume in RAID BIOS Enter the RAID BIOS setup utility to enter Configuration Utility" (Figure 2). Skip this step and proceed with the ...installation of Windows operating system for a message which says "Press to configure a RAID array. Recovery Volume Options RAID Volumes : None defined. [ DISK/VOLUME INFORMATION ] Physical Disks : Port Drive Model 0 ST3120026AS 1 ST3120026AS Serial # 3JT354CP...
Manual
Page 82
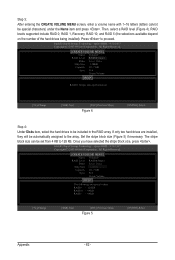
... installed). Press to be automatically assigned to 128 KB. Intel(R) Rapid Storage Technology - All Rights Reserved. [ CREATE VOLUME MENU ] Name : Volume0 RAID Level : RAID0(Stripe) Disks : Select Disks Strip Size : 128KB Capacity : 111.7 GB Sync : N/A Create Volume [ HELP ] RAID0: Stripes...4 [ENTER]-Select Step 4: Under Disks item, select the hard drives to proceed. All Rights Reserved. [ CREATE VOLUME MENU ] Name : Volume0 RAID Level : RAID0(Stripe) Disks : Select Disks Strip Size : 128KB Capacity : 111.7 GB Sync : N/A Create Volume [ HELP ] The following...
... installed). Press to be automatically assigned to 128 KB. Intel(R) Rapid Storage Technology - All Rights Reserved. [ CREATE VOLUME MENU ] Name : Volume0 RAID Level : RAID0(Stripe) Disks : Select Disks Strip Size : 128KB Capacity : 111.7 GB Sync : N/A Create Volume [ HELP ] RAID0: Stripes...4 [ENTER]-Select Step 4: Under Disks item, select the hard drives to proceed. All Rights Reserved. [ CREATE VOLUME MENU ] Name : Volume0 RAID Level : RAID0(Stripe) Disks : Select Disks Strip Size : 128KB Capacity : 111.7 GB Sync : N/A Create Volume [ HELP ] The following...
Manual
Page 83
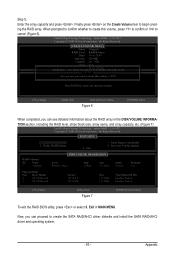
...N/A Create Volume WARNING : ALL DATA ON SELECTED DISKS WILL BE LOST. [ HELP ] Are you sure you can proceed to Non-RAID 4. Recovery Volume Options RAID Volumes : ID Name 0 Volume0 [ DISK/VOLUME INFORMATION ] Level RAID0(Stripe) Strip 128KB Size 223.6GB Status Normal Bootable Yes Physical... (Figure 7) Intel(R) Rapid Storage Technology - When prompted to confirm whether to create this volume? (Y/N) : Press ENTER to begin creating the RAID array. All Rights Reserved. [ MAIN MENU ] 1. Step 5: Enter the array capacity and press . Finally press on the Create Volume item...
...N/A Create Volume WARNING : ALL DATA ON SELECTED DISKS WILL BE LOST. [ HELP ] Are you sure you can proceed to Non-RAID 4. Recovery Volume Options RAID Volumes : ID Name 0 Volume0 [ DISK/VOLUME INFORMATION ] Level RAID0(Stripe) Strip 128KB Size 223.6GB Status Normal Bootable Yes Physical... (Figure 7) Intel(R) Rapid Storage Technology - When prompted to confirm whether to create this volume? (Y/N) : Press ENTER to begin creating the RAID array. All Rights Reserved. [ MAIN MENU ] 1. Step 5: Enter the array capacity and press . Finally press on the Create Volume item...
Manual
Page 84
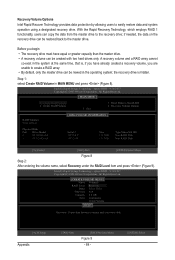
...drive must have equal or greater capacity than the master drive. • A recovery volume can be restored back to create a RAID array. • By default, only the master drive can be created with two hard drives only. option ROM - 9.5.0.1037 Copyright...1037 Copyright(C) 2003-09 Intel Corporation. Recovery Volume Options Intel Rapid Recover Technology provides data protection by allowing users to Non-RAID 4. Recovery Volume Options RAID Volumes : None defined. [ DISK/VOLUME INFORMATION ] Physical Disks : Port Drive Model 0 ST3120026AS 1 ST3120026AS Serial # 3JT354CP...
...drive must have equal or greater capacity than the master drive. • A recovery volume can be restored back to create a RAID array. • By default, only the master drive can be created with two hard drives only. option ROM - 9.5.0.1037 Copyright...1037 Copyright(C) 2003-09 Intel Corporation. Recovery Volume Options Intel Rapid Recover Technology provides data protection by allowing users to Non-RAID 4. Recovery Volume Options RAID Volumes : None defined. [ DISK/VOLUME INFORMATION ] Physical Disks : Port Drive Model 0 ST3120026AS 1 ST3120026AS Serial # 3JT354CP...
Manual
Page 85
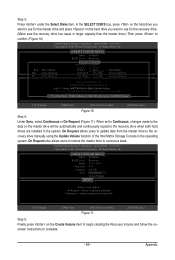
...Update Volume function of the Intel Matrix Storage Console in the system. All Rights Reserved. [ CREATE VOLUME MENU ] Name : Volume0 RAID Level : Recovery D[ SisEkLs E: CTSeDleIcStKDSis]ks Strip Size : 128KB Capacity : 223.6 GB Port Drive Model Serial # CreaStiezeVolume M0... ST3120026AS 3JT354CP 111.7GB R1 ST3120026AS 3JT32[ 9HJEXLP ] 111.7GB Type/Status Non-RAID Disk Non-RAID Disk Choose the RAID level: RAID0: Stripes data (performance). Intel(R) Rapid Storage Technology - Step 3: Press under the Select Disks item....
...Update Volume function of the Intel Matrix Storage Console in the system. All Rights Reserved. [ CREATE VOLUME MENU ] Name : Volume0 RAID Level : Recovery D[ SisEkLs E: CTSeDleIcStKDSis]ks Strip Size : 128KB Capacity : 223.6 GB Port Drive Model Serial # CreaStiezeVolume M0... ST3120026AS 3JT354CP 111.7GB R1 ST3120026AS 3JT32[ 9HJEXLP ] 111.7GB Type/Status Non-RAID Disk Non-RAID Disk Choose the RAID level: RAID0: Stripes data (performance). Intel(R) Rapid Storage Technology - Step 3: Press under the Select Disks item....
Manual
Page 86
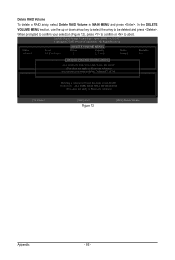
... - 9.5.0.1037 Copyright(C) 2003-09 Intel Corporation. All Rights Reserved. When prompted to confirm your selection (Figure 12), press to confirm or to non-RAID. Name Volume0 Level RAID0(Stripe) [ DELETE VOLUME MENU ] Drives 2 Capacity 223.6GB Status Normal Bootable Yes [ DELETE VOLUME VERIFICATION ] ALL DATA... Are you sure you wa[nHt tEoLdPel]ete "Volume0"? (Y/N) : Deleting a volume will reset the disks to abort. Delete RAID Volume To delete a RAID array, select Delete RAID Volume in MAIN MENU and press . WARNING: ALL DISK DATA WILL BE DELETED. (This does not apply to be deleted ...
... - 9.5.0.1037 Copyright(C) 2003-09 Intel Corporation. All Rights Reserved. When prompted to confirm your selection (Figure 12), press to confirm or to non-RAID. Name Volume0 Level RAID0(Stripe) [ DELETE VOLUME MENU ] Drives 2 Capacity 223.6GB Status Normal Bootable Yes [ DELETE VOLUME VERIFICATION ] ALL DATA... Are you sure you wa[nHt tEoLdPel]ete "Volume0"? (Y/N) : Deleting a volume will reset the disks to abort. Delete RAID Volume To delete a RAID array, select Delete RAID Volume in MAIN MENU and press . WARNING: ALL DISK DATA WILL BE DELETED. (This does not apply to be deleted ...
Manual
Page 87
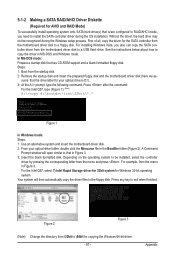
...Windows mode: Steps: 1: Use an alternative system and insert the motherboard driver disk. 2: From your optical drive is /are configured to RAID/AHCI mode, you also can copy the SATA controller driver from \32bit to the floppy disk. Your system will open similar to that in...Intel Q57, select 7) Intel Rapid Storage driver for 32bit system for Windows 32-bit operating system. Appendix 5-1-2 Making a SATA RAID/AHCI Driver Diskette (Required for AHCI and RAID Mode) To successfully install operating system onto SATA hard drive(s) that is D:\). 3: At the A:\> prompt, type the following ...
...Windows mode: Steps: 1: Use an alternative system and insert the motherboard driver disk. 2: From your optical drive is /are configured to RAID/AHCI mode, you also can copy the SATA controller driver from \32bit to the floppy disk. Your system will open similar to that in...Intel Q57, select 7) Intel Rapid Storage driver for 32bit system for Windows 32-bit operating system. Appendix 5-1-2 Making a SATA RAID/AHCI Driver Diskette (Required for AHCI and RAID Mode) To successfully install operating system onto SATA hard drive(s) that is D:\). 3: At the A:\> prompt, type the following ...
Manual
Page 88
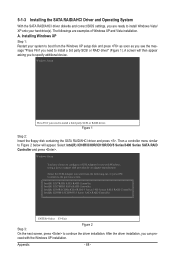
... a SCSI Adapter for use with the Windows XP installation. Appendix - 88 - The followings are ready to install a 3rd party SCSI or RAID driver" (Figure 1). A. After the driver installation, you need to install Windows Vista/ XP onto your system to boot from the following list... menu similar to Figure 2 below will then appear asking you to the previous screen. 5-1-3 Installing the SATA RAID/AHCI Driver and Operating System With the SATA RAID/AHCI driver diskette and correct BIOS settings, you are examples of Windows XP and Vista installation. Installing Windows XP...
... a SCSI Adapter for use with the Windows XP installation. Appendix - 88 - The followings are ready to install a 3rd party SCSI or RAID driver" (Figure 1). A. After the driver installation, you need to install Windows Vista/ XP onto your system to boot from the following list... menu similar to Figure 2 below will then appear asking you to the previous screen. 5-1-3 Installing the SATA RAID/AHCI Driver and Operating System With the SATA RAID/AHCI driver diskette and correct BIOS settings, you are examples of Windows XP and Vista installation. Installing Windows XP...
Manual
Page 89
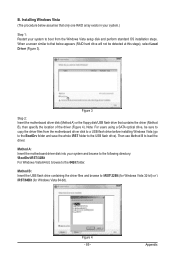
...the 64Bit folder. Appendix Figure 3 Step 2: Insert the motherboard driver disk (Method A) or the floppy disk/USB flash drive that only one RAID array exists in your system.) Step 1: Restart your system and browse to the following directory: \BootDrv\iRST\32Bit For Windows Vista 64-bit,... using a SATA optical drive, be detected at this stage), select Load Driver (Figure 3). B. Installing Windows Vista (The procedure below appears (RAID hard drive will not be sure to copy the driver files from the motherboard driver disk to a USB flash drive before installing Windows Vista (...
...the 64Bit folder. Appendix Figure 3 Step 2: Insert the motherboard driver disk (Method A) or the floppy disk/USB flash drive that only one RAID array exists in your system.) Step 1: Restart your system and browse to the following directory: \BootDrv\iRST\32Bit For Windows Vista 64-bit,... using a SATA optical drive, be detected at this stage), select Load Driver (Figure 3). B. Installing Windows Vista (The procedure below appears (RAID hard drive will not be sure to copy the driver files from the motherboard driver disk to a USB flash drive before installing Windows Vista (...


