
Manual
Page 3
... rights reserved. Disclaimer Information in this manual may be reproduced, copied, translated, transmitted, or published in the use of this product, GIGABYTE provides the following types of documentations: For quick set-up of this manual is protected by any means without prior notice.... For product-related information, check on our website at: http://www.gigabyte.com Identifying Your Motherboard Revision The revision number on your motherboard revision before updating motherboard BIOS, drivers, or when looking for technical information.
... rights reserved. Disclaimer Information in this manual may be reproduced, copied, translated, transmitted, or published in the use of this product, GIGABYTE provides the following types of documentations: For quick set-up of this manual is protected by any means without prior notice.... For product-related information, check on our website at: http://www.gigabyte.com Identifying Your Motherboard Revision The revision number on your motherboard revision before updating motherboard BIOS, drivers, or when looking for technical information.
Manual
Page 5
... 63 3-1 Installing Chipset Drivers 63 3-2 Application Software 64 3-3 Technical Manuals 64 3-4 Contact...65 3-5 System...65 3-6 Download Center 66 3-7 New Utilities...66 Chapter 4 Unique Features 67 4-1 ...Appendix...87 5-1 Configuring SATA Hard Drive(s 87 5-1-1 Configuring Intel P67 SATA Controllers 87 5-1-2 Configuring Marvell 88SE9128 SATA Controllers 95 5-1-3 Installing the SATA RAID/AHCI Driver and Operating System 100 5-2 Configuring Audio Input and Output 107 5-2-1 Configuring 2/4/5.1/7.1-Channel Audio 107 5-2-2 Configuring S/PDIF Out 109 5-2-3 Enabling the Dolby Home Theater...
... 63 3-1 Installing Chipset Drivers 63 3-2 Application Software 64 3-3 Technical Manuals 64 3-4 Contact...65 3-5 System...65 3-6 Download Center 66 3-7 New Utilities...66 Chapter 4 Unique Features 67 4-1 ...Appendix...87 5-1 Configuring SATA Hard Drive(s 87 5-1-1 Configuring Intel P67 SATA Controllers 87 5-1-2 Configuring Marvell 88SE9128 SATA Controllers 95 5-1-3 Installing the SATA RAID/AHCI Driver and Operating System 100 5-2 Configuring Audio Input and Output 107 5-2-1 Configuring 2/4/5.1/7.1-Channel Audio 107 5-2-2 Configuring S/PDIF Out 109 5-2-3 Enabling the Dolby Home Theater...
Manual
Page 6
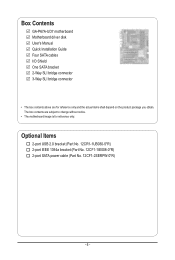
Box Contents GA-P67A-UD7 motherboard Motherboard driver disk User's Manual Quick Installation Guide Four SATA cables I/O Shield One SATA bracket 2-Way SLI bridge connector 3-Way SLI bridge connector • The box contents ...
Box Contents GA-P67A-UD7 motherboard Motherboard driver disk User's Manual Quick Installation Guide Four SATA cables I/O Shield One SATA bracket 2-Way SLI bridge connector 3-Way SLI bridge connector • The box contents ...
Manual
Page 18
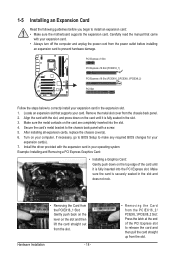
... cards, replace the chassis cover(s). 6. Example: Installing and Removing a PCI Express Graphics Card: • Installing a Graphics Card: Gently push down on your card. Install the driver provided with the slot, and press down on the card are completely inserted into the PCI Express slot. 1-5 Installing an Expansion Card Read the following...
... cards, replace the chassis cover(s). 6. Example: Installing and Removing a PCI Express Graphics Card: • Installing a Graphics Card: Gently push down on your card. Install the driver provided with the slot, and press down on the card are completely inserted into the PCI Express slot. 1-5 Installing an Expansion Card Read the following...
Manual
Page 19
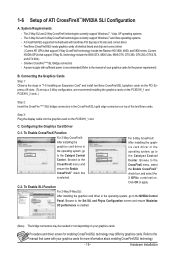
...the Set SLI and Physx Configuration screen and ensure Maximize 3D performance is selected. For 3-Way CrossFireX: After installing the graphics card driver in the CrossFireX/SLI gold edge connectors on the PCIEX16_1 slot. C-2. Hardware Installation C. Browse to the CrossFireX menu and ensure ...cards of ATI CrossFireX™/NVIDIA SLI Configuration A. To Enable CrossFireX Function For 2-Way CrossFireX: After installing the graphics card driver in the operating system, go to the Catalyst Control Center. Refer to the Catalyst Control Center. System Requirements - To ...
...the Set SLI and Physx Configuration screen and ensure Maximize 3D performance is selected. For 3-Way CrossFireX: After installing the graphics card driver in the CrossFireX/SLI gold edge connectors on the PCIEX16_1 slot. C-2. Hardware Installation C. Browse to the CrossFireX menu and ensure ...cards of ATI CrossFireX™/NVIDIA SLI Configuration A. To Enable CrossFireX Function For 2-Way CrossFireX: After installing the graphics card driver in the operating system, go to the Catalyst Control Center. Refer to the Catalyst Control Center. System Requirements - To ...
Manual
Page 36
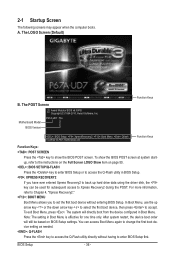
Motherboard Model BIOS Version P67A-UD7 F3a . . . . : BIOS Setup : XpressRecovery2 : Boot Menu : Qflash 10/28/2010-P67-7A89UG04C-00 Function Keys Function Keys: : POST SCREEN Press the key to show the .... The POST Screen Award Modular BIOS v6.00PG Copyright (C) 1984-2010, Award Software, Inc. In Boot Menu, use the up hard drive data using the driver disk, the key can access Boot Menu again to change the first boot device setting as needed. : Q-FLASH Press the key to access the Q-Flash...
Motherboard Model BIOS Version P67A-UD7 F3a . . . . : BIOS Setup : XpressRecovery2 : Boot Menu : Qflash 10/28/2010-P67-7A89UG04C-00 Function Keys Function Keys: : POST SCREEN Press the key to show the .... The POST Screen Award Modular BIOS v6.00PG Copyright (C) 1984-2010, Award Software, Inc. In Boot Menu, use the up hard drive data using the driver disk, the key can access Boot Menu again to change the first boot device setting as needed. : Q-FLASH Press the key to access the Q-Flash...

Manual
Page 52
... advanced Serial ATA features such as Native Command Queuing and hot plug. Disabled Allows the SATA controllers to install operating systems that allows the storage driver to AHCI mode.
... advanced Serial ATA features such as Native Command Queuing and hot plug. Disabled Allows the SATA controllers to install operating systems that allows the storage driver to AHCI mode.

Manual
Page 53
... enable advanced Serial ATA features such as shown in Windows mode or when the LAN Boot ROM is an interface specification that allows the storage driver to AHCI mode. Advanced Host Controller Interface (AHCI) is activated. If no cable problem is the approximate length of the attached LAN cable. Link Detected...
... enable advanced Serial ATA features such as shown in Windows mode or when the LAN Boot ROM is an interface specification that allows the storage driver to AHCI mode. Advanced Host Controller Interface (AHCI) is activated. If no cable problem is the approximate length of the attached LAN cable. Link Detected...

Manual
Page 54
GSATA3 RAID Configuration (Marvell 88SE9128 Chip, GSATA3_6 and GSATA3_7 Con- Advanced Host Controller Interface (AHCI) is an interface specification that allows the storage driver to take effect. In case you want to switch to Fw Mode from other modes and to be able to enter the GSATA3 RAID Configuration ...
GSATA3 RAID Configuration (Marvell 88SE9128 Chip, GSATA3_6 and GSATA3_7 Con- Advanced Host Controller Interface (AHCI) is an interface specification that allows the storage driver to take effect. In case you want to switch to Fw Mode from other modes and to be able to enter the GSATA3 RAID Configuration ...
Manual
Page 63
...Application Software page later. • For USB 2.0 driver support under the Windows XP operating system, please install the Windows XP Service Pack 1 or later. After the system restart, "Xpress Install" will continue to install new GIGABYTE utilities. After installing the SP1 (or later), if... a question mark still exists in Universal Serial Bus Controller in the screen shot below. (If the driver Autorun screen does not appear automatically, go to My Computer...
...Application Software page later. • For USB 2.0 driver support under the Windows XP operating system, please install the Windows XP Service Pack 1 or later. After the system restart, "Xpress Install" will continue to install new GIGABYTE utilities. After installing the SP1 (or later), if... a question mark still exists in Universal Serial Bus Controller in the screen shot below. (If the driver Autorun screen does not appear automatically, go to My Computer...

Manual
Page 64
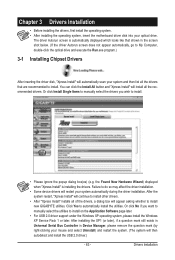
You can click the Install button on the right of an item to install it. 3-3 Technical Manuals This page provides GIGABYTE's application guides, content descriptions for this driver disk, and the motherboard manuals. Drivers Installation - 64 - 3-2 Application Software This page displays all the utilities and applications that GIGABYTE develops and some free software.
You can click the Install button on the right of an item to install it. 3-3 Technical Manuals This page provides GIGABYTE's application guides, content descriptions for this driver disk, and the motherboard manuals. Drivers Installation - 64 - 3-2 Application Software This page displays all the utilities and applications that GIGABYTE develops and some free software.

Manual
Page 65
Drivers Installation 3-4 Contact For the detailed contact information of the GIGABYTE Taiwan headquarter or worldwide branch offices, click the URL on this page to link to the GIGABYTE website. 3-5 System This page provides the basic system information. - 65 -
Drivers Installation 3-4 Contact For the detailed contact information of the GIGABYTE Taiwan headquarter or worldwide branch offices, click the URL on this page to link to the GIGABYTE website. 3-5 System This page provides the basic system information. - 65 -

Manual
Page 66
You can click the Install button on the right of the BIOS, drivers, or applications will be displayed. 3-7 New Utilities This page provides a quick link to GIGABYTE's lately developed utilities for users to install. Drivers Installation - 66 - The latest version of an item to the GIGABYTE website. 3-6 Download Center To update the BIOS, drivers, or applications, click the Download Center button to link to install it.
You can click the Install button on the right of the BIOS, drivers, or applications will be displayed. 3-7 New Utilities This page provides a quick link to GIGABYTE's lately developed utilities for users to install. Drivers Installation - 66 - The latest version of an item to the GIGABYTE website. 3-6 Download Center To update the BIOS, drivers, or applications, click the Download Center button to link to install it.
Manual
Page 67
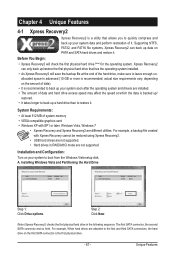
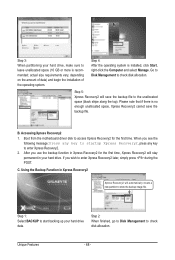
Installation and Configuration: Turn on your system soon after the operating system and drivers are different utilities. For example, When hard drives are not supported. Supporting NTFS, FAT32, and FAT16 file systems, Xpress Recovery2 can only back up your ...
Installation and Configuration: Turn on your system soon after the operating system and drivers are different utilities. For example, When hard drives are not supported. Supporting NTFS, FAT32, and FAT16 file systems, Xpress Recovery2 can only back up your ...
Manual
Page 68
... operating system is no enough unallocated space, Xpress Recovery2 cannot save the backup file to check disk allocation. Accessing Xpress Recovery2 1. Boot from the motherboard driver disk to check disk allocation. actual size requirements vary, depending on the amount of data) and begin the installation of the operating system. If you...
... operating system is no enough unallocated space, Xpress Recovery2 cannot save the backup file to check disk allocation. Accessing Xpress Recovery2 1. Boot from the motherboard driver disk to check disk allocation. actual size requirements vary, depending on the amount of data) and begin the installation of the operating system. If you...

Manual
Page 77
4-5 Q-Share Q-Share is NOT enabled. - 77 - Find the Q-Share icon to Start>All Programs>GIGABYTE>Q-Share. Data Sharing Enabled Options Descriptions Option Connect ... Directions for using Q-Share After installing Q-Share from the motherboard driver disk, go to configure the data sharing settings. About Q-Share ... Data Sharing Disabled Figure 2. Enable Incoming Folder ... Disable Incoming...
4-5 Q-Share Q-Share is NOT enabled. - 77 - Find the Q-Share icon to Start>All Programs>GIGABYTE>Q-Share. Data Sharing Enabled Options Descriptions Option Connect ... Directions for using Q-Share After installing Q-Share from the motherboard driver disk, go to configure the data sharing settings. About Q-Share ... Data Sharing Disabled Figure 2. Enable Incoming Folder ... Disable Incoming...
Manual
Page 83
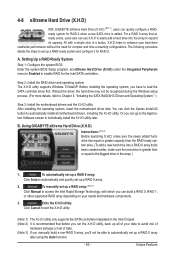
... RAID for complex and time-consuming configurations. You can quickly configure a RAIDready system for RAID 0. 4-8 eXtreme Hard Drive (X.H.D) With GIGABYTE eXtreme Hard Drive (X.H.D) (Note 1), users can click the Xpress Install All button to automatically install all of your needs and hardware ...Up a RAID-Ready System Step 1: Configure the system BIOS Enter the system BIOS Setup program, set up a RAID 0 array. 2. Without the driver, the hard drive may not be able to individually install the X.H.D utility later. Exits the X.H.D utility: Click Cancel to exit the X.H.D utility...
... RAID for complex and time-consuming configurations. You can quickly configure a RAIDready system for RAID 0. 4-8 eXtreme Hard Drive (X.H.D) With GIGABYTE eXtreme Hard Drive (X.H.D) (Note 1), users can click the Xpress Install All button to automatically install all of your needs and hardware ...Up a RAID-Ready System Step 1: Configure the system BIOS Enter the system BIOS Setup program, set up a RAID 0 array. 2. Without the driver, the hard drive may not be able to individually install the X.H.D utility later. Exits the X.H.D utility: Click Cancel to exit the X.H.D utility...

Manual
Page 85
... router device manual for the two available adapters and click OK. Click Install under Realtek Ethernet Diagnostic Utility for the Team, e.g. Step 1: Insert the motherboard driver disk and select Application Software, Install Application Software. Restart your hub's specifications. Step 3: Choose Teaming and click the Create Team button. To remove the existing...
... router device manual for the two available adapters and click OK. Click Install under Realtek Ethernet Diagnostic Utility for the Team, e.g. Step 1: Insert the motherboard driver disk and select Application Software, Install Application Software. Restart your hub's specifications. Step 3: Choose Teaming and click the Create Team button. To remove the existing...

Manual
Page 87
... to AHCI or RAID mode. (Note 3) When a RAID set may prepare only one hard drive. • Windows 7/Vista/XP setup disk. • Motherboard driver disk. 5-1-1 Configuring Intel P67 SATA Controllers A. mance of the RAID set is more than one end of the SATA signal cable to the rear of... step if you do not want to identify the SATA controller for the SATA port. (For example, on the motherboard. Install the SATA RAID/AHCI driver (Note 2) and operating system. If there is built across the SATA 6Gb/s and SATA 3Gb/s channels, the system perfor- Chapter 5 Appendix 5-1 Configuring SATA ...
... to AHCI or RAID mode. (Note 3) When a RAID set may prepare only one hard drive. • Windows 7/Vista/XP setup disk. • Motherboard driver disk. 5-1-1 Configuring Intel P67 SATA Controllers A. mance of the RAID set is more than one end of the SATA signal cable to the rear of... step if you do not want to identify the SATA controller for the SATA port. (For example, on the motherboard. Install the SATA RAID/AHCI driver (Note 2) and operating system. If there is built across the SATA 6Gb/s and SATA 3Gb/s channels, the system perfor- Chapter 5 Appendix 5-1 Configuring SATA ...

Manual
Page 91
... in MAIN MENU. Reset Disks to cancel (Figure 6). Appendix Finally press on the Create Volume item to create the SATA RAID/AHCI driver diskette and install the SATA RAID/AHCI driver and operating system. - 91 - All Rights Reserved. [ CREATE VOLUME MENU ] Name : Volume0 RAID Level : RAID0(Stripe) Disks : Select Disks Strip Size...
... in MAIN MENU. Reset Disks to cancel (Figure 6). Appendix Finally press on the Create Volume item to create the SATA RAID/AHCI driver diskette and install the SATA RAID/AHCI driver and operating system. - 91 - All Rights Reserved. [ CREATE VOLUME MENU ] Name : Volume0 RAID Level : RAID0(Stripe) Disks : Select Disks Strip Size...


