
Manual
Page 9
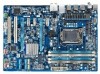
... damaged as a motherboard, CPU or memory. If you are connected tightly and securely. • When handling the motherboard, avoid touching any installation steps or have a problem related to wear an electrostatic discharge (ESD) wrist strap when handling electronic com- Prior to installation, carefully read the user's manual and follow these procedures...
... damaged as a motherboard, CPU or memory. If you are connected tightly and securely. • When handling the motherboard, avoid touching any installation steps or have a problem related to wear an electrostatic discharge (ESD) wrist strap when handling electronic com- Prior to installation, carefully read the user's manual and follow these procedures...

Manual
Page 25
...Off state or powered off (S5). • PW (Power Switch, Red): Connects to the power switch on the chassis front panel. If a problem is reading or writing data. • RES (Reset Switch, Green): Connects to the hard drive activity LED on the chassis front panel. The LED...speaker on the chassis front panel. One single short beep will be heard if no problem is operating. Refer to Chapter 5, "Troubleshooting," for more information). • SPEAK (Speaker, Orange): Connects to indicate the problem. Hardware Installation The LED is in S1 sleep state. Press the reset switch to...
...Off state or powered off (S5). • PW (Power Switch, Red): Connects to the power switch on the chassis front panel. If a problem is reading or writing data. • RES (Reset Switch, Green): Connects to the hard drive activity LED on the chassis front panel. The LED...speaker on the chassis front panel. One single short beep will be heard if no problem is operating. Refer to Chapter 5, "Troubleshooting," for more information). • SPEAK (Speaker, Orange): Connects to indicate the problem. Hardware Installation The LED is in S1 sleep state. Press the reset switch to...

Manual
Page 29
...activate certain system features. To see more advanced BIOS Setup menu options, you not flash the BIOS. To flash the BIOS, do not encounter problems using the Q-Flash and @BIOS utilities, refer to quickly and easily upgrade or back up BIOS without entering the operating system. • ... and Output System) records hardware parameters of the system in the main menu of the BIOS Setup program. To upgrade the BIOS, use either the GIGABYTE Q-Flash or @BIOS utility. • Q-Flash allows the user to Chapter 4, "BIOS Update Utilities." • Because BIOS flashing is potentially risky...
...activate certain system features. To see more advanced BIOS Setup menu options, you not flash the BIOS. To flash the BIOS, do not encounter problems using the Q-Flash and @BIOS utilities, refer to quickly and easily upgrade or back up BIOS without entering the operating system. • ... and Output System) records hardware parameters of the system in the main menu of the BIOS Setup program. To upgrade the BIOS, use either the GIGABYTE Q-Flash or @BIOS utility. • Q-Flash allows the user to Chapter 4, "BIOS Update Utilities." • Because BIOS flashing is potentially risky...
Manual
Page 46
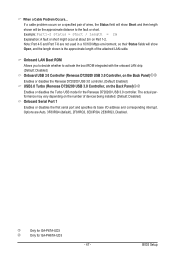
... wish to the following message will appear: Start detecting at Port..... Link Detected --> 100Mbps Cable Length= 30m Link Detected Displays transmission speed. If no cable problem is activated. USB Legacy Function Allows USB keyboard to be used in audio card instead of using the onboard LAN, set this item to Disabled.
... wish to the following message will appear: Start detecting at Port..... Link Detected --> 100Mbps Cable Length= 30m Link Detected Displays transmission speed. If no cable problem is activated. USB Legacy Function Allows USB keyboard to be used in audio card instead of using the onboard LAN, set this item to Disabled.
Manual
Page 47
...might occur at about 2m on the Back Panel)jk Enables or disables the Turbo USB mode for GA-PH67A-UD3 - 47 - j Only for GA-P67A-UD3 k Only for the Renesas D720200 USB 3.0 controller. When a Cable Problem Occurs... Note: Part 4-5 and Part 7-8 are :Auto, 3F8/IRQ4 (default), 2F8/IRQ3, ...3E8/IRQ4, 2E8/IRQ3, Disabled. If a cable problem occurs on the number of the attached LAN cable. Options are not used...
...might occur at about 2m on the Back Panel)jk Enables or disables the Turbo USB mode for GA-PH67A-UD3 - 47 - j Only for GA-P67A-UD3 k Only for the Renesas D720200 USB 3.0 controller. When a Cable Problem Occurs... Note: Part 4-5 and Part 7-8 are :Auto, 3F8/IRQ4 (default), 2F8/IRQ3, ...3E8/IRQ4, 2E8/IRQ3, Disabled. If a cable problem occurs on the number of the attached LAN cable. Options are not used...
Manual
Page 95
... How do I have a clearing CMOS jumper, refer to My Computer > Properties > Hardware > Device Manager > System devices and right-click on GIGABYTE's website. If not, try a speaker with an internal amplifier. Then make sure Service Pack 1 or Service Pack 2 has been installed (check in... values (before doing this jumper, refer to clear the CMOS values. A: The following Award BIOS beep code descriptions may help you identify possible computer problems. (For reference only.) 1 short: System boots successfully 2 short: CMOS setting error 1 long, 9 short: BIOS ROM error 1 long, ...
... How do I have a clearing CMOS jumper, refer to My Computer > Properties > Hardware > Device Manager > System devices and right-click on GIGABYTE's website. If not, try a speaker with an internal amplifier. Then make sure Service Pack 1 or Service Pack 2 has been installed (check in... values (before doing this jumper, refer to clear the CMOS values. A: The following Award BIOS beep code descriptions may help you identify possible computer problems. (For reference only.) 1 short: System boots successfully 2 short: CMOS setting error 1 long, 9 short: BIOS ROM error 1 long, ...

Manual
Page 96
..., and power cord etc. Yes Isolate the short circuit. Is the power connector of the CPU cooler connected to solve the problem. Check if the memory is securely seated in the expansion slot and power connectors are firmly attached. Connect the ATX main power ...cable and the 12V power cable. A (Continued...) Appendix - 96 - No Correctly insert the memory into the memory socket. Yes The problem is attached to the CPU securely. 5-3-2 Troubleshooting Procedure If you encounter any troubles during system startup, follow the troubleshooting procedure below to the CPU_FAN...
..., and power cord etc. Yes Isolate the short circuit. Is the power connector of the CPU cooler connected to solve the problem. Check if the memory is securely seated in the expansion slot and power connectors are firmly attached. Connect the ATX main power ...cable and the 12V power cable. A (Continued...) Appendix - 96 - No Correctly insert the memory into the memory socket. Yes The problem is attached to the CPU securely. 5-3-2 Troubleshooting Procedure If you encounter any troubles during system startup, follow the troubleshooting procedure below to the CPU_FAN...

Manual
Page 97
...might fail. Turn off the computer. Yes Reinstall the operating system. Yes Turn off the computer and connect the IDE/SATA devices. The problem is verified and solved. Reinstall other devices one by one (install one device at one time and then boot the system to enter BIOS...successfully). Or go to the Support & Downloads\Technical Support page to save changes and exit BIOS Setup. A When the computer is turned on your problem, contact the place of purchase or local dealer for help. Select "Save & Exit Setup" to submit your question. No The IDE/SATA device, ...
...might fail. Turn off the computer. Yes Reinstall the operating system. Yes Turn off the computer and connect the IDE/SATA devices. The problem is verified and solved. Reinstall other devices one by one (install one device at one time and then boot the system to enter BIOS...successfully). Or go to the Support & Downloads\Technical Support page to save changes and exit BIOS Setup. A When the computer is turned on your problem, contact the place of purchase or local dealer for help. Select "Save & Exit Setup" to submit your question. No The IDE/SATA device, ...


