
Manual
Page 1
eXtreme Hard Drive (X.H.D) With GIGABYTE eXtreme Hard Drive (X.H.D)(Note 1), users can quickly configure a RAIDready system for RAID 0 when a new SATA drive is recommended that before you run the X.H.D utility, back up all motherboard drivers, including the X.H.D utility. A. Setting Up a RAID-Ready System ...0, RAID 1, or other supported RAID array depending on your hard drive read/write performance without the need for RAID 0. Using GIGABYTE eXtreme Hard Drive (X.H.D) Instructions:(Note 2) Before launching X.H.D, make sure the newly added harddrive has equal or greater capacity than or ...
eXtreme Hard Drive (X.H.D) With GIGABYTE eXtreme Hard Drive (X.H.D)(Note 1), users can quickly configure a RAIDready system for RAID 0 when a new SATA drive is recommended that before you run the X.H.D utility, back up all motherboard drivers, including the X.H.D utility. A. Setting Up a RAID-Ready System ...0, RAID 1, or other supported RAID array depending on your hard drive read/write performance without the need for RAID 0. Using GIGABYTE eXtreme Hard Drive (X.H.D) Instructions:(Note 2) Before launching X.H.D, make sure the newly added harddrive has equal or greater capacity than or ...
Manual
Page 3
... motherboard revision before updating motherboard BIOS, drivers, or when looking for technical information. Documentation Classifications In order to the specifications and features in this manual may be made by copyright laws and is 1.0. For product-related information, check on our website at: http://www.gigabyte.com.tw Identifying Your Motherboard Revision The...
... motherboard revision before updating motherboard BIOS, drivers, or when looking for technical information. Documentation Classifications In order to the specifications and features in this manual may be made by copyright laws and is 1.0. For product-related information, check on our website at: http://www.gigabyte.com.tw Identifying Your Motherboard Revision The...
Manual
Page 4
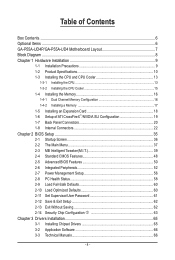
Table of Contents Box Contents...6 Optional Items...6 GA-P55A-UD4P/GA-P55A-UD4 Motherboard Layout 7 Block Diagram...8 Chapter 1 Hardware Installation 9 1-1 Installation Precautions 9 1-2 Product Specifications 10 1-3 Installing the CPU and CPU Cooler 13 1-3-1 Installing the CPU 13 1-3-2 Installing the ... Optimized Defaults 60 2-11 Set Supervisor/User Password 61 2-12 Save & Exit Setup 62 2-13 Exit Without Saving 62 2-14 Security Chip Configuration j 63 Chapter 3 Drivers Installation 65 3-1 Installing Chipset Drivers 65 3-2 Application Software 66 3-3 Technical Manuals 66 - 4 -
Table of Contents Box Contents...6 Optional Items...6 GA-P55A-UD4P/GA-P55A-UD4 Motherboard Layout 7 Block Diagram...8 Chapter 1 Hardware Installation 9 1-1 Installation Precautions 9 1-2 Product Specifications 10 1-3 Installing the CPU and CPU Cooler 13 1-3-1 Installing the CPU 13 1-3-2 Installing the ... Optimized Defaults 60 2-11 Set Supervisor/User Password 61 2-12 Save & Exit Setup 62 2-13 Exit Without Saving 62 2-14 Security Chip Configuration j 63 Chapter 3 Drivers Installation 65 3-1 Installing Chipset Drivers 65 3-2 Application Software 66 3-3 Technical Manuals 66 - 4 -

Manual
Page 5
... 101 5-1-4 Making a SATA RAID/AHCI Driver Diskette 106 5-1-5 Installing the SATA RAID/AHCI Driver and Operating System 108 5-2 Configuring Audio ...Input and Output 121 5-2-1 Configuring 2/4/5.1/7.1-Channel Audio 121 5-2-2 Configuring S/PDIF In/Out 123 5-2-3 Enabling the Dolby Home Theater Function 125 5-2-4 Configuring Microphone Recording 126 5-2-5 Using the Sound Recorder 128 5-3 Troubleshooting 129 5-3-1 Frequently Asked Questions 129 5-3-2 Troubleshooting Procedure 130 5-4 Regulatory Statements 132 j Only for GA-P55A...
... 101 5-1-4 Making a SATA RAID/AHCI Driver Diskette 106 5-1-5 Installing the SATA RAID/AHCI Driver and Operating System 108 5-2 Configuring Audio ...Input and Output 121 5-2-1 Configuring 2/4/5.1/7.1-Channel Audio 121 5-2-2 Configuring S/PDIF In/Out 123 5-2-3 Enabling the Dolby Home Theater Function 125 5-2-4 Configuring Microphone Recording 126 5-2-5 Using the Sound Recorder 128 5-3 Troubleshooting 129 5-3-1 Frequently Asked Questions 129 5-3-2 Troubleshooting Procedure 130 5-4 Regulatory Statements 132 j Only for GA-P55A...
Manual
Page 6
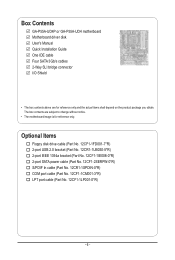
Box Contents GA-P55A-UD4P or GA-P55A-UD4 motherboard Motherboard driver disk User's Manual Quick Installation Guide One IDE cable Four SATA 3Gb/s cables 2-Way SLI bridge connector I/O Shield • The box contents above are subject ...
Box Contents GA-P55A-UD4P or GA-P55A-UD4 motherboard Motherboard driver disk User's Manual Quick Installation Guide One IDE cable Four SATA 3Gb/s cables 2-Way SLI bridge connector I/O Shield • The box contents above are subject ...

Manual
Page 18
Carefully read the manual that supports your expansion card(s). 7. Turn on the card are completely inserted into the PCI Express slot. Install the driver provided with your operating system. 1-5 Installing an Expansion Card Read the following guidelines before installing an expansion card to prevent hardware damage. After installing all ...
Carefully read the manual that supports your expansion card(s). 7. Turn on the card are completely inserted into the PCI Express slot. Install the driver provided with your operating system. 1-5 Installing an Expansion Card Read the following guidelines before installing an expansion card to prevent hardware damage. After installing all ...
Manual
Page 19
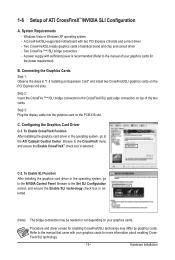
... sufficient power is recommended (Refer to the ATI Catalyst Control Center. To Enable CrossFireX Function After installing the graphics card driver in the operating system, go to the manual of the two cards. To Enable SLI Function After installing the graphics card...by graphics cards. System Requirements - Step 3: Plug the display cable into the graphics card on the PCI Express x16 slots. C. Procedure and driver screen for the power requirement) B. Hardware Installation Step 2: Insert the CrossFire (Note)/SLI bridge connectors in "1-5 Installing an Expansion Card" and ...
... sufficient power is recommended (Refer to the ATI Catalyst Control Center. To Enable CrossFireX Function After installing the graphics card driver in the operating system, go to the manual of the two cards. To Enable SLI Function After installing the graphics card...by graphics cards. System Requirements - Step 3: Plug the display cable into the graphics card on the PCI Express x16 slots. C. Procedure and driver screen for the power requirement) B. Hardware Installation Step 2: Insert the CrossFire (Note)/SLI bridge connectors in "1-5 Installing an Expansion Card" and ...
Manual
Page 36
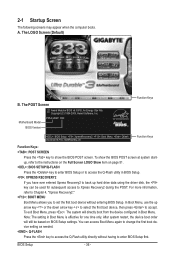
Motherboard Model BIOS Version P55A-UD4P D20 . . . . : BIOS Setup : XpressRecovery2 : Boot Menu : Qflash 09/23/2009-P55-7A89RG0WC-00 Function Keys Function Keys Function Keys: : POST SCREEN Press the key ... to select the first boot device, then press to Xpress Recovery2 during the POST. In Boot Menu, use the up hard drive data using the driver disk, the key can access Boot Menu again to change the first boot device setting as needed. : Q-FLASH Press the key to enter BIOS Setup...
Motherboard Model BIOS Version P55A-UD4P D20 . . . . : BIOS Setup : XpressRecovery2 : Boot Menu : Qflash 09/23/2009-P55-7A89RG0WC-00 Function Keys Function Keys Function Keys: : POST SCREEN Press the key ... to select the first boot device, then press to Xpress Recovery2 during the POST. In Boot Menu, use the up hard drive data using the driver disk, the key can access Boot Menu again to change the first boot device setting as needed. : Q-FLASH Press the key to enter BIOS Setup...
Manual
Page 53
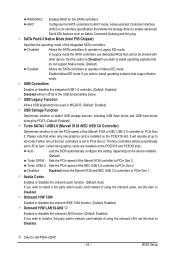
...the device installed. (Default) Turbo SATA3 Sets the PCIe speed of the two controllers is an interface specification that allows the storage driver to Disabled. Enable Native IDE mode if you wish to be used in Legacy IDE mode. The two controllers will turn off...3.0 controller to PCIe Gen 2. USB Legacy Function Allows USB keyboard to install operating systems that support Native mode. RAID(XHD) Enables RAID for GA-P55A-UD4P. - 53 - Disabled Allows the SATA controllers to operate in MS-DOS. (Default: Enabled) USB Storage Function Determines whether to detect USB...
...the device installed. (Default) Turbo SATA3 Sets the PCIe speed of the two controllers is an interface specification that allows the storage driver to Disabled. Enable Native IDE mode if you wish to be used in Legacy IDE mode. The two controllers will turn off...3.0 controller to PCIe Gen 2. USB Legacy Function Allows USB keyboard to install operating systems that support Native mode. RAID(XHD) Enables RAID for GA-P55A-UD4P. - 53 - Disabled Allows the SATA controllers to operate in MS-DOS. (Default: Enabled) USB Storage Function Determines whether to detect USB...

Manual
Page 55
... Controller Interface (AHCI) is an interface specification that allows the storage driver to AHCI mode. Options are : SPP (Standard Parallel Port) (default), EPP (Enhanced Parallel Port), ECP (Extended Capabilities Port), ECP+EPP. Parallel Port Mode Selects an operating mode for GA-P55A-UD4P. - 55 - Onboard Serial Port 1 Enables or disables the first serial...
... Controller Interface (AHCI) is an interface specification that allows the storage driver to AHCI mode. Options are : SPP (Standard Parallel Port) (default), EPP (Enhanced Parallel Port), ECP (Extended Capabilities Port), ECP+EPP. Parallel Port Mode Selects an operating mode for GA-P55A-UD4P. - 55 - Onboard Serial Port 1 Enables or disables the first serial...
Manual
Page 65
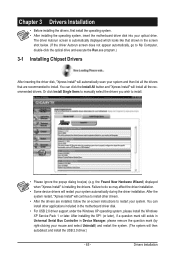
...restart the system. (The system will restart your system and then list all the recommended drivers. Drivers Installation You can install other drivers. • After the drivers are recommended to restart your optical drive. Or click Install Single Items to manually select the...optical drive and execute the Run.exe program.) 3-1 Installing Chipset Drivers After inserting the driver disk, "Xpress Install" will install all the drivers that shown in the motherboard driver disk. • For USB 2.0 driver support under the Windows XP operating system, please install the Windows ...
...restart the system. (The system will restart your system and then list all the recommended drivers. Drivers Installation You can install other drivers. • After the drivers are recommended to restart your optical drive. Or click Install Single Items to manually select the...optical drive and execute the Run.exe program.) 3-1 Installing Chipset Drivers After inserting the driver disk, "Xpress Install" will install all the drivers that shown in the motherboard driver disk. • For USB 2.0 driver support under the Windows XP operating system, please install the Windows ...
Manual
Page 66
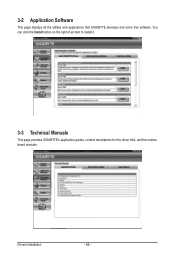
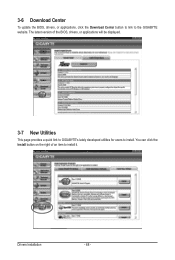
You can click the Install button on the right of an item to install it. 3-3 Technical Manuals This page provides GIGABYTE's application guides, content descriptions for this driver disk, and the motherboard manuals. Drivers Installation - 66 - 3-2 Application Software This page displays all the utilities and applications that GIGABYTE develops and some free software.
You can click the Install button on the right of an item to install it. 3-3 Technical Manuals This page provides GIGABYTE's application guides, content descriptions for this driver disk, and the motherboard manuals. Drivers Installation - 66 - 3-2 Application Software This page displays all the utilities and applications that GIGABYTE develops and some free software.

Manual
Page 67
3-4 Contact For the detailed contact information of the GIGABYTE Taiwan headquarter or worldwide branch offices, click the URL on this page to link to the GIGABYTE website. 3-5 System This page provides the basic system information. - 67 - Drivers Installation
3-4 Contact For the detailed contact information of the GIGABYTE Taiwan headquarter or worldwide branch offices, click the URL on this page to link to the GIGABYTE website. 3-5 System This page provides the basic system information. - 67 - Drivers Installation
Manual
Page 68
Drivers Installation - 68 - You can click the Install button on the right of the BIOS, drivers, or applications will be displayed. 3-7 New Utilities This page provides a quick link to GIGABYTE's lately developed utilities for users to install. 3-6 Download Center To update the BIOS, drivers, or applications, click the Download Center button to link to install it. The latest version of an item to the GIGABYTE website.
Drivers Installation - 68 - You can click the Install button on the right of the BIOS, drivers, or applications will be displayed. 3-7 New Utilities This page provides a quick link to GIGABYTE's lately developed utilities for users to install. 3-6 Download Center To update the BIOS, drivers, or applications, click the Download Center button to link to install it. The latest version of an item to the GIGABYTE website.

Manual
Page 69
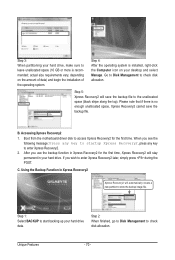
... back up/restore the first physical hard drive that allows you to quickly compress and back up your system soon after the operating system and drivers are attached to boot from the Windows Vista setup disk. Step 2: Click New. (Note) Xpress Recovery2 checks the first physical hard drive in RAID/AHCI...
... back up/restore the first physical hard drive that allows you to quickly compress and back up your system soon after the operating system and drivers are attached to boot from the Windows Vista setup disk. Step 2: Click New. (Note) Xpress Recovery2 checks the first physical hard drive in RAID/AHCI...
Manual
Page 70
... automatically create a new partition to store the backup image file. Unique Features - 70 - Go to Disk Management to check disk allocation. B. Boot from the motherboard driver disk to access Xpress Recovery2 for the first time, Xpress Recovery2 will stay permanent in Xpress Recovery2 Xpress Recovery2 will save the backup file. Step...
... automatically create a new partition to store the backup image file. Unique Features - 70 - Go to Disk Management to check disk allocation. B. Boot from the motherboard driver disk to access Xpress Recovery2 for the first time, Xpress Recovery2 will stay permanent in Xpress Recovery2 Xpress Recovery2 will save the backup file. Step...

Manual
Page 79
... Connect ... Unique Features Data Sharing Disabled Figure 2. Disable Incoming Folder ... Enable Incoming Folder ... Exit... exe to Start>All Programs>GIGABYTE>Q-Share. Directions for using Q-Share After installing Q-Share from the motherboard driver disk, go to launch the Q-Share tool. in the notification area and right-click on the same network, making full...
... Connect ... Unique Features Data Sharing Disabled Figure 2. Disable Incoming Folder ... Enable Incoming Folder ... Exit... exe to Start>All Programs>GIGABYTE>Q-Share. Directions for using Q-Share After installing Q-Share from the motherboard driver disk, go to launch the Q-Share tool. in the notification area and right-click on the same network, making full...
Manual
Page 83
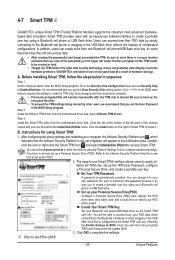
... plugging in a secure location and back them up a Personal Secure Drive (PSD). Unique Features Install the Infineon TPM driver from the motherboard driver disk. (Click the tab at least set up the TPM User Password, configure a Personal Secure Drive, and create ...GIGABYTE's unique Smart TPM (Trusted Platform Module) supports the industry's most advanced hardwarebased data encryption. You can access data. • After creating the password(s) and key(s) associated the TPM, be directed to access/close their PSD data by other users, we recommend that is not liable for GA-P55A...
... plugging in a secure location and back them up a Personal Secure Drive (PSD). Unique Features Install the Infineon TPM driver from the motherboard driver disk. (Click the tab at least set up the TPM User Password, configure a Personal Secure Drive, and create ...GIGABYTE's unique Smart TPM (Trusted Platform Module) supports the industry's most advanced hardwarebased data encryption. You can access data. • After creating the password(s) and key(s) associated the TPM, be directed to access/close their PSD data by other users, we recommend that is not liable for GA-P55A...

Manual
Page 85
... button, X.H.D helps to enable RAID for the Intel SATA controllers. To automatically set up a RAID 0 array. 2. Unique Features Using GIGABYTE eXtreme Hard Drive (X.H.D) Instructions:(Note 2) Before launching X.H.D, make sure the new drive is greater than or equal to expand its capacity. ...in the Intel Chipset. (Note 2) It is added. The following procedure details the steps to load the SATA controller driver first. 4-9 eXtreme Hard Drive (X.H.D) With GIGABYTE eXtreme Hard Drive (X.H.D)(Note 1), users can build a RAID 0, RAID 1, or other supported RAID array depending on ...
... button, X.H.D helps to enable RAID for the Intel SATA controllers. To automatically set up a RAID 0 array. 2. Unique Features Using GIGABYTE eXtreme Hard Drive (X.H.D) Instructions:(Note 2) Before launching X.H.D, make sure the new drive is greater than or equal to expand its capacity. ...in the Intel Chipset. (Note 2) It is added. The following procedure details the steps to load the SATA controller driver first. 4-9 eXtreme Hard Drive (X.H.D) With GIGABYTE eXtreme Hard Drive (X.H.D)(Note 1), users can build a RAID 0, RAID 1, or other supported RAID array depending on ...
Manual
Page 86
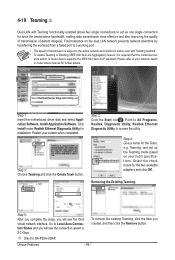
work switch or router device supports the IEEE 802.3ad LACP standard. Step 1: Insert the motherboard driver disk and select Application Software, Install Application Software. Click Install under Realtek Ethernet Diagnostic Utility for the two available adapters and ...of distant image(s). Go to act as one single connection for further details. Fault tolerance on your hub's specifications. Step 4: Give a name for GA-P55A-UD4P. Step 2: Click the Start icon . Restart your network switch or router device manual for twice the transmission bandwidth, making data transmission more effective...
work switch or router device supports the IEEE 802.3ad LACP standard. Step 1: Insert the motherboard driver disk and select Application Software, Install Application Software. Click Install under Realtek Ethernet Diagnostic Utility for the two available adapters and ...of distant image(s). Go to act as one single connection for further details. Fault tolerance on your hub's specifications. Step 4: Give a name for GA-P55A-UD4P. Step 2: Click the Start icon . Restart your network switch or router device manual for twice the transmission bandwidth, making data transmission more effective...


