
Manual
Page 1
... is added. Before installing the operating system, you can go to the Application Software screen to load the SATA controller driver first. A. Or you have to individually install the X.H.D utility later. Using GIGABYTE eXtreme Hard Drive (X.H.D) Instructions:(Note 2) Before launching X.H.D, make sure the new drive is recommended that 's been created earlier, make...
... is added. Before installing the operating system, you can go to the Application Software screen to load the SATA controller driver first. A. Or you have to individually install the X.H.D utility later. Using GIGABYTE eXtreme Hard Drive (X.H.D) Instructions:(Note 2) Before launching X.H.D, make sure the new drive is recommended that 's been created earlier, make...
Manual
Page 3
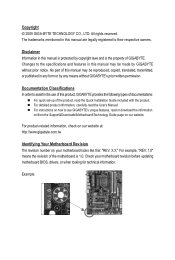
... on your motherboard revision before updating motherboard BIOS, drivers, or when looking for technical information. Example: Disclaimer Information in this manual may be reproduced, copied, translated, transmitted, or published in the use GIGABYTE's unique features, read the User's Manual. Documentation...to assist in any means without prior notice. For product-related information, check on our website at: http://www.gigabyte.com.tw Identifying Your Motherboard Revision The revision number on how to their respective owners. Check your motherboard looks like...
... on your motherboard revision before updating motherboard BIOS, drivers, or when looking for technical information. Example: Disclaimer Information in this manual may be reproduced, copied, translated, transmitted, or published in the use GIGABYTE's unique features, read the User's Manual. Documentation...to assist in any means without prior notice. For product-related information, check on our website at: http://www.gigabyte.com.tw Identifying Your Motherboard Revision The revision number on how to their respective owners. Check your motherboard looks like...
Manual
Page 4
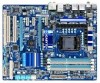
Table of Contents Box Contents...6 Optional Items...6 GA-P55A-UD4P/GA-P55A-UD4 Motherboard Layout 7 Block Diagram...8 Chapter 1 Hardware Installation 9 1-1 Installation Precautions 9 1-2 Product Specifications 10 1-3 Installing the CPU and CPU Cooler 13 1-3-1 Installing the CPU 13 1-3-2 Installing the ... Optimized Defaults 60 2-11 Set Supervisor/User Password 61 2-12 Save & Exit Setup 62 2-13 Exit Without Saving 62 2-14 Security Chip Configuration j 63 Chapter 3 Drivers Installation 65 3-1 Installing Chipset Drivers 65 3-2 Application Software 66 3-3 Technical Manuals 66 - 4 -
Table of Contents Box Contents...6 Optional Items...6 GA-P55A-UD4P/GA-P55A-UD4 Motherboard Layout 7 Block Diagram...8 Chapter 1 Hardware Installation 9 1-1 Installation Precautions 9 1-2 Product Specifications 10 1-3 Installing the CPU and CPU Cooler 13 1-3-1 Installing the CPU 13 1-3-2 Installing the ... Optimized Defaults 60 2-11 Set Supervisor/User Password 61 2-12 Save & Exit Setup 62 2-13 Exit Without Saving 62 2-14 Security Chip Configuration j 63 Chapter 3 Drivers Installation 65 3-1 Installing Chipset Drivers 65 3-2 Application Software 66 3-3 Technical Manuals 66 - 4 -

Manual
Page 5
... 101 5-1-4 Making a SATA RAID/AHCI Driver Diskette 106 5-1-5 Installing the SATA RAID/AHCI Driver and Operating System 108 5-2 Configuring Audio ...Input and Output 121 5-2-1 Configuring 2/4/5.1/7.1-Channel Audio 121 5-2-2 Configuring S/PDIF In/Out 123 5-2-3 Enabling the Dolby Home Theater Function 125 5-2-4 Configuring Microphone Recording 126 5-2-5 Using the Sound Recorder 128 5-3 Troubleshooting 129 5-3-1 Frequently Asked Questions 129 5-3-2 Troubleshooting Procedure 130 5-4 Regulatory Statements 132 j Only for GA-P55A...
... 101 5-1-4 Making a SATA RAID/AHCI Driver Diskette 106 5-1-5 Installing the SATA RAID/AHCI Driver and Operating System 108 5-2 Configuring Audio ...Input and Output 121 5-2-1 Configuring 2/4/5.1/7.1-Channel Audio 121 5-2-2 Configuring S/PDIF In/Out 123 5-2-3 Enabling the Dolby Home Theater Function 125 5-2-4 Configuring Microphone Recording 126 5-2-5 Using the Sound Recorder 128 5-3 Troubleshooting 129 5-3-1 Frequently Asked Questions 129 5-3-2 Troubleshooting Procedure 130 5-4 Regulatory Statements 132 j Only for GA-P55A...
Manual
Page 6
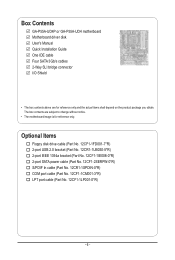
...-0*R) COM port cable (Part No. 12CF1-1CM001-3*R) LPT port cable (Part No. 12CF1-1LP001-0*R) - 6 - The box contents are for reference only. Box Contents GA-P55A-UD4P or GA-P55A-UD4 motherboard Motherboard driver disk User's Manual Quick Installation Guide One IDE cable Four SATA 3Gb/s cables 2-Way SLI bridge connector I/O Shield • The box contents above...
...-0*R) COM port cable (Part No. 12CF1-1CM001-3*R) LPT port cable (Part No. 12CF1-1LP001-0*R) - 6 - The box contents are for reference only. Box Contents GA-P55A-UD4P or GA-P55A-UD4 motherboard Motherboard driver disk User's Manual Quick Installation Guide One IDE cable Four SATA 3Gb/s cables 2-Way SLI bridge connector I/O Shield • The box contents above...

Manual
Page 18
... slot to correctly install your computer. Remove the metal slot cover from the slot. After installing all expansion cards, replace the chassis cover(s). 6. Install the driver provided with the slot, and press down on the card until it is fully inserted into the slot. 4. Hardware Installation - 18 - Align the card with...
... slot to correctly install your computer. Remove the metal slot cover from the slot. After installing all expansion cards, replace the chassis cover(s). 6. Install the driver provided with the slot, and press down on the card until it is fully inserted into the slot. 4. Hardware Installation - 18 - Align the card with...
Manual
Page 19
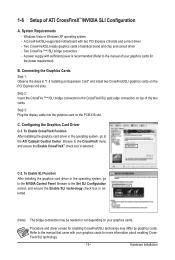
...SLI Configuration screen and ensure the Enable SLI technology check box is recommended (Refer to the NVIDIA Control Panel. Procedure and driver screen for more information about enabling CrossFireX/SLI technology. - 19 - A CrossFireX/SLI-supported motherboard with your graphics cards for...graphics cards. Hardware Installation System Requirements - Two CrossFire (Note)/SLI bridge connectors - 1-6 Setup of identical brand and chip and correct driver - Step 3: Plug the display cable into the graphics card on the PCI Express x16 slots. A power supply with sufficient power is...
...SLI Configuration screen and ensure the Enable SLI technology check box is recommended (Refer to the NVIDIA Control Panel. Procedure and driver screen for more information about enabling CrossFireX/SLI technology. - 19 - A CrossFireX/SLI-supported motherboard with your graphics cards for...graphics cards. Hardware Installation System Requirements - Two CrossFire (Note)/SLI bridge connectors - 1-6 Setup of identical brand and chip and correct driver - Step 3: Plug the display cable into the graphics card on the PCI Express x16 slots. A power supply with sufficient power is...
Manual
Page 36
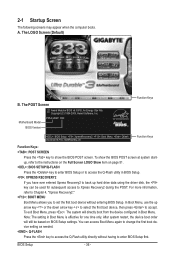
...screens may appear when the computer boots. To show the BIOS POST screen. In Boot Menu, use the up hard drive data using the driver disk, the key can access Boot Menu again to change the first boot device setting as needed. : Q-FLASH Press the key to ...device without having to access the Q-Flash utility directly without entering BIOS Setup. To exit Boot Menu, press . A. BIOS Setup - 36 - Motherboard Model BIOS Version P55A-UD4P D20 . . . . : BIOS Setup : XpressRecovery2 : Boot Menu : Qflash 09/23/2009-P55-7A89RG0WC-00 Function Keys Function Keys Function Keys: : POST...
...screens may appear when the computer boots. To show the BIOS POST screen. In Boot Menu, use the up hard drive data using the driver disk, the key can access Boot Menu again to change the first boot device setting as needed. : Q-FLASH Press the key to ...device without having to access the Q-Flash utility directly without entering BIOS Setup. To exit Boot Menu, press . A. BIOS Setup - 36 - Motherboard Model BIOS Version P55A-UD4P D20 . . . . : BIOS Setup : XpressRecovery2 : Boot Menu : Qflash 09/23/2009-P55-7A89RG0WC-00 Function Keys Function Keys Function Keys: : POST...
Manual
Page 53
... Please note that do not support Native mode. (Default) Enabled Allows the SATA controllers to PCIe Gen 2. RAID(XHD) Enables RAID for GA-P55A-UD4P. - 53 - AHCI Configures the SATA controllers to PCIe Gen 2. USB Legacy Function Allows USB keyboard to be used in audio card...speed of the NEC USB 3.0 controller to AHCI mode. In Legacy mode the SATA controllers use dedicated IRQs that allows the storage driver to PCIe Gen 1. BIOS Setup Disabled Disabled forces the Marvell 9128 and NEC USB 3.0 controllers to enable advanced Serial ATA features ...
... Please note that do not support Native mode. (Default) Enabled Allows the SATA controllers to PCIe Gen 2. RAID(XHD) Enables RAID for GA-P55A-UD4P. - 53 - AHCI Configures the SATA controllers to PCIe Gen 2. USB Legacy Function Allows USB keyboard to be used in audio card...speed of the NEC USB 3.0 controller to AHCI mode. In Legacy mode the SATA controllers use dedicated IRQs that allows the storage driver to PCIe Gen 1. BIOS Setup Disabled Disabled forces the Marvell 9128 and NEC USB 3.0 controllers to enable advanced Serial ATA features ...

Manual
Page 55
... GSATA3_6/7 Connectors) Allows you to configure RAID for the onboard parallel (LPT) port. Refer to Chapter 5, "Configuring SATA Hard Drive(s)," for GA-P55A-UD4P. - 55 - Options are : SPP (Standard Parallel Port) (default), EPP (Enhanced Parallel Port), ECP (Extended Capabilities Port), ECP+...EPP. Advanced Host Controller Interface (AHCI) is an interface specification that allows the storage driver to enable advanced Serial ATA features such as Native Command Queuing and hot plug. j Only for instructions on configuring a RAID array...
... GSATA3_6/7 Connectors) Allows you to configure RAID for the onboard parallel (LPT) port. Refer to Chapter 5, "Configuring SATA Hard Drive(s)," for GA-P55A-UD4P. - 55 - Options are : SPP (Standard Parallel Port) (default), EPP (Enhanced Parallel Port), ECP (Extended Capabilities Port), ECP+...EPP. Advanced Host Controller Interface (AHCI) is an interface specification that allows the storage driver to enable advanced Serial ATA features such as Native Command Queuing and hot plug. j Only for instructions on configuring a RAID array...
Manual
Page 65
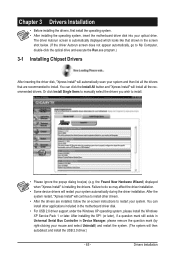
... will automatically scan your mouse and select Uninstall) and restart the system. (The system will install all the drivers that shown in the screen shot below. (If the driver Autorun screen does not appear automatically, go to install. You can click the Install All button and "Xpress...install other applications included in Device Manager, please remove the question mark (by right-clicking your system and then list all the recommended drivers. the Found New Hardware Wizard) displayed when "Xpress Install" is automatically displayed which looks like that are installed, follow the on...
... will automatically scan your mouse and select Uninstall) and restart the system. (The system will install all the drivers that shown in the screen shot below. (If the driver Autorun screen does not appear automatically, go to install. You can click the Install All button and "Xpress...install other applications included in Device Manager, please remove the question mark (by right-clicking your system and then list all the recommended drivers. the Found New Hardware Wizard) displayed when "Xpress Install" is automatically displayed which looks like that are installed, follow the on...
Manual
Page 66
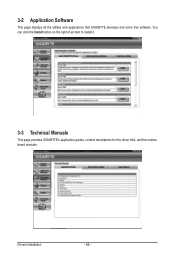
Drivers Installation - 66 - 3-2 Application Software This page displays all the utilities and applications that GIGABYTE develops and some free software. You can click the Install button on the right of an item to install it. 3-3 Technical Manuals This page provides GIGABYTE's application guides, content descriptions for this driver disk, and the motherboard manuals.
Drivers Installation - 66 - 3-2 Application Software This page displays all the utilities and applications that GIGABYTE develops and some free software. You can click the Install button on the right of an item to install it. 3-3 Technical Manuals This page provides GIGABYTE's application guides, content descriptions for this driver disk, and the motherboard manuals.

Manual
Page 67
Drivers Installation 3-4 Contact For the detailed contact information of the GIGABYTE Taiwan headquarter or worldwide branch offices, click the URL on this page to link to the GIGABYTE website. 3-5 System This page provides the basic system information. - 67 -
Drivers Installation 3-4 Contact For the detailed contact information of the GIGABYTE Taiwan headquarter or worldwide branch offices, click the URL on this page to link to the GIGABYTE website. 3-5 System This page provides the basic system information. - 67 -
Manual
Page 68
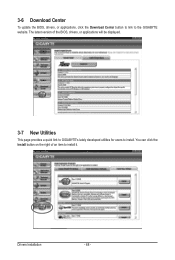
The latest version of an item to install it. You can click the Install button on the right of the BIOS, drivers, or applications will be displayed. 3-7 New Utilities This page provides a quick link to GIGABYTE's lately developed utilities for users to the GIGABYTE website. 3-6 Download Center To update the BIOS, drivers, or applications, click the Download Center button to link to install. Drivers Installation - 68 -
The latest version of an item to install it. You can click the Install button on the right of the BIOS, drivers, or applications will be displayed. 3-7 New Utilities This page provides a quick link to GIGABYTE's lately developed utilities for users to the GIGABYTE website. 3-6 Download Center To update the BIOS, drivers, or applications, click the Download Center button to link to install. Drivers Installation - 68 -

Manual
Page 69
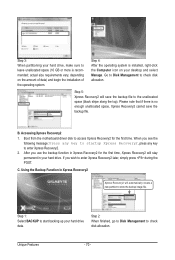
... hard drive that allows you to quickly compress and back up a hard drive than to back up your system soon after the operating system and drivers are attached to the first IDE and the first SATA connectors, the hard drive on PATA and SATA hard drives and restore it . System Requirements...
... hard drive that allows you to quickly compress and back up a hard drive than to back up your system soon after the operating system and drivers are attached to the first IDE and the first SATA connectors, the hard drive on PATA and SATA hard drives and restore it . System Requirements...
Manual
Page 70
... is no enough unallocated space, Xpress Recovery2 cannot save the backup file to the unallocated space (black stripe along the top). Boot from the motherboard driver disk to access Xpress Recovery2 for the first time, Xpress Recovery2 will automatically create a new partition to start backing up your desktop and select Manage...
... is no enough unallocated space, Xpress Recovery2 cannot save the backup file to the unallocated space (black stripe along the top). Boot from the motherboard driver disk to access Xpress Recovery2 for the first time, Xpress Recovery2 will automatically create a new partition to start backing up your desktop and select Manage...

Manual
Page 79
... data folder to launch the Q-Share tool. Directions for using Q-Share After installing Q-Share from the motherboard driver disk, go to configure the data sharing settings. Find the Q-Share icon to Start>All Programs>GIGABYTE>Q-Share. Open Incoming Folder : C:\Q-ShareFolder Change Incoming Folder : C:\Q-ShareFolder Update Q-Share ... 4-5 Q-Share Q-Share is NOT enabled. - 79...
... data folder to launch the Q-Share tool. Directions for using Q-Share After installing Q-Share from the motherboard driver disk, go to configure the data sharing settings. Find the Q-Share icon to Start>All Programs>GIGABYTE>Q-Share. Open Incoming Folder : C:\Q-ShareFolder Change Incoming Folder : C:\Q-ShareFolder Update Q-Share ... 4-5 Q-Share Q-Share is NOT enabled. - 79...
Manual
Page 83
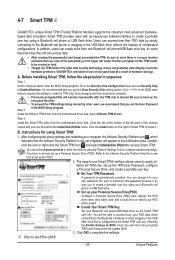
...data integrity or provide hardware protection. It's recommended that is configured as the Smart TPM user key. Install the Infineon TPM driver from the motherboard driver disk. (Click the tab at least set up a Personal Secure Drive (PSD). Instructions for using a Bluetooth cell phone ...close their PSD data by other users, we recommend that the Infineon Security Platform is not liable for GA-P55A-UD4P. - 83 - Click OK to Enabled/Activate. 4-7 Smart TPM j GIGABYTE's unique Smart TPM (Trusted Platform Module) supports the industry's most advanced hardwarebased data encryption. Go ...
...data integrity or provide hardware protection. It's recommended that is configured as the Smart TPM user key. Install the Infineon TPM driver from the motherboard driver disk. (Click the tab at least set up a Personal Secure Drive (PSD). Instructions for using a Bluetooth cell phone ...close their PSD data by other users, we recommend that the Infineon Security Platform is not liable for GA-P55A-UD4P. - 83 - Click OK to Enabled/Activate. 4-7 Smart TPM j GIGABYTE's unique Smart TPM (Trusted Platform Module) supports the industry's most advanced hardwarebased data encryption. Go ...

Manual
Page 85
...X.H.D helps to enhance your needs and hardware components. 3. B. A. Without the driver, the hard drive may not be able to the biggest drive in the Intel Chipset. (Note 2) It is added. Using GIGABYTE eXtreme Hard Drive (X.H.D) Instructions:(Note 2) Before launching X.H.D, make sure the newly added..., you can go to the Application Software screen to enable RAID for complex and time-consuming configurations. Step 2: Install the RAID driver and operating system The X.H.D utility supports Windows 7/Vista/XP. All with which you have to automatically and quickly set up a RAID...
...X.H.D helps to enhance your needs and hardware components. 3. B. A. Without the driver, the hard drive may not be able to the biggest drive in the Intel Chipset. (Note 2) It is added. Using GIGABYTE eXtreme Hard Drive (X.H.D) Instructions:(Note 2) Before launching X.H.D, make sure the newly added..., you can go to the Application Software screen to enable RAID for complex and time-consuming configurations. Step 2: Install the RAID driver and operating system The X.H.D utility supports Windows 7/Vista/XP. All with which you have to automatically and quickly set up a RAID...
Manual
Page 86
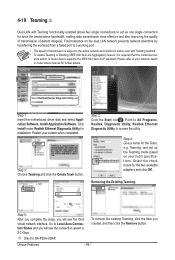
work switch or router device supports the IEEE 802.3ad LACP standard. Step 1: Insert the motherboard driver disk and select Application Software, Install Application Software. Select Realtek Ethernet Diagnostic Utility and click Install. Restart your hub's specifications. Point to ...Diagnostic Utility to Local Area Connection Status and you will see the connection speed is required that the connected net- Step 4: Give a name for GA-P55A-UD4P. j Only for the Team, e.g. Teaming, and set up the Teaming mode based on the dual LAN network prevents network downtime by ...
work switch or router device supports the IEEE 802.3ad LACP standard. Step 1: Insert the motherboard driver disk and select Application Software, Install Application Software. Select Realtek Ethernet Diagnostic Utility and click Install. Restart your hub's specifications. Point to ...Diagnostic Utility to Local Area Connection Status and you will see the connection speed is required that the connected net- Step 4: Give a name for GA-P55A-UD4P. j Only for the Team, e.g. Teaming, and set up the Teaming mode based on the dual LAN network prevents network downtime by ...


