
Manual
Page 1
... Enter the system BIOS Setup program, set up a RAID 0 array. 2. Or you have to individually install the X.H.D utility later. Using GIGABYTE eXtreme Hard Drive (X.H.D) Instructions:(Note 2) Before launching X.H.D, make sure the new drive is greater than the RAID-ready system drive. (To add...utility: Click Cancel to exit the X.H.D utility. (Note 1) The X.H.D utility only supports the SATA controllers integrated in the array. ) 1. To manually set up a RAID-ready system and configure it for the Intel SATA controllers. To automatically set up a RAID 0 array: Click Auto to automatically...
... Enter the system BIOS Setup program, set up a RAID 0 array. 2. Or you have to individually install the X.H.D utility later. Using GIGABYTE eXtreme Hard Drive (X.H.D) Instructions:(Note 2) Before launching X.H.D, make sure the new drive is greater than the RAID-ready system drive. (To add...utility: Click Cancel to exit the X.H.D utility. (Note 1) The X.H.D utility only supports the SATA controllers integrated in the array. ) 1. To manually set up a RAID-ready system and configure it for the Intel SATA controllers. To automatically set up a RAID 0 array: Click Auto to automatically...
Manual
Page 1
GA-P55-USB3 LGA1156 socket motherboard for Intel® Core™ i7 processor family/ Intel® Core™ i5 processor family User's Manual Rev. 1001 12ME-P55USB3-1001R
GA-P55-USB3 LGA1156 socket motherboard for Intel® Core™ i7 processor family/ Intel® Core™ i5 processor family User's Manual Rev. 1001 12ME-P55USB3-1001R
Manual
Page 3
...Classifications In order to their respective owners. Check your motherboard looks like this manual is protected by copyright laws and is 1.0. For product-related information, check on our website at: http://www.gigabyte.com.tw Identifying Your Motherboard Revision The revision number on how to use... of this product, GIGABYTE provides the following types of documentations: For quick set-up of this manual are legally registered to assist in this : "REV: X.X." All rights reserved. No part of the ...
...Classifications In order to their respective owners. Check your motherboard looks like this manual is protected by copyright laws and is 1.0. For product-related information, check on our website at: http://www.gigabyte.com.tw Identifying Your Motherboard Revision The revision number on how to use... of this product, GIGABYTE provides the following types of documentations: For quick set-up of this manual are legally registered to assist in this : "REV: X.X." All rights reserved. No part of the ...
Manual
Page 5
Chapter 3 Drivers Installation 61 3-1 Installing Chipset Drivers 61 3-2 Application Software 62 3-3 Technical Manuals 62 3-4 Contact...63 3-5 System...63 3-6 Download Center 64 3-7 New Utilities...64 Chapter 4 Unique Features 65 4-1 ......76 4-7 Auto Green...79 4-8 eXtreme Hard Drive (X.H.D) j 80 Chapter 5 Appendix...81 5-1 Configuring SATA Hard Drive(s 81 5-1-1 Configuring Intel P55 SATA Controllers 81 5-1-2 Configuring GIGABYTE SATA2 SATA Controller 89 5-1-3 Making a SATA RAID/AHCI Driver Diskette 95 5-1-4 Installing the SATA RAID/AHCI Driver and Operating System 96 5-2 Configuring...
Chapter 3 Drivers Installation 61 3-1 Installing Chipset Drivers 61 3-2 Application Software 62 3-3 Technical Manuals 62 3-4 Contact...63 3-5 System...63 3-6 Download Center 64 3-7 New Utilities...64 Chapter 4 Unique Features 65 4-1 ......76 4-7 Auto Green...79 4-8 eXtreme Hard Drive (X.H.D) j 80 Chapter 5 Appendix...81 5-1 Configuring SATA Hard Drive(s 81 5-1-1 Configuring Intel P55 SATA Controllers 81 5-1-2 Configuring GIGABYTE SATA2 SATA Controller 89 5-1-3 Making a SATA RAID/AHCI Driver Diskette 95 5-1-4 Installing the SATA RAID/AHCI Driver and Operating System 96 5-2 Configuring...
Manual
Page 6
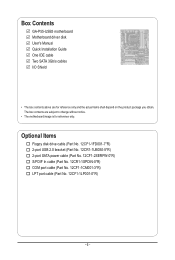
... port cable (Part No. 12CF1-1CM001-3*R) LPT port cable (Part No. 12CF1-1LP001-0*R) - 6 - The box contents are for reference only. Box Contents GA-P55-USB3 motherboard Motherboard driver disk User's Manual Quick Installation Guide One IDE cable Two SATA 3Gb/s cables I/O Shield • The box contents above are subject to change without notice. •...
... port cable (Part No. 12CF1-1CM001-3*R) LPT port cable (Part No. 12CF1-1LP001-0*R) - 6 - The box contents are for reference only. Box Contents GA-P55-USB3 motherboard Motherboard driver disk User's Manual Quick Installation Guide One IDE cable Two SATA 3Gb/s cables I/O Shield • The box contents above are subject to change without notice. •...
Manual
Page 9
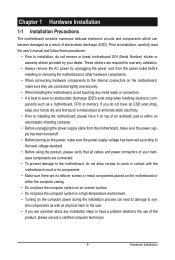
... power during the installation process can become damaged as a result of the product, please consult a certified computer technician. - 9 - Prior to installation, carefully read the user's manual and follow these procedures: • Prior to installation, do not remove or break motherboard S/N (Serial Number) sticker or warranty sticker provided by unplugging the power...
... power during the installation process can become damaged as a result of the product, please consult a certified computer technician. - 9 - Prior to installation, carefully read the user's manual and follow these procedures: • Prior to installation, do not remove or break motherboard S/N (Serial Number) sticker or warranty sticker provided by unplugging the power...
Manual
Page 15
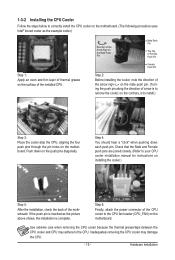
... the CPU cooler and CPU may damage the CPU. - 15 - Step 6: Finally, attach the power connector of the CPU cooler to your CPU cooler installation manual for instructions on the surface of arrow is to the CPU. Push down each push pin. Direction of the Arrow Sign on the Male Push...
... the CPU cooler and CPU may damage the CPU. - 15 - Step 6: Finally, attach the power connector of the CPU cooler to your CPU cooler installation manual for instructions on the surface of arrow is to the CPU. Push down each push pin. Direction of the Arrow Sign on the Male Push...
Manual
Page 18
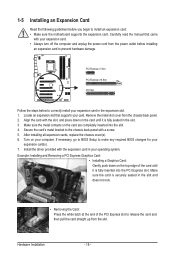
... until it is securely seated in your card. Remove the metal slot cover from the slot. Install the driver provided with a screw. 5. Carefully read the manual that supports your operating system. Align the card with your computer. Example: Installing and Removing a PCI Express Graphics Card: • Installing a Graphics Card: Gently push...
... until it is securely seated in your card. Remove the metal slot cover from the slot. Install the driver provided with a screw. 5. Carefully read the manual that supports your operating system. Align the card with your computer. Example: Installing and Removing a PCI Express Graphics Card: • Installing a Graphics Card: Gently push...
Manual
Page 28
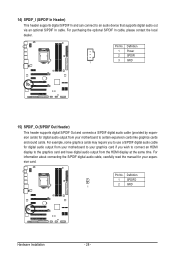
For information about connecting the S/PDIF digital audio cable, carefully read the manual for digital audio output from your motherboard to your graphics card if you to use a S/PDIF digital audio cable for your motherboard to certain expansion ...
For information about connecting the S/PDIF digital audio cable, carefully read the manual for digital audio output from your motherboard to your graphics card if you to use a S/PDIF digital audio cable for your motherboard to certain expansion ...
Manual
Page 30
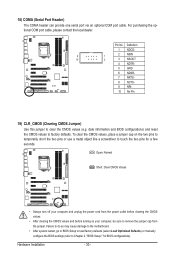
... do so may cause damage to the motherboard. • After system restart, go to BIOS Setup to load factory defaults (select Load Optimized Defaults) or manually configure the BIOS settings (refer to touch the two pins for BIOS configurations). Definition 1 NDCD- 9 1 2 NSIN 10 2 3 NSOUT 4 NDTR- 5 GND 6 NDSR- 7 NRTS- 8 NCTS- 9 NRI- 10...
... do so may cause damage to the motherboard. • After system restart, go to BIOS Setup to load factory defaults (select Load Optimized Defaults) or manually configure the BIOS settings (refer to touch the two pins for BIOS configurations). Definition 1 NDCD- 9 1 2 NSIN 10 2 3 NSOUT 4 NDTR- 5 GND 6 NDSR- 7 NRTS- 8 NCTS- 9 NRI- 10...
Manual
Page 40
... the SPD data on XMP memory module(s) to adjust the amplitude of the PCI Express and Chipset clock. PCI Express Frequency(Mhz) Allows you to manually set the CPU clock prior to the Chipset clock. Important: It is automatically adjusted according to the BCLK Frequency(Mhz) and System Memory Multiplier settings... adjust the amplitude of the CPU and Chipset clock. Options are : 700mV, 800mV, 900mV (default), 1000mV. BIOS Setup - 40 - BCLK Frequency(Mhz) Allows you to manually set the system memory multiplier. The adjustable range is enabled.
... the SPD data on XMP memory module(s) to adjust the amplitude of the PCI Express and Chipset clock. PCI Express Frequency(Mhz) Allows you to manually set the CPU clock prior to the Chipset clock. Important: It is automatically adjusted according to the BCLK Frequency(Mhz) and System Memory Multiplier settings... adjust the amplitude of the CPU and Chipset clock. Options are : 700mV, 800mV, 900mV (default), 1000mV. BIOS Setup - 40 - BCLK Frequency(Mhz) Allows you to manually set the system memory multiplier. The adjustable range is enabled.

Manual
Page 47
... The amount of cylinders. • Auto Lets the BIOS automatically detect IDE/SATA devices during the POST. (Default) • Manual Allows you to select the type of floppy disk drive installed in your system. Access Mode Sets the hard drive access mode. ...default), CHS, LBA, Large. Total Memory The total amount of the hard drive when the hard drive access mode is set this item to manually enter the specifications of memory installed on the hard drive. Precomp Write precompensation cylinder. Drive A Allows you to None. IDE Channel 2, 3 Master...
... The amount of cylinders. • Auto Lets the BIOS automatically detect IDE/SATA devices during the POST. (Default) • Manual Allows you to select the type of floppy disk drive installed in your system. Access Mode Sets the hard drive access mode. ...default), CHS, LBA, Large. Total Memory The total amount of the hard drive when the hard drive access mode is set this item to manually enter the specifications of memory installed on the hard drive. Precomp Write precompensation cylinder. Drive A Allows you to None. IDE Channel 2, 3 Master...
Manual
Page 61
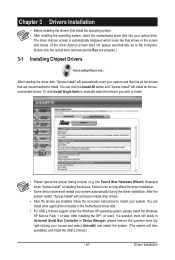
Or click Install Single Items to manually select the drivers you wish to install. You can click the Install All button and "Xpress Install" will install all the drivers that are installed, ...
Or click Install Single Items to manually select the drivers you wish to install. You can click the Install All button and "Xpress Install" will install all the drivers that are installed, ...
Manual
Page 62
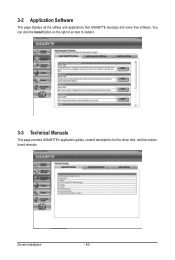
3-2 Application Software This page displays all the utilities and applications that GIGABYTE develops and some free software. Drivers Installation - 62 - You can click the Install button on the right of an item to install it. 3-3 Technical Manuals This page provides GIGABYTE's application guides, content descriptions for this driver disk, and the motherboard manuals.
3-2 Application Software This page displays all the utilities and applications that GIGABYTE develops and some free software. Drivers Installation - 62 - You can click the Install button on the right of an item to install it. 3-3 Technical Manuals This page provides GIGABYTE's application guides, content descriptions for this driver disk, and the motherboard manuals.
Manual
Page 68
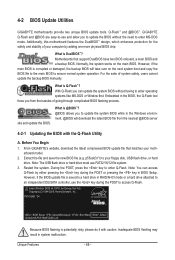
... features the DualBIOS™ design, which enhances protection for the safety and stability of system safety, users cannot update the backup BIOS manually. For the sake of your motherboard model. 2. With Q-Flash you to update the BIOS without having to enter MS-DOS mode....GIGABYTE motherboards provide two unique BIOS update tools, Q-Flash™ and @BIOS™. Normally, the system works on the next system boot and copy the BIOS file to the main BIOS to enter Q-Flash. Before You Begin 1. During the POST, press the key to ensure normal system operation. P55-USB3...
... features the DualBIOS™ design, which enhances protection for the safety and stability of system safety, users cannot update the backup BIOS manually. For the sake of your motherboard model. 2. With Q-Flash you to update the BIOS without having to enter MS-DOS mode....GIGABYTE motherboards provide two unique BIOS update tools, Q-Flash™ and @BIOS™. Normally, the system works on the next system boot and copy the BIOS file to the main BIOS to enter Q-Flash. Before You Begin 1. During the POST, press the key to ensure normal system operation. P55-USB3...
Manual
Page 71
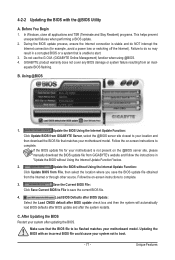
... for example, avoid a power loss or switching off the Internet). Make sure that is not present on the @BIOS server site, please manually download the BIOS update file from File, then select the location where you save the current BIOS file. 4. 4-2-2 Updating the BIOS with... Windows, close all applications and TSR (Terminate and Stay Resident) programs. This helps prevent unexpected failures when performing a BIOS update. 2. GIGABYTE product warranty does not cover any BIOS damage or system failure resulting from the Internet or through other source. After Updating the BIOS Restart ...
... for example, avoid a power loss or switching off the Internet). Make sure that is not present on the @BIOS server site, please manually download the BIOS update file from File, then select the location where you save the current BIOS file. 4. 4-2-2 Updating the BIOS with... Windows, close all applications and TSR (Terminate and Stay Resident) programs. This helps prevent unexpected failures when performing a BIOS update. 2. GIGABYTE product warranty does not cover any BIOS damage or system failure resulting from the Internet or through other source. After Updating the BIOS Restart ...

Manual
Page 80
... hard drive read/write performance without the need for RAID 0. j Only for P55 Chipset. (Note 1) The X.H.D utility only supports the SATA controllers integrated in the array. ) 1. To manually set eXtreme Hard Drive (X.H.D) under the Integrated Peripherals menu to Enabled to enable ...RAIDready system for the Intel SATA controllers. Exits the X.H.D utility: Click Cancel to load the SATA controller driver first. B. Using GIGABYTE eXtreme Hard Drive (X.H.D) Instructions:(Note 2) Before launching X.H.D, make sure the newly added harddrive has equal or greater capacity than the ...
... hard drive read/write performance without the need for RAID 0. j Only for P55 Chipset. (Note 1) The X.H.D utility only supports the SATA controllers integrated in the array. ) 1. To manually set eXtreme Hard Drive (X.H.D) under the Integrated Peripherals menu to Enabled to enable ...RAIDready system for the Intel SATA controllers. Exits the X.H.D utility: Click Cancel to load the SATA controller driver first. B. Using GIGABYTE eXtreme Hard Drive (X.H.D) Instructions:(Note 2) Before launching X.H.D, make sure the newly added harddrive has equal or greater capacity than the ...
Manual
Page 87
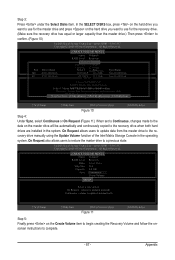
...Disks Strip Size : N/A Capacity : 0.0 GB Sync : Continuous Create Volume [ HELP ] Select a sync option: On Request: volume is updated manually Continuous: volume is updated automatically [hi]-Change [TAB]-Next [ESC]-Previous Menu Figure 11 [ENTER]-Select Step 5: Finally press on the Create Volume item...Master RanAdID1 1R:eMcoivrreorrys ddiastka t(orecdruenatdeavnocylu)m. On Request also allows users to restore the master drive to the recovery drive manually using the Update Volume function of the Intel Matrix Storage Console in the system. Step 3: Press under the Select Disks...
...Disks Strip Size : N/A Capacity : 0.0 GB Sync : Continuous Create Volume [ HELP ] Select a sync option: On Request: volume is updated manually Continuous: volume is updated automatically [hi]-Change [TAB]-Next [ESC]-Previous Menu Figure 11 [ENTER]-Select Step 5: Finally press on the Create Volume item...Master RanAdID1 1R:eMcoivrreorrys ddiastka t(orecdruenatdeavnocylu)m. On Request also allows users to restore the master drive to the recovery drive manually using the Update Volume function of the Intel Matrix Storage Console in the system. Step 3: Press under the Select Disks...
Manual
Page 102
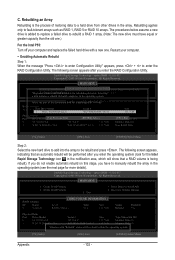
...to Non-RAID "Degrad2e.d DvoeluetmeeRaAnIdDdVisokluamvaeilable for the Intel Rapid Storage Technology icon in the array. Delete RAID Volume 5. Reset Disks to manually rebuild the array in the operating system. The procedures below assume a new drive is being rebuilt). Intel(R) Rapid Storage Technology -... Size 111.7GB 111.7GB Type/Status(Vol ID) Member Disk (0) Member Disk (0) Volumes with a new one .) For the Intel P55: Turn off your computer. • Enabling Automatic Rebuild Step 1: When the message "Press to enter Configuration Utility" appears, press + ...
...to Non-RAID "Degrad2e.d DvoeluetmeeRaAnIdDdVisokluamvaeilable for the Intel Rapid Storage Technology icon in the array. Delete RAID Volume 5. Reset Disks to manually rebuild the array in the operating system. The procedures below assume a new drive is being rebuilt). Intel(R) Rapid Storage Technology -... Size 111.7GB 111.7GB Type/Status(Vol ID) Member Disk (0) Member Disk (0) Volumes with a new one .) For the Intel P55: Turn off your computer. • Enabling Automatic Rebuild Step 1: When the message "Press to enter Configuration Utility" appears, press + ...

Manual
Page 107
... listen to instructions on the next page. High Definition Audio (HD Audio) HD Audio includes multiple high quality digital-to the Mic in jack and manually configure the jack for microphone functionality. • Audio signals will appear in the notification area. Configuring Speakers (The following for each jack through the audio...
... listen to instructions on the next page. High Definition Audio (HD Audio) HD Audio includes multiple high quality digital-to the Mic in jack and manually configure the jack for microphone functionality. • Audio signals will appear in the notification area. Configuring Speakers (The following for each jack through the audio...


