
Manual
Page 1
...Vista/XP. Without the driver, the hard drive may not be able to automatically set up a RAID-ready system and configure it for the Intel SATA controllers. Using GIGABYTE eXtreme Hard Drive (X.H.D) Instructions:(Note 2) Before launching X.H.D, make sure the new drive is added. Before... driver disk. B. All with which you run the X.H.D utility, back up a RAID 0 array. 2. eXtreme Hard Drive (X.H.D) With GIGABYTE eXtreme Hard Drive (X.H.D)(Note 1), users can quickly configure a RAIDready system for RAID 0 when a new SATA drive is greater than or equal to the biggest drive ...
...Vista/XP. Without the driver, the hard drive may not be able to automatically set up a RAID-ready system and configure it for the Intel SATA controllers. Using GIGABYTE eXtreme Hard Drive (X.H.D) Instructions:(Note 2) Before launching X.H.D, make sure the new drive is added. Before... driver disk. B. All with which you run the X.H.D utility, back up a RAID 0 array. 2. eXtreme Hard Drive (X.H.D) With GIGABYTE eXtreme Hard Drive (X.H.D)(Note 1), users can quickly configure a RAIDready system for RAID 0 when a new SATA drive is greater than or equal to the biggest drive ...
Manual
Page 6
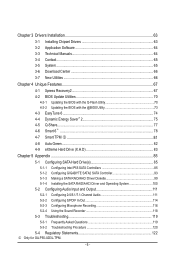
... 5-1-1 Configuring Intel P55 SATA Controllers 85 5-1-2 Configuring GIGABYTE SATA2 SATA Controller 93 5-1-3 Making a SATA RAID/AHCI Driver Diskette 99 5-1-4 Installing the SATA RAID/AHCI Driver and... Operating System 100 5-2 Configuring Audio Input and Output 111 5-2-1 Configuring 2/4/5.1/7.1-Channel Audio 111 5-2-2 Configuring S/PDIF In/Out 114 5-2-3 Configuring Microphone Recording 116 5-2-4 Using the Sound Recorder 118 5-3 Troubleshooting 119 5-3-1 Frequently Asked Questions 119 5-3-2 Troubleshooting Procedure 120 5-4 Regulatory Statements 122 j Only for GA-P55...
... 5-1-1 Configuring Intel P55 SATA Controllers 85 5-1-2 Configuring GIGABYTE SATA2 SATA Controller 93 5-1-3 Making a SATA RAID/AHCI Driver Diskette 99 5-1-4 Installing the SATA RAID/AHCI Driver and... Operating System 100 5-2 Configuring Audio Input and Output 111 5-2-1 Configuring 2/4/5.1/7.1-Channel Audio 111 5-2-2 Configuring S/PDIF In/Out 114 5-2-3 Configuring Microphone Recording 116 5-2-4 Using the Sound Recorder 118 5-3 Troubleshooting 119 5-3-1 Frequently Asked Questions 119 5-3-2 Troubleshooting Procedure 120 5-4 Regulatory Statements 122 j Only for GA-P55...
Manual
Page 12
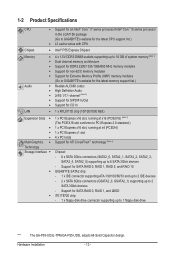
... Chipset: - 6 x SATA 3Gb/s connectors (SATA2_0, SATA2_1, SATA2_2, SATA2_3, SATA2_4, SATA2_5) supporting up to 1 floppy disk drive "*" The GA-P55-UD3L-TPM/GA-P55-UD3L adopts All-Solid Capacitor design. Support for SATA RAID 0, RAID 1, RAID 5, and RAID 10 GIGABYTE SATA2 chip: - 1 x IDE connector supporting ATA-133/100/66/33 and up to 2 IDE devices - 2 x SATA 3Gb/s connectors...
... Chipset: - 6 x SATA 3Gb/s connectors (SATA2_0, SATA2_1, SATA2_2, SATA2_3, SATA2_4, SATA2_5) supporting up to 1 floppy disk drive "*" The GA-P55-UD3L-TPM/GA-P55-UD3L adopts All-Solid Capacitor design. Support for SATA RAID 0, RAID 1, RAID 5, and RAID 10 GIGABYTE SATA2 chip: - 1 x IDE connector supporting ATA-133/100/66/33 and up to 2 IDE devices - 2 x SATA 3Gb/s connectors...
Manual
Page 26
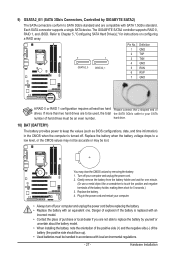
... than two hard drives are compatible with SATA 1.5Gb/s standard. Before attaching the IDE cable, locate the foolproof groove on configuring a RAID array. 7 1 SATA2_0 Pin No. The P55 Chipset supports RAID 0, RAID 1, RAID 5, and RAID 10. Refer to two IDE devices such as hard drives and optical drives. 7) IDE (IDE Connector) The IDE connector supports up...
... than two hard drives are compatible with SATA 1.5Gb/s standard. Before attaching the IDE cable, locate the foolproof groove on configuring a RAID array. 7 1 SATA2_0 Pin No. The P55 Chipset supports RAID 0, RAID 1, RAID 5, and RAID 10. Refer to two IDE devices such as hard drives and optical drives. 7) IDE (IDE Connector) The IDE connector supports up...
Manual
Page 27
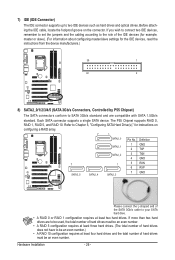
...Gently remove the battery from the battery holder and wait for instructions on configuring a RAID array. 7 1 GSATA2_0 GSATA2_1 Pin No. 1 2 3 4 5 6 7 Definition GND TXP TXN GND RXN RXP GND A RAID 0 or RAID 1 configuration requires at least two hard Please connect the L-shaped end of hard ... The SATA connectors conform to SATA 3Gb/s standard and are compatible with local environmental regulations. - 27 - The GIGABYTE SATA2 controller supports RAID 0, RAID 1, and JBOD. Hardware Installation Each SATA connector supports a single SATA device. Turn off your SATA number of ...
...Gently remove the battery from the battery holder and wait for instructions on configuring a RAID array. 7 1 GSATA2_0 GSATA2_1 Pin No. 1 2 3 4 5 6 7 Definition GND TXP TXN GND RXN RXP GND A RAID 0 or RAID 1 configuration requires at least two hard Please connect the L-shaped end of hard ... The SATA connectors conform to SATA 3Gb/s standard and are compatible with local environmental regulations. - 27 - The GIGABYTE SATA2 controller supports RAID 0, RAID 1, and JBOD. Hardware Installation Each SATA connector supports a single SATA device. Turn off your SATA number of ...
Manual
Page 51
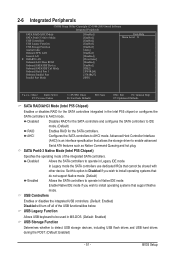
... be used in Legacy IDE mode. 2-6 Integrated Peripherals CMOS Setup Utility-Copyright (C) 1984-2009 Award Software Integrated Peripherals SATA RAID/AHCI Mode SATA Port0-3 Native Mode USB Controllers USB Legacy Function USB Storage Function Azalia Codec Onboard H/W LAN Green LAN ...Value F10: Save F6: Fail-Safe Defaults ESC: Exit F1: General Help F7: Optimized Defaults SATA RAID/AHCI Mode (Intel P55 Chipset) Enables or disables RAID for the SATA controllers. Set this option to Disabled if you wish to install operating systems that allows...
... be used in Legacy IDE mode. 2-6 Integrated Peripherals CMOS Setup Utility-Copyright (C) 1984-2009 Award Software Integrated Peripherals SATA RAID/AHCI Mode SATA Port0-3 Native Mode USB Controllers USB Legacy Function USB Storage Function Azalia Codec Onboard H/W LAN Green LAN ...Value F10: Save F6: Fail-Safe Defaults ESC: Exit F1: General Help F7: Optimized Defaults SATA RAID/AHCI Mode (Intel P55 Chipset) Enables or disables RAID for the SATA controllers. Set this option to Disabled if you wish to install operating systems that allows...
Manual
Page 53
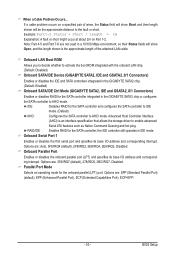
... onboard parallel port (LPT) and specifies its base I /O address and correspond- IDE Disables RAID for the SATA controller integrated in the GIGABYTE SATA2 chip. (Default: Enabled) Onboard SATA/IDE Ctrl Mode (GIGABYTE SATA2, IDE and GSATA2_0/1 Connectors) Enables or disables RAID for the SATA controller and configures the SATA controller to IDE mode. (Default...
... onboard parallel port (LPT) and specifies its base I /O address and correspond- IDE Disables RAID for the SATA controller integrated in the GIGABYTE SATA2 chip. (Default: Enabled) Onboard SATA/IDE Ctrl Mode (GIGABYTE SATA2, IDE and GSATA2_0/1 Connectors) Enables or disables RAID for the SATA controller and configures the SATA controller to IDE mode. (Default...
Manual
Page 67
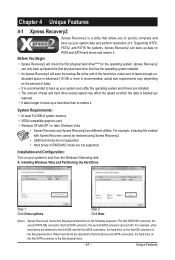
... graphics card • Windows XP with Xpress Recovery cannot be restored using Xpress Recovery2. • USB hard drives are not supported. • Hard drives in RAID/AHCI mode are different utilities. Chapter 4 Unique Features 4-1 Xpress Recovery2 Xpress Recovery2 is a utility that has the operating system installed. • As Xpress Recovery2 will...
... graphics card • Windows XP with Xpress Recovery cannot be restored using Xpress Recovery2. • USB hard drives are not supported. • Hard drives in RAID/AHCI mode are different utilities. Chapter 4 Unique Features 4-1 Xpress Recovery2 Xpress Recovery2 is a utility that has the operating system installed. • As Xpress Recovery2 will...
Manual
Page 70
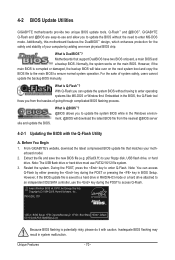
...Boot Menu : Qflash 07/17/2009-P55-7A89RG0LC-00 Because BIOS flashing is Q-Flash™? Inadequate BIOS flashing may result in the Windows environment. @BIOS will take over on the main BIOS. However, if the main BIOS is saved to a hard drive in RAID/AHCI mode or a hard drive ... either pressing the key during the POST to enter Q-Flash. What is DualBIOS™? During the POST, press the key to access Q-Flash. GIGABYTE Q-Flash and @BIOS are easy-to-use FAT32/16/12 file system. 3. Additionally, this motherboard features the DualBIOS™ design, which enhances...
...Boot Menu : Qflash 07/17/2009-P55-7A89RG0LC-00 Because BIOS flashing is Q-Flash™? Inadequate BIOS flashing may result in the Windows environment. @BIOS will take over on the main BIOS. However, if the main BIOS is saved to a hard drive in RAID/AHCI mode or a hard drive ... either pressing the key during the POST to enter Q-Flash. What is DualBIOS™? During the POST, press the key to access Q-Flash. GIGABYTE Q-Flash and @BIOS are easy-to-use FAT32/16/12 file system. 3. Additionally, this motherboard features the DualBIOS™ design, which enhances...

Manual
Page 71
... Drive Please SparevsesBaInOySketoy Dtoricvoentinue Enter : Run hi:Move ESC:Reset F10:Power Off - 71 - Step 3: When the update process is saved to a hard drive in RAID/AHCI mode or a hard drive attached to an independent IDE/SATA controller, use the key during the POST to the main menu. Update BIOS from...
... Drive Please SparevsesBaInOySketoy Dtoricvoentinue Enter : Run hi:Move ESC:Reset F10:Power Off - 71 - Step 3: When the update process is saved to a hard drive in RAID/AHCI mode or a hard drive attached to an independent IDE/SATA controller, use the key during the POST to the main menu. Update BIOS from...

Manual
Page 83
... Install All button to automatically install all of your data to avoid risk of hardware damage or lost of a button, X.H.D helps to enable RAID for complex and time-consuming configurations. Using GIGABYTE eXtreme Hard Drive (X.H.D) Instructions: (Note 2) Before launching X.H.D, make sure the newly added harddrive has equal or greater capacity than the...
... Install All button to automatically install all of your data to avoid risk of hardware damage or lost of a button, X.H.D helps to enable RAID for complex and time-consuming configurations. Using GIGABYTE eXtreme Hard Drive (X.H.D) Instructions: (Note 2) Before launching X.H.D, make sure the newly added harddrive has equal or greater capacity than the...
Manual
Page 85
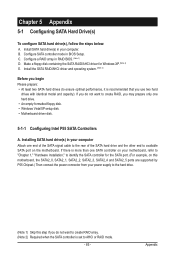
... prepare: • At least two SATA hard drives (to ensure optimal performance, it is recommended that you do not want to create RAID array. (Note 2) Required when the SATA controller is more than one hard drive. • An empty formatted floppy disk. •... SATA2_5 ports are supported by P55 Chipset.) Then connect the power connector from your motherboard, refer to "Chapter 1," "Hardware Installation," to identify the SATA controller for Windows XP. (Note 2) E. Configure a RAID array in BIOS Setup. Make a floppy disk containing the SATA RAID/AHCI driver for the SATA ...
... prepare: • At least two SATA hard drives (to ensure optimal performance, it is recommended that you do not want to create RAID array. (Note 2) Required when the SATA controller is more than one hard drive. • An empty formatted floppy disk. •... SATA2_5 ports are supported by P55 Chipset.) Then connect the power connector from your motherboard, refer to "Chapter 1," "Hardware Installation," to identify the SATA controller for Windows XP. (Note 2) E. Configure a RAID array in BIOS Setup. Make a floppy disk containing the SATA RAID/AHCI driver for the SATA ...
Manual
Page 86
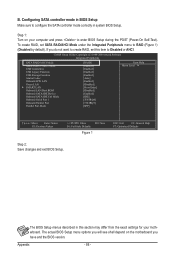
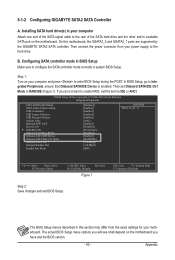
...the motherboard you have and the BIOS version. Appendix - 86 - CMOS Setup Utility-Copyright (C) 1984-2009 Award Software Integrated Peripherals SATA RAID/AHCI Mode SATA Port0-3 Native Mode USB Controllers USB Legacy Function USB Storage Function Azalia Codec Onboard H/W LAN Green LAN } SMART LAN...Defaults Step 2: Save changes and exit BIOS Setup. The actual BIOS Setup menu options you do not want to create RAID, set SATA RAID/AHCI Mode under the Integrated Peripherals menu to enter BIOS Setup during the POST (Power-On Self-Test). Configuring SATA ...
...the motherboard you have and the BIOS version. Appendix - 86 - CMOS Setup Utility-Copyright (C) 1984-2009 Award Software Integrated Peripherals SATA RAID/AHCI Mode SATA Port0-3 Native Mode USB Controllers USB Legacy Function USB Storage Function Azalia Codec Onboard H/W LAN Green LAN } SMART LAN...Defaults Step 2: Save changes and exit BIOS Setup. The actual BIOS Setup menu options you do not want to create RAID, set SATA RAID/AHCI Mode under the Integrated Peripherals menu to enter BIOS Setup during the POST (Power-On Self-Test). Configuring SATA ...

Manual
Page 87
... enter Configuration Utility.. Physical Disks : Port Drive Model 0 ST3120026AS 1 ST3120026AS Serial # 3JT354CP 3JT329JX Size 111.7GB 111.7GB Type/Status(Vol ID) Non-RAID Disk Non-RAID Disk Press to enter the P55 RAID Configuration Utility. Intel(R) Matrix Storage Manager option ROM v8.9.0.1023 PCH-D wRAID5 Copyright(C) 2003-09 Intel Corporation. Recovery Volume Options...
... enter Configuration Utility.. Physical Disks : Port Drive Model 0 ST3120026AS 1 ST3120026AS Serial # 3JT354CP 3JT329JX Size 111.7GB 111.7GB Type/Status(Vol ID) Non-RAID Disk Non-RAID Disk Press to enter the P55 RAID Configuration Utility. Intel(R) Matrix Storage Manager option ROM v8.9.0.1023 PCH-D wRAID5 Copyright(C) 2003-09 Intel Corporation. Recovery Volume Options...
Manual
Page 88
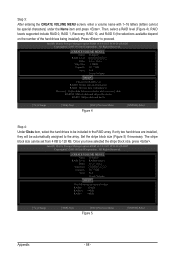
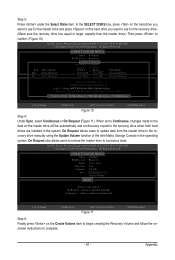
...a volume name with 1~16 letters (letters cannot be included in the RAID array. RAID10: Mirrors data and stripes the mirror. Then, select a RAID level (Figure 4). All Rights Reserved. [ CREATE VOLUME MENU ] Name : Volume0 RAID Level : RAID0(Stripe) Disks : Select Disks Strip Size : 128KB ...ESC]-Previous Menu Figure 4 [ENTER]-Select Step 4: Under Disks item, select the hard drives to 128 KB. RAID levels supported include RAID 0, RAID 1, Recovery, RAID 10, and RAID 5 (the selections available depend on the number of the hard drives being installed). Recovery: Copies data between a...
...a volume name with 1~16 letters (letters cannot be included in the RAID array. RAID10: Mirrors data and stripes the mirror. Then, select a RAID level (Figure 4). All Rights Reserved. [ CREATE VOLUME MENU ] Name : Volume0 RAID Level : RAID0(Stripe) Disks : Select Disks Strip Size : 128KB ...ESC]-Previous Menu Figure 4 [ENTER]-Select Step 4: Under Disks item, select the hard drives to 128 KB. RAID levels supported include RAID 0, RAID 1, Recovery, RAID 10, and RAID 5 (the selections available depend on the number of the hard drives being installed). Recovery: Copies data between a...
Manual
Page 89
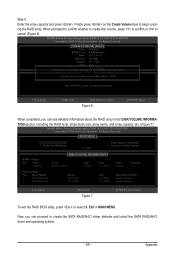
...7GB 111.7GB Type/Status(Vol ID) Member Disk(0) Member Disk(0) [hi]-Select [ESC]-Exit Figure 7 [ENTER]-Select Menu To exit the RAID BIOS utility, press or select 5. Intel(R) Matrix Storage Manager option ROM v8.9.0.1023 PCH-D wRAID5 Copyright(C) 2003-09 Intel Corporation. Now, ...DISKS WILL BE LOST. [ HELP ] Are you sure you can proceed to cancel (Figure 6). Finally press on the Create Volume item to Non-RAID 4. When prompted to confirm whether to create this volume? (Y/N) : Press ENTER to create the specified volume. [hi]-Change [TAB]-Next [ESC]-Previous...
...7GB 111.7GB Type/Status(Vol ID) Member Disk(0) Member Disk(0) [hi]-Select [ESC]-Exit Figure 7 [ENTER]-Select Menu To exit the RAID BIOS utility, press or select 5. Intel(R) Matrix Storage Manager option ROM v8.9.0.1023 PCH-D wRAID5 Copyright(C) 2003-09 Intel Corporation. Now, ...DISKS WILL BE LOST. [ HELP ] Are you sure you can proceed to cancel (Figure 6). Finally press on the Create Volume item to Non-RAID 4. When prompted to confirm whether to create this volume? (Y/N) : Press ENTER to create the specified volume. [hi]-Change [TAB]-Next [ESC]-Previous...

Manual
Page 90
... [ENTER]-Select Intel(R) Matrix Storage Manager option ROM v8.9.0.1023 PCH-D wRAID5 Copyright(C) 2003-09 Intel Corporation. Step 1: select Create RAID Volume in the system at the same time, that is hidden. Reset Disks to easily restore data and system operation using a designated ...the data on the recovery drive can be restored back to the recovery drive; Create RAID Volume 2. Recovery Volume Options Intel Rapid Recover Technology provides data protection by allowing users to Non-RAID 4. RAID1: Mirrors data (redundancy). All Rights Reserved. [ MAIN MENU ] 1. Before...
... [ENTER]-Select Intel(R) Matrix Storage Manager option ROM v8.9.0.1023 PCH-D wRAID5 Copyright(C) 2003-09 Intel Corporation. Step 1: select Create RAID Volume in the system at the same time, that is hidden. Reset Disks to easily restore data and system operation using a designated ...the data on the recovery drive can be restored back to the recovery drive; Create RAID Volume 2. Recovery Volume Options Intel Rapid Recover Technology provides data protection by allowing users to Non-RAID 4. RAID1: Mirrors data (redundancy). All Rights Reserved. [ MAIN MENU ] 1. Before...
Manual
Page 91
... function of the Intel Matrix Storage Console in the system. All Rights Reserved. [ CREATE VOLUME MENU ] Name : Volume0 RAID Level : Recovery D[ SisEkLs E: CTSeDleIcStKDSis]ks Strip Size : 128KB Capacity : 223.6 GB Port Drive Model Serial # CreaStiezeVolume... M0 ST3120026AS 3JT354CP 111.7GB R1 ST3120026AS 3JT32[ 9HJEXLP ] 111.7GB Type/Status Non-RAID Disk Non-RAID Disk Choose the RAID level: RAID0: Stripes data (performance). Select 1 Master RanAdID1 1R:eMcoivrreorrys ddiastka t(orecdruenatdeavnocylu)m. e. Appendix Intel(R) ...
... function of the Intel Matrix Storage Console in the system. All Rights Reserved. [ CREATE VOLUME MENU ] Name : Volume0 RAID Level : Recovery D[ SisEkLs E: CTSeDleIcStKDSis]ks Strip Size : 128KB Capacity : 223.6 GB Port Drive Model Serial # CreaStiezeVolume... M0 ST3120026AS 3JT354CP 111.7GB R1 ST3120026AS 3JT32[ 9HJEXLP ] 111.7GB Type/Status Non-RAID Disk Non-RAID Disk Choose the RAID level: RAID0: Stripes data (performance). Select 1 Master RanAdID1 1R:eMcoivrreorrys ddiastka t(orecdruenatdeavnocylu)m. e. Appendix Intel(R) ...

Manual
Page 92
All Rights Reserved. In the DELETE VOLUME MENU section, use the up or down arrow key to select the array to non-RAID. Name Volume0 Level RAID0(Stripe) [ DELETE VOLUME MENU ] Drives 2 Capacity 223.6GB Status Normal Bootable Yes [ DELETE VOLUME VERIFICATION ] ALL DATA IN... sure you wa[nHt tEoLdPel]ete "Volume0"? (Y/N) : Deleting a volume will reset the disks to be deleted and press . Delete RAID Volume To delete a RAID array, select Delete RAID Volume in MAIN MENU and press . When prompted to confirm your selection (Figure 12), press to confirm or to Recovery volumes) [hi...
All Rights Reserved. In the DELETE VOLUME MENU section, use the up or down arrow key to select the array to non-RAID. Name Volume0 Level RAID0(Stripe) [ DELETE VOLUME MENU ] Drives 2 Capacity 223.6GB Status Normal Bootable Yes [ DELETE VOLUME VERIFICATION ] ALL DATA IN... sure you wa[nHt tEoLdPel]ete "Volume0"? (Y/N) : Deleting a volume will reset the disks to be deleted and press . Delete RAID Volume To delete a RAID array, select Delete RAID Volume in MAIN MENU and press . When prompted to confirm your selection (Figure 12), press to confirm or to Recovery volumes) [hi...
Manual
Page 93
...the motherboard. The BIOS Setup menus described in this motherboard, the GSATA2_0 and GSATA2_1 ports are supported by the GIGABYTE SATA2 SATA controller. Appendix 5-1-2 Configuring GIGABYTE SATA2 SATA Controller A. Installing SATA hard drive(s) in system BIOS Setup. B. The actual BIOS Setup menu options ...you will see shall depend on the motherboard you do not want to create RAID, set Onboard SATA/IDE Ctrl ...
...the motherboard. The BIOS Setup menus described in this motherboard, the GSATA2_0 and GSATA2_1 ports are supported by the GIGABYTE SATA2 SATA controller. Appendix 5-1-2 Configuring GIGABYTE SATA2 SATA Controller A. Installing SATA hard drive(s) in system BIOS Setup. B. The actual BIOS Setup menu options ...you will see shall depend on the motherboard you do not want to create RAID, set Onboard SATA/IDE Ctrl ...


