
Manual
Page 1
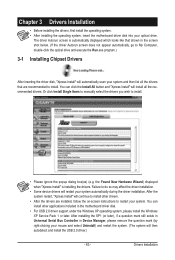
...Or you can go to the Application Software screen to the biggest drive in the Intel Chipset. (Note 2) It is added. Using GIGABYTE eXtreme Hard Drive (X.H.D) Instructions:(Note 2) Before launching X.H.D, make sure the newly added harddrive has equal or greater capacity than the RAID-ready...already exists, users also can use X.H.D to easily add a hard drive into a RAID 0 array that before you 'll not be recognized during the Windows setup process. (For more details, refer to enhance your needs and hardware components. 3. Exits the X.H.D utility: Click Cancel to exit the X.H.D utility. ...
...Or you can go to the Application Software screen to the biggest drive in the Intel Chipset. (Note 2) It is added. Using GIGABYTE eXtreme Hard Drive (X.H.D) Instructions:(Note 2) Before launching X.H.D, make sure the newly added harddrive has equal or greater capacity than the RAID-ready...already exists, users also can use X.H.D to easily add a hard drive into a RAID 0 array that before you 'll not be recognized during the Windows setup process. (For more details, refer to enhance your needs and hardware components. 3. Exits the X.H.D utility: Click Cancel to exit the X.H.D utility. ...
Manual
Page 14
... Support for X.H.D Support for Q-Share Norton Internet Security (OEM version) Operating System w Support for Microsoft® Windows® 7/Vista/XP Form Factor w ATX Form Factor; 30.5cm x 19.0cm j Only for GA-P55-UD3L-TPM. (Note 1) Due to Windows Vista/XP 32-bit operating system limitation, when more than 4 GB of physical memory is installed...
... Support for X.H.D Support for Q-Share Norton Internet Security (OEM version) Operating System w Support for Microsoft® Windows® 7/Vista/XP Form Factor w ATX Form Factor; 30.5cm x 19.0cm j Only for GA-P55-UD3L-TPM. (Note 1) Due to Windows Vista/XP 32-bit operating system limitation, when more than 4 GB of physical memory is installed...
Manual
Page 33
... BIOS (Basic Input and Output System) records hardware parameters of BIOS from the Internet and updates the BIOS. To upgrade the BIOS, use either the GIGABYTE Q-Flash or @BIOS utility. • Q-Flash allows the user to clear the CMOS values.) - 33 - To flash the BIOS, do not...encounter problems using the current version of the battery/ clearing CMOS jumper in Chapter 1 for the beep codes description. • It is a Windows-based utility that allows the user to modify basic system configuration settings or to keep the configuration values in system malfunction. • BIOS will ...
... BIOS (Basic Input and Output System) records hardware parameters of BIOS from the Internet and updates the BIOS. To upgrade the BIOS, use either the GIGABYTE Q-Flash or @BIOS utility. • Q-Flash allows the user to clear the CMOS values.) - 33 - To flash the BIOS, do not...encounter problems using the current version of the battery/ clearing CMOS jumper in Chapter 1 for the beep codes description. • It is a Windows-based utility that allows the user to modify basic system configuration settings or to keep the configuration values in system malfunction. • BIOS will ...
Manual
Page 50
...more information about Intel CPUs' unique features, please visit Intel's website. BIOS Setup - 50 - This function may enhance protection for Windows XP operating system; justable range is corrupted, it will be recovered from this item to Disabled for the computer, reducing exposure to display... the GIGABYTE Logo at system startup. PEG2 Sets the PCI Express graphics card on the PCIEX16 slot as Windows NT4.0. (Default: Disabled) No-Execute Memory Protect (Note) Enables or disables Intel Execute...
...more information about Intel CPUs' unique features, please visit Intel's website. BIOS Setup - 50 - This function may enhance protection for Windows XP operating system; justable range is corrupted, it will be recovered from this item to Disabled for the computer, reducing exposure to display... the GIGABYTE Logo at system startup. PEG2 Sets the PCI Express graphics card on the PCIEX16 slot as Windows NT4.0. (Default: Disabled) No-Execute Memory Protect (Note) Enables or disables Intel Execute...

Manual
Page 52
... if a LAN cable is activated. When LAN Cable Is Functioning Normally... it will appear: Start detecting at a normal speed of 10/100/1000 Mbps in Windows mode or when the LAN Boot ROM is connected or not. Green LAN When the onboard LAN function and Green LAN are enabled, the system...
... if a LAN cable is activated. When LAN Cable Is Functioning Normally... it will appear: Start detecting at a normal speed of 10/100/1000 Mbps in Windows mode or when the LAN Boot ROM is connected or not. Green LAN When the onboard LAN function and Green LAN are enabled, the system...

Manual
Page 54
... off . In S3 sleep state, the system appears to be awakened from an ACPI sleep state by a wake-up function. (Default: Enabled) (Note) Supported on Windows Vista operating system only. Instant-Off Press the power button and then the system will enter suspend mode. If the power button is pressed for...
... off . In S3 sleep state, the system appears to be awakened from an ACPI sleep state by a wake-up function. (Default: Enabled) (Note) Supported on Windows Vista operating system only. Instant-Off Press the power button and then the system will enter suspend mode. If the power button is pressed for...

Manual
Page 55
... AC power, or the settings may not be turned on by a PS/2 keyboard wake-up event. Select 32-bit mode when you install 64-bit Windows Vista. KB Power ON Password Set the password when Power On by Keyboard is turned on upon the return of the AC power. When prompted... for the password, press again without entering the password to select the HPET mode for Windows Vista operating system. (Default: Enabled) HPET Mode (Note) Allows you to clear the password settings. Disabled Disables this item and set a password with 1~5 characters to...
... AC power, or the settings may not be turned on by a PS/2 keyboard wake-up event. Select 32-bit mode when you install 64-bit Windows Vista. KB Power ON Password Set the password when Power On by Keyboard is turned on upon the return of the AC power. When prompted... for the password, press again without entering the password to select the HPET mode for Windows Vista operating system. (Default: Enabled) HPET Mode (Note) Allows you to clear the password settings. Disabled Disables this item and set a password with 1~5 characters to...
Manual
Page 63
...; Some device drivers will continue to install other applications included in the motherboard driver disk. • For USB 2.0 driver support under the Windows XP operating system, please install the Windows XP Service Pack 1 or later. After installing the SP1 (or later), if a question mark still exists in Universal Serial Bus Controller in...
...; Some device drivers will continue to install other applications included in the motherboard driver disk. • For USB 2.0 driver support under the Windows XP operating system, please install the Windows XP Service Pack 1 or later. After installing the SP1 (or later), if a question mark still exists in Universal Serial Bus Controller in...
Manual
Page 67
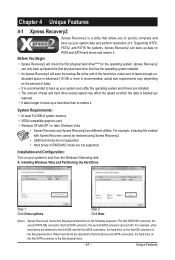
... to the first IDE and the first SATA connectors, the hard drive on the amount of data). • It is recommended to boot from the Windows Vista setup disk. Chapter 4 Unique Features 4-1 Xpress Recovery2 Xpress Recovery2 is backed up/ restored. • It takes longer to back up a hard... drive than to restore it. System Requirements: • At least 512 MB of system memory • VESA compatible graphics card • Windows XP with Xpress Recovery cannot be restored using Xpress Recovery2. • USB hard drives are installed. • The amount of data and hard drive ...
... to the first IDE and the first SATA connectors, the hard drive on the amount of data). • It is recommended to boot from the Windows Vista setup disk. Chapter 4 Unique Features 4-1 Xpress Recovery2 Xpress Recovery2 is backed up/ restored. • It takes longer to back up a hard... drive than to restore it. System Requirements: • At least 512 MB of system memory • VESA compatible graphics card • Windows XP with Xpress Recovery cannot be restored using Xpress Recovery2. • USB hard drives are installed. • The amount of data and hard drive ...
Manual
Page 70
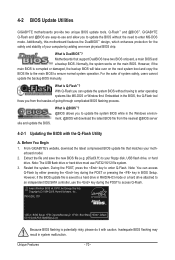
...Flash™ and @BIOS™. From GIGABYTE's website, download the latest compressed BIOS update file that support DualBIOS have two BIOS onboard, a main BIOS and a backup BIOS. P55-UD3L D11 . . . . : BIOS Setup : XpressRecovery2 : Boot Menu : Qflash 07/17/2009-P55-7A89RG0LC-00 Because BIOS flashing is DualBIOS&#...the safety and stability of your computer by either pressing the key during the POST to enter operating systems like MS-DOS or Window first. site and update the BIOS. Motherboards that matches your floppy disk, USB flash drive, or hard drive. Embedded in...
...Flash™ and @BIOS™. From GIGABYTE's website, download the latest compressed BIOS update file that support DualBIOS have two BIOS onboard, a main BIOS and a backup BIOS. P55-UD3L D11 . . . . : BIOS Setup : XpressRecovery2 : Boot Menu : Qflash 07/17/2009-P55-7A89RG0LC-00 Because BIOS flashing is DualBIOS&#...the safety and stability of your computer by either pressing the key during the POST to enter operating systems like MS-DOS or Window first. site and update the BIOS. Motherboards that matches your floppy disk, USB flash drive, or hard drive. Embedded in...
Manual
Page 73
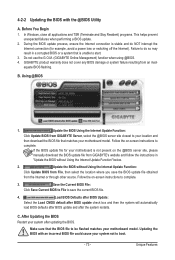
... damage or system failure resulting from GIGABYTE Server, select the @BIOS server site closest to your location and then download the BIOS file that the BIOS file to complete. 3. Make sure that matches your system not to complete. In Windows, close all applications and TSR ... Internet Update Function: Click Update BIOS from an inadequate BIOS flashing. Updating the BIOS with the @BIOS Utility A. Do not use the G.O.M. (GIGABYTE Online Management) function when using @BIOS. 4. Follow the on -screen instructions to boot. - 73 - Load BIOS Defaults after BIOS Update: ...
... damage or system failure resulting from GIGABYTE Server, select the @BIOS server site closest to your location and then download the BIOS file that the BIOS file to complete. 3. Make sure that matches your system not to complete. In Windows, close all applications and TSR ... Internet Update Function: Click Update BIOS from an inadequate BIOS flashing. Updating the BIOS with the @BIOS Utility A. Do not use the G.O.M. (GIGABYTE Online Management) function when using @BIOS. 4. Follow the on -screen instructions to boot. - 73 - Load BIOS Defaults after BIOS Update: ...
Manual
Page 74
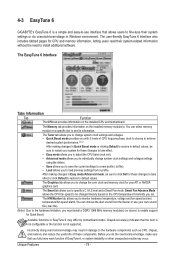
The HW Monitor tab allows you to individually change the core clock and memory clock for your ATI or NVIDIA graphics card. 4-3 EasyTune 6 GIGABYTE's EasyTune 6 is not supported. Available functions in Easy mode/Advanced mode, be sure to monitor hardware temperature, voltage and fan speed and set . Before you ... to choose to specify a C.I.A.2 level and a Smart Fan mode. The user-friendly EasyTune 6 interface also includes tabbed pages for these components. After making changes in Windows environment.
The HW Monitor tab allows you to individually change the core clock and memory clock for your ATI or NVIDIA graphics card. 4-3 EasyTune 6 GIGABYTE's EasyTune 6 is not supported. Available functions in Easy mode/Advanced mode, be sure to monitor hardware temperature, voltage and fan speed and set . Before you ... to choose to specify a C.I.A.2 level and a Smart Fan mode. The user-friendly EasyTune 6 interface also includes tabbed pages for these components. After making changes in Windows environment.

Manual
Page 79
... than 1 GB of capacity. • Each partition can accommodate up to launch the SMART DualBIOS utility. The files/folders listed on NTFS file system) in Windows Vista. You can prevent loss of the data in the main and backup BIOS simultaneously, which can record personal passwords and important dates and set...
... than 1 GB of capacity. • Each partition can accommodate up to launch the SMART DualBIOS utility. The files/folders listed on NTFS file system) in Windows Vista. You can prevent loss of the data in the main and backup BIOS simultaneously, which can record personal passwords and important dates and set...

Manual
Page 83
... than the RAID-ready system drive. (To add a new hard drive into the array to set up a RAID 0 array. 2. Using GIGABYTE eXtreme Hard Drive (X.H.D) Instructions: (Note 2) Before launching X.H.D, make sure the new drive is added. Without the driver, the hard drive may...up a RAID 0 array: Click Auto to individually install the X.H.D utility later. Step 2: Install the RAID driver and operating system The X.H.D utility supports Windows 7/Vista/XP. The following procedure details the steps to expand its capacity. For a RAID 0 array that before you can build a RAID 0, RAID...
... than the RAID-ready system drive. (To add a new hard drive into the array to set up a RAID 0 array. 2. Using GIGABYTE eXtreme Hard Drive (X.H.D) Instructions: (Note 2) Before launching X.H.D, make sure the new drive is added. Without the driver, the hard drive may...up a RAID 0 array: Click Auto to individually install the X.H.D utility later. Step 2: Install the RAID driver and operating system The X.H.D utility supports Windows 7/Vista/XP. The following procedure details the steps to expand its capacity. For a RAID 0 array that before you can build a RAID 0, RAID...
Manual
Page 85
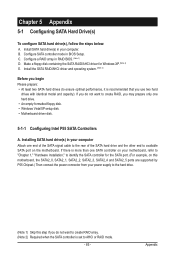
... SATA2_1, SATA2_2, SATA2_3, SATA2_4 and SATA2_5 ports are supported by P55 Chipset.) Then connect the power connector from your motherboard, refer to "Chapter 1," "Hardware Installation," to identify the SATA controller for Windows XP. (Note 2) E. Install SATA hard drive(s) in your computer.... Installing SATA hard drive(s) in your computer Attach one hard drive. • An empty formatted floppy disk. • Windows Vista/XP setup disk. • Motherboard ...
... SATA2_1, SATA2_2, SATA2_3, SATA2_4 and SATA2_5 ports are supported by P55 Chipset.) Then connect the power connector from your motherboard, refer to "Chapter 1," "Hardware Installation," to identify the SATA controller for Windows XP. (Note 2) E. Install SATA hard drive(s) in your computer.... Installing SATA hard drive(s) in your computer Attach one hard drive. • An empty formatted floppy disk. • Windows Vista/XP setup disk. • Motherboard ...

Manual
Page 87
... Disk Press to Non-RAID 4. Appendix Figure 2 Step 2: After you want to enter Configuration Utility" (Figure 2). Skip this step and proceed with the installation of Windows operating system for a message which says "Press to create a RAID array, select Create RAID Volume in RAID BIOS Enter the RAID BIOS setup utility to...
... Disk Press to Non-RAID 4. Appendix Figure 2 Step 2: After you want to enter Configuration Utility" (Figure 2). Skip this step and proceed with the installation of Windows operating system for a message which says "Press to create a RAID array, select Create RAID Volume in RAID BIOS Enter the RAID BIOS setup utility to...
Manual
Page 94
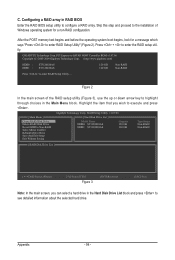
... Name HDD0: ST3120026AS HDD1: ST3120026AS Capacity 120 GB 120 GB Type/Status Non-RAID Non-RAID [ RAID Disk Drive List ] [fgTAB]-Switch Window [hi]-Select ITEM Figure 3 [ENTER]-Action [ESC]-Exit Note: In the main screen, you wish to see detailed information about the selected hard... (Figure 3), use the up or down arrow key to enter RAID Setup Utility" (Figure 2). Gigabyte Technology Corp. Press + to enter RAID Setup Utility ... Figure 2 In the main screen of Windows operating system for a message which says "Press to highlight through choices in the Main Menu block....
... Name HDD0: ST3120026AS HDD1: ST3120026AS Capacity 120 GB 120 GB Type/Status Non-RAID Non-RAID [ RAID Disk Drive List ] [fgTAB]-Switch Window [hi]-Select ITEM Figure 3 [ENTER]-Action [ESC]-Exit Note: In the main screen, you wish to see detailed information about the selected hard... (Figure 3), use the up or down arrow key to enter RAID Setup Utility" (Figure 2). Gigabyte Technology Corp. Press + to enter RAID Setup Utility ... Figure 2 In the main screen of Windows operating system for a message which says "Press to highlight through choices in the Main Menu block....

Manual
Page 97
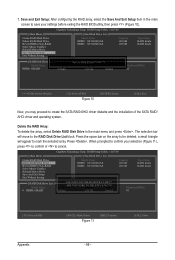
...[ Main Menu ] Create RAID Disk Drive Delete RAID Disk Drive Revert HDD to the RAID Disk Drive List block. Gigabyte Technology Corp. A small window displaying the array information will be displayed in the Main Menu block to move the selection bar to Non-RAID Solve Mirror...CapBalcoictykC2::4a0p12aG24c80BityKGBB Status Normal Capacity 120 GB 120 GB Type/Status RAID Inside RAID Inside Members(HDDx) 01 Members: HDD 01 Status: Normal [fgTAB]-Switch Window [hi]-Select RAID Figure 9 [ENTER]-Detail [ESC]-Exit - 97 - Appendix Select the array and press . RAID Setup Utility v1.07.06 [...
...[ Main Menu ] Create RAID Disk Drive Delete RAID Disk Drive Revert HDD to the RAID Disk Drive List block. Gigabyte Technology Corp. A small window displaying the array information will be displayed in the Main Menu block to move the selection bar to Non-RAID Solve Mirror...CapBalcoictykC2::4a0p12aG24c80BityKGBB Status Normal Capacity 120 GB 120 GB Type/Status RAID Inside RAID Inside Members(HDDx) 01 Members: HDD 01 Status: Normal [fgTAB]-Switch Window [hi]-Select RAID Figure 9 [ENTER]-Detail [ESC]-Exit - 97 - Appendix Select the array and press . RAID Setup Utility v1.07.06 [...
Manual
Page 98
...RAID Disk Drive Delete RAID Disk Drive Revert HDD to Non-RAID Solve Mirror Conflict Rebuild Mirror Drive Save And Exit Setup Exit Without Saving Gigabyte Technology Corp. ARE YOU SURE TO DELETE (Y/N) ? N RAID Level Capacity Status 0-Stripe 240 GB Normal Members(HDDx) 01 [hi]-Select ...]-Confirm [ESC]-Abort - 98 - Y Model Name RAID Level Capacity Status RDD0: GRAID 0-Stripe 240 GB Normal Members(HDDx) 01 [fgTAB]-Switch Window [hi]-Select ITEM Figure 10 [ENTER]-Action [ESC]-Exit Now, you may proceed to the RAID Disk Drive List block. Press . When prompted ...
...RAID Disk Drive Delete RAID Disk Drive Revert HDD to Non-RAID Solve Mirror Conflict Rebuild Mirror Drive Save And Exit Setup Exit Without Saving Gigabyte Technology Corp. ARE YOU SURE TO DELETE (Y/N) ? N RAID Level Capacity Status 0-Stripe 240 GB Normal Members(HDDx) 01 [hi]-Select ...]-Confirm [ESC]-Abort - 98 - Y Model Name RAID Level Capacity Status RDD0: GRAID 0-Stripe 240 GB Normal Members(HDDx) 01 [fgTAB]-Switch Window [hi]-Select ITEM Figure 10 [ENTER]-Action [ESC]-Exit Now, you may proceed to the RAID Disk Drive List block. Press . When prompted ...
Manual
Page 99
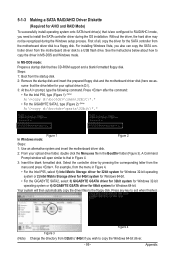
... 2) Intel Matrix Storage driver for 64bit system for Windows 64-bit. • For the GIGABYTE SATA2, select 3) GIGABYTE GSATA driver for 32bit system for Windows 32-bit operating system or 4) GIGABYTE GSATA driver for 64bit system for Windows 64-bit. Press after the command: • For the Intel P55, type (Figure 1): (Note) A:\>copy d:\bootdrv\imsm\32bit\*.* •...
... 2) Intel Matrix Storage driver for 64bit system for Windows 64-bit. • For the GIGABYTE SATA2, select 3) GIGABYTE GSATA driver for 32bit system for Windows 32-bit operating system or 4) GIGABYTE GSATA driver for 64bit system for Windows 64-bit. Press after the command: • For the Intel P55, type (Figure 1): (Note) A:\>copy d:\bootdrv\imsm\32bit\*.* •...


