Manual
Page 5
... Diskette 87 5-1-4 Installing the SATA RAID/AHCI Driver and Operating System 88 5-2 Configuring Audio Input and Output 96 5-2-1 Configuring 2/4/5.1/7.1-Channel Audio 96 5-2-2 Installing the S/PDIF In Cable (Optional 98 5-2-3 Configuring Microphone Recording 100 5-2-4 Using the Sound Recorder 102 5-3 Troubleshooting 103 5-3-1 Frequently Asked Questions 103 5-3-2 Troubleshooting Procedure 104 Regulatory Statements 106 Only for GA-P35-DS3R. - 5 -
... Diskette 87 5-1-4 Installing the SATA RAID/AHCI Driver and Operating System 88 5-2 Configuring Audio Input and Output 96 5-2-1 Configuring 2/4/5.1/7.1-Channel Audio 96 5-2-2 Installing the S/PDIF In Cable (Optional 98 5-2-3 Configuring Microphone Recording 100 5-2-4 Using the Sound Recorder 102 5-3 Troubleshooting 103 5-3-1 Frequently Asked Questions 103 5-3-2 Troubleshooting Procedure 104 Regulatory Statements 106 Only for GA-P35-DS3R. - 5 -
Manual
Page 12
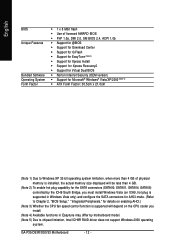
GA-P35-DS3R/DS3/S3 Motherboard - 12 - English BIOS Unique Features Bundled Software Operating System Form Factor Š 1 x 8 Mbit flash Š Use of licensed AWARD BIOS Š PnP 1.... 2) To enable hot plug capability for the SATA connectors (SATAII0, SATAII1, SATAII4, SATAII5) controlled by the ICH9 South Bridge, you must install Windows Vista (on ICH9, hot plug is supported in Windows Vista only) and configure the SATA connectors for AHCI mode. (Refer to Chapter 2, "BIOS Setup," "Integrated Peripherals," for details on enabling...
GA-P35-DS3R/DS3/S3 Motherboard - 12 - English BIOS Unique Features Bundled Software Operating System Form Factor Š 1 x 8 Mbit flash Š Use of licensed AWARD BIOS Š PnP 1.... 2) To enable hot plug capability for the SATA connectors (SATAII0, SATAII1, SATAII4, SATAII5) controlled by the ICH9 South Bridge, you must install Windows Vista (on ICH9, hot plug is supported in Windows Vista only) and configure the SATA connectors for AHCI mode. (Refer to Chapter 2, "BIOS Setup," "Integrated Peripherals," for details on enabling...
Manual
Page 42
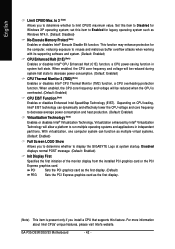
...message. (Default: Enabled) Init Display First Specifies the first initiation of the monitor display from the installed PCI graphics card or the PCI Express graphics card. GA-P35-DS3R/DS3/S3 Motherboard - 42 - Virtualization enhanced by Intel® Virtualization Technology will be reduced during... function as Windows NT4.0. (Default: Disabled) No-Execute Memory Protect (Note) Enables or disables Intel® Execute Disable Bit function. With virtualization, one computer system can dynamically and effectively lower the CPU voltage and core frequency to display the GIGABYTE Logo at ...
...message. (Default: Enabled) Init Display First Specifies the first initiation of the monitor display from the installed PCI graphics card or the PCI Express graphics card. GA-P35-DS3R/DS3/S3 Motherboard - 42 - Virtualization enhanced by Intel® Virtualization Technology will be reduced during... function as Windows NT4.0. (Default: Disabled) No-Execute Memory Protect (Note) Enables or disables Intel® Execute Disable Bit function. With virtualization, one computer system can dynamically and effectively lower the CPU voltage and core frequency to display the GIGABYTE Logo at ...

Manual
Page 44
.../2000. Onboard H/W LAN Enables or disables the onboard LAN function. (Default: Enabled) If you wish to install a 3rd party add-in network card instead of the integrated SATA controllers. GA-P35-DS3R/DS3/S3 Motherboard - 44 - Windows XP/2000. USB 2.0 Controller Enables or disables the integrated USB 2.0 controller. (Default: Enabled) USB Keyboard Support Allows USB...
.../2000. Onboard H/W LAN Enables or disables the onboard LAN function. (Default: Enabled) If you wish to install a 3rd party add-in network card instead of the integrated SATA controllers. GA-P35-DS3R/DS3/S3 Motherboard - 44 - Windows XP/2000. USB 2.0 Controller Enables or disables the integrated USB 2.0 controller. (Default: Enabled) USB Keyboard Support Allows USB...
Manual
Page 48
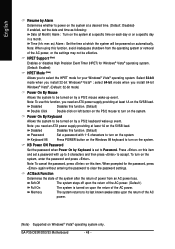
...of Month) Alarm : Turn on the system at which the system will be turned on automatically. GA-P35-DS3R/DS3/S3 Motherboard - 48 - HPET Support (Note) Enables or disables High Precision Event Timer (HPET) for Windows® Vista® operating system. (Default: Enabled) HPET Mode (Note) Allows you to ... this item. Soft-Off The system stays off upon the return of the AC power. (Note) Supported on the system. Note: you install 64-bit Windows® Vista®. (Default: 32-bit mode) Power On By Mouse Allows the system to turn on by Keyboard is turned on ...
...of Month) Alarm : Turn on the system at which the system will be turned on automatically. GA-P35-DS3R/DS3/S3 Motherboard - 48 - HPET Support (Note) Enables or disables High Precision Event Timer (HPET) for Windows® Vista® operating system. (Default: Enabled) HPET Mode (Note) Allows you to ... this item. Soft-Off The system stays off upon the return of the AC power. (Note) Supported on the system. Note: you install 64-bit Windows® Vista®. (Default: 32-bit mode) Power On By Mouse Allows the system to turn on by Keyboard is turned on ...
Manual
Page 59
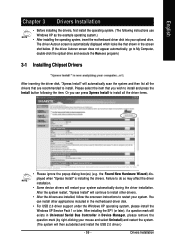
... the optical drive and execute the Run.exe program.) 3-1 Installing Chipset Drivers After inserting the driver disk, "Xpress Install" will continue to install all the drivers that you can install other drivers. • After the drivers are recommended to install and press the Install button following instructions use Windows XP as the example operating system.) • After...
... the optical drive and execute the Run.exe program.) 3-1 Installing Chipset Drivers After inserting the driver disk, "Xpress Install" will continue to install all the drivers that you can install other drivers. • After the drivers are recommended to install and press the Install button following instructions use Windows XP as the example operating system.) • After...
Manual
Page 63
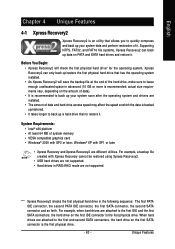
...data). • It is recommended; English Chapter 4 Unique Features 4-1 Xpress Recovery2 Xpress Recovery2 is an utility that has the operating system installed. • As Xpress Recovery2 will check the first physical hard drive* for the operating system. Xpress Recovery2 can back up your system soon...10 GB or more is recommended to back up your system data and perform restoration of system memory • VESA compatible graphics card • Windows® 2000 with SP3 or later; System Requirements: • Intel® x86 platform • At least 64 MB of it. Before ...
...data). • It is recommended; English Chapter 4 Unique Features 4-1 Xpress Recovery2 Xpress Recovery2 is an utility that has the operating system installed. • As Xpress Recovery2 will check the first physical hard drive* for the operating system. Xpress Recovery2 can back up your system soon...10 GB or more is recommended to back up your system data and perform restoration of system memory • VESA compatible graphics card • Windows® 2000 with SP3 or later; System Requirements: • Intel® x86 platform • At least 64 MB of it. Before ...
Manual
Page 64
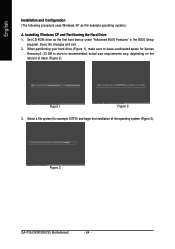
...unallocated space for example, NTFS) and begin the installation of data) (Figure 2). Save the changes and exit. 2. Select a file system (for Xpress Recovery2 (10 GB or more is recommended; Figure 1 Figure 2 3. Figure 3 GA-P35-DS3R/DS3/S3 Motherboard - 64 - actual size ...requirements vary, depending on the amount of the operating system (Figure 3). Set CD-ROM drive as the example operating system.) A. English Installation and Configuration (The following procedure uses Windows XP as the first...
...unallocated space for example, NTFS) and begin the installation of data) (Figure 2). Save the changes and exit. 2. Select a file system (for Xpress Recovery2 (10 GB or more is recommended; Figure 1 Figure 2 3. Figure 3 GA-P35-DS3R/DS3/S3 Motherboard - 64 - actual size ...requirements vary, depending on the amount of the operating system (Figure 3). Set CD-ROM drive as the example operating system.) A. English Installation and Configuration (The following procedure uses Windows XP as the first...
Manual
Page 71
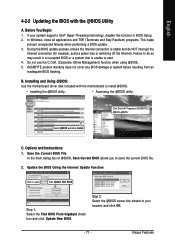
... the Internet connection (for example, avoid a power loss or switching off the Internet). Click Start>All Programs>GIGABYTE> @BIOS>@BIOS Select @BIOS and click Install. During the BIOS update process, ensure the Internet connection is stable and do so may result in BIOS Setup... BIOS file. 2. In Windows, close all applications and TSR (Terminate and Stay Resident) programs. This helps prevent unexpected failures when performing a BIOS update. 3. Installing and Using @BIOS: Use the motherboard driver disk included with the @BIOS Utility A. GIGABYTE product warranty does not cover...
... the Internet connection (for example, avoid a power loss or switching off the Internet). Click Start>All Programs>GIGABYTE> @BIOS>@BIOS Select @BIOS and click Install. During the BIOS update process, ensure the Internet connection is stable and do so may result in BIOS Setup... BIOS file. 2. In Windows, close all applications and TSR (Terminate and Stay Resident) programs. This helps prevent unexpected failures when performing a BIOS update. 3. Installing and Using @BIOS: Use the motherboard driver disk included with the @BIOS Utility A. GIGABYTE product warranty does not cover...

Manual
Page 74
Right-click on a Windows Vista certified USB flash drive to boost your computer. Follow the steps below to enable the ReadyBoost function: Step 1: Go to speed up your USB flash drive's memory to Computer. GA-P35-DS3R/DS3/S3 Motherboard - 74 - You may enable ReadyBoost and allocate part of your... memory on the USB flash drive icon and choose Properties. Step 2: In the ReadyBoost tab, select Use this device. English 4-4 Windows Vista ReadyBoost Windows ReadyBoost allows you to use for ReadyBoost using the slider or spin box. Click Apply and then OK to turn on ReadyBoost. •...
Right-click on a Windows Vista certified USB flash drive to boost your computer. Follow the steps below to enable the ReadyBoost function: Step 1: Go to speed up your USB flash drive's memory to Computer. GA-P35-DS3R/DS3/S3 Motherboard - 74 - You may enable ReadyBoost and allocate part of your... memory on the USB flash drive icon and choose Properties. Step 2: In the ReadyBoost tab, select Use this device. English 4-4 Windows Vista ReadyBoost Windows ReadyBoost allows you to use for ReadyBoost using the slider or spin box. Click Apply and then OK to turn on ReadyBoost. •...
Manual
Page 75
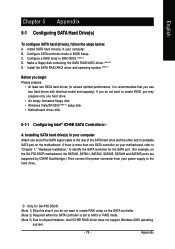
Make a floppy disk containing the SATA RAID/AHCI driver. (Note 2) E. Installing SATA hard drive(s) in your motherboard, refer to "Chapter 1," "Hardware Installation," to identify the SATA controller for GA-P35-DS3R. (Note 1) Skip this step if you use two hard drives with identical model and ...RAID array on the GA-P35-DS3R motherboard, the SATAII0, SATAII1, SATAII2, SATAII3, SATAII4 and SATAII5 ports are supported by ICH9R Southbridge.) Then connect the power connector from your computer Attach one hard drive. • An empty formatted floppy disk. • Windows Vista/XP/2000 (...
Make a floppy disk containing the SATA RAID/AHCI driver. (Note 2) E. Installing SATA hard drive(s) in your motherboard, refer to "Chapter 1," "Hardware Installation," to identify the SATA controller for GA-P35-DS3R. (Note 1) Skip this step if you use two hard drives with identical model and ...RAID array on the GA-P35-DS3R motherboard, the SATAII0, SATAII1, SATAII2, SATAII3, SATAII4 and SATAII5 ports are supported by ICH9R Southbridge.) Then connect the power connector from your computer Attach one hard drive. • An empty formatted floppy disk. • Windows Vista/XP/2000 (...
Manual
Page 77
... 111.7GB Non-RAID Disk Press to create a RAID array, select Create RAID Volume in RAID BIOS Enter the RAID BIOS setup utility to the installation of Windows operating system for a message which says "Press to Non-RAID 4. Create RAID Volume If you press + , the MAIN MENU screen will appear (Figure 3). Physical...
... 111.7GB Non-RAID Disk Press to create a RAID array, select Create RAID Volume in RAID BIOS Enter the RAID BIOS setup utility to the installation of Windows operating system for a message which says "Press to Non-RAID 4. Create RAID Volume If you press + , the MAIN MENU screen will appear (Figure 3). Physical...
Manual
Page 82
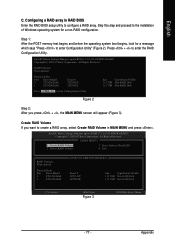
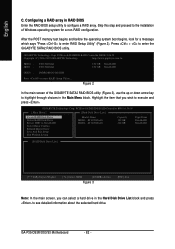
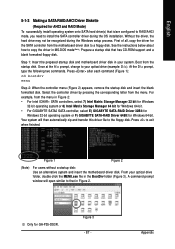
...Name HDD0: ST3120026AS HDD1: ST3120026AS Capacity 120 GB 120 GB Type/Status Non-RAID Non-RAID [ RAID Disk Drive List ] [IJTAB]-Switch Window [KL]-Select ITEM [ENTER]-Action Figure 3 [ESC]-Exit Note: In the main screen, you wish to enter RAID Setup Utility" (Figure... setup utility to enter the GIGABYTE SATA2 RAID BIOS utility. GA-P35-DS3R/DS3/S3 Motherboard - 82 - English C. Press + to configure a RAID array. Configuring a RAID array in the Main Menu block. GIGABYTE Technology Corp. Skip this step and proceed to the installation of the GIGABYTE SATA2 RAID BIOS utility (Figure...
...Name HDD0: ST3120026AS HDD1: ST3120026AS Capacity 120 GB 120 GB Type/Status Non-RAID Non-RAID [ RAID Disk Drive List ] [IJTAB]-Switch Window [KL]-Select ITEM [ENTER]-Action Figure 3 [ESC]-Exit Note: In the main screen, you wish to enter RAID Setup Utility" (Figure... setup utility to enter the GIGABYTE SATA2 RAID BIOS utility. GA-P35-DS3R/DS3/S3 Motherboard - 82 - English C. Press + to configure a RAID array. Configuring a RAID array in the Main Menu block. GIGABYTE Technology Corp. Skip this step and proceed to the installation of the GIGABYTE SATA2 RAID BIOS utility (Figure...
Manual
Page 86
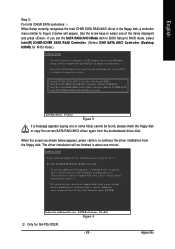
GIGABYTE Technology Corp. The selection bar will appear to mark the selected array. N RAID Level Capacity Status 0-Stripe 240 GB Normal Members(HDDx) 01 [KL]-Select RAID [SPACE]-Mark Delete [DEL]-Confirm Figure 11 GA-P35-DS3R...Exit (Y/N)?Y RAID Level 0-Stripe Capacity Status 240 GB Normal Members(HDDx) 01 [IJTAB]-Switch Window [KL]-Select ITEM [ENTER]-Action Figure 10 [ESC]-Exit Now, you may proceed to ...RAID Disk Drive Revert HDD to create the SATA RAID/AHCI driver diskette and the installation of the SATA RAID/AHCI driver and operating system. ARE YOU SURE TO DELETE ...
GIGABYTE Technology Corp. The selection bar will appear to mark the selected array. N RAID Level Capacity Status 0-Stripe 240 GB Normal Members(HDDx) 01 [KL]-Select RAID [SPACE]-Mark Delete [DEL]-Confirm Figure 11 GA-P35-DS3R...Exit (Y/N)?Y RAID Level 0-Stripe Capacity Status 240 GB Normal Members(HDDx) 01 [IJTAB]-Switch Window [KL]-Select ITEM [ENTER]-Action Figure 10 [ESC]-Exit Now, you may proceed to ...RAID Disk Drive Revert HDD to create the SATA RAID/AHCI driver diskette and the installation of the SATA RAID/AHCI driver and operating system. ARE YOU SURE TO DELETE ...
Manual
Page 87
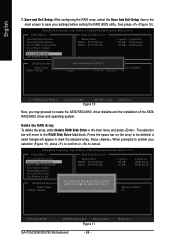
... for Windows 64-bit. • For GIGABYTE SATA2 SATA controller, select E) GIGABYTE SATA-RAID Driver 32Bit for Windows 32-bit operating system or F) GIGABYTE SATA-RAID Driver 64Bit for Windows 64-bit. Press to your system. Without the driver, the hard drive may not be recognized during the OS installation. At... file to that in MS-DOS mode(Note). Only for GA-P35-DS3R. Figure 3 - 87 - Prepare a startup disk that is/are configured to RAID/AHCI mode, you need to install the SATA controller driver during the Windows setup process. Your system will open similar to the floppy disk...
... for Windows 64-bit. • For GIGABYTE SATA2 SATA controller, select E) GIGABYTE SATA-RAID Driver 32Bit for Windows 32-bit operating system or F) GIGABYTE SATA-RAID Driver 64Bit for Windows 64-bit. Press to your system. Without the driver, the hard drive may not be recognized during the OS installation. At... file to that in MS-DOS mode(Note). Only for GA-P35-DS3R. Figure 3 - 87 - Prepare a startup disk that is/are configured to RAID/AHCI mode, you need to install the SATA controller driver during the Windows setup process. Your system will open similar to the floppy disk...

Manual
Page 88
... Press F6 if you see the next screen. S=Specify Additional Device ENTER=Continue F3=Exit Figure 2 GA-P35-DS3R/DS3/S3 Motherboard - 88 - Installing Windows XP Step 1: Restart your hard drive(s). English 5-1-4 Installing the SATA RAID/AHCI Driver and Operating System Now that below appears, insert the floppy disk containing the SATA RAID/AHCI driver and...
... Press F6 if you see the next screen. S=Specify Additional Device ENTER=Continue F3=Exit Figure 2 GA-P35-DS3R/DS3/S3 Motherboard - 88 - Installing Windows XP Step 1: Restart your hard drive(s). English 5-1-4 Installing the SATA RAID/AHCI Driver and Operating System Now that below appears, insert the floppy disk containing the SATA RAID/AHCI driver and...
Manual
Page 89
... screen. Use the arrow keys to Figure 3 below appears, press to configure a SCSI Adapter for use with Windows, press ENTER. Intel(R) ICH9 SATA AHCI Controller (Desktop ICH9R) Intel(R) 82801HEM SATA RAID Controller (Mobile ICH8M-E) ...RAID Controller. (Select ICH9 SATA AHCI Controller (Desktop ICH9R) for GA-P35-DS3R. - 89 - S=Specify Additional Device ENTER=Continue F3=Exit Figure 4 Only for AHCI mode.) Windows Setup You have any device support disks from a mass storage device ... do not have chosen to continue the driver installation from the motherboard driver disk. The driver...
... screen. Use the arrow keys to Figure 3 below appears, press to configure a SCSI Adapter for use with Windows, press ENTER. Intel(R) ICH9 SATA AHCI Controller (Desktop ICH9R) Intel(R) 82801HEM SATA RAID Controller (Mobile ICH8M-E) ...RAID Controller. (Select ICH9 SATA AHCI Controller (Desktop ICH9R) for GA-P35-DS3R. - 89 - S=Specify Additional Device ENTER=Continue F3=Exit Figure 4 Only for AHCI mode.) Windows Setup You have any device support disks from a mass storage device ... do not have chosen to continue the driver installation from the motherboard driver disk. The driver...

Manual
Page 90
... to the previous screen. The driver installation will load support for use with Windows, using a device support disk provided by an adapter manufacturer. When the screen as shown below will appear. S=Specify Additional Device ENTER=Continue F3=Exit Figure 6 GA-P35-DS3R/DS3/S3 Motherboard - 90 - English Step 3: For GIGABYTE SATA2 SATA controller: When Setup correctly...
... to the previous screen. The driver installation will load support for use with Windows, using a device support disk provided by an adapter manufacturer. When the screen as shown below will appear. S=Specify Additional Device ENTER=Continue F3=Exit Figure 6 GA-P35-DS3R/DS3/S3 Motherboard - 90 - English Step 3: For GIGABYTE SATA2 SATA controller: When Setup correctly...

Manual
Page 91
WindowsXP Professional Setup Welcome to run on your computer. To quit Setup without installing Windows XP, press F3. Appendix To set up Windows XP now, press ENTER. Enter= Continue R=Repair F3=Exit Figure 7 - 91 - To repair a Windows XP installation using Recovery Console, press R. This port of the Setup program prepares Microsoft(R) Windows (R) XP to Setup. English Step 4: After the SATA RAID/AHCI driver installation is completed, you can proceed with the Windows XP installation.
WindowsXP Professional Setup Welcome to run on your computer. To quit Setup without installing Windows XP, press F3. Appendix To set up Windows XP now, press ENTER. Enter= Continue R=Repair F3=Exit Figure 7 - 91 - To repair a Windows XP installation using Recovery Console, press R. This port of the Setup program prepares Microsoft(R) Windows (R) XP to Setup. English Step 4: After the SATA RAID/AHCI driver installation is completed, you can proceed with the Windows XP installation.
Manual
Page 92
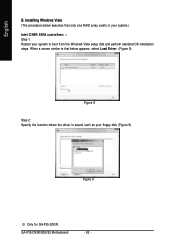
When a screen similar to boot from the Windows Vista setup disk and perform standard OS installation steps. GA-P35-DS3R/DS3/S3 Motherboard - 92 - Installing Windows Vista (The procedure below appears, select Load Driver. (Figure 8). Figure 8 Step 2: Specify the location where the driver is saved, such as your system to that below assumes that only one RAID array exists in your system.) Intel ICH9R SATA controllers: Step 1: Restart your floppy disk (Figure 9). Figure 9 Only for GA-P35-DS3R. English B.
When a screen similar to boot from the Windows Vista setup disk and perform standard OS installation steps. GA-P35-DS3R/DS3/S3 Motherboard - 92 - Installing Windows Vista (The procedure below appears, select Load Driver. (Figure 8). Figure 8 Step 2: Specify the location where the driver is saved, such as your system to that below assumes that only one RAID array exists in your system.) Intel ICH9R SATA controllers: Step 1: Restart your floppy disk (Figure 9). Figure 9 Only for GA-P35-DS3R. English B.

