Manual
Page 3
Copyright © 2009 GIGA-BYTE TECHNOLOGY CO., LTD. Documentation Classifications In order to assist in this manual are legally registered to use GIGABYTE's unique features, read the User's Manual. For instructions on your motherboard revision before updating motherboard BIOS, drivers, or when looking for technical information. Example: Changes to the specifications and features in the use of this manual is protected by copyright laws and is 1.0. The...
Copyright © 2009 GIGA-BYTE TECHNOLOGY CO., LTD. Documentation Classifications In order to assist in this manual are legally registered to use GIGABYTE's unique features, read the User's Manual. For instructions on your motherboard revision before updating motherboard BIOS, drivers, or when looking for technical information. Example: Changes to the specifications and features in the use of this manual is protected by copyright laws and is 1.0. The...
Manual
Page 4
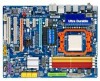
... OptionalItems ...6 GA-MA790X-UD3P Motherboard Layout 7 Block Diagram ...8 Chapter 1 Hardware Installation 9 1-1 Installation Precautions 9 1-2 Product Specifications 10 1-3 Installing the CPU and CPU Cooler 13 1-3-1 Installing the CPU 13 1-3-2 Installing the CPU Cooler 15 1-4 Installing the Memory 16 1-4-1 Dual Channel Memory Configuration 16 1-4-2 Installing a Memory 17 1-5 Installing an Expansion Card 18 1-6 Setup of ATI CrossFireXTM Configuration 19 1-7 Back Panel Connectors 20 1-8 Internal Connectors 22 Chapter 2 BIOS Setup 33 2-1 Startup Screen 34 2-2 The Main Menu 35...
... OptionalItems ...6 GA-MA790X-UD3P Motherboard Layout 7 Block Diagram ...8 Chapter 1 Hardware Installation 9 1-1 Installation Precautions 9 1-2 Product Specifications 10 1-3 Installing the CPU and CPU Cooler 13 1-3-1 Installing the CPU 13 1-3-2 Installing the CPU Cooler 15 1-4 Installing the Memory 16 1-4-1 Dual Channel Memory Configuration 16 1-4-2 Installing a Memory 17 1-5 Installing an Expansion Card 18 1-6 Setup of ATI CrossFireXTM Configuration 19 1-7 Back Panel Connectors 20 1-8 Internal Connectors 22 Chapter 2 BIOS Setup 33 2-1 Startup Screen 34 2-2 The Main Menu 35...
Manual
Page 10
... 2 IDE devices - 6 x SATA 3Gb/s connectors (SATA2_0, SATA2_1, SATA2_2, SATA2_3, SATA2_4, SATA2_5) supporting up to 2 SATA 3Gb/s devices - TSB43AB23 chip Up to 3 IEEE 1394a ports (2 on the back panel, 1 via the IEEE 1394a bracket connected to the internal IEEE 1394a header) Integrated in the South Bridge Up to 12 USB 2.0/1.1 ports (8 on the back panel, 4 via the USB brackets connected to 1 floppy disk drive T.I. Support for SATA RAID 0, RAID 1, and JBOD iTE IT8720 chip: - 1 x floppy disk drive connector supporting up to the internal USB headers) GA-MA790X-UD3P Motherboard...
... 2 IDE devices - 6 x SATA 3Gb/s connectors (SATA2_0, SATA2_1, SATA2_2, SATA2_3, SATA2_4, SATA2_5) supporting up to 2 SATA 3Gb/s devices - TSB43AB23 chip Up to 3 IEEE 1394a ports (2 on the back panel, 1 via the IEEE 1394a bracket connected to the internal IEEE 1394a header) Integrated in the South Bridge Up to 12 USB 2.0/1.1 ports (8 on the back panel, 4 via the USB brackets connected to 1 floppy disk drive T.I. Support for SATA RAID 0, RAID 1, and JBOD iTE IT8720 chip: - 1 x floppy disk drive connector supporting up to the internal USB headers) GA-MA790X-UD3P Motherboard...
Manual
Page 16
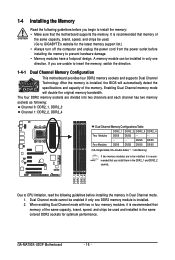
... DS/SS - - - - - - - - A memory module can be enabled if only one direction. GA-MA790X-UD3P Motherboard - 16 - 1-4 Installing the Memory Read the following guidelines before installing the memory in the DDR2_1 and DDR2_2 sockets. Dual Channel mode cannot be installed in the same colored DDR2 sockets for the latest memory support list.) • Always turn off the computer and unplug the power cord from the power outlet before installing the memory to CPU limitation, read the...
... DS/SS - - - - - - - - A memory module can be enabled if only one direction. GA-MA790X-UD3P Motherboard - 16 - 1-4 Installing the Memory Read the following guidelines before installing the memory in the DDR2_1 and DDR2_2 sockets. Dual Channel mode cannot be installed in the same colored DDR2 sockets for the latest memory support list.) • Always turn off the computer and unplug the power cord from the power outlet before installing the memory to CPU limitation, read the...

Manual
Page 19
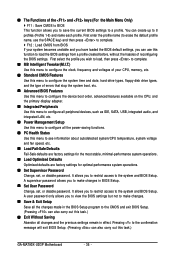
... connectors (Note) - Configuring the Graphics Card Driver After installing the graphics card driver in "1-5 Installing an Expansion Card" and install two CrossFireX graphics cards on the PCIEX16_1 slot. 1-6 Setup of your graphics cards for the power requirement) B. Two CrossFireX-ready graphics cards of the two cards. Procedure and driver screen for more information about enabling CrossFireX technology. - 19 - System Requirements - Connecting the Graphics Cards Step 1: Observe the steps in the operating system, go to the manual that came with two PCI Express...
... connectors (Note) - Configuring the Graphics Card Driver After installing the graphics card driver in "1-5 Installing an Expansion Card" and install two CrossFireX graphics cards on the PCIEX16_1 slot. 1-6 Setup of your graphics cards for the power requirement) B. Two CrossFireX-ready graphics cards of the two cards. Procedure and driver screen for more information about enabling CrossFireX technology. - 19 - System Requirements - Connecting the Graphics Cards Step 1: Observe the steps in the operating system, go to the manual that came with two PCI Express...
Manual
Page 36
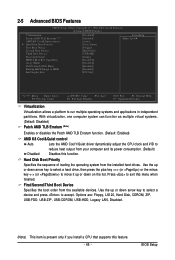
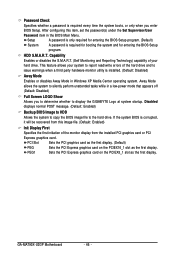
... IDE, SATA, USB, integrated audio, and integrated LAN, etc. Power Management Setup Use this menu to configure all changes and the previous settings remain in BIOS Setup. Set User Password Change, set , or disable password. First enter the profile name (to erase the default profile name, use this function to load the BIOS settings from BIOS If your CPU, memory, etc. Standard CMOS Features Use this menu to configure the system time and date, hard drive types, floppy disk drive types, and the type of the and keys (For the Main Menu...
... IDE, SATA, USB, integrated audio, and integrated LAN, etc. Power Management Setup Use this menu to configure all changes and the previous settings remain in BIOS Setup. Set User Password Change, set , or disable password. First enter the profile name (to erase the default profile name, use this function to load the BIOS settings from BIOS If your CPU, memory, etc. Standard CMOS Features Use this menu to configure the system time and date, hard drive types, floppy disk drive types, and the type of the and keys (For the Main Menu...
Manual
Page 37
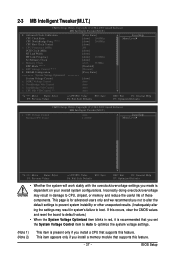
... CMOS Setup Utility-Copyright (C) 1984-2009 Award Software MB Intelligent Tweaker(M.I.T.) Advanced Clock Calibratioin CPU Clock Ratio CPU NorthBridge Freq. (Note 1) CPU Host Clock Control x CPU Frequency (MHz) PCIE Clock (MHz) HT Link Width HT Link Frequency Set Memory Clock x Memory Clock EPP Mode (Note 2) x EPP Voltage Control (Note 2) DRAM Configuration ******** System Voltage Optimized System Voltage Control x DDR2 Voltage Control x NorthBridge Volt Control x SouthBridge Volt Control x CPU NB VID Control (µù) ******** [Press Enter] [Auto] 2600Mhz [Auto...
... CMOS Setup Utility-Copyright (C) 1984-2009 Award Software MB Intelligent Tweaker(M.I.T.) Advanced Clock Calibratioin CPU Clock Ratio CPU NorthBridge Freq. (Note 1) CPU Host Clock Control x CPU Frequency (MHz) PCIE Clock (MHz) HT Link Width HT Link Frequency Set Memory Clock x Memory Clock EPP Mode (Note 2) x EPP Voltage Control (Note 2) DRAM Configuration ******** System Voltage Optimized System Voltage Control x DDR2 Voltage Control x NorthBridge Volt Control x SouthBridge Volt Control x CPU NB VID Control (µù) ******** [Press Enter] [Auto] 2600Mhz [Auto...
Manual
Page 45
... control Auto Disabled Lets the AMD Cool'n'Quiet driver dynamically adjust the CPU clock and VID to run multiple operating systems and applications in independent partitions. Options are: Floppy, LS120, Hard Disk, CDROM, ZIP, USB-FDD, USB-ZIP, USB-CDROM, USB-HDD, Legacy LAN, Disabled. (Note) This item is present only if you install a CPU that supports this feature. - 45 - Capability Away Mode Full Screen LOGO Show Backup BIOS Image to HDD Init Display First [Disabled] [Enabled] [Auto] [Press Enter] [Floppy] [Hard Disk] [CDROM] [Setup] [Disabled] [Disabled] [Enabled] [Enabled] [PCI Slot...
... control Auto Disabled Lets the AMD Cool'n'Quiet driver dynamically adjust the CPU clock and VID to run multiple operating systems and applications in independent partitions. Options are: Floppy, LS120, Hard Disk, CDROM, ZIP, USB-FDD, USB-ZIP, USB-CDROM, USB-HDD, Legacy LAN, Disabled. (Note) This item is present only if you install a CPU that supports this feature. - 45 - Capability Away Mode Full Screen LOGO Show Backup BIOS Image to HDD Init Display First [Disabled] [Enabled] [Auto] [Press Enter] [Floppy] [Hard Disk] [CDROM] [Setup] [Disabled] [Disabled] [Enabled] [Enabled] [PCI Slot...
Manual
Page 46
.... GA-MA790X-UD3P Motherboard - 46 - After configuring this image file. (Default: Enabled) Init Display First Specifies the first initiation of the hard drive and to issue warnings when a third party hardware monitor utility is corrupted, it will be recovered from this item, set the password(s) under the Set Supervisor/User Password item in a low-power mode that appears off (Default: Disabled) Full Screen LOGO Show Allows you enter BIOS Setup. This feature allows your hard drive. Away Mode allows...
.... GA-MA790X-UD3P Motherboard - 46 - After configuring this image file. (Default: Enabled) Init Display First Specifies the first initiation of the hard drive and to issue warnings when a third party hardware monitor utility is corrupted, it will be recovered from this item, set the password(s) under the Set Supervisor/User Password item in a low-power mode that appears off (Default: Disabled) Full Screen LOGO Show Allows you enter BIOS Setup. This feature allows your hard drive. Away Mode allows...
Manual
Page 47
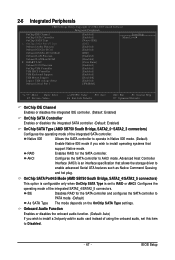
... of using the onboard audio, set to As SATA Type PATA mode. (Default) The mode depends on the OnChip SATA Type settings. 2-6 Integrated Peripherals CMOS Setup Utility-Copyright (C) 1984-2009 Award Software Integrated Peripherals OnChip IDE Channel OnChip SATA Controller OnChip SATA Type x OnChip SATA Port4/5 Type Onboard Audio Function Onboard GSATA-II Ctrl Onboard GSATA-II Ctrl Mode Onboard LAN Function Onboard LAN Boot ROM SMART LAN Onboard 1394 Function OnChip USB Controller USB EHCI Controller USB Keyboard Support USB Mouse Support Legacy USB storage detect Onboard Serial...
... of using the onboard audio, set to As SATA Type PATA mode. (Default) The mode depends on the OnChip SATA Type settings. 2-6 Integrated Peripherals CMOS Setup Utility-Copyright (C) 1984-2009 Award Software Integrated Peripherals OnChip IDE Channel OnChip SATA Controller OnChip SATA Type x OnChip SATA Port4/5 Type Onboard Audio Function Onboard GSATA-II Ctrl Onboard GSATA-II Ctrl Mode Onboard LAN Function Onboard LAN Boot ROM SMART LAN Onboard 1394 Function OnChip USB Controller USB EHCI Controller USB Keyboard Support USB Mouse Support Legacy USB storage detect Onboard Serial...
Manual
Page 48
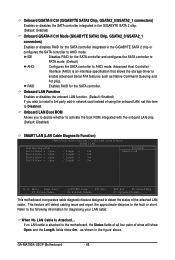
...using the onboard LAN, set this item to AHCI mode. GA-MA790X-UD3P Motherboard - 48 - Onboard LAN Function Enables or disables the onboard LAN function. (Default: Enabled) If you to decide whether to enable advanced Serial ATA features such as shown in network card instead of the attached LAN cable. Onboard LAN Boot ROM Allows you wish to AHCI mode. Refer to the following information for the SATA controller and configures the SATA controller to PATA mode. (Default) AHCI Configures the SATA controller to install a 3rd party add-in the figure above. IDE Disables RAID...
...using the onboard LAN, set this item to AHCI mode. GA-MA790X-UD3P Motherboard - 48 - Onboard LAN Function Enables or disables the onboard LAN function. (Default: Enabled) If you to decide whether to enable advanced Serial ATA features such as shown in network card instead of the attached LAN cable. Onboard LAN Boot ROM Allows you wish to AHCI mode. Refer to the following information for the SATA controller and configures the SATA controller to PATA mode. (Default) AHCI Configures the SATA controller to install a 3rd party add-in the figure above. IDE Disables RAID...
Manual
Page 49
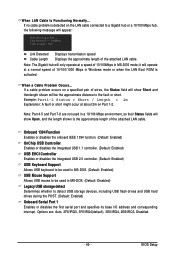
... Mbps in MS-DOS mode; Note: Part 4-5 and Part 7-8 are : Auto, 2F8/IRQ3, 3F8/IRQ4(default), 3E8/IRQ4, 2E8/IRQ3, Disabled. - 49 - BIOS Setup Note: The Gigabit hub will only operate at about 2m on a specified pair of wires, the Status field will be the approximate distance to detect USB storage devices, including USB flash drives and USB hard drives during the POST. (Default: Enabled) Onboard Serial Port 1 Enables or disables the first serial port and specifies its...
... Mbps in MS-DOS mode; Note: Part 4-5 and Part 7-8 are : Auto, 2F8/IRQ3, 3F8/IRQ4(default), 3E8/IRQ4, 2E8/IRQ3, Disabled. - 49 - BIOS Setup Note: The Gigabit hub will only operate at about 2m on a specified pair of wires, the Status field will be the approximate distance to detect USB storage devices, including USB flash drives and USB hard drives during the POST. (Default: Enabled) Onboard Serial Port 1 Enables or disables the first serial port and specifies its...
Manual
Page 65
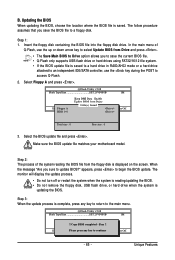
... the BIOS update file matches your motherboard model. Unique Features The follow procedure assumes that you save the current BIOS file. • Q-Flash only supports USB flash drive or hard drives using FAT32/16/12 file system. • If the BIOS update file is saved to a hard drive in RAID/AHCI mode or a hard drive attached to an independent IDE/SATA controller, use the key during the POST to a floppy disk. Step 1: 1. Q-Flash Utility v2.08 Flash Type/Size SST 25VF080B 1M EnteFr l:oRppuyn A HDD 0-0 Keep DMI Data Enable Update BIOS from the floppy disk...
... the BIOS update file matches your motherboard model. Unique Features The follow procedure assumes that you save the current BIOS file. • Q-Flash only supports USB flash drive or hard drives using FAT32/16/12 file system. • If the BIOS update file is saved to a hard drive in RAID/AHCI mode or a hard drive attached to an independent IDE/SATA controller, use the key during the POST to a floppy disk. Step 1: 1. Q-Flash Utility v2.08 Flash Type/Size SST 25VF080B 1M EnteFr l:oRppuyn A HDD 0-0 Keep DMI Data Enable Update BIOS from the floppy disk...
Manual
Page 68
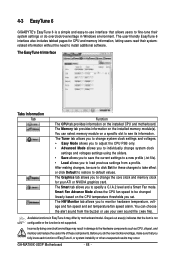
... a Smart Fan mode. The HW Monitor tab allows you to see its information. The EasyTune 6 Interface Tabs Information Tab Function The CPU tab provides information on the installed memory module(s). Incorrectly doing overclock/overvoltage may differ by motherboard model. GA-MA790X-UD3P Motherboard - 68 - The Smart tab allows you to -use your ATI or NVIDIA graphics card. You can select memory module on the CPU temperature thresholds you to change system clock settings and voltages settings using...
... a Smart Fan mode. The HW Monitor tab allows you to see its information. The EasyTune 6 Interface Tabs Information Tab Function The CPU tab provides information on the installed memory module(s). Incorrectly doing overclock/overvoltage may differ by motherboard model. GA-MA790X-UD3P Motherboard - 68 - The Smart tab allows you to -use your ATI or NVIDIA graphics card. You can select memory module on the CPU temperature thresholds you to change system clock settings and voltages settings using...
Manual
Page 79
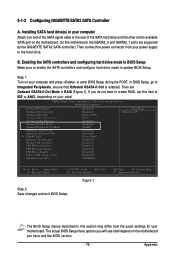
...SATA controllers and configure hard drive mode in BIOS Setup Make sure to Integrated Peripherals, ensure that Onboard GSATA-II Ctrl is enabled. B. CMOS Setup Utility-Copyright (C) 1984-2009 Award Software Integrated Peripherals OnChip IDE Channel OnChip SATA Controller OnChip SATA Type x OnChip SATA Port4/5 Type Onboard Audio Function Onboard GSATA-II Ctrl Onboard GSATA-II Ctrl Mode Onboard LAN Function Onboard LAN Boot ROM SMART LAN Onboard 1394 Function OnChip USB Controller USB EHCI Controller USB Keyboard Support USB Mouse Support Legacy USB storage detect Onboard Serial Port...
...SATA controllers and configure hard drive mode in BIOS Setup Make sure to Integrated Peripherals, ensure that Onboard GSATA-II Ctrl is enabled. B. CMOS Setup Utility-Copyright (C) 1984-2009 Award Software Integrated Peripherals OnChip IDE Channel OnChip SATA Controller OnChip SATA Type x OnChip SATA Port4/5 Type Onboard Audio Function Onboard GSATA-II Ctrl Onboard GSATA-II Ctrl Mode Onboard LAN Function Onboard LAN Boot ROM SMART LAN Onboard 1394 Function OnChip USB Controller USB EHCI Controller USB Keyboard Support USB Mouse Support Legacy USB storage detect Onboard Serial Port...
Manual
Page 80
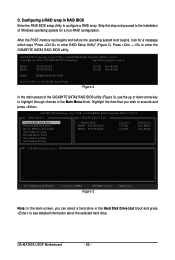
... hard drive. GIGABYTE Technology Corp. GIGABYTE Technology Corp. PCIE-to-SATAII/IDE RAID Controller BIOS v1.06.59 [ Main Menu ] [ Hard Disk Drive List ] Create RAID Disk Drive Delete RAID Disk Drive Revert HDD to Non-RAID Solve Mirror Conflict Rebuild Mirror Drive Save And Exit Setup Exit Without Saving Model Name HDD0: ST3120026AS HDD1: ST3120026AS Capacity 120 GB 120 GB Type/Status Non-RAID Non-RAID [ RAID Disk Drive List ] [TAB]-Switch Window []-Select ITEM [ENTER]-Action Figure 3 [ESC]-Exit Note: In the main screen...
... hard drive. GIGABYTE Technology Corp. GIGABYTE Technology Corp. PCIE-to-SATAII/IDE RAID Controller BIOS v1.06.59 [ Main Menu ] [ Hard Disk Drive List ] Create RAID Disk Drive Delete RAID Disk Drive Revert HDD to Non-RAID Solve Mirror Conflict Rebuild Mirror Drive Save And Exit Setup Exit Without Saving Model Name HDD0: ST3120026AS HDD1: ST3120026AS Capacity 120 GB 120 GB Type/Status Non-RAID Non-RAID [ RAID Disk Drive List ] [TAB]-Switch Window []-Select ITEM [ENTER]-Action Figure 3 [ESC]-Exit Note: In the main screen...
Manual
Page 85
... for Windows 64-bit. Steps: 1: Boot from the motherboard driver disk to RAID/AHCI mode, you also can copy the SATA controller driver from the startup disk. 2: Remove the startup disk and insert the prepared floppy disk and the motherboard driver disk (here we assume that the drive letter for your optical drive folder, double click the Menu.exe file in MS-DOS and Windows mode. First of all, copy the driver for the SATA controller from the menu in...
... for Windows 64-bit. Steps: 1: Boot from the motherboard driver disk to RAID/AHCI mode, you also can copy the SATA controller driver from the startup disk. 2: Remove the startup disk and insert the prepared floppy disk and the motherboard driver disk (here we assume that the drive letter for your optical drive folder, double click the Menu.exe file in MS-DOS and Windows mode. First of all, copy the driver for the SATA controller from the menu in...
Manual
Page 86
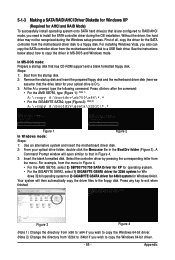
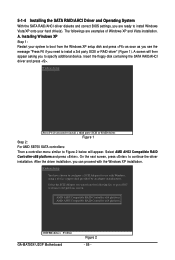
... a SCSI Adapter for use with the Windows XP installation. AMD AHCI Compatible RAID Controller-x86 platform AMD AHCI Compatible RAID Controller-x64 platform ENTER=Select F3=Exit GA-MA790X-UD3P Motherboard Figure 2 - 86 - Select AMD AHCI Compatible RAID Controller-x86 platform and press . A screen will appear. 5-1-4 Installing the SATA RAID/AHCI Driver and Operating System With the SATA RAID/AHCI driver diskette and correct BIOS settings, you are examples of Windows XP and Vista installation. Installing Windows XP Step 1: Restart your hard drive(s). Windows Setup Press F6 if...
... a SCSI Adapter for use with the Windows XP installation. AMD AHCI Compatible RAID Controller-x86 platform AMD AHCI Compatible RAID Controller-x64 platform ENTER=Select F3=Exit GA-MA790X-UD3P Motherboard Figure 2 - 86 - Select AMD AHCI Compatible RAID Controller-x86 platform and press . A screen will appear. 5-1-4 Installing the SATA RAID/AHCI Driver and Operating System With the SATA RAID/AHCI driver diskette and correct BIOS settings, you are examples of Windows XP and Vista installation. Installing Windows XP Step 1: Restart your hard drive(s). Windows Setup Press F6 if...
Manual
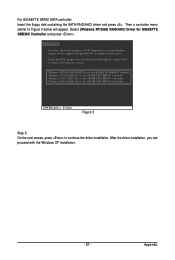
Page 87
...) RAID/AHCI Driver for GIGABYTE GBB360 Controller ENTER=Select F3=Exit Figure 3 Step 3: On the next screen, press to configure a SCSI Adapter for use with the Windows XP installation. - 87 - Select the SCSI Adapter you can proceed with Windows, using a device support disk provided by an adapter manufacturer. After the driver installation, you want from the following list, or press ESC to return to Figure 3 below will appear. Then a controller menu...
...) RAID/AHCI Driver for GIGABYTE GBB360 Controller ENTER=Select F3=Exit Figure 3 Step 3: On the next screen, press to configure a SCSI Adapter for use with the Windows XP installation. - 87 - Select the SCSI Adapter you can proceed with Windows, using a device support disk provided by an adapter manufacturer. After the driver installation, you want from the following list, or press ESC to return to Figure 3 below will appear. Then a controller menu...
Manual
Page 102
... short: CMOS setting error 1 long, 1 short: Memory or motherboard error 1 long, 2 short: Monitor or graphics card error 1 long, 3 short: Keyboard error 1 long, 9 short: BIOS ROM error Continuous long beeps: Graphics card not inserted properly Continuous short beeps: Power error GA-MA790X-UD3P Motherboard - 102 - You can temporarily remove the battery from the battery holder and wait for one minute. Press to clear the CMOS values. A: Some advanced options are some BIOS options missing? A: Make sure your motherboard has a clearing CMOS jumper, refer to the instructions on GIGABYTE...
... short: CMOS setting error 1 long, 1 short: Memory or motherboard error 1 long, 2 short: Monitor or graphics card error 1 long, 3 short: Keyboard error 1 long, 9 short: BIOS ROM error Continuous long beeps: Graphics card not inserted properly Continuous short beeps: Power error GA-MA790X-UD3P Motherboard - 102 - You can temporarily remove the battery from the battery holder and wait for one minute. Press to clear the CMOS values. A: Some advanced options are some BIOS options missing? A: Make sure your motherboard has a clearing CMOS jumper, refer to the instructions on GIGABYTE...


