Manual
Page 3
...specifications and features in any means without prior notice. For product-related information, check on our website at: http://www.gigabyte.com.tw Identifying Your Motherboard Revision The revision number on your motherboard revision before updating motherboard BIOS, drivers, or when... owners. Example: Documentation Classifications In order to assist in this product, GIGABYTE provides the following types of documentations: For quick set-up of this manual are legally registered to use GIGABYTE's unique features, read the User's Manual. For instructions on...
...specifications and features in any means without prior notice. For product-related information, check on our website at: http://www.gigabyte.com.tw Identifying Your Motherboard Revision The revision number on your motherboard revision before updating motherboard BIOS, drivers, or when... owners. Example: Documentation Classifications In order to assist in this product, GIGABYTE provides the following types of documentations: For quick set-up of this manual are legally registered to use GIGABYTE's unique features, read the User's Manual. For instructions on...

Manual
Page 5
... 87 5-2-1 Configuring 2/4/5.1/7.1-Channel Audio 87 5-2-2 Installing the S/PDIF In and Out Cable (Optional 89 5-2-3 Enabling the Dolby Home Theater Function 91 5-2-4 Configuring Microphone Recording 92 5-2-5 Using the Sound Recorder 94 5-3 Troubleshooting 95 5-3-1 Frequently Asked Questions 95 5-3-2 Troubleshooting Procedure 96 Regulatory Statements 98 - 5 -
... 87 5-2-1 Configuring 2/4/5.1/7.1-Channel Audio 87 5-2-2 Installing the S/PDIF In and Out Cable (Optional 89 5-2-3 Enabling the Dolby Home Theater Function 91 5-2-4 Configuring Microphone Recording 92 5-2-5 Using the Sound Recorder 94 5-3 Troubleshooting 95 5-3-1 Frequently Asked Questions 95 5-3-2 Troubleshooting Procedure 96 Regulatory Statements 98 - 5 -
Manual
Page 9
... on the motherboard, make sure the power supply voltage has been set according to the local voltage standard. • Before using the product, please verify that all cables and power connectors of your dealer. Hardware Installation These stickers are required for warranty ... are connected tightly and securely. • When handling the motherboard, avoid touching any installation steps or have a problem related to the use of the product, please consult a certified computer technician. - 9 - Chapter 1 Hardware Installation 1-1 Installation Precautions The motherboard contains numerous ...
... on the motherboard, make sure the power supply voltage has been set according to the local voltage standard. • Before using the product, please verify that all cables and power connectors of your dealer. Hardware Installation These stickers are required for warranty ... are connected tightly and securely. • When handling the motherboard, avoid touching any installation steps or have a problem related to the use of the product, please consult a certified computer technician. - 9 - Chapter 1 Hardware Installation 1-1 Installation Precautions The motherboard contains numerous ...
Manual
Page 11
... fan speed detection CPU overheating warning CPU/System fan fail warning CPU/System fan speed control (Note 6) BIOS 2 x 8 Mbit flash Use of licensed AWARD BIOS Support for DualBIOSTM PnP 1.0a, DMI 2.0, SM BIOS 2.4, ACPI 1.0b - 11 - Hardware Installation
... fan speed detection CPU overheating warning CPU/System fan fail warning CPU/System fan speed control (Note 6) BIOS 2 x 8 Mbit flash Use of licensed AWARD BIOS Support for DualBIOSTM PnP 1.0a, DMI 2.0, SM BIOS 2.4, ACPI 1.0b - 11 - Hardware Installation
Manual
Page 12
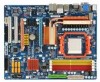
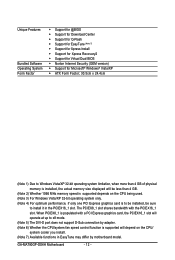
GA-MA790GP-DS4H Motherboard - 12 - Unique Features Bundled Software Operating System Form Factor Support for @BIOS Support for Download Center Support for Q-Flash Support ... install it in the PCIEX16_1 slot. The PCIEX8_1 slot shares bandwidth with a PCI Express graphics card, the PCIEX16_1 slot will depend on the CPU being used. (Note 3) For Windows Vista/XP 32-bit operating system only. (Note 4) For optimum performance, if only one PCI Express graphics card is populated with the...
GA-MA790GP-DS4H Motherboard - 12 - Unique Features Bundled Software Operating System Form Factor Support for @BIOS Support for Download Center Support for Q-Flash Support ... install it in the PCIEX16_1 slot. The PCIEX8_1 slot shares bandwidth with a PCI Express graphics card, the PCIEX16_1 slot will depend on the CPU being used. (Note 3) For Windows Vista/XP 32-bit operating system only. (Note 4) For optimum performance, if only one PCI Express graphics card is populated with the...
Manual
Page 15
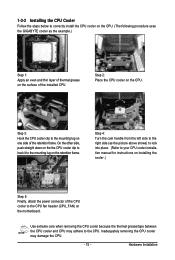
... On the other side, push straight down on the the CPU cooler clip to hook it to the mounting lug on the CPU. Hardware Installation Use extreme care when removing the CPU cooler because the thermal grease/tape between the CPU cooler and CPU may damage the CPU. - 15 - ...1-3-2 Installing the CPU Cooler Follow the steps below to correctly install the CPU cooler on the CPU. (The following procedure uses the GIGABYTE cooler as the picture above shows) to lock into place. (Refer to your CPU cooler installation manual for instructions on installing the cooler.) Step 5:...
... On the other side, push straight down on the the CPU cooler clip to hook it to the mounting lug on the CPU. Hardware Installation Use extreme care when removing the CPU cooler because the thermal grease/tape between the CPU cooler and CPU may damage the CPU. - 15 - ...1-3-2 Installing the CPU Cooler Follow the steps below to correctly install the CPU cooler on the CPU. (The following procedure uses the GIGABYTE cooler as the picture above shows) to lock into place. (Refer to your CPU cooler installation manual for instructions on installing the cooler.) Step 5:...
Manual
Page 16
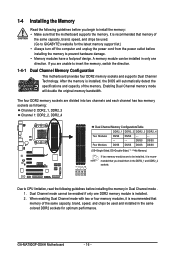
...or four memory modules, it is recommended that memory of the same capacity, brand, speed, and chips be used . (Go to GIGABYTE's website for optimum performance. A memory module can be installed in only one DDR2 memory module is recommended that...to install the memory: • Make sure that memory of the same capacity, brand, speed, and chips be used and installed in the same colored DDR2 sockets for the latest memory support list.) • Always turn off the ...the memory. It is installed, the BIOS will double the original memory bandwidth. GA-MA790GP-DS4H Motherboard - 16 -
...or four memory modules, it is recommended that memory of the same capacity, brand, speed, and chips be used . (Go to GIGABYTE's website for optimum performance. A memory module can be installed in only one DDR2 memory module is recommended that...to install the memory: • Make sure that memory of the same capacity, brand, speed, and chips be used and installed in the same colored DDR2 sockets for the latest memory support list.) • Always turn off the ...the memory. It is installed, the BIOS will double the original memory bandwidth. GA-MA790GP-DS4H Motherboard - 16 -
Manual
Page 21
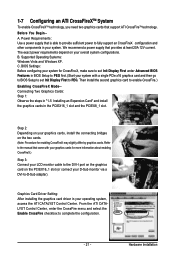
Power Requirements: Use a power supply that came with your graphics cards for more information about enabling CrossFireX.) Step 3: Connect your LCD monitor cable to the DVI-I port on ...
Power Requirements: Use a power supply that came with your graphics cards for more information about enabling CrossFireX.) Step 3: Connect your LCD monitor cable to the DVI-I port on ...
Manual
Page 22
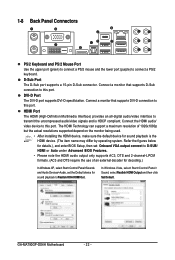
...HDMI audio output only supports AC3, DTS and 2-channel-LPCM formats. (AC3 and DTS require the use of 1920x1080p but the actual resolutions supported depend on the monitor being used. • After installing the HDMI device, make sure the default device for sound playback to this... HDMI (High-Definition Multimedia Interface) provides an all-digital audio/video interface to connect a PS/2 keyboard. GA-MA790GP-DS4H Motherboard - 22 - 1-8 Back Panel Connectors PS/2 Keyboard and PS/2 Mouse Port Use the upper port (green) to connect a PS/2 mouse and the lower port (purple) to transmit the...
...HDMI audio output only supports AC3, DTS and 2-channel-LPCM formats. (AC3 and DTS require the use of 1920x1080p but the actual resolutions supported depend on the monitor being used. • After installing the HDMI device, make sure the default device for sound playback to this... HDMI (High-Definition Multimedia Interface) provides an all-digital audio/video interface to connect a PS/2 keyboard. GA-MA790GP-DS4H Motherboard - 22 - 1-8 Back Panel Connectors PS/2 Keyboard and PS/2 Mouse Port Use the upper port (green) to connect a PS/2 mouse and the lower port (purple) to transmit the...
Manual
Page 23
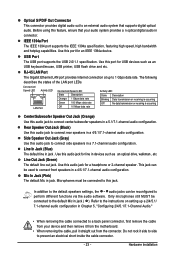
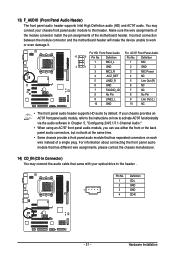
...panel connector, first remove the cable from your audio system provides a n optical digital audio in jack . Side Speaker Out Jack (Gray) Use this jack. IEEE 1394a Port The IEEE 1394 port supports the IEEE 1394a specification, featuring high speed, high bandwidth and hotplug capabilities. Optical ...S/PDIF Out Connector This connector provides digital audio out to the default Mic in jack ( ). Use this audio jack for USB devices such as an optical drive, walkman, etc. RJ-45 LAN Port The Gigabit Ethernet LAN port provides...
...panel connector, first remove the cable from your audio system provides a n optical digital audio in jack . Side Speaker Out Jack (Gray) Use this jack. IEEE 1394a Port The IEEE 1394 port supports the IEEE 1394a specification, featuring high speed, high bandwidth and hotplug capabilities. Optical ...S/PDIF Out Connector This connector provides digital audio out to the default Mic in jack ( ). Use this audio jack for USB devices such as an optical drive, walkman, etc. RJ-45 LAN Port The Gigabit Ethernet LAN port provides...

Manual
Page 26
... is not connected, the computer will not start. • To meet expansion requirements, it is turned off and all the components on the motherboard. When using a power supply providing a 2x2 12V and a 2x10 power connector. 5 8 1 4 ATX_12V_2X4 ATX_12V_2X4: Pin No. Definition 1 GND (Only for 2x4 pin 12V...12V GND PS_ON(soft On/Off) GND GND GND -5V +5V +5V +5V (Only for 2x12 pinATX) GND (Only for 2x12 pinATX) GA-MA790GP-DS4H Motherboard - 26 - The 12V power connector mainly supplies power to the power connector in the correct orientation. Do not insert the power supply cable...
... is not connected, the computer will not start. • To meet expansion requirements, it is turned off and all the components on the motherboard. When using a power supply providing a 2x2 12V and a 2x10 power connector. 5 8 1 4 ATX_12V_2X4 ATX_12V_2X4: Pin No. Definition 1 GND (Only for 2x4 pin 12V...12V GND PS_ON(soft On/Off) GND GND GND -5V +5V +5V +5V (Only for 2x12 pinATX) GND (Only for 2x12 pinATX) GA-MA790GP-DS4H Motherboard - 26 - The 12V power connector mainly supplies power to the power connector in the correct orientation. Do not insert the power supply cable...

Manual
Page 27
... a fan cable, be sure to two IDE devices such as hard drives and optical drives. The motherboard supports CPU fan speed control, which requires the use of the IDE devices (for example, master or slave). (For information about configuring master/slave settings for the IDE devices, read the instructions from overheating...
... a fan cable, be sure to two IDE devices such as hard drives and optical drives. The motherboard supports CPU fan speed control, which requires the use of the IDE devices (for example, master or slave). (For information about configuring master/slave settings for the IDE devices, read the instructions from overheating...
Manual
Page 28
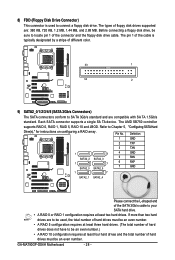
...10 configuration requires at least two hard drives. If more than two hard drives are : 360 KB, 720 KB, 1.2 MB, 1.44 MB, and 2.88 MB. GA-MA790GP-DS4H Motherboard - 28 - The AMD SB750 controller supports RAID 0, RAID 1, RAID 5, RAID 10 and JBOD. Each SA TA connector supports a single SA TA device. ... and are compatible with SA TA 1.5Gb/s standard. Before connecting a floppy disk drive, be an even number. The pin 1 of the cable is used , the total number of hard drives must be sure to Chapter 5, "Configuring SATA Hard Drive(s)," for instructions on configuring a RAID array.
...10 configuration requires at least two hard drives. If more than two hard drives are : 360 KB, 720 KB, 1.2 MB, 1.44 MB, and 2.88 MB. GA-MA790GP-DS4H Motherboard - 28 - The AMD SB750 controller supports RAID 0, RAID 1, RAID 5, RAID 10 and JBOD. Each SA TA connector supports a single SA TA device. ... and are compatible with SA TA 1.5Gb/s standard. Before connecting a floppy disk drive, be an even number. The pin 1 of the cable is used , the total number of hard drives must be sure to Chapter 5, "Configuring SATA Hard Drive(s)," for instructions on configuring a RAID array.
Manual
Page 29
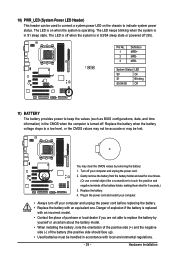
... keep the values (such as BIOS configurations, date, and time information) in the CMOS when the computer is replaced with an equivalent one minute. (Or use a metal object like a screwdriver to touch the positive and negative terminals of the battery (the positive side should face up). •...; Used batteries must be handled in the power cord and restart your computer. • Always turn off your computer and unplug the power cord before replacing ...
... keep the values (such as BIOS configurations, date, and time information) in the CMOS when the computer is replaced with an equivalent one minute. (Or use a metal object like a screwdriver to touch the positive and negative terminals of the battery (the positive side should face up). •...; Used batteries must be handled in the power cord and restart your computer. • Always turn off your computer and unplug the power cord before replacing ...

Manual
Page 30
... on the chassis front panel. The system reports system startup status by chassis. SPEAK+ PWPW+ MSGMSG+ NC RES+ RESHD- When connecting your system using the power switch (refer to Chapter 2, "BIOS Setup," "Power Management Setup," for information about beep codes. • HD (Hard Drive Activity ... in S3/S4/S5 Off S3/S4 sleep state or powered off (S5). • PW (Power Switch, Red): Connects to indicate the problem. GA-MA790GP-DS4H Motherboard - 30 - HD+ 21 Reset Switch Hard Drive Activity LED • MSG (Message/Power/Sleep LED, Yellow): System Status LED Connects to...
... on the chassis front panel. The system reports system startup status by chassis. SPEAK+ PWPW+ MSGMSG+ NC RES+ RESHD- When connecting your system using the power switch (refer to Chapter 2, "BIOS Setup," "Power Management Setup," for information about beep codes. • HD (Hard Drive Activity ... in S3/S4/S5 Off S3/S4 sleep state or powered off (S5). • PW (Power Switch, Red): Connects to indicate the problem. GA-MA790GP-DS4H Motherboard - 30 - HD+ 21 Reset Switch Hard Drive Activity LED • MSG (Message/Power/Sleep LED, Yellow): System Status LED Connects to...
Manual
Page 31
... make the device unable to activate AC'97 functioninality via the audio software in Chapter 5, "Configuring 2/4/5.1/7.1-Channel Audio." • When using an AC'97 front panel audio module, you can use either the front or the back panel audio connectors, but not both at the same time. • Some chassis provide a front...
... make the device unable to activate AC'97 functioninality via the audio software in Chapter 5, "Configuring 2/4/5.1/7.1-Channel Audio." • When using an AC'97 front panel audio module, you can use either the front or the back panel audio connectors, but not both at the same time. • Some chassis provide a front...
Manual
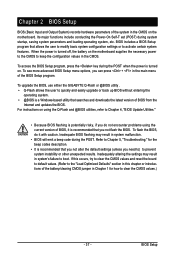
Page 35
... Optimized Defaults) or manually configure the BIOS settings (refer to Chapter 2, "BIOS Setup," for a few seconds. 21) CLR_CMOS (Clearing CMOS Jumper) Use this jumper to remove the jumper cap from the jumper. Hardware Installation To clear the CMOS values, place a jumper cap on your computer and unplug... clearing the CMOS values. • After clearing the CMOS values and before turning on the two pins to temporarily short the two pins or use a metal object like a screwdriver to factory defaults. Open: Normal Short: Clear CMOS Values • Always turn off your computer, be sure...
... Optimized Defaults) or manually configure the BIOS settings (refer to Chapter 2, "BIOS Setup," for a few seconds. 21) CLR_CMOS (Clearing CMOS Jumper) Use this jumper to remove the jumper cap from the jumper. Hardware Installation To clear the CMOS values, place a jumper cap on your computer and unplug... clearing the CMOS values. • After clearing the CMOS values and before turning on the two pins to temporarily short the two pins or use a metal object like a screwdriver to factory defaults. Open: Normal Short: Clear CMOS Values • Always turn off your computer, be sure...
Manual
Page 37
... battery on the motherboard supplies the necessary power to the CMOS to prevent system instability or other unexpected results. To upgrade the BIOS, use either the GIGABYTE Q-Flash or @BIOS utility . • Q-Flash allows the user to activate certain system features. BIOS includes a BIOS Setup program that...the CMOS on . To see more advanced BIOS Setup menu options, you not flash the BIOS. To flash the BIOS, do not encounter problems using the Q-Flash and @BIOS utilities, refer to Chapter 4, "BIOS Update Utilities." • Because BIOS flashing is turned on the motherboard. When...
... battery on the motherboard supplies the necessary power to the CMOS to prevent system instability or other unexpected results. To upgrade the BIOS, use either the GIGABYTE Q-Flash or @BIOS utility . • Q-Flash allows the user to activate certain system features. BIOS includes a BIOS Setup program that...the CMOS on . To see more advanced BIOS Setup menu options, you not flash the BIOS. To flash the BIOS, do not encounter problems using the Q-Flash and @BIOS utilities, refer to Chapter 4, "BIOS Update Utilities." • Because BIOS flashing is turned on the motherboard. When...
Manual
Page 38
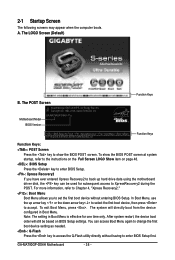
...to select the first boot device, then press to enter BIOS Setup first. 2-1 Startup Screen The following screens may appear when the computer boots. GA-MA790GP-DS4H F1a . . . . : BIOS Setup /Q-Flash : XpressRecovery2 : Boot Menu : Qflash 07/15/2008-RS780D-SB750-6A66AG0BC-00 Function Keys ... Function Keys B. The system will still be used for one time only. For more information, refer to Chapter 4, "Xpress Recovery2." : Boot Menu Boot Menu allows you have ever entered Xpress Recovery2 to XpressRecovery2 during the POST. GA-MA790GP-DS4H Motherboard - 38 - A. To show the ...
...to select the first boot device, then press to enter BIOS Setup first. 2-1 Startup Screen The following screens may appear when the computer boots. GA-MA790GP-DS4H F1a . . . . : BIOS Setup /Q-Flash : XpressRecovery2 : Boot Menu : Qflash 07/15/2008-RS780D-SB750-6A66AG0BC-00 Function Keys ... Function Keys B. The system will still be used for one time only. For more information, refer to Chapter 4, "Xpress Recovery2." : Boot Menu Boot Menu allows you have ever entered Xpress Recovery2 to XpressRecovery2 during the POST. GA-MA790GP-DS4H Motherboard - 38 - A. To show the ...
Manual
Page 39
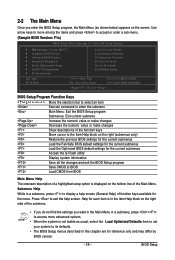
...: Exit current submenu Increase the numeric value or make changes Decrease the numeric value or make changes Show descriptions of the Main Menu. BIOS Setup Use arrow keys to move among the items and press to accept or enter a sub-menu. (Sample BIOS Version: F1a) CMOS Setup Utility-Copyright (C) 1984-2008...
...: Exit current submenu Increase the numeric value or make changes Decrease the numeric value or make changes Show descriptions of the Main Menu. BIOS Setup Use arrow keys to move among the items and press to accept or enter a sub-menu. (Sample BIOS Version: F1a) CMOS Setup Utility-Copyright (C) 1984-2008...

