Manual
Page 4
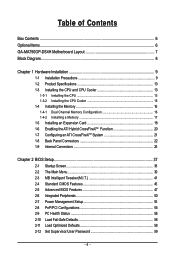
...Optional Items...6 GA-MA790GP-DS4H Motherboard Layout 7 Block Diagram...8 Chapter 1 Hardware Installation 9 1-1 Installation Precautions 9 1-2 Product Specifications 10 1-3 Installing the CPU and CPU Cooler 13 1-3-1 Installing the CPU 13 1-3-2 Installing the CPU Cooler 15 1-4 Installing the Memory 16 1-4-1 Dual Channel Memory Configuration 16 1-4-2 Installing a Memory 17 1-5 Installing an Expansion Card 18 1-6 Enabling the ATI Hybrid CrossFireXTM Function 20 1-7 Configuring an ATI CrossFireXTM System 21 1-8 Back Panel Connectors 22 1-9 Internal Connectors 25 Chapter 2 BIOS Setup...
...Optional Items...6 GA-MA790GP-DS4H Motherboard Layout 7 Block Diagram...8 Chapter 1 Hardware Installation 9 1-1 Installation Precautions 9 1-2 Product Specifications 10 1-3 Installing the CPU and CPU Cooler 13 1-3-1 Installing the CPU 13 1-3-2 Installing the CPU Cooler 15 1-4 Installing the Memory 16 1-4-1 Dual Channel Memory Configuration 16 1-4-2 Installing a Memory 17 1-5 Installing an Expansion Card 18 1-6 Enabling the ATI Hybrid CrossFireXTM Function 20 1-7 Configuring an ATI CrossFireXTM System 21 1-8 Back Panel Connectors 22 1-9 Internal Connectors 25 Chapter 2 BIOS Setup...
Manual
Page 10
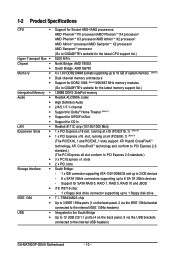
... 2 IDE devices - 6 x SATA 3Gb/s connectors supporting up to the internal USB headers) GA-MA790GP-DS4H Motherboard - 10 - TSB43AB23 chip Up to 3 IEEE 1394a ports (1 on the back panel, 2 via the IEEE 1394a bracket connected to the internal IEEE 1394a headers) Integrated in the South Bridge Up to 12 USB 2.0/1.1 ports (4 on the back panel, 8 via the USB brackets connected to 1 floppy disk drive T.I. 1-2 Product Specifications CPU Hyper Transport Bus Chipset Memory Intergrated Memory Audio ...
... 2 IDE devices - 6 x SATA 3Gb/s connectors supporting up to the internal USB headers) GA-MA790GP-DS4H Motherboard - 10 - TSB43AB23 chip Up to 3 IEEE 1394a ports (1 on the back panel, 2 via the IEEE 1394a bracket connected to the internal IEEE 1394a headers) Integrated in the South Bridge Up to 12 USB 2.0/1.1 ports (4 on the back panel, 8 via the USB brackets connected to 1 floppy disk drive T.I. 1-2 Product Specifications CPU Hyper Transport Bus Chipset Memory Intergrated Memory Audio ...
Manual
Page 16
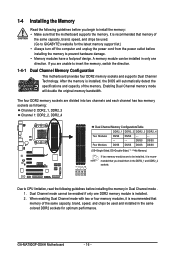
... sockets. Dual Channel mode cannot be used and installed in Dual Channel mode . 1. DDR2_1 DDR2_2 DDR2_3 DDR2_4 Due to CPU limitation, read the following guidelines before installing the memory to prevent hardware damage. • Memory modules have a foolproof design. GA-MA790GP-DS4H Motherboard - 16 - After the memory is recommended that the motherboard supports the memory. When enabling Dual Channel mode with two or four memory modules, it is recommended that memory of the same capacity, brand, speed, and chips...
... sockets. Dual Channel mode cannot be used and installed in Dual Channel mode . 1. DDR2_1 DDR2_2 DDR2_3 DDR2_4 Due to CPU limitation, read the following guidelines before installing the memory to prevent hardware damage. • Memory modules have a foolproof design. GA-MA790GP-DS4H Motherboard - 16 - After the memory is recommended that the motherboard supports the memory. When enabling Dual Channel mode with two or four memory modules, it is recommended that memory of the same capacity, brand, speed, and chips...
Manual
Page 18
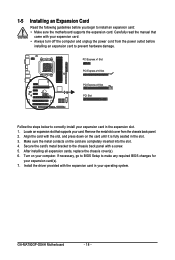
... read the manual that supports your expansion card(s). 7. PCI Express x1 Slot PCI Express x16 Slot PCI Express x8 Slot PCI Slot Follow the steps below to make any required BIOS changes for your card. Turn on the card are completely inserted into the slot. 4. Make sure the metal contacts on your operating system. After installing all expansion cards, replace the chassis cover(s). 6. GA-MA790GP-DS4H Motherboard - 18 - If necessary, go to BIOS Setup to correctly install your expansion card in your...
... read the manual that supports your expansion card(s). 7. PCI Express x1 Slot PCI Express x16 Slot PCI Express x8 Slot PCI Slot Follow the steps below to make any required BIOS changes for your card. Turn on the card are completely inserted into the slot. 4. Make sure the metal contacts on your operating system. After installing all expansion cards, replace the chassis cover(s). 6. GA-MA790GP-DS4H Motherboard - 18 - If necessary, go to BIOS Setup to correctly install your expansion card in your...
Manual
Page 20
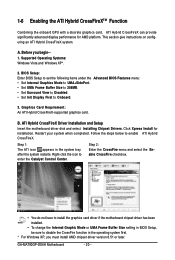
... Xpress Install for AMD platform. Follow the steps below to disable the CrossFire function in the system tray after the system restarts. GA-MA790GP-DS4H Motherboard - 20 - This section give instructions on configuring an ATI Hybrid CrossFireX system. Restart your system when completed. Right-click the icon to Onboard. 3. BIOS Setup: Enter BIOS Setup to set the following items under the Advanced BIOS Features menu: • Set Internal Graphics Mode to UMA...
... Xpress Install for AMD platform. Follow the steps below to disable the CrossFire function in the system tray after the system restarts. GA-MA790GP-DS4H Motherboard - 20 - This section give instructions on configuring an ATI Hybrid CrossFireX system. Restart your system when completed. Right-click the icon to Onboard. 3. BIOS Setup: Enter BIOS Setup to set the following items under the Advanced BIOS Features menu: • Set Internal Graphics Mode to UMA...
Manual
Page 21
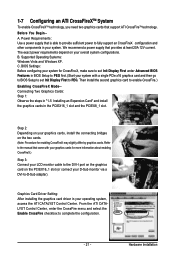
... system configurations. Power Requirements: Use a power supply that came with a single PCIe x16 graphics card and then go to BIOS Setup to set Init Display First under Advanced BIOS Features in your system for CrossFire X, make sure to set Init Display First to the DVI-I port on the graphics card on the PCIEX16_1 slot (or connect your operating system, access the ATI CATALYST Control Center . Then install the second graphics card to enable CrossFire.) Enabling CrossFireX Mode-Connecting Two Graphics Cards...
... system configurations. Power Requirements: Use a power supply that came with a single PCIe x16 graphics card and then go to BIOS Setup to set Init Display First under Advanced BIOS Features in your system for CrossFire X, make sure to set Init Display First to the DVI-I port on the graphics card on the PCIEX16_1 slot (or connect your operating system, access the ATI CATALYST Control Center . Then install the second graphics card to enable CrossFire.) Enabling CrossFireX Mode-Connecting Two Graphics Cards...
Manual
Page 22
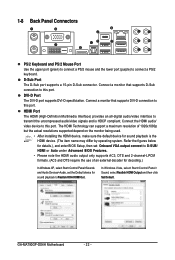
... D-Sub port supports a 15-pin D-Sub connector. DVI-D Port The DVI-D port supports DVI-D specifictation. GA-MA790GP-DS4H Motherboard - 22 - Connect a monitor that supports DVI-D connection to transmit the uncompressed audio/video signals and is the HDMI device. (The item name may differ by operating system. The HDMI Technology can support a maximum resolution of an external decoder for decoding.) In Windows XP, select Start>Control Panel>Sounds and Audio Devices>Audio, set the Default device for sound playback is HDCP compliant. Connect a monitor that supports D-Sub connection to...
... D-Sub port supports a 15-pin D-Sub connector. DVI-D Port The DVI-D port supports DVI-D specifictation. GA-MA790GP-DS4H Motherboard - 22 - Connect a monitor that supports DVI-D connection to transmit the uncompressed audio/video signals and is the HDMI device. (The item name may differ by operating system. The HDMI Technology can support a maximum resolution of an external decoder for decoding.) In Windows XP, select Start>Control Panel>Sounds and Audio Devices>Audio, set the Default device for sound playback is HDCP compliant. Connect a monitor that supports D-Sub connection to...
Manual
Page 40
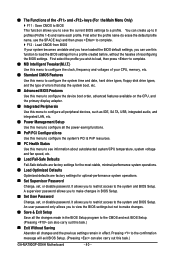
First enter the profile name (to erase the default profile name, use this task.) GA-MA790GP-DS4H Motherboard - 40 - It allows you to restrict access to load the BIOS settings from BIOS If your CPU, memory, etc. „ Standard CMOS Features Use this menu to configure the system time and date, hard drive types, floppy disk drive types, and the type of reconfiguring the BIOS settings. „ The Functions of the and keys (For the Main Menu Only) ` F11 : Save CMOS to BIOS This...
First enter the profile name (to erase the default profile name, use this task.) GA-MA790GP-DS4H Motherboard - 40 - It allows you to restrict access to load the BIOS settings from BIOS If your CPU, memory, etc. „ Standard CMOS Features Use this menu to configure the system time and date, hard drive types, floppy disk drive types, and the type of reconfiguring the BIOS settings. „ The Functions of the and keys (For the Main Menu Only) ` F11 : Save CMOS to BIOS This...
Manual
Page 42
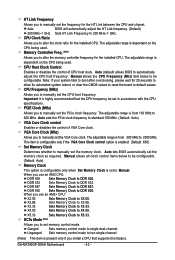
... VGA Core Clock control option is highly recommended that supports this feature. X4.00 Sets Memory Clock to single dual-channel. GA-MA790GP-DS4H Motherboard - 42 - CPU Host Clock Control Enables or disables the control of VGA Core clock. Note: If your system fails to boot after overclocking, please wait for 20 seconds to allow for the installed CPU. Auto sets the PCIe clock frequency to standard 100 MHz. (Default: Auto) VGA Core Clock control Enables or disables the control of CPU host clock. Sets Memory Clock to X2.66. X2.66 Sets Memory Clock to DDR 667. X5.33 Sets Memory...
... VGA Core Clock control option is highly recommended that supports this feature. X4.00 Sets Memory Clock to single dual-channel. GA-MA790GP-DS4H Motherboard - 42 - CPU Host Clock Control Enables or disables the control of VGA Core clock. Note: If your system fails to boot after overclocking, please wait for 20 seconds to allow for the installed CPU. Auto sets the PCIe clock frequency to standard 100 MHz. (Default: Auto) VGA Core Clock control Enables or disables the control of CPU host clock. Sets Memory Clock to X2.66. X2.66 Sets Memory Clock to DDR 667. X5.33 Sets Memory...
Manual
Page 47
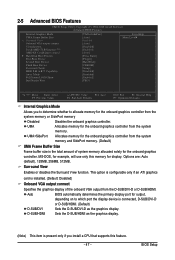
... D-SUB/HDMI. BIOS Setup MS-DOS, for example, will use only this feature. - 47 - 2-5 Advanced BIOS Features CMOS Setup Utility-Copyright (C) 1984-2008 Award Software Advanced BIOS Features Internal Graphics Mode UMA Frame Buffer Size x Surround View Onboard VGA output connect Virtualization Patch AMD TLB Erratum (Note) AMD K8 Cool&Quiet control ` Hard Disk Boot Priority First Boot Device Second Boot Device Third Boot Device Password Check HDD S.M.A.R.T. UMA+SidePort Allocates memory for the onboard graphics controller from the system memory and SidePort memory. (Default) UMA Frame...
... D-SUB/HDMI. BIOS Setup MS-DOS, for example, will use only this feature. - 47 - 2-5 Advanced BIOS Features CMOS Setup Utility-Copyright (C) 1984-2008 Award Software Advanced BIOS Features Internal Graphics Mode UMA Frame Buffer Size x Surround View Onboard VGA output connect Virtualization Patch AMD TLB Erratum (Note) AMD K8 Cool&Quiet control ` Hard Disk Boot Priority First Boot Device Second Boot Device Third Boot Device Password Check HDD S.M.A.R.T. UMA+SidePort Allocates memory for the onboard graphics controller from the system memory and SidePort memory. (Default) UMA Frame...
Manual
Page 48
... monitor utility is required every time the system boots, or only when you to determine whether to display the GIGABYTE Logo at system startup. HDD S.M.A.R.T. Away Mode allows the system to silently perform unattended tasks while in the BIOS Main Menu. Options are: Floppy, LS120, Hard Disk, CDROM, ZIP, USB-FDD, USB-ZIP, USB-CDROM, USB-HDD, Legacy LAN, Disabled. Setup A password is only required for entering the BIOS Setup program. GA-MA790GP-DS4H Motherboard - 48 - Use the up or down arrow key...
... monitor utility is required every time the system boots, or only when you to determine whether to display the GIGABYTE Logo at system startup. HDD S.M.A.R.T. Away Mode allows the system to silently perform unattended tasks while in the BIOS Main Menu. Options are: Floppy, LS120, Hard Disk, CDROM, ZIP, USB-FDD, USB-ZIP, USB-CDROM, USB-HDD, Legacy LAN, Disabled. Setup A password is only required for entering the BIOS Setup program. GA-MA790GP-DS4H Motherboard - 48 - Use the up or down arrow key...
Manual
Page 50
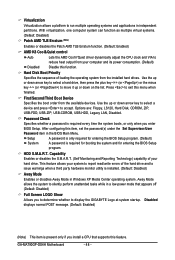
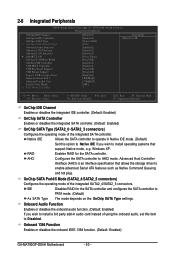
... Setup Utility-Copyright (C) 1984-2008 Award Software Integrated Peripherals OnChip IDE Channel OnChip SATA Controller OnChip SATA Type x OnChip SATA Port4/5 Type Onboard Audio Function Onboard 1394 Function Onboard LAN Function ` SMART LAN Onboard LAN Boot ROM OnChip USB Controller USB EHCI Controller USB Keyboard Support USB Mouse Support Legacy USB storage detect Onboard Serial Port 1 Onboard Parallel Port Parallel Port Mode x ECP Mode Use DMA [Enabled] [Enabled] [Native IDE] [IDE] [Enabled] [Enabled] [Enabled] [Press Enter] [Disabled] [Enabled] [Enabled] [Disabled] [Disabled] [Enabled...
... Setup Utility-Copyright (C) 1984-2008 Award Software Integrated Peripherals OnChip IDE Channel OnChip SATA Controller OnChip SATA Type x OnChip SATA Port4/5 Type Onboard Audio Function Onboard 1394 Function Onboard LAN Function ` SMART LAN Onboard LAN Boot ROM OnChip USB Controller USB EHCI Controller USB Keyboard Support USB Mouse Support Legacy USB storage detect Onboard Serial Port 1 Onboard Parallel Port Parallel Port Mode x ECP Mode Use DMA [Enabled] [Enabled] [Native IDE] [IDE] [Enabled] [Enabled] [Enabled] [Press Enter] [Disabled] [Enabled] [Enabled] [Disabled] [Disabled] [Enabled...
Manual
Page 52
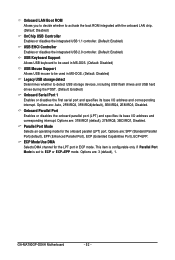
...Default: Disabled) USB Mouse Support Allows USB mouse to be used in ECP mode. Parallel Port Mode Selects an operating mode for the LPT port in MS-DOS. (Default: Disabled) Legacy USB storage detect Determines whether to ECP or ECP+EPP mode. ECP Mode Use DMA Selects DMA channel for the onboard parallel (LPT) port. GA-MA790GP-DS4H Motherboard - 52 - Options are : 3 (default), 1. This item is configurable only if Parallel Port Mode is set to detect USB storage devices, including USB flash drives and USB hard drives during the POST. (Default: Enabled) Onboard Serial Port 1 Enables...
...Default: Disabled) USB Mouse Support Allows USB mouse to be used in ECP mode. Parallel Port Mode Selects an operating mode for the LPT port in MS-DOS. (Default: Disabled) Legacy USB storage detect Determines whether to ECP or ECP+EPP mode. ECP Mode Use DMA Selects DMA channel for the onboard parallel (LPT) port. GA-MA790GP-DS4H Motherboard - 52 - Options are : 3 (default), 1. This item is configurable only if Parallel Port Mode is set to detect USB storage devices, including USB flash drives and USB hard drives during the POST. (Default: Enabled) Onboard Serial Port 1 Enables...
Manual
Page 53
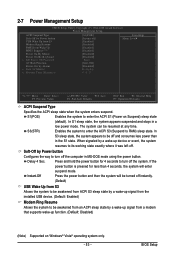
... a wake-up signal from the installed USB device. (Default: Enabled) Modem Ring Resume Allows the system to turn off ] [Enabled] [Disabled] [Enabled] [Enabled] [Disabled] [Disabled] Enter [Soft-Off] [Disabled] Everyday 0 : 0 : 0 Item Help Menu Level` KLJI: Move Enter: Select F5: Previous Values +/-/PU/PD: Value F10: Save F6: Fail-Safe Defaults ESC: Exit F1: General Help F7: Optimized Defaults ACPI Suspend Type Specifies the ACPI sleep state when the system enters suspend. 2-7 Power Management Setup CMOS Setup Utility-Copyright (C) 1984-2008 Award Software Power...
... a wake-up signal from the installed USB device. (Default: Enabled) Modem Ring Resume Allows the system to turn off ] [Enabled] [Disabled] [Enabled] [Enabled] [Disabled] [Disabled] Enter [Soft-Off] [Disabled] Everyday 0 : 0 : 0 Item Help Menu Level` KLJI: Move Enter: Select F5: Previous Values +/-/PU/PD: Value F10: Save F6: Fail-Safe Defaults ESC: Exit F1: General Help F7: Optimized Defaults ACPI Suspend Type Specifies the ACPI sleep state when the system enters suspend. 2-7 Power Management Setup CMOS Setup Utility-Copyright (C) 1984-2008 Award Software Power...

Manual
Page 57
... to control CPU fan speed. Reset Case Open Status Keeps or clears the record of CPU fan installed and sets the optimal CPU fan control mode. (Default) Voltage Sets Voltage mode for a 3-pin CPU fan. Enabled clears the record of the chassis intrusion detection device attached to Enabled. Current Voltage(V) Vcore/DDR2 1.8V/+3.3V/+12V Displays the current system voltages. Y ou can adjust the fan speed with EasyT une based on system requirements. This item is configurable only if CPU Smart FAN Control is not connected or fails. When CPU temperature...
... to control CPU fan speed. Reset Case Open Status Keeps or clears the record of CPU fan installed and sets the optimal CPU fan control mode. (Default) Voltage Sets Voltage mode for a 3-pin CPU fan. Enabled clears the record of the chassis intrusion detection device attached to Enabled. Current Voltage(V) Vcore/DDR2 1.8V/+3.3V/+12V Displays the current system voltages. Y ou can adjust the fan speed with EasyT une based on system requirements. This item is configurable only if CPU Smart FAN Control is not connected or fails. When CPU temperature...
Manual
Page 75
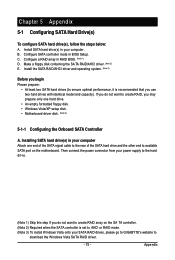
... available SATA port on the SA TA controller. (Note 2) Required when the SATA controller is set to AHCI or RAID mode. (Note 3) To install W indows Vista onto your power supply to the hard drive. (Note 1) Skip this step if you do not want to download the W indows Vista SATA RAID driver. - 75 - Then connect the power connector from your SATA RAID drives, please go to GIGABYTE's website to create RAID array on the motherboard. Configure a RAID array in BIOS Setup. Appendix...
... available SATA port on the SA TA controller. (Note 2) Required when the SATA controller is set to AHCI or RAID mode. (Note 3) To install W indows Vista onto your power supply to the hard drive. (Note 1) Skip this step if you do not want to download the W indows Vista SATA RAID driver. - 75 - Then connect the power connector from your SATA RAID drives, please go to GIGABYTE's website to create RAID array on the motherboard. Configure a RAID array in BIOS Setup. Appendix...
Manual
Page 76
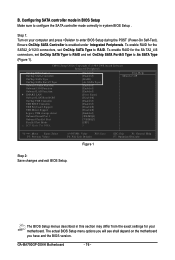
... RAID and set OnChip SATA Type to enter BIOS Setup during the POST (Power-On Self-Test). Configuring SATA controller mode in system BIOS Setup . CMOS Setup Utility-Copyright (C) 1984-2008 Award Software Integrated Peripherals OnChip IDE Channel OnChip SATA Controller OnChip SATA Type OnChip SATA Port4/5 Type Onboard Audio Function Onboard 1394 Function Onboard LAN Function ` SMART LAN Onboard LAN Boot ROM OnChip USB Controller USB EHCI Controller USB Keyboard Support USB Mouse Support Legacy USB storage detect Onboard Serial Port 1 Onboard Parallel Port Parallel Port Mode x ECP Mode Use...
... RAID and set OnChip SATA Type to enter BIOS Setup during the POST (Power-On Self-Test). Configuring SATA controller mode in system BIOS Setup . CMOS Setup Utility-Copyright (C) 1984-2008 Award Software Integrated Peripherals OnChip IDE Channel OnChip SATA Controller OnChip SATA Type OnChip SATA Port4/5 Type Onboard Audio Function Onboard 1394 Function Onboard LAN Function ` SMART LAN Onboard LAN Boot ROM OnChip USB Controller USB EHCI Controller USB Keyboard Support USB Mouse Support Legacy USB storage detect Onboard Serial Port 1 Onboard Parallel Port Parallel Port Mode x ECP Mode Use...
Manual
Page 81
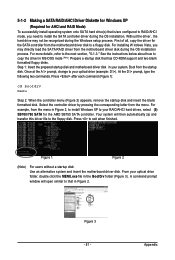
... RAID/AHCI hard drives, select (5) SB700/750 SATA for the AMD SB750 SATA controller. Boot from the menu. Select the controller driver by pressing the corresponding letter from the startup disk. Figure 1 Figure 2 (Note) For users without a startup disk: Use an alternative system and insert the motherboard driver disk. A command prompt window will then automatically zip and transfer this driver file to the floppy disk. First of all, copy the driver for the SATA controller from the motherboard driver disk...
... RAID/AHCI hard drives, select (5) SB700/750 SATA for the AMD SB750 SATA controller. Boot from the menu. Select the controller driver by pressing the corresponding letter from the startup disk. Figure 1 Figure 2 (Note) For users without a startup disk: Use an alternative system and insert the motherboard driver disk. A command prompt window will then automatically zip and transfer this driver file to the floppy disk. First of all, copy the driver for the SATA controller from the motherboard driver disk...
Manual
Page 82
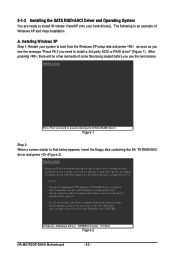
... adapter. S=Specify Additional Device ENTER=Continue F3=Exit Figure 2 GA-MA790GP-DS4H Motherboard - 82 - The following mass storage devices(s) * To specify additional SCSI adapters, CD-ROM drives, or special disk controllers for the following is an example of Windows XP and Vista installation. After pressing , there will load support for use with Windows, press ENTER. Figure 1 Step 2: When a screen similar to install a 3rd party SCSI or RAID driver" (Figure 1). Currently, Setup will be a few...
... adapter. S=Specify Additional Device ENTER=Continue F3=Exit Figure 2 GA-MA790GP-DS4H Motherboard - 82 - The following mass storage devices(s) * To specify additional SCSI adapters, CD-ROM drives, or special disk controllers for the following is an example of Windows XP and Vista installation. After pressing , there will load support for use with Windows, press ENTER. Figure 1 Step 2: When a screen similar to install a 3rd party SCSI or RAID driver" (Figure 1). Currently, Setup will be a few...
Manual
Page 91
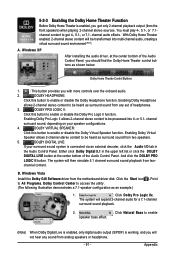
... Live is enabled, only digital audio output (S/PDIF) is working, and you will not hear any set of the Audio Control Panel. Enabling Dolby Pro Logic II allows 2-channel stereo content to be heard as surround sound from two speakers. 5. Windows Vista Install the Dolby GUI Software driver from analog speakers or headphone. - 91 - Appendix Enabling Dolby Headphone allows 2-channel stereo content to be transformed into 4- Enabling Dolby Virtual Speaker allows 2-channel stereo...
... Live is enabled, only digital audio output (S/PDIF) is working, and you will not hear any set of the Audio Control Panel. Enabling Dolby Pro Logic II allows 2-channel stereo content to be heard as surround sound from two speakers. 5. Windows Vista Install the Dolby GUI Software driver from analog speakers or headphone. - 91 - Appendix Enabling Dolby Headphone allows 2-channel stereo content to be transformed into 4- Enabling Dolby Virtual Speaker allows 2-channel stereo...


