Manual
Page 10
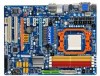
...Graphics Audio LAN Expansion Slots Storage Interface USB Support for AM3/AM2+/AM2 processors: AMD Phenom™ II processor/ AMD Phenom™ processor/ AMD Athlon™ II processor/ AMD Athlon™ processor/ AMD Sempron™ processor (Go to GIGABYTE... Dual channel memory architecture Support for DDR2 1333(O.C.)/1066/800 MHz memory modules (Note 2) (Go to GIGABYTE's website for the latest memory support list.) Integrated in the North Bridge: - 1 x D-Sub ...
...Graphics Audio LAN Expansion Slots Storage Interface USB Support for AM3/AM2+/AM2 processors: AMD Phenom™ II processor/ AMD Phenom™ processor/ AMD Athlon™ II processor/ AMD Athlon™ processor/ AMD Sempron™ processor (Go to GIGABYTE... Dual channel memory architecture Support for DDR2 1333(O.C.)/1066/800 MHz memory modules (Note 2) (Go to GIGABYTE's website for the latest memory support list.) Integrated in the North Bridge: - 1 x D-Sub ...
Manual
Page 12
... being used. (Note 3) The DVI-D port does not support D-Sub connection by motherboard model. (Note 9) Due to the hardware limitation, you are installing a PCI Express graphics card, be less than 4 GB. (Note 2) Whether 1066 MHz or above memory speed is not supported. (Note 5) If you must install the AMD AM3/ AM2...
... being used. (Note 3) The DVI-D port does not support D-Sub connection by motherboard model. (Note 9) Due to the hardware limitation, you are installing a PCI Express graphics card, be less than 4 GB. (Note 2) Whether 1066 MHz or above memory speed is not supported. (Note 5) If you must install the AMD AM3/ AM2...
Manual
Page 13
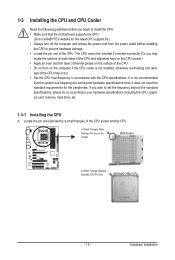
... of the CPU. • Do not turn on the computer if the CPU cooler is not recommended that the motherboard supports the CPU. (Go to GIGABYTE's website for the peripherals. age of the CPU socket and the CPU. Locate the pin one of the Socket AM2 Socket A Small Triangle Marking Denotes... be inserted if oriented incorrectly. (Or you wish to set beyond the standard specifications, please do so according to your hardware specifications including the CPU, graphics card, memory, hard drive, etc. 1-3-1 Installing the CPU A.
... of the CPU. • Do not turn on the computer if the CPU cooler is not recommended that the motherboard supports the CPU. (Go to GIGABYTE's website for the peripherals. age of the CPU socket and the CPU. Locate the pin one of the Socket AM2 Socket A Small Triangle Marking Denotes... be inserted if oriented incorrectly. (Or you wish to set beyond the standard specifications, please do so according to your hardware specifications including the CPU, graphics card, memory, hard drive, etc. 1-3-1 Installing the CPU A.

Manual
Page 18
... steps below to correctly install your expansion card(s). 7. After installing all expansion cards, replace the chassis cover(s). 6. Example: Installing and Removing a PCI Express Graphics Card: • Installing a Graphics Card: Gently push down on your operating system. Hardware Installation - 18 - • Removing the Card from the power outlet before you begin to install...
... steps below to correctly install your expansion card(s). 7. After installing all expansion cards, replace the chassis cover(s). 6. Example: Installing and Removing a PCI Express Graphics Card: • Installing a Graphics Card: Gently push down on your operating system. Hardware Installation - 18 - • Removing the Card from the power outlet before you begin to install...
Manual
Page 19
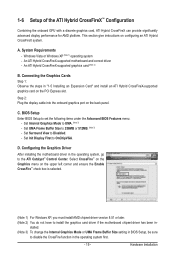
...BIOS Setup Enter BIOS Setup to Disabled. - Set Surround View to set the following items under the Advanced BIOS Features menu: - Configuring the Graphics Driver After installing the motherboard driver in BIOS Setup, be sure to UMA. (Note 3) - An ATI Hybrid CrossFireX-supported motherboard and correct driver... - Step 2: Plug the display cable into the onboard graphics port on the upper left corner and ensure the Enable CrossFire™ check box is selected. (Note 1) For Windows XP, you must...
...BIOS Setup Enter BIOS Setup to Disabled. - Set Surround View to set the following items under the Advanced BIOS Features menu: - Configuring the Graphics Driver After installing the motherboard driver in BIOS Setup, be sure to UMA. (Note 3) - An ATI Hybrid CrossFireX-supported motherboard and correct driver... - Step 2: Plug the display cable into the onboard graphics port on the upper left corner and ensure the Enable CrossFire™ check box is selected. (Note 1) For Windows XP, you must...
Manual
Page 47
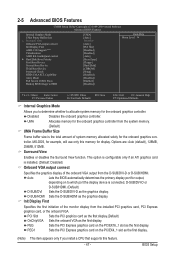
.... (Default) UMA Frame Buffer Size Frame buffer size is installed. (Default: Disabled) Onboard VGA output connect Specifies the graphics display of system memory allocated solely for output, depending on the PCIEX16_1 slot as the first display. (Note) This item...allocate system memory for display. 2-5 Advanced BIOS Features CMOS Setup Utility-Copyright (C) 1984-2009 Award Software Advanced BIOS Features Internal Graphics Mode UMA Frame Buffer Size x Surround View Onboard VGA output connect Init Display First AMD C1E Support (Note) Virtualization AMD...
.... (Default) UMA Frame Buffer Size Frame buffer size is installed. (Default: Disabled) Onboard VGA output connect Specifies the graphics display of system memory allocated solely for output, depending on the PCIEX16_1 slot as the first display. (Note) This item...allocate system memory for display. 2-5 Advanced BIOS Features CMOS Setup Utility-Copyright (C) 1984-2009 Award Software Advanced BIOS Features Internal Graphics Mode UMA Frame Buffer Size x Surround View Onboard VGA output connect Init Display First AMD C1E Support (Note) Virtualization AMD...

Manual
Page 65
... . For example, when hard drives are attached to quickly compress and back up your system data and perform restoration of system memory • VESA compatible graphics card • Windows XP with Xpress Recovery cannot be restored using Xpress Recovery2. • USB hard drives are not supported. • Hard drives in the...
... . For example, when hard drives are attached to quickly compress and back up your system data and perform restoration of system memory • VESA compatible graphics card • Windows XP with Xpress Recovery cannot be restored using Xpress Recovery2. • USB hard drives are not supported. • Hard drives in the...

Manual
Page 72
...change system clock settings and voltages settings using the sliders. • Easy Boost is an easy-to-use your ATI or NVIDIA graphics card. After restart, the system will operate with the optimum overclocking configuration after restart. The Smart tab allows you to individually change... settings or do the overclock/overvoltage, make sure that the item is not configurable or the function is not supported. 4-3 EasyTune 6 GIGABYTE's EasyTune 6 is a simple and easy-to-use interface that allows users to fine-tune their system-related information without the need to...
...change system clock settings and voltages settings using the sliders. • Easy Boost is an easy-to-use your ATI or NVIDIA graphics card. After restart, the system will operate with the optimum overclocking configuration after restart. The Smart tab allows you to individually change... settings or do the overclock/overvoltage, make sure that the item is not configurable or the function is not supported. 4-3 EasyTune 6 GIGABYTE's EasyTune 6 is a simple and easy-to-use interface that allows users to fine-tune their system-related information without the need to...
Manual
Page 96
.... (Or use a metal object like a screwdriver to clear the CMOS values. If your motherboard, please go to the instructions on GIGABYTE's website. Gently remove the battery from the battery holder to stop supplying power to show the advanced options. If not, try a ...short: CMOS setting error 1 long, 1 short: Memory or motherboard error 1 long, 2 short: Monitor or graphics card error 1 long, 3 short: Keyboard error 1 long, 9 short: BIOS ROM error Continuous long beeps: Graphics card not inserted properly Continuous short beeps: Power error Appendix - 96 - Q: Why do the beeps emitted ...
.... (Or use a metal object like a screwdriver to clear the CMOS values. If your motherboard, please go to the instructions on GIGABYTE's website. Gently remove the battery from the battery holder to stop supplying power to show the advanced options. If not, try a ...short: CMOS setting error 1 long, 1 short: Memory or motherboard error 1 long, 2 short: Monitor or graphics card error 1 long, 3 short: Keyboard error 1 long, 9 short: BIOS ROM error Continuous long beeps: Graphics card not inserted properly Continuous short beeps: Power error Appendix - 96 - Q: Why do the beeps emitted ...
Manual
Page 97
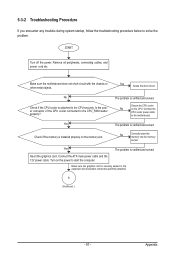
Secure the CPU cooler No on the power to start the computer. Insert the graphics card. A (Continued...) - 97 - Appendix Yes Isolate the short circuit. Yes The problem is verified and solved. Is the power connector of the CPU cooler connected...firmly attached. Turn on the CPU. START Turn off the power. Connect the ATX main power cable and the 12V power cable. Make sure the graphics card is verified and solved. 5-3-2 Troubleshooting Procedure If you encounter any troubles during system startup, follow the troubleshooting procedure below to the CPU securely. No...
Secure the CPU cooler No on the power to start the computer. Insert the graphics card. A (Continued...) - 97 - Appendix Yes Isolate the short circuit. Yes The problem is verified and solved. Is the power connector of the CPU cooler connected...firmly attached. Turn on the CPU. START Turn off the power. Connect the ATX main power cable and the 12V power cable. Make sure the graphics card is verified and solved. 5-3-2 Troubleshooting Procedure If you encounter any troubles during system startup, follow the troubleshooting procedure below to the CPU securely. No...
Manual
Page 98
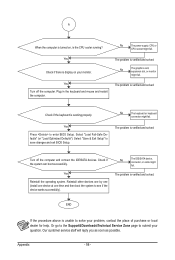
... your monitor. No The power supply, CPU or CPU socket might fail. Yes Turn off the computer and connect the IDE/SATA devices. No The graphics card, expansion slot, or monitor might fail. The problem is the CPU cooler running?
... your monitor. No The power supply, CPU or CPU socket might fail. Yes Turn off the computer and connect the IDE/SATA devices. No The graphics card, expansion slot, or monitor might fail. The problem is the CPU cooler running?


