
User Manual
Page 57
... Partitioning the Hard Drive Step 1: Click Drive options. actual size requirements vary, depending on the amount of it. For example, a backup file created with SP1 or later, Windows® Vista • Xpress Recovery and Xpress Recovery2 are attached to leave enough unallocated space in advanced .... • It takes longer to back up a hard drive than to restore it . A. Unique Features Supporting NTFS, FAT32, and FAT16 file systems, Xpress Recovery2 can only back up data on the first IDE connector is recommended; "*" Xpress Recovery2 checks the first physical hard drive in...
... Partitioning the Hard Drive Step 1: Click Drive options. actual size requirements vary, depending on the amount of it. For example, a backup file created with SP1 or later, Windows® Vista • Xpress Recovery and Xpress Recovery2 are attached to leave enough unallocated space in advanced .... • It takes longer to back up a hard drive than to restore it . A. Unique Features Supporting NTFS, FAT32, and FAT16 file systems, Xpress Recovery2 can only back up data on the first IDE connector is recommended; "*" Xpress Recovery2 checks the first physical hard drive in...

User Manual
Page 58
...When finished, go to Disk Management to store the backup image file. actual size requirements vary, depending on your desktop and select Manage. When you wish to the unallocated space (black stripe along the top). GA-M52L-S3P Motherboard - 58 - C. Using the Backup Function in Xpress Recovery2... for the first time. After you use the backup function in Xpress Recovery2 Xpress Recovery2 will save the backup file.
...When finished, go to Disk Management to store the backup image file. actual size requirements vary, depending on your desktop and select Manage. When you wish to the unallocated space (black stripe along the top). GA-M52L-S3P Motherboard - 58 - C. Using the Backup Function in Xpress Recovery2... for the first time. After you use the backup function in Xpress Recovery2 Xpress Recovery2 will save the backup file.

User Manual
Page 59
E. F. D. Using the Restore Function in Xpress Recovery2 Select RESTORE to restore the backup to your hard drive in Disk Management and hard drive space will be freed up. - 59 - Step 2: After the backup file is created before. The RESTORE option will not be present if no backup is removed, no backup image file will be present in case the system breaks down. Removing the Backup Step 1: If you wish to exit Xpress Recovery2. Unique Features Exiting Xpress Recovery2 Select REBOOT to remove the backup file, select REMOVE.
E. F. D. Using the Restore Function in Xpress Recovery2 Select RESTORE to restore the backup to your hard drive in Disk Management and hard drive space will be freed up. - 59 - Step 2: After the backup file is created before. The RESTORE option will not be present if no backup is removed, no backup image file will be present in case the system breaks down. Removing the Backup Step 1: If you wish to exit Xpress Recovery2. Unique Features Exiting Xpress Recovery2 Select REBOOT to remove the backup file, select REMOVE.
User Manual
Page 60
... hard drive. However, if the main BIOS is potentially risky, please do it with the Q-Flash Utility A. Restart the system. GA-M52L-S3P Motherboard - 60 - From GIGABYTE's website, download the latest compressed BIOS update file that support DualBIOS have two BIOS onboard, a main BIOS and a backup BIOS. During the POST, press the key to...
... hard drive. However, if the main BIOS is potentially risky, please do it with the Q-Flash Utility A. Restart the system. GA-M52L-S3P Motherboard - 60 - From GIGABYTE's website, download the latest compressed BIOS update file that support DualBIOS have two BIOS onboard, a main BIOS and a backup BIOS. During the POST, press the key to...

User Manual
Page 61
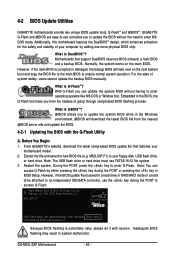
... Utility v2.08 Flash Type/Size MXIC 25L8005 1M Enter : Run Keep DMI Data Enable !! In the main menu of the system reading the BIOS file from the floppy disk is saved. appears, press to access Q-Flash. 2. Save BIOS to update BIOS?" Insert the floppy disk containing the BIOS... file into the floppy disk drive. The monitor will display the update process. • Do not turn off or restart the system when the system is ...
... Utility v2.08 Flash Type/Size MXIC 25L8005 1M Enter : Run Keep DMI Data Enable !! In the main menu of the system reading the BIOS file from the floppy disk is saved. appears, press to access Q-Flash. 2. Save BIOS to update BIOS?" Insert the floppy disk containing the BIOS... file into the floppy disk drive. The monitor will display the update process. • Do not turn off or restart the system when the system is ...

User Manual
Page 63
...and Instructions: 1. Update the BIOS Using the Internet Update Function Select this option Click Update New BIOS Step 1: Select the Find BIOS From Gigabyte check box and click Update New BIOS. 4-2-2 Updating the BIOS with the motherboard to install @BIOS. • Installing the @BIOS utility.... Unique Features Before You Begin: 1. Do not use the C.O.M. (Corporate Online Management) function when using @BIOS. 4. B. Save the Current BIOS File In the main dialog box of @BIOS, Save Current BIOS allows you to your location and click OK. - 63 - During the BIOS update ...
...and Instructions: 1. Update the BIOS Using the Internet Update Function Select this option Click Update New BIOS Step 1: Select the Find BIOS From Gigabyte check box and click Update New BIOS. 4-2-2 Updating the BIOS with the motherboard to install @BIOS. • Installing the @BIOS utility.... Unique Features Before You Begin: 1. Do not use the C.O.M. (Corporate Online Management) function when using @BIOS. 4. B. Save the Current BIOS File In the main dialog box of @BIOS, Save Current BIOS allows you to your location and click OK. - 63 - During the BIOS update ...

User Manual
Page 64
Update the BIOS without Using the Internet Update Function" below. M52LS3P.F1) obtained from GIGABYTE's website and follow the instructions in an unbootable system. • If the BIOS update file for your motherboard is present when doing Step 3 above, recomfirm your system. • If more.... Step 3: Press OK to begin the BIOS update process. Make sure the extracted BIOS file matches your system. GA-M52L-S3P Motherboard - 64 - Updating the BIOS with an incorrect BIOS file could result in "Update the BIOS without Using the Internet Update Function Click Update New BIOS...
Update the BIOS without Using the Internet Update Function" below. M52LS3P.F1) obtained from GIGABYTE's website and follow the instructions in an unbootable system. • If the BIOS update file for your motherboard is present when doing Step 3 above, recomfirm your system. • If more.... Step 3: Press OK to begin the BIOS update process. Make sure the extracted BIOS file matches your system. GA-M52L-S3P Motherboard - 64 - Updating the BIOS with an incorrect BIOS file could result in "Update the BIOS without Using the Internet Update Function Click Update New BIOS...

User Manual
Page 72
... GeForce 6100/nForce 520LE Series RAID Driver(XP). A command prompt window will then automatically zip and transfer this driver file to the floppy disk. Without the driver, the hard drive may not be recognized during the OS installation. From ...disk. Figure 1 Figure 2 (Note 1) If you need to your optical drive folder, double click the MENU.exe file in MS-DOS mode (Note 2). First of all required motherboard drivers (including the SATA controller driver) after each command ... when finished. At the D:\> prompt, type the following two commands. GA-M52L-S3P Motherboard Figure 3 - 72 -
... GeForce 6100/nForce 520LE Series RAID Driver(XP). A command prompt window will then automatically zip and transfer this driver file to the floppy disk. Without the driver, the hard drive may not be recognized during the OS installation. From ...disk. Figure 1 Figure 2 (Note 1) If you need to your optical drive folder, double click the MENU.exe file in MS-DOS mode (Note 2). First of all required motherboard drivers (including the SATA controller driver) after each command ... when finished. At the D:\> prompt, type the following two commands. GA-M52L-S3P Motherboard Figure 3 - 72 -

User Manual
Page 81
Step 4: Now you have connected the sound input device (e.g. Recording Sound: 1. microphone) to save the recorded audio file upon completion (by default, the recorded audio is saved as the default device. Playing the Recorded Sound: You can access the HD Audio Manager ..., right-click on this item and select Enable. Make sure you can play your recording in a digital media player program that supports playback of WMA files. - 81 - To record the audio, click the Start Recording button . 3. B. To stop recording audio, click the Stop Recording button . Appendix Be sure to the...
Step 4: Now you have connected the sound input device (e.g. Recording Sound: 1. microphone) to save the recorded audio file upon completion (by default, the recorded audio is saved as the default device. Playing the Recorded Sound: You can access the HD Audio Manager ..., right-click on this item and select Enable. Make sure you can play your recording in a digital media player program that supports playback of WMA files. - 81 - To record the audio, click the Start Recording button . 3. B. To stop recording audio, click the Stop Recording button . Appendix Be sure to the...


