
User Manual
Page 5
Chapter 3 Drivers Installation 45 3-1 Install Chipset Drivers 45 3-2 Software Application 46 3-3 Software Information 46 3-4 Hardware Information 47 3-5 Contact Us ...47 Chapter 4 Appendix 49 4-1 Unique Software Utilities 49 4-1-1 EasyTune 5 Introduction 49 4-1-2 Xpress Recovery Introduction 50 4-1-3 Flash BIOS Method Introduction 53 4-1-4 Serial ATA BIOS Setting Utility Introduction 62 4-1-5 2- / 4- / 6- / 8- Channel Audio Function Introduction 70 4-2 Troubleshooting 78 - 5 -
Chapter 3 Drivers Installation 45 3-1 Install Chipset Drivers 45 3-2 Software Application 46 3-3 Software Information 46 3-4 Hardware Information 47 3-5 Contact Us ...47 Chapter 4 Appendix 49 4-1 Unique Software Utilities 49 4-1-1 EasyTune 5 Introduction 49 4-1-2 Xpress Recovery Introduction 50 4-1-3 Flash BIOS Method Introduction 53 4-1-4 Serial ATA BIOS Setting Utility Introduction 62 4-1-5 2- / 4- / 6- / 8- Channel Audio Function Introduction 70 4-2 Troubleshooting 78 - 5 -

User Manual
Page 10
...Supports @BIOS Š Supports EasyTune 5 (Note 3) Overclocking Š Over Voltage via BIOS (CPU/ DDR/ VCC18/ VCC12/ AGP) Š Over Clock via cable) Š 1 front audio connector Š 1 IR connector Š 1 PS/2 keyboard port Š 1 PS/2 mouse port Onboard LAN Š Onboard RTL8100C chip (10/100 Mbit) Š 1 RJ 45 port... Š 1600MH/z system bus Š Supports core frequencies in your system, please install either one double-sided or two single-sided DDR400 memory modules. GA-K8U Motherboard - 10 - EasyTune 5 functions may vary depending on different motherboards.
...Supports @BIOS Š Supports EasyTune 5 (Note 3) Overclocking Š Over Voltage via BIOS (CPU/ DDR/ VCC18/ VCC12/ AGP) Š Over Clock via cable) Š 1 front audio connector Š 1 IR connector Š 1 PS/2 keyboard port Š 1 PS/2 mouse port Onboard LAN Š Onboard RTL8100C chip (10/100 Mbit) Š 1 RJ 45 port... Š 1600MH/z system bus Š Supports core frequencies in your system, please install either one double-sided or two single-sided DDR400 memory modules. GA-K8U Motherboard - 10 - EasyTune 5 functions may vary depending on different motherboards.

User Manual
Page 15
have a standard USB interface. Line In Devices like CD-ROM, walkman etc. can be connected to configure 2-/4-/6-/8-channel audio functioning. - 15 - MIC In Microphone can use audio software to MIC In jack. Hardware Installation USB port Before you connect your device(s) into USB connector(s), please make sure your OS or device(s) vendors. ...
have a standard USB interface. Line In Devices like CD-ROM, walkman etc. can be connected to configure 2-/4-/6-/8-channel audio functioning. - 15 - MIC In Microphone can use audio software to MIC In jack. Hardware Installation USB port Before you connect your device(s) into USB connector(s), please make sure your OS or device(s) vendors. ...

User Manual
Page 22
... pin assignments for the cable are buying support front audio connector, please contact your chassis must remove 5-6, 9-10 Jumper. Please note, you can have front audio connector. Pin No. Definition 1 1 CD-L 2 GND 3 GND 4 CD-R GA-K8U Motherboard - 22 - To find out if the ...chassis you must have the alternative of using front audio connector or of using rear audio connector to play sound. Also please ...
... pin assignments for the cable are buying support front audio connector, please contact your chassis must remove 5-6, 9-10 Jumper. Please note, you can have front audio connector. Pin No. Definition 1 1 CD-L 2 GND 3 GND 4 CD-R GA-K8U Motherboard - 22 - To find out if the ...chassis you must have the alternative of using front audio connector or of using rear audio connector to play sound. Also please ...

User Manual
Page 23
.... Hardware Installation Use SPDIF in feature only when your stereo system has digital input and output function. Be careful with the polarity of providing digital audio to external speakers or compressed AC3 data to work or even damage it. For optional SPDIF cable, please contact your local dealer. 1 2 5 6 Pin No. 1 2 3 4 5 6 Definition...
.... Hardware Installation Use SPDIF in feature only when your stereo system has digital input and output function. Be careful with the polarity of providing digital audio to external speakers or compressed AC3 data to work or even damage it. For optional SPDIF cable, please contact your local dealer. 1 2 5 6 Pin No. 1 2 3 4 5 6 Definition...

User Manual
Page 25
... 15 GPSB2 16 No Pin If you connect the game cables. English 18) GAME (Game Connector) This connector supports joystick, MIDI keyboard and other relate audio devices.
... 15 GPSB2 16 No Pin If you connect the game cables. English 18) GAME (Game Connector) This connector supports joystick, MIDI keyboard and other relate audio devices.

User Manual
Page 33
... value) Disabled Disable onboard Serial ATA function. BIOS Setup English 2-3 Integrated Peripherals CMOS Setup Utility-Copyright (C) 1984-2004 Award Software Integrated Peripherals OnChip Audio OnChip SATA OnChip SATA Mode On-Chip Primary IDE On-Chip Secondary IDE IDE DMA transfer access Onboard H/W LAN USB 1.1 Controller USB Keyboard Support...: Select F5: Previous Values +/-/PU/PD: Value F10: Save F6: Fail-Safe Defaults ESC: Exit F1: General Help F7: Optimized Defaults OnChip Audio Enabled Enable onboard AC97 audio function. (Default value) Disabled Disable onboard AC97...
... value) Disabled Disable onboard Serial ATA function. BIOS Setup English 2-3 Integrated Peripherals CMOS Setup Utility-Copyright (C) 1984-2004 Award Software Integrated Peripherals OnChip Audio OnChip SATA OnChip SATA Mode On-Chip Primary IDE On-Chip Secondary IDE IDE DMA transfer access Onboard H/W LAN USB 1.1 Controller USB Keyboard Support...: Select F5: Previous Values +/-/PU/PD: Value F10: Save F6: Fail-Safe Defaults ESC: Exit F1: General Help F7: Optimized Defaults OnChip Audio Enabled Enable onboard AC97 audio function. (Default value) Disabled Disable onboard AC97...
User Manual
Page 70
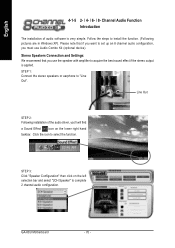
STEP 1: Connect the stereo speakers or earphone to select the function. Please note that you use Audio Combo Kit (optional device). Click the icon to "Line Out". GA-K8U Motherboard - 70 - Follow the steps to acquire the best sound effect if the stereo output is very simple. Stereo Speakers ...Connection and Settings: We recommend that if you want to set up an 8 channel audio configuration, you 'll will find a ...
STEP 1: Connect the stereo speakers or earphone to select the function. Please note that you use Audio Combo Kit (optional device). Click the icon to "Line Out". GA-K8U Motherboard - 70 - Follow the steps to acquire the best sound effect if the stereo output is very simple. Stereo Speakers ...Connection and Settings: We recommend that if you want to set up an 8 channel audio configuration, you 'll will find a ...

User Manual
Page 71
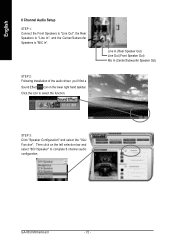
Line In (Rear Speaker Out) Line Out (Front Speaker Out) STEP 3: Click "Speaker Configuration" and select the "UAJ Function". Then click on the lower right hand taskbar. STEP 2: Following installation of the audio driver, you'll find a Sound Effect icon on the left selection bar and select "4CH Speaker" to complete 4 channel audio configuration. - 71 - Click the icon to "Line In". Appendix English 4 Channel Audio Setup STEP 1: Connect the Front Speakers to "Line Out", the Rear Speakers to select the function.
Line In (Rear Speaker Out) Line Out (Front Speaker Out) STEP 3: Click "Speaker Configuration" and select the "UAJ Function". Then click on the lower right hand taskbar. STEP 2: Following installation of the audio driver, you'll find a Sound Effect icon on the left selection bar and select "4CH Speaker" to complete 4 channel audio configuration. - 71 - Click the icon to "Line In". Appendix English 4 Channel Audio Setup STEP 1: Connect the Front Speakers to "Line Out", the Rear Speakers to select the function.
User Manual
Page 72
... left selection bar and select "6CH Speaker" to select the function. Then click on the lower right hand taskbar. GA-K8U Motherboard - 72 - Click the icon to complete 6 channel audio configuration. Line In (Rear Speaker Out) Line Out (Front Speaker Out) Mic In (Center/Subwoofer Speaker Out) STEP... 3: Click "Speaker Configuration" and select the "UAJ Function". English 6 Channel Audio Setup STEP 1: Connect the Front Speakers to "Line Out", the Rear Speakers to "Line In", and the Center/Subwoofer Speakers to "MIC In".
... left selection bar and select "6CH Speaker" to select the function. Then click on the lower right hand taskbar. GA-K8U Motherboard - 72 - Click the icon to complete 6 channel audio configuration. Line In (Rear Speaker Out) Line Out (Front Speaker Out) Mic In (Center/Subwoofer Speaker Out) STEP... 3: Click "Speaker Configuration" and select the "UAJ Function". English 6 Channel Audio Setup STEP 1: Connect the Front Speakers to "Line Out", the Rear Speakers to "Line In", and the Center/Subwoofer Speakers to "MIC In".

User Manual
Page 73
... 2: Connect the Surround-Kit to the SUR_CEN connector located on the back of 8 channel audio configuration: Method 1: Connect the front channels to the "Line Out" port located on the audio panel and the rear channels to the Surround-Kit "REAR R/L" port. Connect the center/...subwoofer channels to the Surround-Kit "SUB CENTER" and the R/L channels to use the Surround-Kit. English 8 Channel Audio Setup (requires Audio Combo Kit, optional device) : Audio Combo Kit includes a Surround-Kit and a SPDIF output cable (an optical and coaxial cable). STEP 3: There are two methods...
... 2: Connect the Surround-Kit to the SUR_CEN connector located on the back of 8 channel audio configuration: Method 1: Connect the front channels to the "Line Out" port located on the audio panel and the rear channels to the Surround-Kit "REAR R/L" port. Connect the center/...subwoofer channels to the Surround-Kit "SUB CENTER" and the R/L channels to use the Surround-Kit. English 8 Channel Audio Setup (requires Audio Combo Kit, optional device) : Audio Combo Kit includes a Surround-Kit and a SPDIF output cable (an optical and coaxial cable). STEP 3: There are two methods...

User Manual
Page 74
...GA-K8U Motherboard - 74 - STEP 5: Click "Speaker Configuration" and select both the "UAJ Function" and "Only Surround-Kit". Sound Effect Configuration: At the sound effect menu, users can adjust sound option settings as desired. Connect the center/subwoofer channels to the "MIC In" port located on the audio..." port. (This method requires UAJ function) STEP 4: Following installation of the audio driver, you'll find a Sound Effect icon on the left selection bar and select "8CH Speaker" to complete 8 channel audio configuration. Click the icon to the "Line In" port. English Method 2: ...
...GA-K8U Motherboard - 74 - STEP 5: Click "Speaker Configuration" and select both the "UAJ Function" and "Only Surround-Kit". Sound Effect Configuration: At the sound effect menu, users can adjust sound option settings as desired. Connect the center/subwoofer channels to the "MIC In" port located on the audio..." port. (This method requires UAJ function) STEP 4: Following installation of the audio driver, you'll find a Sound Effect icon on the left selection bar and select "8CH Speaker" to complete 8 channel audio configuration. Click the icon to the "Line In" port. English Method 2: ...

User Manual
Page 75
... Kit (refer to the motherboard. 3. Connect the SPDIF output device to the rear bracket of the 8 channel audio function and SPDIF out function, you want to use both of PC, and fix it with rear bracket could link to the "SPDIF output" connector (...
... Kit (refer to the motherboard. 3. Connect the SPDIF output device to the rear bracket of the 8 channel audio function and SPDIF out function, you want to use both of PC, and fix it with rear bracket could link to the "SPDIF output" connector (...

User Manual
Page 76
...devices properly. Please note that 3D audio function will appear as above. Jack-Sensing includes 2 parts: AUTO and MANUAL. A window will only appear when 3D audio inputs. Following is an example for Windows 98/ 98SE/ 2000/ ME. GA-K8U Motherboard - 76 - English Jack-Sensing... and UAJ Introduction Jack-Sensing provides audio connectors error-detection function. Auto-detecting: Please connect the devices to...
...devices properly. Please note that 3D audio function will appear as above. Jack-Sensing includes 2 parts: AUTO and MANUAL. A window will only appear when 3D audio inputs. Following is an example for Windows 98/ 98SE/ 2000/ ME. GA-K8U Motherboard - 76 - English Jack-Sensing... and UAJ Introduction Jack-Sensing provides audio connectors error-detection function. Auto-detecting: Please connect the devices to...

User Manual
Page 77
... Manual setting: If the device picture shows different from what you set . English If you set, please press "Manual Selection" to worry the audio device should be plug in Line-in / Line-out). That means users do not need to set wrong with the connectors, the warning message will... come out as right picture. UAJ Introduction UAJ (Universal Audio Jack) has a very smart feature: It will work perfectly after UAJ is activated. Enable UAJ function: You can click "UAJ Automatic" button to the...
... Manual setting: If the device picture shows different from what you set . English If you set, please press "Manual Selection" to worry the audio device should be plug in Line-in / Line-out). That means users do not need to set wrong with the connectors, the warning message will... come out as right picture. UAJ Introduction UAJ (Universal Audio Jack) has a very smart feature: It will work perfectly after UAJ is activated. Enable UAJ function: You can click "UAJ Automatic" button to the...


