
User Manual
Page 51
..." will auto-detect the right USB2.0 driver). - 51 - in Windows XP. English Chapter 3 Drivers Installation Pictures below are shown in "Universal Serial Bus controller" under Windows XP operating system, please use Windows Service Pack. After install Windows Service Pack, it will auto start and show a question mark "?" Drivers Installation Insert the driver CD-title that recommended to install...
..." will auto-detect the right USB2.0 driver). - 51 - in Windows XP. English Chapter 3 Drivers Installation Pictures below are shown in "Universal Serial Bus controller" under Windows XP operating system, please use Windows Service Pack. After install Windows Service Pack, it will auto start and show a question mark "?" Drivers Installation Insert the driver CD-title that recommended to install...
User Manual
Page 71
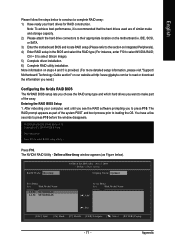
...complete RAID array: 1) Have ready your computer, wait until you see the RAID software prompting you want to press F10 before the window disappears. Define a New Array window appears (as part of the array. Striping Block: Optimal Free Disks Loc Disk Model Name 2.0.M ST3120026AS 2.1.M ST3120026AS Array Disks Loc ... setup in the BIOS and select the RAID type (For instance, enter F10 to their appropriate location on our website at http:\\www.gigabyte.com.tw to read or download the information you need.) Configuring the Nvidia RAID BIOS The NVRAID BIOS setup lets you choose the RAID...
...complete RAID array: 1) Have ready your computer, wait until you see the RAID software prompting you want to press F10 before the window disappears. Define a New Array window appears (as part of the array. Striping Block: Optimal Free Disks Loc Disk Model Name 2.0.M ST3120026AS 2.1.M ST3120026AS Array Disks Loc ... setup in the BIOS and select the RAID type (For instance, enter F10 to their appropriate location on our website at http:\\www.gigabyte.com.tw to read or download the information you need.) Configuring the Nvidia RAID BIOS The NVRAID BIOS setup lets you choose the RAID...
User Manual
Page 74
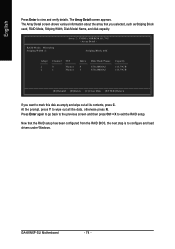
...Mode: Mirroring Striping Width : 1 Array 2 : NVIDIA MIRROR 111.79G - At the prompt, press Y to wipe out all its contents, press C. GA-K8NXP-SLI Motherboard - 74 - Press Enter again to go back to the previous screen and then press Ctrl + X to view and verify details. Striping Block:...data, otherwise press N. Array Detail - English Press Enter to exit the RAID setup. Now that you want to configure and load drivers under Windows. The Array Detail screen appears. The Array Detail screen shows various information about the array that the RAID setup has been configured ...
...Mode: Mirroring Striping Width : 1 Array 2 : NVIDIA MIRROR 111.79G - At the prompt, press Y to wipe out all its contents, press C. GA-K8NXP-SLI Motherboard - 74 - Press Enter again to go back to the previous screen and then press Ctrl + X to view and verify details. Striping Block:...data, otherwise press N. Array Detail - English Press Enter to exit the RAID setup. Now that you want to configure and load drivers under Windows. The Array Detail screen appears. The Array Detail screen shows various information about the array that the RAID setup has been configured ...
User Manual
Page 75
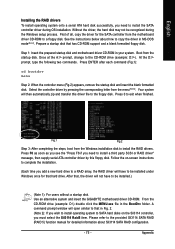
... new hard drive to a RAID array, the RAID driver will open similar to that has CD-ROM support and a blank formatted floppy disk. Use an alternative system and insert the GIGABYTE motherboard driver CD-ROM. A command prompt window will have to exit when finished. Fig.1 Fig.2 Step... 3: After completing the steps, boot from the Windows installation disk to the CD-ROM drive (example: D:\>). From the...
... new hard drive to a RAID array, the RAID driver will open similar to that has CD-ROM support and a blank formatted floppy disk. Use an alternative system and insert the GIGABYTE motherboard driver CD-ROM. A command prompt window will have to exit when finished. Fig.1 Fig.2 Step... 3: After completing the steps, boot from the Windows installation disk to the CD-ROM drive (example: D:\>). From the...
User Manual
Page 76
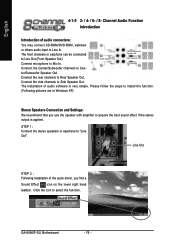
.... Line Out STEP 2 : Following installation of the audio driver, you use the speaker with amplifier to install the function. (Following pictures are in Windows XP) Stereo Speakers Connection and Settings: We recommend that you find a Sound Effect icon on the lower right hand taskbar. GA-K8NXP-SLI Motherboard - 76 - Line In Line Out (Front Speaker...
.... Line Out STEP 2 : Following installation of the audio driver, you use the speaker with amplifier to install the function. (Following pictures are in Windows XP) Stereo Speakers Connection and Settings: We recommend that you find a Sound Effect icon on the lower right hand taskbar. GA-K8NXP-SLI Motherboard - 76 - Line In Line Out (Front Speaker...


