User Manual
Page 1
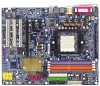
GA-K8NF-9 AMD Socket 939 Processor Motherboard User's Manual Rev. 1005 12ME-K8NF9-1005
GA-K8NF-9 AMD Socket 939 Processor Motherboard User's Manual Rev. 1005 12ME-K8NF9-1005

User Manual
Page 3
..., please carefully read or download the information you need. No part of Gigabyte. Specifications and features are legally registered to read the "Product User Manual". „ For detailed information related to Gigabyte's unique features, please go to the "Technology Guide" section on Gigabyte's website to their respective companies. For more product details, please click...
..., please carefully read or download the information you need. No part of Gigabyte. Specifications and features are legally registered to read the "Product User Manual". „ For detailed information related to Gigabyte's unique features, please go to the "Technology Guide" section on Gigabyte's website to their respective companies. For more product details, please click...
User Manual
Page 9
...motherboard or any metal leads or connectors. 3. To prevent damage to the motherboard, please do not allow screws to come in the user manual. 3. If you are no leftover screws or metal components placed on an uneven surface. 7. Product determined to installation, please follow the ...can lead to damage to system components as well as physical harm to the user. 8. Installation Notices 1. Thus, prior to be an unofficial Gigabyte product. - 9 - Damage due to natural disaster, accident or human cause. 2. Please turn off before unplugging the power supply connector from the...
...motherboard or any metal leads or connectors. 3. To prevent damage to the motherboard, please do not allow screws to come in the user manual. 3. If you are no leftover screws or metal components placed on an uneven surface. 7. Product determined to installation, please follow the ...can lead to damage to system components as well as physical harm to the user. 8. Installation Notices 1. Thus, prior to be an unofficial Gigabyte product. - 9 - Damage due to natural disaster, accident or human cause. 2. Please turn off before unplugging the power supply connector from the...
User Manual
Page 13
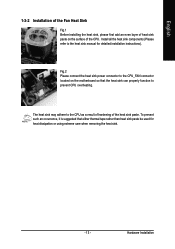
Hardware Installation Fig.2 Please connect the heat sink power connector to prevent CPU overheating. The heat sink may adhere to the heat sink manual for heat dissipation or using extreme care when removing the heat sink. - 13 - English 1-3-2 Installation of the Fan Heat Sink Fig.1 Before installing the heat ...
Hardware Installation Fig.2 Please connect the heat sink power connector to prevent CPU overheating. The heat sink may adhere to the heat sink manual for heat dissipation or using extreme care when removing the heat sink. - 13 - English 1-3-2 Installation of the Fan Heat Sink Fig.1 Before installing the heat ...

User Manual
Page 32
...BIOS to Sat, determined by the BIOS and is , , , . GA-K8NF-9 Motherboard - 32 - IDE Channel 1 Master/Slave IDE devices setup. The four options are used and the system will skip the automatic • Manual detection step and allow for automatic device detection. Week Month The week, ...F7: Optimized Defaults F1: General Help Date The date format is display only The month, Jan. IDE Channel 0 Master/Slave ; You can manually input the correct settings. English 2-1 Standard CMOS Features Date (mm:dd:yy) Time (hh:mm:ss) CMOS Setup Utility-Copyright (C) 1984...
...BIOS to Sat, determined by the BIOS and is , , , . GA-K8NF-9 Motherboard - 32 - IDE Channel 1 Master/Slave IDE devices setup. The four options are used and the system will skip the automatic • Manual detection step and allow for automatic device detection. Week Month The week, ...F7: Optimized Defaults F1: General Help Date The date format is display only The month, Jan. IDE Channel 0 Master/Slave ; You can manually input the correct settings. English 2-1 Standard CMOS Features Date (mm:dd:yy) Time (hh:mm:ss) CMOS Setup Utility-Copyright (C) 1984...

User Manual
Page 37
... value) 3E8/IRQ4 Enable onboard IrDA port and address is 3E8/IRQ4. 2E8/IRQ3 Disabled Enable onboard IrDA port and address is 2F8/IRQ3. And manually set "NV SATA2 class code" to 0104. USB Memory Type SHADOW Set USB memory type to SHADOW. (Default value) Base Memory(640K)Set USB memory...
... value) 3E8/IRQ4 Enable onboard IrDA port and address is 3E8/IRQ4. 2E8/IRQ3 Disabled Enable onboard IrDA port and address is 2F8/IRQ3. And manually set "NV SATA2 class code" to 0104. USB Memory Type SHADOW Set USB memory type to SHADOW. (Default value) Base Memory(640K)Set USB memory...

User Manual
Page 41
... automatically. Users can adjust the fan speed with Easy Tune based on their requirements. (Note) The CPU fan runs at the FAQ section on GIGABYTE's website. - 41 - BIOS Setup Whether the CPU Smart FAN Control function is enabled, CPU fan will depend on CPU temperature. For more ...detailed information please check at full speed when both CPU Smart FAN Control and CPU FAN Manual Control are disabled. CPU Smart FAN Control (Note) Disabled Disable this function. (Default value) Enabled When this function. (Default value) CPU ...
... automatically. Users can adjust the fan speed with Easy Tune based on their requirements. (Note) The CPU fan runs at the FAQ section on GIGABYTE's website. - 41 - BIOS Setup Whether the CPU Smart FAN Control function is enabled, CPU fan will depend on CPU temperature. For more ...detailed information please check at full speed when both CPU Smart FAN Control and CPU FAN Manual Control are disabled. CPU Smart FAN Control (Note) Disabled Disable this function. (Default value) Enabled When this function. (Default value) CPU ...
User Manual
Page 42
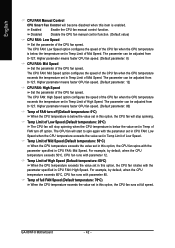
... set in CPU FAN: Low Speed when the CPU temperature exceeds the value set in Temp Limit of Mid Speed. Disabled Disable the CPU fan manual control function. (Default value) CPU FAN: Low Speed Set the parameter of the CPU fan speed. The parameter can be adjusted from 0~127. The...CPU temperature exceeds the value set in this option, the CPU fan rotates with the parameter specified in CPU FAN: Mid Speed. GA-K8NF-9 Motherboard - 42 - English CPU FAN Manual Control CPU Smart Fan Control will become disabled when this item is below the value set in CPU FAN: High Speed. Temp ...
... set in CPU FAN: Low Speed when the CPU temperature exceeds the value set in Temp Limit of Mid Speed. Disabled Disable the CPU fan manual control function. (Default value) CPU FAN: Low Speed Set the parameter of the CPU fan speed. The parameter can be adjusted from 0~127. The...CPU temperature exceeds the value set in this option, the CPU fan rotates with the parameter specified in CPU FAN: Mid Speed. GA-K8NF-9 Motherboard - 42 - English CPU FAN Manual Control CPU Smart Fan Control will become disabled when this item is below the value set in CPU FAN: High Speed. Temp ...

User Manual
Page 73
Jack-Sensing includes 2 parts: AUTO and MANUAL. English Jack-Sensing Introduction Jack-Sensing provides audio connectors error-detection function. (Note) Install Microsoft DirectX8.1 or later version before to MIC In jack. Appendix ...
Jack-Sensing includes 2 parts: AUTO and MANUAL. English Jack-Sensing Introduction Jack-Sensing provides audio connectors error-detection function. (Note) Install Microsoft DirectX8.1 or later version before to MIC In jack. Appendix ...

User Manual
Page 74
GA-K8NF-9 Motherboard - 74 - English If you set, please press "Manual Selection" to set wrong with the connectors, the warning message will come out as right picture. Manual setting: If the device picture shows different from what you set .
GA-K8NF-9 Motherboard - 74 - English If you set, please press "Manual Selection" to set wrong with the connectors, the warning message will come out as right picture. Manual setting: If the device picture shows different from what you set .
User Manual
Page 75
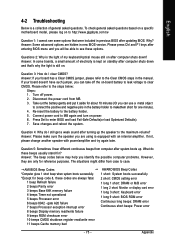
... one minute). 4. Appendix Please press Ctrl and F1 keys after turning up . If your board has a Clear CMOS jumper, please refer to http://www.gigabyte.com.tw Question 1: I still get a weak sound after entering BIOS menu and you can use a metal object to connect the positive and negative pins ...in the manual. Take out the battery gently and put it aside for about 10 minutes (Or you identify the possible computer problems. However, they are always fatal...
... one minute). 4. Appendix Please press Ctrl and F1 keys after turning up . If your board has a Clear CMOS jumper, please refer to http://www.gigabyte.com.tw Question 1: I still get a weak sound after entering BIOS menu and you can use a metal object to connect the positive and negative pins ...in the manual. Take out the battery gently and put it aside for about 10 minutes (Or you identify the possible computer problems. However, they are always fatal...


