
User Manual
Page 37
.... (Default value) Disable IDE Prefetch mode. Onboard Serial Port 1 Auto 3F8/IRQ4 BIOS will automatically setup the IrDA port address. If your SATA hard drive is connected to the SATA0 or SATA1 connector , please set "NV SATA1 class code" to 0104. Disabled Disable this function. (Default... onboard Serial port 1 and address is 3BC/IRQ7. (Note) When using driver version 1.2, please enable "NV IDE/SATA RAID function" if you wish to base memory(640K). English NV SATA 2 Primary RAID Enabled Enable 2nd SATA primary RAID function. USB Memory Type SHADOW Set USB memory type to SHADOW....
.... (Default value) Disable IDE Prefetch mode. Onboard Serial Port 1 Auto 3F8/IRQ4 BIOS will automatically setup the IrDA port address. If your SATA hard drive is connected to the SATA0 or SATA1 connector , please set "NV SATA1 class code" to 0104. Disabled Disable this function. (Default... onboard Serial port 1 and address is 3BC/IRQ7. (Note) When using driver version 1.2, please enable "NV IDE/SATA RAID function" if you wish to base memory(640K). English NV SATA 2 Primary RAID Enabled Enable 2nd SATA primary RAID function. USB Memory Type SHADOW Set USB memory type to SHADOW....

User Manual
Page 52
...press F9 during system power-on PATA and SATA IDE controllers. After the steps above are completed, subsequent access to back up data on hard disks on . . . Intel 945 BIOS for the first time, it will stay permanent in your CD-ROM drive. GA-K8NF-9 Motherboard - 52 - Supporting Microsoft operating ...corner of the screen. Save the settings and exit the BIOS Setup. Insert the provided driver CD into your hard disk. System storage capacity and the reading/writing speed of OS and all required drivers as well as software. It is designed to enter Xpress Recovery2 without the CD-ROM...
...press F9 during system power-on PATA and SATA IDE controllers. After the steps above are completed, subsequent access to back up data on hard disks on . . . Intel 945 BIOS for the first time, it will stay permanent in your CD-ROM drive. GA-K8NF-9 Motherboard - 52 - Supporting Microsoft operating ...corner of the screen. Save the settings and exit the BIOS Setup. Insert the provided driver CD into your hard disk. System storage capacity and the reading/writing speed of OS and all required drivers as well as software. It is designed to enter Xpress Recovery2 without the CD-ROM...

User Manual
Page 53
...- mended but the actual space is dependent on Nvidia chipsets, BIOS update is no backup file.) 2. BACKUP: Back up data from the driver CD before data backup. 2. Limitations: 1. On a few motherboards based on the size of Xpress Recovery2 1. REMOVE: Remove previously-created backup... is required for the backup file must be solved by BIOS update) GA-K8U GA-K8NXP-9 GA-8N-SLI Royal GA-K8U-9 GA-K8N Ultra-9 GA-8N-SLI Pro GA-K8NXP-SLI GA-K8NF-9 (PCB Ver. 1.0) GA-8N-SLI GA-K8N Ultra-SLI GA-K8NE (PCB Ver. 1.0) GA-K8N Pro-SLI GA-K8NMF-9 - 53 - SATA IDE channel 3 f.
...- mended but the actual space is dependent on Nvidia chipsets, BIOS update is no backup file.) 2. BACKUP: Back up data from the driver CD before data backup. 2. Limitations: 1. On a few motherboards based on the size of Xpress Recovery2 1. REMOVE: Remove previously-created backup... is required for the backup file must be solved by BIOS update) GA-K8U GA-K8NXP-9 GA-8N-SLI Royal GA-K8U-9 GA-K8N Ultra-9 GA-8N-SLI Pro GA-K8NXP-SLI GA-K8NF-9 (PCB Ver. 1.0) GA-8N-SLI GA-K8N Ultra-SLI GA-K8NE (PCB Ver. 1.0) GA-K8N Pro-SLI GA-K8NMF-9 - 53 - SATA IDE channel 3 f.

User Manual
Page 64
...F10 to select Silicon Image). 5) Complete driver installation. 6) Complete RAID utility installation.... ... The NVIDIA RAID Utility - Define a New Array - IDE, SCSI, or SATA. 3) Enter the motherboard BIOS and locate RAID setup (Please refer to press F10.... Del [ESC] Quit [F6] Back [F7] Finish [TAB] Navigate [ ] Select [ENTER] Popup GA-K8NF-9 Motherboard - 64 - Press F10. English Please follow the steps below ). Entering the RAID BIOS Setup ... detailed setup information, please visit our website at http:\\www.gigabyte.com.tw to read or download the information you need.) Configuring...
...F10 to select Silicon Image). 5) Complete driver installation. 6) Complete RAID utility installation.... ... The NVIDIA RAID Utility - Define a New Array - IDE, SCSI, or SATA. 3) Enter the motherboard BIOS and locate RAID setup (Please refer to press F10.... Del [ESC] Quit [F6] Back [F7] Finish [TAB] Navigate [ ] Select [ENTER] Popup GA-K8NF-9 Motherboard - 64 - Press F10. English Please follow the steps below ). Entering the RAID BIOS Setup ... detailed setup information, please visit our website at http:\\www.gigabyte.com.tw to read or download the information you need.) Configuring...
User Manual
Page 68
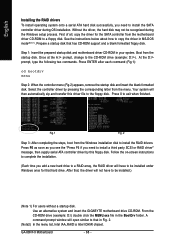
...startup disk. Use an alternative system and insert the GIGABYTE motherboard drive CD-ROM. From the CD-ROM drive (example: D:\) double click the MENU.exe file in MS-DOS mode(Note 1). GA-K8NF-9 Motherboard - 68 - Step 1: Insert the prepared startup disk and motherboard driver CD-ROM in Fig. 2. (Note2) In the... the startup disk and insert the blank formatted disk. Press F6 as soon as you see the "Press F6 if you need to install the SATA controller driver during the Windows setup process. Press 0 to exit when finished. (Note 2) Fig.1 Fig. 2 Step 3: After completing the steps, boot from...
...startup disk. Use an alternative system and insert the GIGABYTE motherboard drive CD-ROM. From the CD-ROM drive (example: D:\) double click the MENU.exe file in MS-DOS mode(Note 1). GA-K8NF-9 Motherboard - 68 - Step 1: Insert the prepared startup disk and motherboard driver CD-ROM in Fig. 2. (Note2) In the... the startup disk and insert the blank formatted disk. Press F6 as soon as you see the "Press F6 if you need to install the SATA controller driver during the Windows setup process. Press 0 to exit when finished. (Note 2) Fig.1 Fig. 2 Step 3: After completing the steps, boot from...


