User Manual
Page 16
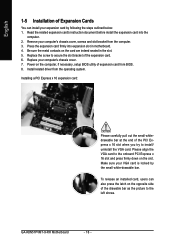
...indeed seated in motherboard. 4. To release an installed card, users can install your VGA card is locked by following the steps outlined below: 1. GA-K8N51PVMT-9-RH Motherboard - 16 - Press the expansion card firmly into the computer. 2. Make sure your expansion card by the small white-drawable bar. Be ...the end of the PCI Express x 16 slot when you try to secure the slot bracket of the expansion card. 6. Install related driver from the operating system. Replace the screw to install/ uninstall the VGA card. Read the related expansion card's instruction document before install the...
...indeed seated in motherboard. 4. To release an installed card, users can install your VGA card is locked by following the steps outlined below: 1. GA-K8N51PVMT-9-RH Motherboard - 16 - Press the expansion card firmly into the computer. 2. Make sure your expansion card by the small white-drawable bar. Be ...the end of the PCI Express x 16 slot when you try to secure the slot bracket of the expansion card. 6. Install related driver from the operating system. Replace the screw to install/ uninstall the VGA card. Read the related expansion card's instruction document before install the...

User Manual
Page 22
English 6) IDE1 / IDE2 (IDE Connector) An IDE device connects to work properly. 1 7 7 1 Pin No. 1 2 3 4 5 6 7 Definition GND TXP TXN GND RXN RXP GND GA-K8N51PVMT-9-RH Motherboard - 22 - Please refer to the BIOS setting for information on settings, please refer to the instructions located on one IDE cable, and the single ... nForce 430) SATA 3Gb/s can connect to one IDE device as Master and the other as Slave (for the SATA 3Gb/s and install the proper driver in order to the computer via an IDE connector.
English 6) IDE1 / IDE2 (IDE Connector) An IDE device connects to work properly. 1 7 7 1 Pin No. 1 2 3 4 5 6 7 Definition GND TXP TXN GND RXN RXP GND GA-K8N51PVMT-9-RH Motherboard - 22 - Please refer to the BIOS setting for information on settings, please refer to the instructions located on one IDE cable, and the single ... nForce 430) SATA 3Gb/s can connect to one IDE device as Master and the other as Slave (for the SATA 3Gb/s and install the proper driver in order to the computer via an IDE connector.

User Manual
Page 50
You can click an item to install it. 3-3 Software Information This page lists the contents of software and drivers in this CD-title. English 3-2 Software Application This page displays all the tools that GIGABYTE developed and some free software. GA-K8N51PVMT-9-RH Motherboard - 50 -
You can click an item to install it. 3-3 Software Information This page lists the contents of software and drivers in this CD-title. English 3-2 Software Application This page displays all the tools that GIGABYTE developed and some free software. GA-K8N51PVMT-9-RH Motherboard - 50 -

User Manual
Page 52
... NTSC/PAL TV Projector Step 1: (The following steps to configure the driver settings. Select nView Display Settings from the side menu and select HDTV from the Current display list. Step 2: Click the GeForce 6150 tab when advanced properties dialog box appears. GA-K8N51PVMT-9-RH Motherboard - 52 - Step 3: Right-click on the HDTV icon and... the video adapter according to the corresponding jack, then refer to the following procedure uses HDTV setup as an example) After installation of the motherboard driver, rightclick on your HDTV.
... NTSC/PAL TV Projector Step 1: (The following steps to configure the driver settings. Select nView Display Settings from the side menu and select HDTV from the Current display list. Step 2: Click the GeForce 6150 tab when advanced properties dialog box appears. GA-K8N51PVMT-9-RH Motherboard - 52 - Step 3: Right-click on the HDTV icon and... the video adapter according to the corresponding jack, then refer to the following procedure uses HDTV setup as an example) After installation of the motherboard driver, rightclick on your HDTV.

User Manual
Page 54
...any key to startup XpressRecovery2..... Boot from CD-ROM for the first time, it will appear in the bottom left corner of the screen. GA-K8N51PVMT-9-RH Motherboard - 54 - Supporting Microsoft operating systems including Windows XP/2000/NT/98/Me and DOS, and file systems including FAT16, FAT32, and...1984-2006, Award Software, Inc. After Xpress Recovery2 is able to back up data on hard disks on . . . Insert the provided driver CD into your hard disk. System storage capacity and the reading/writing speed of system memory 3. After the steps above are completed, subsequent access...
...any key to startup XpressRecovery2..... Boot from CD-ROM for the first time, it will appear in the bottom left corner of the screen. GA-K8N51PVMT-9-RH Motherboard - 54 - Supporting Microsoft operating systems including Windows XP/2000/NT/98/Me and DOS, and file systems including FAT16, FAT32, and...1984-2006, Award Software, Inc. After Xpress Recovery2 is able to back up data on hard disks on . . . Insert the provided driver CD into your hard disk. System storage capacity and the reading/writing speed of system memory 3. After the steps above are completed, subsequent access...

User Manual
Page 72
... a startup disk: Use an alternative system and insert the GIGABYTE motherboard driver CD-ROM. A command prompt window will then automatically zip and transfer this driver file to the CD-ROM drive (example: D:\>). First of all, copy the driver for the SATA controller from the menu in MS-DOS mode...exe file in your system. See the instructions below about how to exit when finished. Press 0 to copy the driver in Figure 13, press J to select (J) nVIDIA C51 Series Raid (XP) if you need to install Windows XP. Boot from the menu. GA-K8N51PVMT-9-RH Motherboard Figure 14 - 72 -
... a startup disk: Use an alternative system and insert the GIGABYTE motherboard driver CD-ROM. A command prompt window will then automatically zip and transfer this driver file to the CD-ROM drive (example: D:\>). First of all, copy the driver for the SATA controller from the menu in MS-DOS mode...exe file in your system. See the instructions below about how to exit when finished. Press 0 to copy the driver in Figure 13, press J to select (J) nVIDIA C51 Series Raid (XP) if you need to install Windows XP. Boot from the menu. GA-K8N51PVMT-9-RH Motherboard Figure 14 - 72 -

User Manual
Page 74
.... The screen will appear. Select the SCSI Adapter you want to configure a SCSI Adapter for use with Windows, press ENTER. NVIDIA RAID CLASS DRIVER (required) NVIDIA NForce Storage Controller (required) ENTER=Select F3=Exit Figure 17 Windows Setup Setup will load support for the following list, or press... ESC to return to Figure 17 below will return to select NVIDIA RAID CLASS DRIVER* (Figure 17) and press ENTER. English Step 3: If Setup correctly recognizes the driver in Figure 17. GA-K8N51PVMT-9-RH Motherboard - 74 -
.... The screen will appear. Select the SCSI Adapter you want to configure a SCSI Adapter for use with Windows, press ENTER. NVIDIA RAID CLASS DRIVER (required) NVIDIA NForce Storage Controller (required) ENTER=Select F3=Exit Figure 17 Windows Setup Setup will load support for the following list, or press... ESC to return to Figure 17 below will return to select NVIDIA RAID CLASS DRIVER* (Figure 17) and press ENTER. English Step 3: If Setup correctly recognizes the driver in Figure 17. GA-K8N51PVMT-9-RH Motherboard - 74 -

User Manual
Page 76
Solutions 1: Use the NVRAID tool (nForce Driver Version 5.xx) to convert the boot volume to enter system BIOS Setup during POST (Power-On Self Test). Step 2: After system restarts, press Del to a ... RAID [Disabled] Disabled Disabled Disabled Disabled Item Help Menu Level : Move Enter: Select F5: Previous Values +/-/PU/PD: Value F10: Save F6: Fail-Safe Defaults GA-K8N51PVMT-9-RH Motherboard Figure 22 - 76 - ESC: Exit F1: General Help F7: Optimized Defaults There are the detailed step-by-step instructions: Step 1: Install Windows 2000 onto...
Solutions 1: Use the NVRAID tool (nForce Driver Version 5.xx) to convert the boot volume to enter system BIOS Setup during POST (Power-On Self Test). Step 2: After system restarts, press Del to a ... RAID [Disabled] Disabled Disabled Disabled Disabled Item Help Menu Level : Move Enter: Select F5: Previous Values +/-/PU/PD: Value F10: Save F6: Fail-Safe Defaults GA-K8N51PVMT-9-RH Motherboard Figure 22 - 76 - ESC: Exit F1: General Help F7: Optimized Defaults There are the detailed step-by-step instructions: Step 1: Install Windows 2000 onto...

User Manual
Page 78
... CD, refer to install Windows 2000 Service Pack 3 or 4, RAID is still supported on Windows 2000. English Step 5: Install the NVIDIA nForce Driver Package while in striping mode) that includes Windows 2000 and Service Pack 3 or Service Pack 4 fixes integrated in a bootable format. GA-K8N51PVMT-9-RH Motherboard - 78 - Go to create a bootable RAID volume.
... CD, refer to install Windows 2000 Service Pack 3 or 4, RAID is still supported on Windows 2000. English Step 5: Install the NVIDIA nForce Driver Package while in striping mode) that includes Windows 2000 and Service Pack 3 or Service Pack 4 fixes integrated in a bootable format. GA-K8N51PVMT-9-RH Motherboard - 78 - Go to create a bootable RAID volume.

User Manual
Page 80
Choose Headphone or Line Out depending on the device connected and click OK. GA-K8N51PVMT-9-RH Motherboard - 80 - STEP 3: After a speaker or headphone is connected. The 2-channel audio setup is completed. 4 Channel Audio Setup STEP 1 : After installation of the audio driver, you should find an Audio Manager icon in your system tray (you what type...
Choose Headphone or Line Out depending on the device connected and click OK. GA-K8N51PVMT-9-RH Motherboard - 80 - STEP 3: After a speaker or headphone is connected. The 2-channel audio setup is completed. 4 Channel Audio Setup STEP 1 : After installation of the audio driver, you should find an Audio Manager icon in your system tray (you what type...

User Manual
Page 82
... speaker connected (8-channel audio consists of equipment is completed. STEP 2: In the Audio Control Panel, click the Audio I/O tab. GA-K8N51PVMT-9-RH Motherboard - 82 - English 8 Channel Audio Setup STEP 1 : After installation of the audio driver, you should find an Audio Manager icon in your system tray (you what type of Front Speaker Out (Line...
... speaker connected (8-channel audio consists of equipment is completed. STEP 2: In the Audio Control Panel, click the Audio I/O tab. GA-K8N51PVMT-9-RH Motherboard - 82 - English 8 Channel Audio Setup STEP 1 : After installation of the audio driver, you should find an Audio Manager icon in your system tray (you what type of Front Speaker Out (Line...


