Manual
Page 4
... Box Contents...6 Optional Items...6 GA-H67MA-D2H Motherboard Layout 7 GA-H67MA-D2H Motherboard Block Diagram 8 Chapter 1 Hardware Installation 9 1-1 Installation Precautions 9 1-2 Product Specifications 10 1-3 Installing the CPU and CPU Cooler 13 1-3-1 Installing the CPU 13 1-3-2 Installing the CPU Cooler 15 1-4 Installing the Memory 16 1-4-1 Dual Channel Memory Configuration 16 1-4-2 Installing a Memory 17 1-5 Installing an Expansion Card 18 1-6 Back Panel Connectors 19 1-7 Internal Connectors 21 Chapter 2 BIOS Setup 29 2-1 Startup Screen 30 2-2 The Main Menu 31 2-3 MB...
... Box Contents...6 Optional Items...6 GA-H67MA-D2H Motherboard Layout 7 GA-H67MA-D2H Motherboard Block Diagram 8 Chapter 1 Hardware Installation 9 1-1 Installation Precautions 9 1-2 Product Specifications 10 1-3 Installing the CPU and CPU Cooler 13 1-3-1 Installing the CPU 13 1-3-2 Installing the CPU Cooler 15 1-4 Installing the Memory 16 1-4-1 Dual Channel Memory Configuration 16 1-4-2 Installing a Memory 17 1-5 Installing an Expansion Card 18 1-6 Back Panel Connectors 19 1-7 Internal Connectors 21 Chapter 2 BIOS Setup 29 2-1 Startup Screen 30 2-2 The Main Menu 31 2-3 MB...

Manual
Page 10
...-D port, supporting a maximum resolution of 1920x1200 * The DVI-D port does not support D-Sub connection by adapter. - 1 x HDMI port, supporting a maximum resolution of 1920x1200 Realtek ALC892 codec High Definition Audio 2/4/5.1/7.1-channel Support for SATA RAID 0, RAID 1, RAID 5, and RAID 10 * When a RAID set is installed, the actual memory size displayed will be sure to install it in the LGA1155 package (Go to GIGABYTE's website for the latest CPU support list L3 cache varies with CPU Chipset Intel® H67 Express Chipset Memory w Onboard Graphics...
...-D port, supporting a maximum resolution of 1920x1200 * The DVI-D port does not support D-Sub connection by adapter. - 1 x HDMI port, supporting a maximum resolution of 1920x1200 Realtek ALC892 codec High Definition Audio 2/4/5.1/7.1-channel Support for SATA RAID 0, RAID 1, RAID 5, and RAID 10 * When a RAID set is installed, the actual memory size displayed will be sure to install it in the LGA1155 package (Go to GIGABYTE's website for the latest CPU support list L3 cache varies with CPU Chipset Intel® H67 Express Chipset Memory w Onboard Graphics...

Manual
Page 16
... the specifications and capacity of the same capacity, brand, speed, and chips be used . (Go to insert the memory, switch the direction. 1-4-1 Dual Channel Memory Configuration This motherboard provides two DDR3 memory sockets and supports Dual Channel Technology. When enabling Dual Channel mode with two memory modules, it is recommended that the motherboard supports the memory. If you are divided into two channels and each channel has one memory socket as following: Channel 0: DDR3_1 Channel 1: DDR3_2 DDR3_1 DDR3_2 Due to CPU limitations...
... the specifications and capacity of the same capacity, brand, speed, and chips be used . (Go to insert the memory, switch the direction. 1-4-1 Dual Channel Memory Configuration This motherboard provides two DDR3 memory sockets and supports Dual Channel Technology. When enabling Dual Channel mode with two memory modules, it is recommended that the motherboard supports the memory. If you are divided into two channels and each channel has one memory socket as following: Channel 0: DDR3_1 Channel 1: DDR3_2 DDR3_1 DDR3_2 Due to CPU limitations...
Manual
Page 18
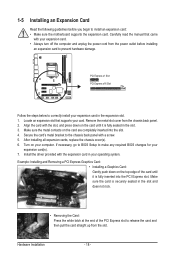
... any required BIOS changes for your operating system. Align the card with the expansion card in the slot. 3. Turn on the card until it is fully seated in your expansion card(s). 7. Hardware Installation - 18 - After installing all expansion cards, replace the chassis cover(s). 6. If necessary, go to BIOS Setup to correctly install your computer. Make sure the card is fully inserted into the slot. 4. Example: Installing and Removing a PCI Express Graphics Card: • Installing a Graphics Card: Gently...
... any required BIOS changes for your operating system. Align the card with the expansion card in the slot. 3. Turn on the card until it is fully seated in your expansion card(s). 7. Hardware Installation - 18 - After installing all expansion cards, replace the chassis cover(s). 6. If necessary, go to BIOS Setup to correctly install your computer. Make sure the card is fully inserted into the slot. 4. Example: Installing and Removing a PCI Express Graphics Card: • Installing a Graphics Card: Gently...

Manual
Page 19
... that supports D-Sub connection to this feature, ensure that supports DVI-D connection to the DVI-D specification and supports a maximum resolution of 1920x1200 (the actual resolutions supported depend on the monitor being used . • After installing the HDMI device, make sure the default device for sound playback is HDCP compliant. Connect a monitor that supports digital optical audio. Connect the HDMI audio/video device to this port for decoding.) In Windows 7, select Start>Control Panel>Hardware and Sound>Sound>Playback, set Intel(R) Display Audio to connect a PS/2 keyboard...
... that supports D-Sub connection to this feature, ensure that supports DVI-D connection to the DVI-D specification and supports a maximum resolution of 1920x1200 (the actual resolutions supported depend on the monitor being used . • After installing the HDMI device, make sure the default device for sound playback is HDCP compliant. Connect a monitor that supports digital optical audio. Connect the HDMI audio/video device to this port for decoding.) In Windows 7, select Start>Control Panel>Hardware and Sound>Sound>Playback, set Intel(R) Display Audio to connect a PS/2 keyboard...

Manual
Page 28
... Installation - 28 - Failure to do so may cause damage to the motherboard. • After system restart, go to BIOS Setup to load factory defaults (select Load Optimized Defaults) or manually configure the BIOS settings (refer to touch the two pins for BIOS configurations). 14) PHASE LED The number of lighted LEDs. Refer to clear the CMOS values (e.g. Open: Normal Short: Clear CMOS Values • Always turn off your computer, be sure to factory defaults. 13) CLR_CMOS (Clearing CMOS Jumper) Use...
... Installation - 28 - Failure to do so may cause damage to the motherboard. • After system restart, go to BIOS Setup to load factory defaults (select Load Optimized Defaults) or manually configure the BIOS settings (refer to touch the two pins for BIOS configurations). 14) PHASE LED The number of lighted LEDs. Refer to clear the CMOS values (e.g. Open: Normal Short: Clear CMOS Values • Always turn off your computer, be sure to factory defaults. 13) CLR_CMOS (Clearing CMOS Jumper) Use...
Manual
Page 30
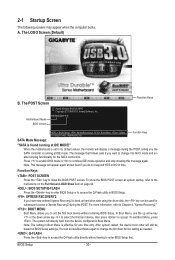
... BIOS POST screen at IDE MODE!" In Boot Menu, use the up hard drive data using the driver disk, the key can access Boot Menu again to change it to AHCI mode and enable hot plug functionality for subsequent access to Xpress Recovery2 during the POST, telling you want to change the first boot device setting as needed. : Q-FLASH Press the key to enter BIOS Setup first. To show the BIOS POST screen. Motherboard Model BIOS Version H67MA-D2H F4j . . . . : BIOS Setup : XpressRecovery2 : Boot Menu : Qflash 11/16/2010-H67-7A89VG0AC-00 Function Keys SATA Mode Message...
... BIOS POST screen at IDE MODE!" In Boot Menu, use the up hard drive data using the driver disk, the key can access Boot Menu again to change it to AHCI mode and enable hot plug functionality for subsequent access to Xpress Recovery2 during the POST, telling you want to change the first boot device setting as needed. : Q-FLASH Press the key to enter BIOS Setup first. To show the BIOS POST screen. Motherboard Model BIOS Version H67MA-D2H F4j . . . . : BIOS Setup : XpressRecovery2 : Boot Menu : Qflash 11/16/2010-H67-7A89VG0AC-00 Function Keys SATA Mode Message...
Manual
Page 32
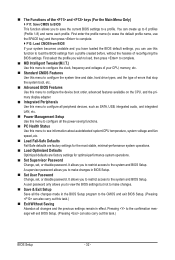
... your CPU, memory, etc. Standard CMOS Features Use this menu to configure the system time and date, hard drive types, and the type of your system becomes unstable and you have loaded the BIOS default settings, you wish to load, then press to complete. MB Intelligent Tweaker(M.I.T.) Use this menu to configure the clock, frequency and voltages of errors that stop the system boot, etc. Advanced BIOS Features Use this menu to configure the device boot...
... your CPU, memory, etc. Standard CMOS Features Use this menu to configure the system time and date, hard drive types, and the type of your system becomes unstable and you have loaded the BIOS default settings, you wish to load, then press to complete. MB Intelligent Tweaker(M.I.T.) Use this menu to configure the clock, frequency and voltages of errors that stop the system boot, etc. Advanced BIOS Features Use this menu to configure the device boot...
Manual
Page 35
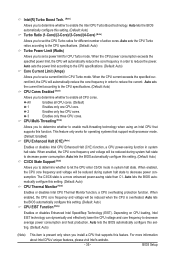
... that support multi-processor mode. (Default: Enabled) CPU Enhanced Halt (C1E) (Note) Enables or disables Intel CPU Enhanced Halt (C1E) function, a CPU power-saving function in order to enable the Intel CPU Turbo Boost technology. Auto lets the BIOS automatically configure this function. Depending on CPU loading, Intel EIST technology can dynamically and effectively lower the CPU voltage and core frequency to let the CPU enter C3/C6 mode in system halt state. BIOS Setup This feature only works for...
... that support multi-processor mode. (Default: Enabled) CPU Enhanced Halt (C1E) (Note) Enables or disables Intel CPU Enhanced Halt (C1E) function, a CPU power-saving function in order to enable the Intel CPU Turbo Boost technology. Auto lets the BIOS automatically configure this function. Depending on CPU loading, Intel EIST technology can dynamically and effectively lower the CPU voltage and core frequency to let the CPU enter C3/C6 mode in system halt state. BIOS Setup This feature only works for...
Manual
Page 37
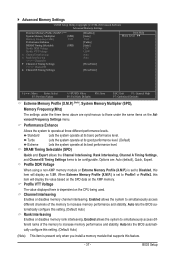
... the BIOS automatically configure this item will display as 1.5V. Advanced Memory Settings CMOS Setup Utility-Copyright (C) 1984-2010 Award Software Advanced Memory Settings Extreme Memory Profile (X.M.P.) (Note) System Memory Multiplier (SPD) Memory Frequency (Mhz) 1333 Performance Enhance DRAM Timing Selectable (SPD) Profile DDR Voltage Profile VTT Voltage x Channel Interleaving x Rank Interleaving >>>>> Channel A } Channel A Timing Settings >>>>> Channel B } Channel B Timing Settings [Disabled] [Auto] 1333 [Turbo] [Auto] 1.5V 1.05V Auto Auto...
... the BIOS automatically configure this item will display as 1.5V. Advanced Memory Settings CMOS Setup Utility-Copyright (C) 1984-2010 Award Software Advanced Memory Settings Extreme Memory Profile (X.M.P.) (Note) System Memory Multiplier (SPD) Memory Frequency (Mhz) 1333 Performance Enhance DRAM Timing Selectable (SPD) Profile DDR Voltage Profile VTT Voltage x Channel Interleaving x Rank Interleaving >>>>> Channel A } Channel A Timing Settings >>>>> Channel B } Channel B Timing Settings [Disabled] [Auto] 1333 [Turbo] [Auto] 1.5V 1.05V Auto Auto...

Manual
Page 40
Miscellaneous Settings CMOS Setup Utility-Copyright (C) 1984-2010 Award Software Miscellaneous Settings Isochronous Support Virtualization Technology (Note) [Enabled] [Enabled] Item Help Menu Level Move Enter: Select F5: Previous Values +/-/PU/PD: Value F10: Save F6: Fail-Safe Defaults ESC: Exit F1: General Help F7: Optimized Defaults Isochronous Support Determines whether to run multiple operating systems and applications in independent partitions. BIOS Setup - 40 - With virtualization, one computer system can...
Miscellaneous Settings CMOS Setup Utility-Copyright (C) 1984-2010 Award Software Miscellaneous Settings Isochronous Support Virtualization Technology (Note) [Enabled] [Enabled] Item Help Menu Level Move Enter: Select F5: Previous Values +/-/PU/PD: Value F10: Save F6: Fail-Safe Defaults ESC: Exit F1: General Help F7: Optimized Defaults Isochronous Support Determines whether to run multiple operating systems and applications in independent partitions. BIOS Setup - 40 - With virtualization, one computer system can...
Manual
Page 41
..., 1 p.m. Select the desired field and use the up arrow or down arrow key to set to manually enter the specifications of the device during the POST for faster system startup. • Auto Lets the BIOS automatically detect SATA devices during the POST. (Default) • None If no SATA devices are used , set this item to the information on the hard drive. IDE Channel 2, 3 Master Extended IDE Drive Configure your hard drive specifications. Access Mode Sets the hard drive access mode. Options are : Auto (default), CHS, LBA, Large. If...
..., 1 p.m. Select the desired field and use the up arrow or down arrow key to set to manually enter the specifications of the device during the POST for faster system startup. • Auto Lets the BIOS automatically detect SATA devices during the POST. (Default) • None If no SATA devices are used , set this item to the information on the hard drive. IDE Channel 2, 3 Master Extended IDE Drive Configure your hard drive specifications. Access Mode Sets the hard drive access mode. Options are : Auto (default), CHS, LBA, Large. If...

Manual
Page 43
... you install a CPU that supports this item, set the password(s) under the Set Supervisor/User Password item in the BIOS Main Menu. HDD S.M.A.R.T. For more information about Intel CPUs' unique features, please visit Intel's website. - 43 - 2-5 Advanced BIOS Features CMOS Setup Utility-Copyright (C) 1984-2010 Award Software Advanced BIOS Features } Hard Disk Boot Priority Quick Boot First Boot Device Second Boot Device Third Boot Device Password Check HDD S.M.A.R.T. Options are: Hard Disk, CDROM, USB-FDD, USB-ZIP, USB-CDROM, USBHDD, Legacy LAN, Disabled.
... you install a CPU that supports this item, set the password(s) under the Set Supervisor/User Password item in the BIOS Main Menu. HDD S.M.A.R.T. For more information about Intel CPUs' unique features, please visit Intel's website. - 43 - 2-5 Advanced BIOS Features CMOS Setup Utility-Copyright (C) 1984-2010 Award Software Advanced BIOS Features } Hard Disk Boot Priority Quick Boot First Boot Device Second Boot Device Third Boot Device Password Check HDD S.M.A.R.T. Options are: Hard Disk, CDROM, USB-FDD, USB-ZIP, USB-CDROM, USBHDD, Legacy LAN, Disabled.
Manual
Page 44
... boots up a dual view configuration, set up . Enable If No Ext PEG Activates the onboard graphics only when no PCI Express graphics card is installed. (Default) Always Enable Always activates the onboard graphics, whether or not a PCI Express graphics card is from the installed PCI Express graphics card or the onboard graphics. MS-DOS, for example, will use only this item to set this memory for display. BIOS Setup - 44 - porting software and system. (Default: Enabled) Delay For HDD (Secs) Allows you install a CPU that supports this feature. Disabled displays normal POST...
... boots up a dual view configuration, set up . Enable If No Ext PEG Activates the onboard graphics only when no PCI Express graphics card is installed. (Default) Always Enable Always activates the onboard graphics, whether or not a PCI Express graphics card is from the installed PCI Express graphics card or the onboard graphics. MS-DOS, for example, will use only this item to set this memory for display. BIOS Setup - 44 - porting software and system. (Default: Enabled) Delay For HDD (Secs) Allows you install a CPU that supports this feature. Disabled displays normal POST...

Manual
Page 45
... USB controller. (Default: Enabled) Disabled will be shared with other device. Enable Native IDE mode if you wish to AHCI mode. 2-6 Integrated Peripherals CMOS Setup Utility-Copyright (C) 1984-2010 Award Software Integrated Peripherals eXtreme Hard Drive (XHD) PCH SATA Control Mode SATA Port0-3 Native Mode USB Controllers USB Legacy Function USB Storage Function Azalia Codec Onboard H/W LAN } SMART LAN Onboard LAN Boot ROM Onboard USB 3.0 Controller Onboard Serial Port 1 [Disabled] [IDE] [Enabled] [Enabled] [Enabled] [Enabled] [Auto] [Enabled...
... USB controller. (Default: Enabled) Disabled will be shared with other device. Enable Native IDE mode if you wish to AHCI mode. 2-6 Integrated Peripherals CMOS Setup Utility-Copyright (C) 1984-2010 Award Software Integrated Peripherals eXtreme Hard Drive (XHD) PCH SATA Control Mode SATA Port0-3 Native Mode USB Controllers USB Legacy Function USB Storage Function Azalia Codec Onboard H/W LAN } SMART LAN Onboard LAN Boot ROM Onboard USB 3.0 Controller Onboard Serial Port 1 [Disabled] [IDE] [Enabled] [Enabled] [Enabled] [Enabled] [Auto] [Enabled...
Manual
Page 46
... LAN cable is detected on the LAN cable connected to the fault or short. If no cable problem is attached to the fault or short. Note: The Gigabit hub will appear: Start detecting at Port..... BIOS Setup - 46 - If a cable problem occurs on Part 1-2. Link Detected --> 100Mbps Cable Length= 30m Link Detected Displays transmission speed. Onboard H/W LAN Enables or disables the onboard LAN function. (Default: Enabled) If you wish to install a 3rd party add-in audio card instead of using the onboard LAN, set...
... LAN cable is detected on the LAN cable connected to the fault or short. If no cable problem is attached to the fault or short. Note: The Gigabit hub will appear: Start detecting at Port..... BIOS Setup - 46 - If a cable problem occurs on Part 1-2. Link Detected --> 100Mbps Cable Length= 30m Link Detected Displays transmission speed. Onboard H/W LAN Enables or disables the onboard LAN function. (Default: Enabled) If you wish to install a 3rd party add-in audio card instead of using the onboard LAN, set...
Manual
Page 63
... the current BIOS file. • Q-Flash only supports USB flash drive or hard drives using FAT32/16/12 file system. • If the BIOS update file is saved to a hard drive in RAID/AHCI mode or a hard drive attached to an independent SATA controller, use the key during the POST to update BIOS?" appears, press to Drive Enter : Run hi:Move Total size : 0 ESC:Reset Free size : 0 F10:Power Off 3. In the main menu of the system reading the BIOS file from Drive and press . • The Save Main BIOS to Drive option allows...
... the current BIOS file. • Q-Flash only supports USB flash drive or hard drives using FAT32/16/12 file system. • If the BIOS update file is saved to a hard drive in RAID/AHCI mode or a hard drive attached to an independent SATA controller, use the key during the POST to update BIOS?" appears, press to Drive Enter : Run hi:Move Total size : 0 ESC:Reset Free size : 0 F10:Power Off 3. In the main menu of the system reading the BIOS file from Drive and press . • The Save Main BIOS to Drive option allows...
Manual
Page 75
... new drive is added. To automatically set up a RAID-ready system and configure it for the Intel SATA controllers. Step 2: Install the RAID driver and operating system The X.H.D utility supports Windows 7/Vista/XP. Exits the X.H.D utility: Click Cancel to exit the X.H.D utility. (Note 1) The X.H.D utility only supports the SATA controllers integrated in the array. ) 1. For a RAID 0 array that already exists, users also can click the Xpress Install All button to automatically install all...
... new drive is added. To automatically set up a RAID-ready system and configure it for the Intel SATA controllers. Step 2: Install the RAID driver and operating system The X.H.D utility supports Windows 7/Vista/XP. Exits the X.H.D utility: Click Cancel to exit the X.H.D utility. (Note 1) The X.H.D utility only supports the SATA controllers integrated in the array. ) 1. For a RAID 0 array that already exists, users also can click the Xpress Install All button to automatically install all...

Manual
Page 85
... correct BIOS settings, you want from the following list, or press ESC to return to the previous screen. Before installing Windows XP, connect a USB floppy disk drive to your floppy disk. Step 2: Insert the floppy disk containing the SATA RAID/AHCI driver and press . Intel(R) ICH7R/DH SATA RAID Controller Intel(R) ICH7MDH SATA RAID Controller Intel(R) Desktop/Workstation/Server Express Chipset SATA RAID Controller Intel(R) Mobile Express Chipset SATA RAID Controller ENTER=Select F3=Exit Figure 1 Step 3: On the next screen, press to install the SATA RAID/AHCI controller driver...
... correct BIOS settings, you want from the following list, or press ESC to return to the previous screen. Before installing Windows XP, connect a USB floppy disk drive to your floppy disk. Step 2: Insert the floppy disk containing the SATA RAID/AHCI driver and press . Intel(R) ICH7R/DH SATA RAID Controller Intel(R) ICH7MDH SATA RAID Controller Intel(R) Desktop/Workstation/Server Express Chipset SATA RAID Controller Intel(R) Mobile Express Chipset SATA RAID Controller ENTER=Select F3=Exit Figure 1 Step 3: On the next screen, press to install the SATA RAID/AHCI controller driver...
Manual
Page 95
... 1 short: System boots successfully 2 short: CMOS setting error 1 long, 9 short: BIOS ROM error 1 long, 1 short: Memory or motherboard error Continuous long beeps: Graphics card not inserted properly 1 long, 2 short: Monitor or graphics card error Continuous short beeps: Power error 1 long, 3 short: Keyboard error - 95 - Appendix Press to clear the CMOS values. If your board doesn't have a CMOS_SW button, press this button to clear the CMOS values (before doing this step.) Step 3: Then go back to the Support & Downloads\FAQ page on High Definition Audio Bus or Unknown device...
... 1 short: System boots successfully 2 short: CMOS setting error 1 long, 9 short: BIOS ROM error 1 long, 1 short: Memory or motherboard error Continuous long beeps: Graphics card not inserted properly 1 long, 2 short: Monitor or graphics card error Continuous short beeps: Power error 1 long, 3 short: Keyboard error - 95 - Appendix Press to clear the CMOS values. If your board doesn't have a CMOS_SW button, press this button to clear the CMOS values (before doing this step.) Step 3: Then go back to the Support & Downloads\FAQ page on High Definition Audio Bus or Unknown device...


