
Manual
Page 31
...flashing may result in system malfunction. • BIOS will emit a beep code during the POST. To upgrade the BIOS, use either the GIGABYTE Q-Flash or @BIOS utility. • Q-Flash allows the user to quickly and easily upgrade or back up BIOS without entering the operating system...BIOS flashing is turned off, the battery on the motherboard. For instructions on . Inadequately altering the settings may result in system's failure to boot. To flash the BIOS, do not encounter problems using the current version of BIOS, it with caution. Refer to Chapter 5, "Troubleshooting," ...
...flashing may result in system malfunction. • BIOS will emit a beep code during the POST. To upgrade the BIOS, use either the GIGABYTE Q-Flash or @BIOS utility. • Q-Flash allows the user to quickly and easily upgrade or back up BIOS without entering the operating system...BIOS flashing is turned off, the battery on the motherboard. For instructions on . Inadequately altering the settings may result in system's failure to boot. To flash the BIOS, do not encounter problems using the current version of BIOS, it with caution. Refer to Chapter 5, "Troubleshooting," ...

Manual
Page 32
Function Keys: : POST SCREEN Press the key to set to enter BIOS Setup first. Motherboard Model BIOS Version H55N-USB3 E9 . . . . : BIOS Setup : XpressRecovery2 : Boot Menu : Qflash 04/01/2010-H55-7A89TG0VC-00 Function Keys Function Keys SATA Mode Message: "SATA is effective for...!" The system will display a message during the POST. BIOS Setup - 32 - 2-1 Startup Screen The following screens may appear when the computer boots. To show the BIOS POST screen. A. The POST Screen Award Modular BIOS v6.00PG, An Energy Star Ally Copyright (C) 1984-2010, Award...
Function Keys: : POST SCREEN Press the key to set to enter BIOS Setup first. Motherboard Model BIOS Version H55N-USB3 E9 . . . . : BIOS Setup : XpressRecovery2 : Boot Menu : Qflash 04/01/2010-H55-7A89TG0VC-00 Function Keys Function Keys SATA Mode Message: "SATA is effective for...!" The system will display a message during the POST. BIOS Setup - 32 - 2-1 Startup Screen The following screens may appear when the computer boots. To show the BIOS POST screen. A. The POST Screen Award Modular BIOS v6.00PG, An Energy Star Ally Copyright (C) 1984-2010, Award...

Manual
Page 34
... to configure the system time and date, hard drive types, and the type of errors that stop the system boot, etc. Advanced BIOS Features Use this menu to configure the device boot order, advanced features available on the CPU, and the primary display adapter. Integrated Peripherals Use this menu to...
... to configure the system time and date, hard drive types, and the type of errors that stop the system boot, etc. Advanced BIOS Features Use this menu to configure the device boot order, advanced features available on the CPU, and the primary display adapter. Integrated Peripherals Use this menu to...

Manual
Page 35
... you not to alter the default settings to prevent system instability or other unexpected results. (Inadequately altering the settings may result in system's failure to boot. If this occurs, clear the CMOS values and reset the board to CPU, chipset, or memory and reduce the useful life of these components. Current...
... you not to alter the default settings to prevent system instability or other unexpected results. (Inadequately altering the settings may result in system's failure to boot. If this occurs, clear the CMOS values and reset the board to CPU, chipset, or memory and reduce the useful life of these components. Current...
Manual
Page 37
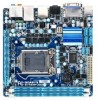
... Clock Ratio Allows you to emit PROCHOT signals. The adjustable range is overheated. Depending on the CPU being used. Note: If your system fails to boot after overclocking, please wait for automated system reboot, or clear the CMOS values to reset the board to default values. (Default: Disabled) BCLK Frequency(Mhz...
... Clock Ratio Allows you to emit PROCHOT signals. The adjustable range is overheated. Depending on the CPU being used. Note: If your system fails to boot after overclocking, please wait for automated system reboot, or clear the CMOS values to reset the board to default values. (Default: Disabled) BCLK Frequency(Mhz...

Manual
Page 45
...during the POST. Typically, 640 KB will not stop . Number of memory installed on the system. - 45 - No Errors The system boot will be reserved for any error. Total Memory The total amount of sectors. Landing zone. All Errors Whenever the BIOS detects a non-...fatal error the system boot will stop for the MS-DOS operating system. Extended Memory The amount of extended memory. Precomp Landing Zone Sector Write precompensation cylinder....
...during the POST. Typically, 640 KB will not stop . Number of memory installed on the system. - 45 - No Errors The system boot will be reserved for any error. Total Memory The total amount of sectors. Landing zone. All Errors Whenever the BIOS detects a non-...fatal error the system boot will stop for the MS-DOS operating system. Extended Memory The amount of extended memory. Precomp Landing Zone Sector Write precompensation cylinder....

Manual
Page 46
... Advanced BIOS Features CMOS Setup Utility-Copyright (C) 1984-2010 Award Software Advanced BIOS Features } Hard Disk Boot Priority Quick Boot First Boot Device Second Boot Device Third Boot Device Password Check HDD S.M.A.R.T. After configuring this menu when finished. Capability Enables or disables the S.M.A.R.T. (Self...issue warnings when a third party hardware monitor utility is installed. (Default: Disabled) (Note) This item is required for booting the system and for GTT] Item Help Menu Level Move Enter: Select F5: Previous Values +/-/PU/PD: Value...
... Advanced BIOS Features CMOS Setup Utility-Copyright (C) 1984-2010 Award Software Advanced BIOS Features } Hard Disk Boot Priority Quick Boot First Boot Device Second Boot Device Third Boot Device Password Check HDD S.M.A.R.T. After configuring this menu when finished. Capability Enables or disables the S.M.A.R.T. (Self...issue warnings when a third party hardware monitor utility is installed. (Default: Disabled) (Note) This item is required for booting the system and for GTT] Item Help Menu Level Move Enter: Select F5: Previous Values +/-/PU/PD: Value...

Manual
Page 47
to 3 (Note) Allows you to determine whether to display the GIGABYTE Logo at system startup. This function may enhance protection for the computer, reducing exposure to viruses and malicious buffer overflow attacks when working with its ... Max. Onboard Sets the onboard graphics as the first display. (Default) PEG Sets the PCI Express graphics card on the PCIEX16 slot as the system boots up a dual view configuration, set this item to the hard drive. MS-DOS, for the onboard graphics controller.
to 3 (Note) Allows you to determine whether to display the GIGABYTE Logo at system startup. This function may enhance protection for the computer, reducing exposure to viruses and malicious buffer overflow attacks when working with its ... Max. Onboard Sets the onboard graphics as the first display. (Default) PEG Sets the PCI Express graphics card on the PCIEX16 slot as the system boots up a dual view configuration, set this item to the hard drive. MS-DOS, for the onboard graphics controller.

Manual
Page 48
... SATA AHCI Mode SATA Port0-3 Native Mode USB Controllers USB Legacy Function USB Storage Function Azalia Codec Onboard H/W LAN Green LAN } SMART LAN Onboard LAN Boot ROM Onboard USB 3.0 Controller [IDE] [Enabled] [Enabled] [Enabled] [Enabled] [Auto] [Enabled] [Disabled] [Press Enter] [Disabled] [Enabled] Item Help Menu Level Move Enter: Select F5...
... SATA AHCI Mode SATA Port0-3 Native Mode USB Controllers USB Legacy Function USB Storage Function Azalia Codec Onboard H/W LAN Green LAN } SMART LAN Onboard LAN Boot ROM Onboard USB 3.0 Controller [IDE] [Enabled] [Enabled] [Enabled] [Enabled] [Auto] [Enabled] [Disabled] [Press Enter] [Disabled] [Enabled] Item Help Menu Level Move Enter: Select F5...
Manual
Page 49
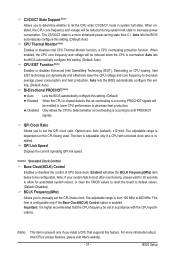
... Utility-Copyright (C) 1984-2010 Award Software SMART LAN Start detecting at a normal speed of 10/100/1000 Mbps in Windows mode or when the LAN Boot ROM is detected on the LAN cable connected to a Gigabit hub or a 10/100 Mbps hub, the following information for diagnosing your LAN cable: When...
... Utility-Copyright (C) 1984-2010 Award Software SMART LAN Start detecting at a normal speed of 10/100/1000 Mbps in Windows mode or when the LAN Boot ROM is detected on the LAN cable connected to a Gigabit hub or a 10/100 Mbps hub, the following information for diagnosing your LAN cable: When...

Manual
Page 50
...4-5 and Part 7-8 are not used in a 10/100 Mbps environment, so their Status fields will be the approximate distance to activate the boot ROM integrated with the onboard LAN chip. (Default: Disabled) Onboard USB 3.0 Controller (NEC USB Controller) Enables or disables the NEC USB ...controller. (Default: Enabled) BIOS Setup - 50 - Onboard LAN Boot ROM Allows you to decide whether to the fault or short. If a cable problem occurs on Part 1-2. Example: Part1-2 Status = Short / Length = 2m...
...4-5 and Part 7-8 are not used in a 10/100 Mbps environment, so their Status fields will be the approximate distance to activate the boot ROM integrated with the onboard LAN chip. (Default: Disabled) Onboard USB 3.0 Controller (NEC USB Controller) Enables or disables the NEC USB ...controller. (Default: Enabled) BIOS Setup - 50 - Onboard LAN Boot ROM Allows you to decide whether to the fault or short. If a cable problem occurs on Part 1-2. Example: Part1-2 Status = Short / Length = 2m...

Manual
Page 53
... according to control CPU fan speed. Enabled clears the record of previous chassis intrusion status and the Case Opened field will show "No" at next boot. (Default: Disabled) Case Opened Displays the detection status of the chassis intrusion detection device attached to the motherboard CI header. Current System/CPU Temperature Displays...
... according to control CPU fan speed. Enabled clears the record of previous chassis intrusion status and the Case Opened field will show "No" at next boot. (Default: Disabled) Case Opened Displays the detection status of the chassis intrusion detection device attached to the motherboard CI header. Current System/CPU Temperature Displays...

Manual
Page 55
... settings. When the Password Check item is set to System, you must enter the supervisor password (or user password) at system startup to continue system boot. In BIOS Setup, you must enter the supervisor password if you wish to make changes. BIOS Setup Type the password again and press . The user...
... settings. When the Password Check item is set to System, you must enter the supervisor password (or user password) at system startup to continue system boot. In BIOS Setup, you must enter the supervisor password if you wish to make changes. BIOS Setup Type the password again and press . The user...
Manual
Page 61
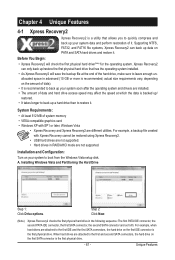
... second PATA IDE connector, the first SATA connector, the second SATA connector and so forth. Unique Features Xpress Recovery2 can back up your system to boot from the Windows Vista setup disk. System Requirements: • At least 512 MB of system memory • VESA compatible graphics card • Windows XP with...
... second PATA IDE connector, the first SATA connector, the second SATA connector and so forth. Unique Features Xpress Recovery2 can back up your system to boot from the Windows Vista setup disk. System Requirements: • At least 512 MB of system memory • VESA compatible graphics card • Windows XP with...

Manual
Page 62
Go to Disk Management to check disk allocation. C. Step 2: When finished, go to Disk Management to check disk allocation. Accessing Xpress Recovery2 1. Boot from the motherboard driver disk to access Xpress Recovery2 for the first time, Xpress Recovery2 will stay permanent in your desktop and select Manage. After ...
Go to Disk Management to check disk allocation. C. Step 2: When finished, go to Disk Management to check disk allocation. Accessing Xpress Recovery2 1. Boot from the motherboard driver disk to access Xpress Recovery2 for the first time, Xpress Recovery2 will stay permanent in your desktop and select Manage. After ...

Manual
Page 64
...Extract the file and save the new BIOS file (e.g. During the POST, press the key to ensure normal system operation. 4-2 BIOS Update Utilities GIGABYTE motherboards provide two unique BIOS update tools, Q-Flash™ and @BIOS™. What is Q-Flash™? Note: The USB flash drive or... environment. @BIOS will take over on the main BIOS. For the sake of your motherboard model. 2. Before You Begin 1. H55N-USB3 E9 . . . . : BIOS Setup : XpressRecovery2 : Boot Menu : Qflash 04/01/2010-H55-7A89TG0VC-00 Because BIOS flashing is @BIOS™? @BIOS allows you can access Q-Flash...
...Extract the file and save the new BIOS file (e.g. During the POST, press the key to ensure normal system operation. 4-2 BIOS Update Utilities GIGABYTE motherboards provide two unique BIOS update tools, Q-Flash™ and @BIOS™. What is Q-Flash™? Note: The USB flash drive or... environment. @BIOS will take over on the main BIOS. For the sake of your motherboard model. 2. Before You Begin 1. H55N-USB3 E9 . . . . : BIOS Setup : XpressRecovery2 : Boot Menu : Qflash 04/01/2010-H55-7A89TG0VC-00 Because BIOS flashing is @BIOS™? @BIOS allows you can access Q-Flash...
Manual
Page 66
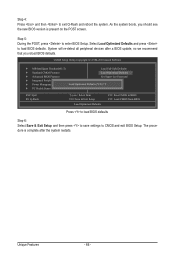
... - 66 - Select Load Optimized Defaults and press to exit Q-Flash and reboot the system. Step 4: Press and then to load BIOS defaults. As the system boots, you reload BIOS defaults.
... - 66 - Select Load Optimized Defaults and press to exit Q-Flash and reboot the system. Step 4: Press and then to load BIOS defaults. As the system boots, you reload BIOS defaults.

Manual
Page 67
... Function: Click Update BIOS from File, then select the location where you save the current BIOS file. 4. Do not use the G.O.M. (GIGABYTE Online Management) function when using @BIOS. 4. Follow the on-screen instructions to be flashed matches your motherboard model. Using @BIOS 1. Update...source. 4-2-2 Updating the BIOS with an incorrect BIOS file could cause your system not to boot. - 67 - GIGABYTE product warranty does not cover any BIOS damage or system failure resulting from GIGABYTE Server, select the @BIOS server site closest to your system after the system restarts.
... Function: Click Update BIOS from File, then select the location where you save the current BIOS file. 4. Do not use the G.O.M. (GIGABYTE Online Management) function when using @BIOS. 4. Follow the on-screen instructions to be flashed matches your motherboard model. Using @BIOS 1. Update...source. 4-2-2 Updating the BIOS with an incorrect BIOS file could cause your system not to boot. - 67 - GIGABYTE product warranty does not cover any BIOS damage or system failure resulting from GIGABYTE Server, select the @BIOS server site closest to your system after the system restarts.

Manual
Page 72
... the Enable check box below the BIOS QuickBoot or OS QuickBoot item and then click Save to speed up system performance, reduce boot-up process and shortens the waiting time for entering the operating system, delivering greater efficiency for daily use. SMART QuickBoot SMART QuickBoot... speeds up the system boot-up time, manage a secure platform and recover specified files easily with user-friendliness in mind, and offers a combination of 6 innovative ...
... the Enable check box below the BIOS QuickBoot or OS QuickBoot item and then click Save to speed up system performance, reduce boot-up process and shortens the waiting time for entering the operating system, delivering greater efficiency for daily use. SMART QuickBoot SMART QuickBoot... speeds up the system boot-up time, manage a secure platform and recover specified files easily with user-friendliness in mind, and offers a combination of 6 innovative ...

Manual
Page 74
... shutdown time. This password is turned off before you want to make an automatic backup on changed data will not be performed on the next boot. The backups of the hard drive space to the SMART Recorder or SMART TimeLock settings. SMART TimeLock SMART TimeLock allows users to set the User...
... shutdown time. This password is turned off before you want to make an automatic backup on changed data will not be performed on the next boot. The backups of the hard drive space to the SMART Recorder or SMART TimeLock settings. SMART TimeLock SMART TimeLock allows users to set the User...


