Manual
Page 17
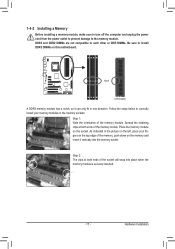
...on the socket. Step 1: Note the orientation of the socket will snap into the memory socket. Place the memory module on this motherboard. Notch DDR3 DIMM A DDR3 memory module has a notch, so it vertically into place when the memory module is securely inserted. - 17 - Step 2: The clips at both ends of... retaining clips at both ends of the memory, push down on the left, place your memory modules in one direction. As indicated in the picture on the memory and insert it can only fit in the memory sockets. DDR3 and DDR2 DIMMs are not compatible to each other or DDR DIMMs. Be...
...on the socket. Step 1: Note the orientation of the socket will snap into the memory socket. Place the memory module on this motherboard. Notch DDR3 DIMM A DDR3 memory module has a notch, so it vertically into place when the memory module is securely inserted. - 17 - Step 2: The clips at both ends of... retaining clips at both ends of the memory, push down on the left, place your memory modules in one direction. As indicated in the picture on the memory and insert it can only fit in the memory sockets. DDR3 and DDR2 DIMMs are not compatible to each other or DDR DIMMs. Be...

Manual
Page 67
... the first physical hard drive in advanced (10 GB or more is recommended; Unique Features System Requirements: • At least 512 MB of system memory • VESA compatible graphics card • Windows XP with Xpress Recovery cannot be restored using Xpress Recovery2. • USB hard drives are not supported. • Hard drives...
... the first physical hard drive in advanced (10 GB or more is recommended; Unique Features System Requirements: • At least 512 MB of system memory • VESA compatible graphics card • Windows XP with Xpress Recovery cannot be restored using Xpress Recovery2. • USB hard drives are not supported. • Hard drives...


