
Manual
Page 2
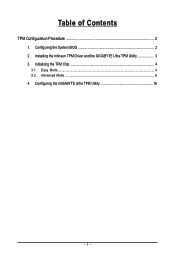
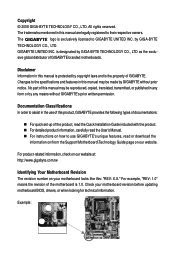
Table of Contents TPM Configuration Procedure 3 1. Installing the Smart TPM Utility 4 3. Configuring the Smart TPM Utility 18 4.1. Other Bluetooth Settings 21 4.4. Other Features...21 - 2 - Initializing the TPM Chip with the Smart TPM Utility 5 3.2. Configuring the System BIOS 3 2. Installing the Infineon TPM Driver 4 2.2. Creating a Bluetooth Cell Phone Key 19 4.3. Creating a USB Key 18 4.2. Installing the Infineon TPM Driver and the Smart TPM Utility 4 2.1. Initializing the TPM chip 5 3.1. Advanced Mode...8 4.
Table of Contents TPM Configuration Procedure 3 1. Installing the Smart TPM Utility 4 3. Configuring the Smart TPM Utility 18 4.1. Other Bluetooth Settings 21 4.4. Other Features...21 - 2 - Initializing the TPM Chip with the Smart TPM Utility 5 3.2. Configuring the System BIOS 3 2. Installing the Infineon TPM Driver 4 2.2. Creating a Bluetooth Cell Phone Key 19 4.3. Creating a USB Key 18 4.2. Installing the Infineon TPM Driver and the Smart TPM Utility 4 2.1. Initializing the TPM chip 5 3.1. Advanced Mode...8 4.
Manual
Page 3
Installing the Infineon TPM driver and the Smart TPM utility 3. Configuring the Smart TPM utility 1. Configuring the system BIOS 2. Initializing the TPM chip 4. Be sure to the Security Chip Configuration ...
Installing the Infineon TPM driver and the Smart TPM utility 3. Configuring the Smart TPM utility 1. Configuring the system BIOS 2. Initializing the TPM chip 4. Be sure to the Security Chip Configuration ...
Manual
Page 4
... the Smart TPM Utility Before you 'll be directed to install the Infineon TPM driver and the Smart TPM utility altogether. - 4 - Installing the Infineon TPM Driver Insert the GIGABYTE motherboard driver disk. "Xpress Install" will install all of Smart TPM to install. Click the Install button on the "Xpress Install" main ... are recommended to install it. Installing the Smart TPM Utility Click the tab at the bottom of the left pane of the selected drivers, including the Infineon TPM driver. 2.2. Some motherboard driver disks include the Smart TPM utility in "Xpress Install."
... the Smart TPM Utility Before you 'll be directed to install the Infineon TPM driver and the Smart TPM utility altogether. - 4 - Installing the Infineon TPM Driver Insert the GIGABYTE motherboard driver disk. "Xpress Install" will install all of Smart TPM to install. Click the Install button on the "Xpress Install" main ... are recommended to install it. Installing the Smart TPM Utility Click the tab at the bottom of the left pane of the selected drivers, including the Infineon TPM driver. 2.2. Some motherboard driver disks include the Smart TPM utility in "Xpress Install."
Manual
Page 5
3. Initializing the TPM chip After configuring the system BIOS and installing the driver software, the Infineon Security Platform icon , which your PSD will be able to access/close your PSD data when connecting to the Bluetooth cell phone ...
3. Initializing the TPM chip After configuring the system BIOS and installing the driver software, the Infineon Security Platform icon , which your PSD will be able to access/close your PSD data when connecting to the Bluetooth cell phone ...
Manual
Page 1
Installing the Infineon TPM Driver and the GIGABYTE Ultra TPM Utility 3 3. Advanced Mode ...6 4. Configuring the GIGABYTE Ultra TPM Utility 16 - 1 - Configuring the System BIOS 2 2. Easy Mode ...4 3.2. Initializing the TPM Chip 4 3.1. Table of Contents TPM Configuration Procedure 2 1.
Installing the Infineon TPM Driver and the GIGABYTE Ultra TPM Utility 3 3. Advanced Mode ...6 4. Configuring the GIGABYTE Ultra TPM Utility 16 - 1 - Configuring the System BIOS 2 2. Easy Mode ...4 3.2. Initializing the TPM Chip 4 3.1. Table of Contents TPM Configuration Procedure 2 1.
Manual
Page 2
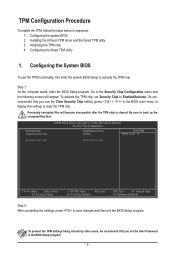
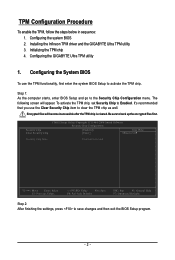
Configuring the system BIOS 2. Installing the Infineon TPM driver and the GIGABYTE Ultra TPM utility 3. Configuring the System BIOS To use the Clear Security Chip item to activate the TPM chip. Security Chip Clear Security Chip CMOS ... Chip to save changes and then exit the BIOS Setup program. - 2 - Be sure to the Security Chip Configuration menu. Encrypted files will appear. Configuring the GIGABYTE Ultra TPM utility 1. TPM Configuration Procedure To enable the TPM, follow the steps below in sequence: 1. Step 1: As the computer starts, enter BIOS Setup and...
Configuring the system BIOS 2. Installing the Infineon TPM driver and the GIGABYTE Ultra TPM utility 3. Configuring the System BIOS To use the Clear Security Chip item to activate the TPM chip. Security Chip Clear Security Chip CMOS ... Chip to save changes and then exit the BIOS Setup program. - 2 - Be sure to the Security Chip Configuration menu. Encrypted files will appear. Configuring the GIGABYTE Ultra TPM utility 1. TPM Configuration Procedure To enable the TPM, follow the steps below in sequence: 1. Step 1: As the computer starts, enter BIOS Setup and...
Manual
Page 3
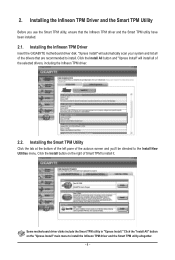
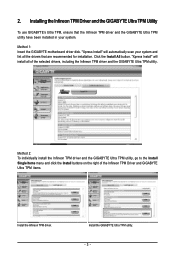
...buttons on the right of the selected drivers, including the Infineon TPM driver and the GIGABYTE Ultra TPM utility. Click the Install All button. "Xpress Install" will install all the drivers that the Infineon TPM driver and the GIGABYTE Ultra TPM utility have been installed ... and list all of the Infineon TPM Driver and GIGABYTE Ultra TPM items. Install the Infineon TPM driver. Installing the Infineon TPM Driver and the GIGABYTE Ultra TPM Utility To use GIGABYTE's Ultra TPM, ensure that are recommended for installation. Install the GIGABYTE Ultra TPM utility. - 3 - "Xpress...
...buttons on the right of the selected drivers, including the Infineon TPM driver and the GIGABYTE Ultra TPM utility. Click the Install All button. "Xpress Install" will install all the drivers that the Infineon TPM driver and the GIGABYTE Ultra TPM utility have been installed ... and list all of the Infineon TPM Driver and GIGABYTE Ultra TPM items. Install the Infineon TPM driver. Installing the Infineon TPM Driver and the GIGABYTE Ultra TPM Utility To use GIGABYTE's Ultra TPM, ensure that are recommended for installation. Install the GIGABYTE Ultra TPM utility. - 3 - "Xpress...
Manual
Page 4
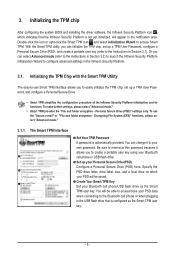
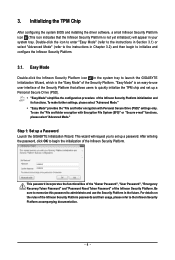
...begin the initialization of the Infineon Security Platform initialization and its functions. Initializing the TPM Chip After configuring the system BIOS and installing the driver software, a small Infineon Security Platform icon (This icon indicates that allows users to set up a Personal Secure Drive (PSD). •...Mode." For details on the rules of the Infineon Security Platform passwords and their usage, please refer to launch the GIGABYTE Initialization Wizard, which is not yet initialized.) will request you to quickly initialize the TPM chip and set up a Password Launch the...
...begin the initialization of the Infineon Security Platform initialization and its functions. Initializing the TPM Chip After configuring the system BIOS and installing the driver software, a small Infineon Security Platform icon (This icon indicates that allows users to set up a Personal Secure Drive (PSD). •...Mode." For details on the rules of the Infineon Security Platform passwords and their usage, please refer to launch the GIGABYTE Initialization Wizard, which is not yet initialized.) will request you to quickly initialize the TPM chip and set up a Password Launch the...
Manual
Page 3
... made by GIGA-BYTE TECHNOLOGY CO., LTD. Example: by GIGABYTE without GIGABYTE's prior written permission. GIGABYTE UNITED INC. For product-related information, check on our website at: http://www.gigabyte.com.tw Identifying Your Motherboard Revision The revision number on our... copied, translated, transmitted, or published in the use GIGABYTE's unique features, read or download the information on/from the Support\Motherboard\Technology Guide page on your motherboard revision before updating motherboard BIOS, drivers, or when looking for technical information. No part of ...
... made by GIGA-BYTE TECHNOLOGY CO., LTD. Example: by GIGABYTE without GIGABYTE's prior written permission. GIGABYTE UNITED INC. For product-related information, check on our website at: http://www.gigabyte.com.tw Identifying Your Motherboard Revision The revision number on our... copied, translated, transmitted, or published in the use GIGABYTE's unique features, read or download the information on/from the Support\Motherboard\Technology Guide page on your motherboard revision before updating motherboard BIOS, drivers, or when looking for technical information. No part of ...
Manual
Page 5
... 5-1-2 Making a SATA RAID/AHCI Driver Diskette 93 5-1-3 Installing the SATA RAID/AHCI Driver and Operating System 95 5-2 ConfiguringAudio ...Input and Output 100 5-2-1 Configuring 2/4/5.1/7.1-Channel Audio 100 5-2-2 Installing the S/PDIF In Cable (Optional 102 5-2-3 Enabling the Dolby Home Theater Function 104 5-2-4 Configuring Microphone Recording 105 5-2-5 Using the Sound Recorder 107 5-3 Troubleshooting 108 5-3-1 Frequently Asked Questions 108 5-3-2 Troubleshooting Procedure 109 Regulatory Statements 111 Only for GA-EP45-DS3R...
... 5-1-2 Making a SATA RAID/AHCI Driver Diskette 93 5-1-3 Installing the SATA RAID/AHCI Driver and Operating System 95 5-2 ConfiguringAudio ...Input and Output 100 5-2-1 Configuring 2/4/5.1/7.1-Channel Audio 100 5-2-2 Installing the S/PDIF In Cable (Optional 102 5-2-3 Enabling the Dolby Home Theater Function 104 5-2-4 Configuring Microphone Recording 105 5-2-5 Using the Sound Recorder 107 5-3 Troubleshooting 108 5-3-1 Frequently Asked Questions 108 5-3-2 Troubleshooting Procedure 109 Regulatory Statements 111 Only for GA-EP45-DS3R...

Manual
Page 6
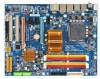
Box Contents GA-EP45-DS3R or GA-EP45-DS3 motherboard Motherboard driver disk User's Manual Quick Installation Guide One IDE cable and one floppy disk drive cable Four SATA 3Gb/s cables One SATA bracket I/O Shield Only for GA-EP45-DS3R. • The box contents above are subject to change without notice. • The motherboard image is for reference only and...
Box Contents GA-EP45-DS3R or GA-EP45-DS3 motherboard Motherboard driver disk User's Manual Quick Installation Guide One IDE cable and one floppy disk drive cable Four SATA 3Gb/s cables One SATA bracket I/O Shield Only for GA-EP45-DS3R. • The box contents above are subject to change without notice. • The motherboard image is for reference only and...
Manual
Page 18
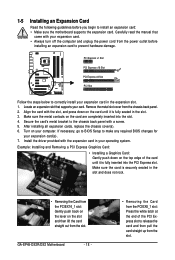
... any required BIOS changes for your expansion card in the slot. 3. Locate an expansion slot that came with a screw. 5. Install the driver provided with the slot, and press down on the card until it is fully inserted into the slot. 4. Make sure the metal contacts ...Follow the steps below to the chassis back panel with your operating system. Turn on the card are completely inserted into the PCI Express slot. GA-EP45-DS3R/DS3 Motherboard - 18 - • Removing the Card from the slot. Secure the card's metal bracket to correctly install your expansion card(s). ...
... any required BIOS changes for your expansion card in the slot. 3. Locate an expansion slot that came with a screw. 5. Install the driver provided with the slot, and press down on the card until it is fully inserted into the slot. 4. Make sure the metal contacts ...Follow the steps below to the chassis back panel with your operating system. Turn on the card are completely inserted into the PCI Express slot. GA-EP45-DS3R/DS3 Motherboard - 18 - • Removing the Card from the slot. Secure the card's metal bracket to correctly install your expansion card(s). ...
Manual
Page 36
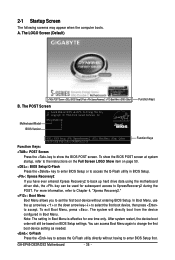
... for subsequent access to enter BIOS Setup first. The LOGO Screen (Default) :POST Screen :BIOS Setup/Q-Flash :XpressRecovery2 :Boot Menu :Qflash Function Keys B. EP45-DS3R F3l . . . . : BIOS Setup : XpressRecovery2 : Boot Menu : Qflash 05/20/2008-P45-ICH10-7A89PG01C-00 Function Keys Function Keys: : POST... Setup settings. GA-EP45-DS3R/DS3 Motherboard - 36 - Note: The setting in BIOS Setup. : Xpress Recovery2 If you to set the first boot device without having to XpressRecovery2 during the POST. In Boot Menu, use the up hard drive data using the motherboard driver disk, the...
... for subsequent access to enter BIOS Setup first. The LOGO Screen (Default) :POST Screen :BIOS Setup/Q-Flash :XpressRecovery2 :Boot Menu :Qflash Function Keys B. EP45-DS3R F3l . . . . : BIOS Setup : XpressRecovery2 : Boot Menu : Qflash 05/20/2008-P45-ICH10-7A89PG01C-00 Function Keys Function Keys: : POST... Setup settings. GA-EP45-DS3R/DS3 Motherboard - 36 - Note: The setting in BIOS Setup. : Xpress Recovery2 If you to set the first boot device without having to XpressRecovery2 during the POST. In Boot Menu, use the up hard drive data using the motherboard driver disk, the...

Manual
Page 51
.... - 51 - Advanced Host Controller Interface (AHCI) is an interface specification that allows the storage driver to AHCI mode. Only for GA-EP45-DS3R. Disabled Disables RAID for the SATA controllers. RAID Enables RAID for the SATA controllers and configures the SATA controllers to PATA mode. (Default) AHCI Configures ...
.... - 51 - Advanced Host Controller Interface (AHCI) is an interface specification that allows the storage driver to AHCI mode. Only for GA-EP45-DS3R. Disabled Disables RAID for the SATA controllers. RAID Enables RAID for the SATA controllers and configures the SATA controllers to PATA mode. (Default) AHCI Configures ...
Manual
Page 52
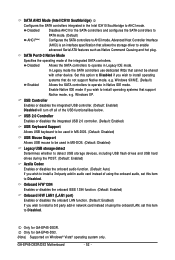
...to enable advanced Serial ATA features such as Native Command Queuing and hot plug. Only for GA-EP45-DS3R. Advanced Host Controller Interface (AHCI) is an interface specification that allows the storage driver to operate in Native IDE mode. Enable Native IDE mode if you wish to install ...Support Allows USB keyboard to be used in MS-DOS. (Default: Disabled) USB Mouse Support Allows USB mouse to be shared with other device. GA-EP45-DS3R/DS3 Motherboard - 52 - Windows XP. Onboard H/W 1394 Enables or disables the onboard IEEE 1394 function. (Default: Enabled) Onboard H/W LAN1 (...
...to enable advanced Serial ATA features such as Native Command Queuing and hot plug. Only for GA-EP45-DS3R. Advanced Host Controller Interface (AHCI) is an interface specification that allows the storage driver to operate in Native IDE mode. Enable Native IDE mode if you wish to install ...Support Allows USB keyboard to be used in MS-DOS. (Default: Disabled) USB Mouse Support Allows USB mouse to be shared with other device. GA-EP45-DS3R/DS3 Motherboard - 52 - Windows XP. Onboard H/W 1394 Enables or disables the onboard IEEE 1394 function. (Default: Enabled) Onboard H/W LAN1 (...
Manual
Page 65
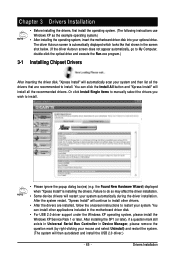
... Install All button and "Xpress Install" will continue to install other applications included in the screen shot below. (If the driver Autorun screen does not appear automatically, go to install. After installing the SP1 (or later), if a question mark still exists...instructions to restart your system. Failure to install. • Please ignore the popup dialog box(es) (e.g. Chapter 3 Drivers Installation • Before installing the drivers, first install the operating system. (The following instructions use Windows XP as the example operating system.) • After installing...
... Install All button and "Xpress Install" will continue to install other applications included in the screen shot below. (If the driver Autorun screen does not appear automatically, go to install. After installing the SP1 (or later), if a question mark still exists...instructions to restart your system. Failure to install. • Please ignore the popup dialog box(es) (e.g. Chapter 3 Drivers Installation • Before installing the drivers, first install the operating system. (The following instructions use Windows XP as the example operating system.) • After installing...
Manual
Page 66
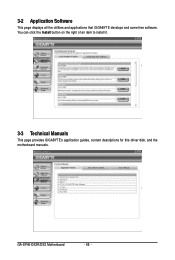
You can click the Install button on the right of an item to install it. 3-3 Technical Manuals This page provides GIGABYTE's application guides, content descriptions for this driver disk, and the motherboard manuals. 3-2 Application Software This page displays all the utilities and applications that GIGABYTE develops and some free software. GA-EP45-DS3R/DS3 Motherboard - 66 -
You can click the Install button on the right of an item to install it. 3-3 Technical Manuals This page provides GIGABYTE's application guides, content descriptions for this driver disk, and the motherboard manuals. 3-2 Application Software This page displays all the utilities and applications that GIGABYTE develops and some free software. GA-EP45-DS3R/DS3 Motherboard - 66 -
Manual
Page 67
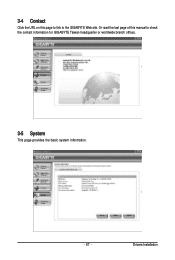
3-4 Contact Click the URL on this manual to the GIGABYTE Web site. Drivers Installation Or read the last page of this page to link to check the contact information for GIGABYTE Taiwan headquarter or worldwide branch offices. 3-5 System This page provides the basic system information. - 67 -
3-4 Contact Click the URL on this manual to the GIGABYTE Web site. Drivers Installation Or read the last page of this page to link to check the contact information for GIGABYTE Taiwan headquarter or worldwide branch offices. 3-5 System This page provides the basic system information. - 67 -
Manual
Page 68
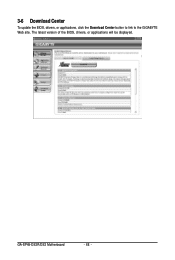
3-6 Download Center To update the BIOS, drivers, or applications, click the Download Center button to link to the GIGABYTE Web site. The latest version of the BIOS, drivers, or applications will be displayed. GA-EP45-DS3R/DS3 Motherboard - 68 -
3-6 Download Center To update the BIOS, drivers, or applications, click the Download Center button to link to the GIGABYTE Web site. The latest version of the BIOS, drivers, or applications will be displayed. GA-EP45-DS3R/DS3 Motherboard - 68 -
Manual
Page 69
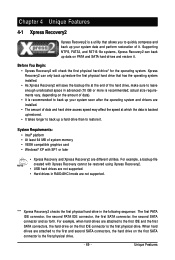
... Requirements: • Intel® platform • At least 64 MB of it. Xpress Recovery2 can back up your system soon after the operating system and drivers are attached to the first IDE and the first SATA connectors, the hard drive on the first IDE connector is a utility that has the operating...
... Requirements: • Intel® platform • At least 64 MB of it. Xpress Recovery2 can back up your system soon after the operating system and drivers are attached to the first IDE and the first SATA connectors, the hard drive on the first IDE connector is a utility that has the operating...


