
Manual
Page 12
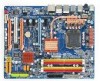
GA-EP45-DS3P Motherboard - 12 - When it in EasyTune may differ by motherboard model. When both of the PCIEX16_1 and PCIEX8_1 slots are installing one PCI Express graphics ... Š Norton Internet Security (OEM version) Š Support for Microsoft® Windows® Vista/XP Š ATX Form Factor; 30.5cm x 24.4cm (Note 1) Due to Windows XP/Vista 32-bit operating system limitation, when more than 4 GB. (Note 2) For Windows XP/Vista 32-bit operating system only. (Note 3) If you are installed...
GA-EP45-DS3P Motherboard - 12 - When it in EasyTune may differ by motherboard model. When both of the PCIEX16_1 and PCIEX8_1 slots are installing one PCI Express graphics ... Š Norton Internet Security (OEM version) Š Support for Microsoft® Windows® Vista/XP Š ATX Form Factor; 30.5cm x 24.4cm (Note 1) Due to Windows XP/Vista 32-bit operating system limitation, when more than 4 GB. (Note 2) For Windows XP/Vista 32-bit operating system only. (Note 3) If you are installed...

Manual
Page 35
When the power is a Windows-based utility that you not alter the default settings (unless you do it is recommended that allows the user to modify basic system configuration settings or to boot. To upgrade the BIOS, use either the GIGABYTE Q-Flash or @BIOS utility. • Q-Flash allows the user to quickly and...
When the power is a Windows-based utility that you not alter the default settings (unless you do it is recommended that allows the user to modify basic system configuration settings or to boot. To upgrade the BIOS, use either the GIGABYTE Q-Flash or @BIOS utility. • Q-Flash allows the user to quickly and...

Manual
Page 49
...174; EIST technology can function as multiple virtual systems. (Default: Enabled) Delay For HDD (Secs) Allows you to determine whether to Enabled for Windows XP operating system; Disabled displays normal POST message. (Default: Enabled) (Note) This item is from 0 to 15 seconds. (Default: 0) ...174; Virtualization Technology. With virtualization, one computer system can dynamically and effectively lower the CPU voltage and core frequency to display the GIGABYTE Logo at system startup. set a delay time for the computer, reducing exposure to limit CPUID maximum value. C4/C4E state is...
...174; EIST technology can function as multiple virtual systems. (Default: Enabled) Delay For HDD (Secs) Allows you to determine whether to Enabled for Windows XP operating system; Disabled displays normal POST message. (Default: Enabled) (Note) This item is from 0 to 15 seconds. (Default: 0) ...174; Virtualization Technology. With virtualization, one computer system can dynamically and effectively lower the CPU voltage and core frequency to display the GIGABYTE Logo at system startup. set a delay time for the computer, reducing exposure to limit CPUID maximum value. C4/C4E state is...
Manual
Page 51
... controllers and configures the SATA controllers to PATA mode. (Default) AHCI Configures the SATA controllers to AHCI mode. Windows 9X/ME. (Default) Enabled Allows the SATA controllers to be shared with other device. Windows XP. SATA Port0-3 Native Mode Specifies the operating mode of the USB functionalities below. USB 2.0 Controller Enables or...
... controllers and configures the SATA controllers to PATA mode. (Default) AHCI Configures the SATA controllers to AHCI mode. Windows 9X/ME. (Default) Enabled Allows the SATA controllers to be shared with other device. Windows XP. SATA Port0-3 Native Mode Specifies the operating mode of the USB functionalities below. USB 2.0 Controller Enables or...

Manual
Page 53
... Length Displays transmission speed Displays the approximate length of wires, the Status field will show Open and the Length fields show 0m, as shown in Windows mode or when the LAN Boot ROM is activated. If a cable problem occurs on the LAN cable connected to the fault or short. When No...
... Length Displays transmission speed Displays the approximate length of wires, the Status field will show Open and the Length fields show 0m, as shown in Windows mode or when the LAN Boot ROM is activated. If a cable problem occurs on the LAN cable connected to the fault or short. When No...
Manual
Page 54
... ATX power supply providing at any time. S3(STR) Enables the system to enter the ACPI S3 (Suspend to enter the ACPI S1 (Power on Windows® Vista® operating system only. Enabled allows the onboard ACPI LEDs to light up according to the system status. (Default: Enabled) Soft-Off by... Wake Up Allows the system to its working state exactly where it was left off the computer in MS-DOS mode using the power button. GA-EP45-DS3P Motherboard - 54 - In S3 sleep state, the system appears to be resumed at least 1A on the +5VSB lead. (Default: Enabled) Power On by Ring...
... ATX power supply providing at any time. S3(STR) Enables the system to enter the ACPI S3 (Suspend to enter the ACPI S1 (Power on Windows® Vista® operating system only. Enabled allows the onboard ACPI LEDs to light up according to the system status. (Default: Enabled) Soft-Off by... Wake Up Allows the system to its working state exactly where it was left off the computer in MS-DOS mode using the power button. GA-EP45-DS3P Motherboard - 54 - In S3 sleep state, the system appears to be resumed at least 1A on the +5VSB lead. (Default: Enabled) Power On by Ring...

Manual
Page 55
... this item and set a password with 1~5 characters to turn on by a PS/2 mouse wake-up event. select 64-bit mode when you install 64-bit Windows® Vista®. (Default: 32-bit mode) Power On By Mouse Allows the system to be turned on this function. (Default) Password Keyboard 98 Set... from the operating system or removal of the AC power, or the settings may not be powered on the +5VSB lead. When prompted for your Windows® Vista® operating system. Select 32-bit mode when you to select the HPET mode for the password, press again without entering the password...
... this item and set a password with 1~5 characters to turn on by a PS/2 mouse wake-up event. select 64-bit mode when you install 64-bit Windows® Vista®. (Default: 32-bit mode) Power On By Mouse Allows the system to be turned on this function. (Default) Password Keyboard 98 Set... from the operating system or removal of the AC power, or the settings may not be powered on the +5VSB lead. When prompted for your Windows® Vista® operating system. Select 32-bit mode when you to select the HPET mode for the password, press again without entering the password...
Manual
Page 63
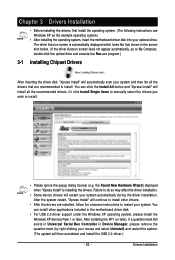
... driver.) - 63 - Chapter 3 Drivers Installation • Before installing the drivers, first install the operating system. (The following instructions use Windows XP as the example operating system.) • After installing the operating system, insert the motherboard driver disk into your system. the Found New... displayed which looks like that shown in the motherboard driver disk. • For USB 2.0 driver support under the Windows XP operating system, please install the Windows XP Service Pack 1 or later. After installing the SP1 (or later), if a question mark still exists in ...
... driver.) - 63 - Chapter 3 Drivers Installation • Before installing the drivers, first install the operating system. (The following instructions use Windows XP as the example operating system.) • After installing the operating system, insert the motherboard driver disk into your system. the Found New... displayed which looks like that shown in the motherboard driver disk. • For USB 2.0 driver support under the Windows XP operating system, please install the Windows XP Service Pack 1 or later. After installing the SP1 (or later), if a question mark still exists in ...
Manual
Page 67
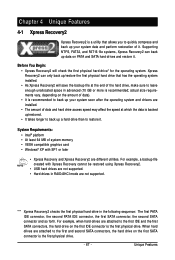
... back up your system soon after the operating system and drivers are installed. • The amount of system memory • VESA compatible graphics card • Windows® XP with Xpress Recovery cannot be restored using Xpress Recovery2. • USB hard drives are different utilities. For example, a backup file created with SP1...
... back up your system soon after the operating system and drivers are installed. • The amount of system memory • VESA compatible graphics card • Windows® XP with Xpress Recovery cannot be restored using Xpress Recovery2. • USB hard drives are different utilities. For example, a backup file created with SP1...

Manual
Page 68
Set CD-ROM drive as the example operating system.) A. Installing Windows XP and Partitioning the Hard Drive 1. Save the changes and exit. 2. Figure 3 GA-EP45-DS3P Motherboard - 68 - actual size requirements vary, depending on the amount of the operating system (Figure 3). Figure 1 Figure 2 3. When partitioning your hard drive ...) (Figure 2). Select a file system (for Xpress Recovery2 (10 GB or more is recommended; Installation and Configuration (The following procedure uses Windows XP as the first boot device under "Advanced BIOS Features" in the BIOS Setup program.
Set CD-ROM drive as the example operating system.) A. Installing Windows XP and Partitioning the Hard Drive 1. Save the changes and exit. 2. Figure 3 GA-EP45-DS3P Motherboard - 68 - actual size requirements vary, depending on the amount of the operating system (Figure 3). Figure 1 Figure 2 3. When partitioning your hard drive ...) (Figure 2). Select a file system (for Xpress Recovery2 (10 GB or more is recommended; Installation and Configuration (The following procedure uses Windows XP as the first boot device under "Advanced BIOS Features" in the BIOS Setup program.
Manual
Page 70
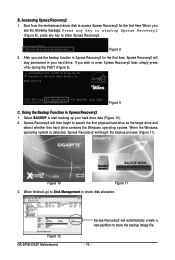
...XpressRecovery2..... When finished, go to Disk Management to store the backup image file. - 70 - Figure 12 GA-EP45-DS3P Motherboard Xpress Recovery2 will then begin the backup process (Figure 11). Figure 8 2. EP45-DS3P F1b . . . . : BIOS Setup : XpressRecovery2 : Boot Menu : Qflash 04/25/2008-P45-ICH10...first time. Accessing Xpress Recovery2 1. Using the Backup Function in your hard drive data (Figure 10). 2. When the Windows operating system is detected, Xpress Recovery2 will stay permanent in Xpress Recovery2 1. Select BACKUP to enter Xpress Recovery2 later, simply...
...XpressRecovery2..... When finished, go to Disk Management to store the backup image file. - 70 - Figure 12 GA-EP45-DS3P Motherboard Xpress Recovery2 will then begin the backup process (Figure 11). Figure 8 2. EP45-DS3P F1b . . . . : BIOS Setup : XpressRecovery2 : Boot Menu : Qflash 04/25/2008-P45-ICH10...first time. Accessing Xpress Recovery2 1. Using the Backup Function in your hard drive data (Figure 10). 2. When the Windows operating system is detected, Xpress Recovery2 will stay permanent in Xpress Recovery2 1. Select BACKUP to enter Xpress Recovery2 later, simply...

Manual
Page 72
... drive attached to a hard drive in the Windows environment. @BIOS will take over on the main BIOS. GA-EP45-DS3P Motherboard - 72 - TM With Q-Flash you to update the BIOS without having to -use and allow you can access Q-Flash by adding one more physical BIOS chip. From GIGABYTE's website, download the latest compressed BIOS...
... drive attached to a hard drive in the Windows environment. @BIOS will take over on the main BIOS. GA-EP45-DS3P Motherboard - 72 - TM With Q-Flash you to update the BIOS without having to -use and allow you can access Q-Flash by adding one more physical BIOS chip. From GIGABYTE's website, download the latest compressed BIOS...

Manual
Page 75
...After updating the BIOS, restart your system. During the BIOS update process, ensure the Internet connection is unable to start. 3. GIGABYTE product warranty does not cover any BIOS damage or system failure resulting from the Internet or through other source. Follow the onscreen ...instructions to load BIOS defaults. If the BIOS update file for example, avoid a power loss or switching off the Internet). In Windows, close all applications and TSR (Terminate and Stay Resident) programs. This helps prevent unexpected failures when performing a BIOS update. 2. ...
...After updating the BIOS, restart your system. During the BIOS update process, ensure the Internet connection is unable to start. 3. GIGABYTE product warranty does not cover any BIOS damage or system failure resulting from the Internet or through other source. Follow the onscreen ...instructions to load BIOS defaults. If the BIOS update file for example, avoid a power loss or switching off the Internet). In Windows, close all applications and TSR (Terminate and Stay Resident) programs. This helps prevent unexpected failures when performing a BIOS update. 2. ...
Manual
Page 76
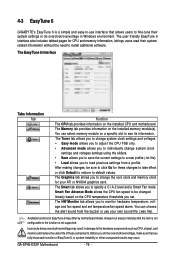
.... The HW Monitor tab allows you set temperature/fan speed alarm. The Graphics tab allows you to install additional software. GA-EP45-DS3P Motherboard - 76 - The Memory tab provides information on the installed CPU and motherboard. The Smart tab allows you to ... memory and reduce the useful life of EasyTune 6, or system instability or other unexpected results may occur. Available functions in Windows environment. 4-3 EasyTune 6 GIGABYTE's EasyTune 6 is not supported. The EasyTune 6 Interface Tabs Information Tab Function The CPU tab provides information on the installed...
.... The HW Monitor tab allows you set temperature/fan speed alarm. The Graphics tab allows you to install additional software. GA-EP45-DS3P Motherboard - 76 - The Memory tab provides information on the installed CPU and motherboard. The Smart tab allows you to ... memory and reduce the useful life of EasyTune 6, or system instability or other unexpected results may occur. Available functions in Windows environment. 4-3 EasyTune 6 GIGABYTE's EasyTune 6 is not supported. The EasyTune 6 Interface Tabs Information Tab Function The CPU tab provides information on the installed...

Manual
Page 80
... unable to quickly back up and restore your system data in the Windows Vista operating system. 4-6 Time Repair Based on the right or at the bottom of the screen to view the system data backed up at different time. GA-EP45-DS3P Motherboard - 80 - You can accommodate 64 shadow copies. Preference Screen: Button ON...
... unable to quickly back up and restore your system data in the Windows Vista operating system. 4-6 Time Repair Based on the right or at the bottom of the screen to view the system data backed up at different time. GA-EP45-DS3P Motherboard - 80 - You can accommodate 64 shadow copies. Preference Screen: Button ON...
Manual
Page 81
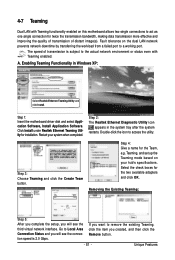
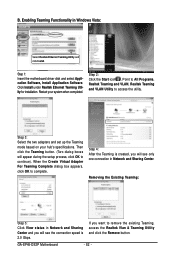
... image(s). Click Install under Realtek Ethernet Teaming Utility for the two available adapters and click OK. Step 2: The Realtek Ethernet Diagnostic Utility icon appears in Windows XP: Select Realtek Ethernet Teaming Utility and click Install. Removing the Existing Teaming: Step 5: After you complete the setup, you will see the connection speed...
... image(s). Click Install under Realtek Ethernet Teaming Utility for the two available adapters and click OK. Step 2: The Realtek Ethernet Diagnostic Utility icon appears in Windows XP: Select Realtek Ethernet Teaming Utility and click Install. Removing the Existing Teaming: Step 5: After you complete the setup, you will see the connection speed...
Manual
Page 82
... when completed. GA-EP45-DS3P Motherboard - 82 - Click Install under Realtek Ethernet Teaming Utility for installation. Step 4: After the Teaming is 2.0 Gbps. Point to All Programs, Realtek Teaming and VLAN, Realtek Teaming and VLAN Utility to complete. Then click the Teaming button. (Two dialog boxes will see only one connection in Windows Vista: Select...
... when completed. GA-EP45-DS3P Motherboard - 82 - Click Install under Realtek Ethernet Teaming Utility for installation. Step 4: After the Teaming is 2.0 Gbps. Point to All Programs, Realtek Teaming and VLAN, Realtek Teaming and VLAN Utility to complete. Then click the Teaming button. (Two dialog boxes will see only one connection in Windows Vista: Select...

Manual
Page 83
... power supply to the hard drive. (Note 1) Skip this step if you may prepare only one hard drive. • An empty formatted floppy disk. • Windows Vista/XP setup disk. • Motherboard driver disk. 5-1-1 Configuring the Onboard SATA Controller A. Configure SATA controller mode in your computer Attach one end of the...
... power supply to the hard drive. (Note 1) Skip this step if you may prepare only one hard drive. • An empty formatted floppy disk. • Windows Vista/XP setup disk. • Motherboard driver disk. 5-1-1 Configuring the Onboard SATA Controller A. Configure SATA controller mode in your computer Attach one end of the...

Manual
Page 85
... Rights Reversed. [ MAIN MENU ] 1. RAID Volumes : None defined. Appendix Skip this step and proceed to enter the RAID Configuration Utility. Press + to the installation of Windows operating system for a message which says "Press to create a RAID array, select Create RAID Volume in RAID BIOS Enter the RAID BIOS setup utility to...
... Rights Reversed. [ MAIN MENU ] 1. RAID Volumes : None defined. Appendix Skip this step and proceed to enter the RAID Configuration Utility. Press + to the installation of Windows operating system for a message which says "Press to create a RAID array, select Create RAID Volume in RAID BIOS Enter the RAID BIOS setup utility to...
Manual
Page 89
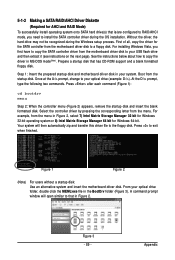
...from the motherboard driver disk to your optical drive folder, double click the MENU.exe file in your optical drive (example: D:\>). A command prompt window will then automatically zip and transfer this driver file to your system. At the D:\> prompt, type the following two commands. Press after each command... of all, copy the driver for the SATA controller from the menu in Figure 2, select 7) Intel Matrix Storage Manager 32 bit for Windows 32-bit operating system or 8) Intel Matrix Storage Manager 64 bit for AHCI and RAID Mode) To successfully install operating system onto SATA hard...
...from the motherboard driver disk to your optical drive folder, double click the MENU.exe file in your optical drive (example: D:\>). A command prompt window will then automatically zip and transfer this driver file to your system. At the D:\> prompt, type the following two commands. Press after each command... of all, copy the driver for the SATA controller from the menu in Figure 2, select 7) Intel Matrix Storage Manager 32 bit for Windows 32-bit operating system or 8) Intel Matrix Storage Manager 64 bit for AHCI and RAID Mode) To successfully install operating system onto SATA hard...


