Manual
Page 9
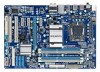
...; Before turning on the power, make sure they are connected tightly and securely. • When handling the motherboard, avoid touching any installation steps or have a problem related to wear an electrostatic discharge (ESD) wrist strap when handling electronic com- These stickers are required for warranty validation. • Always remove the AC...
...; Before turning on the power, make sure they are connected tightly and securely. • When handling the motherboard, avoid touching any installation steps or have a problem related to wear an electrostatic discharge (ESD) wrist strap when handling electronic com- These stickers are required for warranty validation. • Always remove the AC...
Manual
Page 26
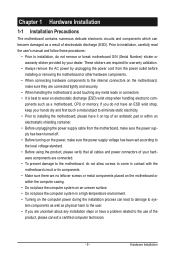
...The front panel design may configure the way to turn off when the system is off your chassis front panel module to indicate the problem. When connecting your system using the power switch (refer to Chapter 2, "BIOS Setup," "Power Management Setup," for information about beep ... the chassis to this header, make sure the wire assignments and the pin assignments are matched correctly. Hardware Installation - 26 - If a problem is operating. Message/Power/ Power Sleep LED Switch Speaker MSG+ MSG- A front panel module mainly consists of power switch, reset switch, ...
...The front panel design may configure the way to turn off when the system is off your chassis front panel module to indicate the problem. When connecting your system using the power switch (refer to Chapter 2, "BIOS Setup," "Power Management Setup," for information about beep ... the chassis to this header, make sure the wire assignments and the pin assignments are matched correctly. Hardware Installation - 26 - If a problem is operating. Message/Power/ Power Sleep LED Switch Speaker MSG+ MSG- A front panel module mainly consists of power switch, reset switch, ...
Manual
Page 31
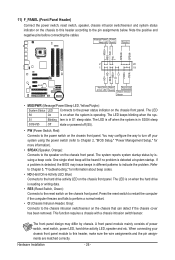
... utility that searches and downloads the latest version of BIOS from the Internet and updates the BIOS. To flash the BIOS, do not encounter problems using the current version of BIOS, it with caution. To access the BIOS Setup program, press the key during the POST when the power.... When the power is recommended that you can press + in the main menu of the BIOS Setup program. To upgrade the BIOS, use either the GIGABYTE Q-Flash or @BIOS utility. • Q-Flash allows the user to activate certain system features. Refer to Chapter 5, "Troubleshooting," for how to prevent system...
... utility that searches and downloads the latest version of BIOS from the Internet and updates the BIOS. To flash the BIOS, do not encounter problems using the current version of BIOS, it with caution. To access the BIOS Setup program, press the key during the POST when the power.... When the power is recommended that you can press + in the main menu of the BIOS Setup program. To upgrade the BIOS, use either the GIGABYTE Q-Flash or @BIOS utility. • Q-Flash allows the user to activate certain system features. Refer to Chapter 5, "Troubleshooting," for how to prevent system...
Manual
Page 49
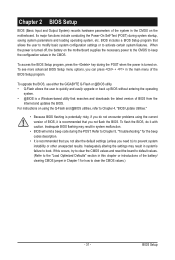
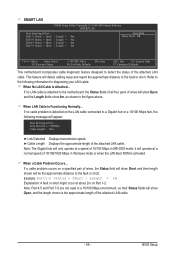
... to detect the status of the attached LAN cable. Cable Length Displays the approximate length of the attached LAN cable. If a cable problem occurs on the LAN cable connected to the fault or short. Refer to the following message will be the approximate distance to a Gigabit... the approximate length of wires, the Status field will show 0m, as shown in MS-DOS mode; If no LAN cable is activated. When a Cable Problem Occurs... When LAN Cable Is Functioning Normally... Example: Part1-2 Status = Short / Length = 2m Explanation: A fault or short might occur at Port..... Note...
... to detect the status of the attached LAN cable. Cable Length Displays the approximate length of the attached LAN cable. If a cable problem occurs on the LAN cable connected to the fault or short. Refer to the following message will be the approximate distance to a Gigabit... the approximate length of wires, the Status field will show 0m, as shown in MS-DOS mode; If no LAN cable is activated. When a Cable Problem Occurs... When LAN Cable Is Functioning Normally... Example: Part1-2 Status = Short / Length = 2m Explanation: A fault or short might occur at Port..... Note...
Manual
Page 84
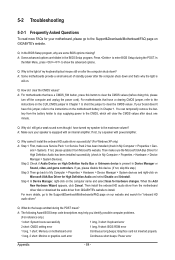
... have this , please turn off the computer and unplug the power cord). A: The following Award BIOS beep code descriptions may help you identify possible computer problems. (For reference only.) 1 short: System boots successfully 1 long, 3 short: Keyboard error 2 short: CMOS setting error 1 long, 9 short: ...Audio and select Disable and Uninstall. If not, try a speaker with an internal amplifier. If not, please update it from GIGABYTE's website to the maximum volume? 5-2 Troubleshooting 5-2-1 Frequently Asked Questions To read more details, go to the Support&Downloads\Motherboards...
... have this , please turn off the computer and unplug the power cord). A: The following Award BIOS beep code descriptions may help you identify possible computer problems. (For reference only.) 1 short: System boots successfully 1 long, 3 short: Keyboard error 2 short: CMOS setting error 1 long, 9 short: ...Audio and select Disable and Uninstall. If not, try a speaker with an internal amplifier. If not, please update it from GIGABYTE's website to the maximum volume? 5-2 Troubleshooting 5-2-1 Frequently Asked Questions To read more details, go to the Support&Downloads\Motherboards...
Manual
Page 85
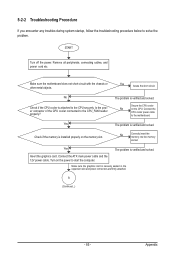
The problem is securely seated in the expansion slot and power connectors are firmly attached. No Correctly insert the memory into the memory socket. Appendix START Turn ... motherboard. Insert the graphics card. A (Continued...) - 85 - Remove all peripherals, connecting cables, and power cord etc. Yes The problem is installed properly on the memory slot. Yes The problem is attached to solve the problem. Secure the CPU cooler No on the power to start the computer. Make sure the motherboard does not...
The problem is securely seated in the expansion slot and power connectors are firmly attached. No Correctly insert the memory into the memory socket. Appendix START Turn ... motherboard. Insert the graphics card. A (Continued...) - 85 - Remove all peripherals, connecting cables, and power cord etc. Yes The problem is installed properly on the memory slot. Yes The problem is attached to solve the problem. Secure the CPU cooler No on the power to start the computer. Make sure the motherboard does not...
Manual
Page 86
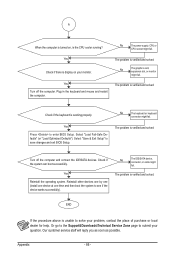
... CPU socket might fail. Yes Turn off the computer and connect the IDE/SATA devices. The problem is verified and solved. The problem is verified and solved. The problem is verified and solved. Plug in the keyboard and mouse and restart the computer. Our customer ...the computer is turned on your monitor. No The keyboard or keyboard connector might fail. The problem is verified and solved. Appendix - 86 - Select "Save & Exit Setup" to submit your problem, contact the place of purchase or local dealer for help. Yes Reinstall the operating system....
... CPU socket might fail. Yes Turn off the computer and connect the IDE/SATA devices. The problem is verified and solved. The problem is verified and solved. The problem is verified and solved. Plug in the keyboard and mouse and restart the computer. Our customer ...the computer is turned on your monitor. No The keyboard or keyboard connector might fail. The problem is verified and solved. Appendix - 86 - Select "Save & Exit Setup" to submit your problem, contact the place of purchase or local dealer for help. Yes Reinstall the operating system....


