Manual
Page 6
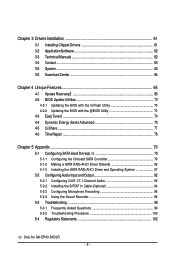
... Configuring the Onboard SATA Controller 79 5-1-2 Making a SATA RAID/AHCI Driver Diskette 85 5-1-3 Installing the SATA RAID/AHCI Driver and Operating System 87 5-2 Configuring Audio Input ...and Output 92 5-2-1 Configuring 2/4/5.1/7.1-Channel Audio 92 5-2-2 Installing the S/PDIF In Cable (Optional 94 5-2-3 Configuring Microphone Recording 96 5-2-4 Using the Sound Recorder 98 5-3 Troubleshooting 99 5-3-1 Frequently Asked Questions 99 5-3-2 Troubleshooting Procedure 100 5-4 Regulatory Statements 102 Only for GA-EP43...
... Configuring the Onboard SATA Controller 79 5-1-2 Making a SATA RAID/AHCI Driver Diskette 85 5-1-3 Installing the SATA RAID/AHCI Driver and Operating System 87 5-2 Configuring Audio Input ...and Output 92 5-2-1 Configuring 2/4/5.1/7.1-Channel Audio 92 5-2-2 Installing the S/PDIF In Cable (Optional 94 5-2-3 Configuring Microphone Recording 96 5-2-4 Using the Sound Recorder 98 5-3 Troubleshooting 99 5-3-1 Frequently Asked Questions 99 5-3-2 Troubleshooting Procedure 100 5-4 Regulatory Statements 102 Only for GA-EP43...
Manual
Page 12
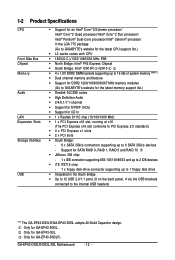
...RAID 0, RAID 1, RAID 5 and RAID 10 Š JMicron 368 chip: - 1 x IDE connector supporting ATA-133/100/66/33 and up to 2 IDE devices Š iTE IT8718 chip: - 1 x floppy disk drive connector supporting up to 1 floppy disk drive Š Integrated in the LGA 775 package (Go to GIGABYTE...138; 2 x PCI slots Š South Bridge: - 6 x SATA 3Gb/s connectors supporting up to the internal USB headers) "*" The GA-EP43-DS3LR/GA-EP43-DS3L adopts All-Solid Capacitor design. 1-2 Product Specifications CPU Front Side Bus Chipset Memory Audio LAN Expansion Slots Storage Interface USB Š Support for an...
...RAID 0, RAID 1, RAID 5 and RAID 10 Š JMicron 368 chip: - 1 x IDE connector supporting ATA-133/100/66/33 and up to 2 IDE devices Š iTE IT8718 chip: - 1 x floppy disk drive connector supporting up to 1 floppy disk drive Š Integrated in the LGA 775 package (Go to GIGABYTE...138; 2 x PCI slots Š South Bridge: - 6 x SATA 3Gb/s connectors supporting up to the internal USB headers) "*" The GA-EP43-DS3LR/GA-EP43-DS3L adopts All-Solid Capacitor design. 1-2 Product Specifications CPU Front Side Bus Chipset Memory Audio LAN Expansion Slots Storage Interface USB Š Support for an...

Manual
Page 27
... S1 sleep state. Pin No. The ICH10R controller supports RAID 0, RAID 1, RAID 5 and RAID 10. Refer to your SATA hard drive. • A RAID 0 or RAID 1 configuration requires at least four hard drives and the total number of the SATA 3Gb/s cable to Chapter 5, "Configuring SATA Hard Drive(s)," for GA-EP43-DS3LR. - 27 - Each SATA connector supports a single SATA...
... S1 sleep state. Pin No. The ICH10R controller supports RAID 0, RAID 1, RAID 5 and RAID 10. Refer to your SATA hard drive. • A RAID 0 or RAID 1 configuration requires at least four hard drives and the total number of the SATA 3Gb/s cable to Chapter 5, "Configuring SATA Hard Drive(s)," for GA-EP43-DS3LR. - 27 - Each SATA connector supports a single SATA...
Manual
Page 51
... SATA controllers to AHCI mode. Enable Native IDE mode if you wish to install operating systems that support Native mode. Only for GA-EP43-S3L. Only for GA-EP43-DS3L. BIOS Setup Disabled Disables RAID for the SATA controllers and configures the SATA controllers to PATAmode. (Default) AHCI Configures the SATA controllers to operate in Legacy...
... SATA controllers to AHCI mode. Enable Native IDE mode if you wish to install operating systems that support Native mode. Only for GA-EP43-S3L. Only for GA-EP43-DS3L. BIOS Setup Disabled Disables RAID for the SATA controllers and configures the SATA controllers to PATAmode. (Default) AHCI Configures the SATA controllers to operate in Legacy...
Manual
Page 65
... data and hard drive access speed may affect the speed at the end of the hard drive, make sure to leave enough unallocated space in RAID/AHCI mode are attached to the first and second SATA connectors, the hard drive on the first IDE connector is the first physical drive. When...
... data and hard drive access speed may affect the speed at the end of the hard drive, make sure to leave enough unallocated space in RAID/AHCI mode are attached to the first and second SATA connectors, the hard drive on the first IDE connector is the first physical drive. When...
Manual
Page 70
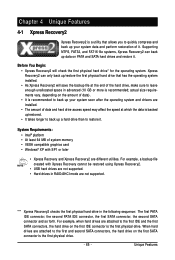
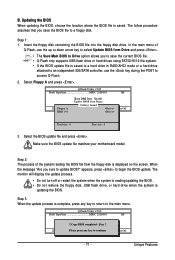
What is saved to a hard drive in RAID/AHCI mode or a hard drive attached to an ... your computer by either pressing the key during the POST to enter Q-Flash. Before You Begin: 1. Restart the system. EP43-DS3L F1da . . . . : BIOS Setup : XpressRecovery2 : Boot Menu : Qflash 05/21/2008-P43-ICH10-7A89PG0FC-00 ...USB flash drive, or hard drive. 4-2 BIOS Update Utilities GIGABYTE motherboards provide two unique BIOS update tools, Q-FlashTM and @BIOSTM. GIGABYTE Q-Flash and @BIOS are easy-to-use FAT32/16/12 file system. 3. GA-EP43-DS3LR/DS3L/S3L Motherboard - 70 -
What is saved to a hard drive in RAID/AHCI mode or a hard drive attached to an ... your computer by either pressing the key during the POST to enter Q-Flash. Before You Begin: 1. Restart the system. EP43-DS3L F1da . . . . : BIOS Setup : XpressRecovery2 : Boot Menu : Qflash 05/21/2008-P43-ICH10-7A89PG0FC-00 ...USB flash drive, or hard drive. 4-2 BIOS Update Utilities GIGABYTE motherboards provide two unique BIOS update tools, Q-FlashTM and @BIOSTM. GIGABYTE Q-Flash and @BIOS are easy-to-use FAT32/16/12 file system. 3. GA-EP43-DS3LR/DS3L/S3L Motherboard - 70 -
Manual
Page 71
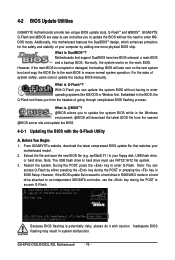
... supports USB flash drive or hard drives using FAT32/16/12 file system. • If the BIOS update file is saved to a hard drive in RAID/AHCI mode or a hard drive attached to an independent IDE/SATA controller, use the up or down arrow key to select Update BIOS from Drive...
... supports USB flash drive or hard drives using FAT32/16/12 file system. • If the BIOS update file is saved to a hard drive in RAID/AHCI mode or a hard drive attached to an independent IDE/SATA controller, use the up or down arrow key to select Update BIOS from Drive...

Manual
Page 79
...performance, it is set to the hard drive. Configure a RAID array in your computer. Installing SATA hard drive(s) in BIOS Setup. Only for GA-EP43-DS3LR. (Note 1) Skip this step if you do not want to create RAID array on the motherboard. B. Make a floppy disk containing the... SATA RAID/AHCI driver. (Note 2) E. Chapter 5 Appendix 5-1 Configuring SATA Hard Drive(s) ...
...performance, it is set to the hard drive. Configure a RAID array in your computer. Installing SATA hard drive(s) in BIOS Setup. Only for GA-EP43-DS3LR. (Note 1) Skip this step if you do not want to create RAID array on the motherboard. B. Make a floppy disk containing the... SATA RAID/AHCI driver. (Note 2) E. Chapter 5 Appendix 5-1 Configuring SATA Hard Drive(s) ...
Manual
Page 80
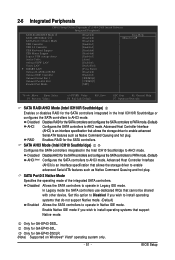
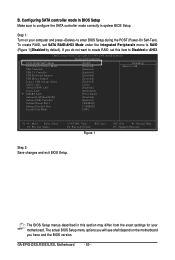
...-Test). If you have and the BIOS version. The actual BIOS Setup menu options you will see shall depend on your motherboard. GA-EP43-DS3LR/DS3L/S3L Motherboard - 80 - B. Configuring SATA controller mode in BIOS Setup Make sure to configure the SATA controller mode correctly in this item to RAID (Figure 1)(Disabled by default).
...-Test). If you have and the BIOS version. The actual BIOS Setup menu options you will see shall depend on your motherboard. GA-EP43-DS3LR/DS3L/S3L Motherboard - 80 - B. Configuring SATA controller mode in BIOS Setup Make sure to configure the SATA controller mode correctly in this item to RAID (Figure 1)(Disabled by default).

Manual
Page 81
...memory test begins and before the operating system boot begins, look for a non-RAID configuration. Figure 2 Step 2: After you want to Non-RAID 4. Exit RAID Volumes : None defined. Create RAID Volume 2. Intel(R) Matrix Storage Manager option ROM v8.5.0.1013 ICH10R wRAID5 Copyright(C)... (Figure 3). Reset Disks to create a RAID array, select Create RAID Volume in RAID BIOS Enter the RAID BIOS setup utility to enter the RAID Configuration Utility. Configuring a RAID array in MAIN MENU and press . Press + to configure a RAID array. C. RAID Volumes : None defined. Physical Disks : ...
...memory test begins and before the operating system boot begins, look for a non-RAID configuration. Figure 2 Step 2: After you want to Non-RAID 4. Exit RAID Volumes : None defined. Create RAID Volume 2. Intel(R) Matrix Storage Manager option ROM v8.5.0.1013 ICH10R wRAID5 Copyright(C)... (Figure 3). Reset Disks to create a RAID array, select Create RAID Volume in RAID BIOS Enter the RAID BIOS setup utility to enter the RAID Configuration Utility. Configuring a RAID array in MAIN MENU and press . Press + to configure a RAID array. C. RAID Volumes : None defined. Physical Disks : ...

Manual
Page 82
... Disks 128KB 223.6 GB Create Volume [ HELP ] Choose the RAID level: RAID0: Stripes data (performance). There are typical values: RAID0 - 128KB RAID10 - 64KB RAID5 - 64KB [KL]-Change [TAB]-Next [ESC]-Previous Menu Figure 5 [ENTER]-Select GA-EP43-DS3LR/DS3L/S3L Motherboard - 82 - Then, select a RAID level (Figure 4). Once you have selected the stripe block size...
... Disks 128KB 223.6 GB Create Volume [ HELP ] Choose the RAID level: RAID0: Stripes data (performance). There are typical values: RAID0 - 128KB RAID10 - 64KB RAID5 - 64KB [KL]-Change [TAB]-Next [ESC]-Previous Menu Figure 5 [ENTER]-Select GA-EP43-DS3LR/DS3L/S3L Motherboard - 82 - Then, select a RAID level (Figure 4). Once you have selected the stripe block size...
Manual
Page 83
... Disk(0) [KL]-Select [ESC]-Exit Figure 7 [ENTER]-Select Menu To exit the ICH10R RAID BIOS utility, press or select Exit in the DISK/VOLUME INFORMATION section, including the RAID level, stripe block size, array name, and array capacity, etc. (Figure 7) Intel(R)...Matrix Storage Manager option ROM v8.5.0.1013 ICH10R wRAID5 Copyright(C) 2003-08 Intel Corporation. Delete RAID Volume 3. Appendix Reset Disks to begin creating the RAID array. All Rights Reversed. [ CREATE VOLUME MENU ] Name : RAID Level : Disks : Strip Size : Capacity : RAID_Volume0 RAID0(Stripe) Select Disks 128KB 223...
... Disk(0) [KL]-Select [ESC]-Exit Figure 7 [ENTER]-Select Menu To exit the ICH10R RAID BIOS utility, press or select Exit in the DISK/VOLUME INFORMATION section, including the RAID level, stripe block size, array name, and array capacity, etc. (Figure 7) Intel(R)...Matrix Storage Manager option ROM v8.5.0.1013 ICH10R wRAID5 Copyright(C) 2003-08 Intel Corporation. Delete RAID Volume 3. Appendix Reset Disks to begin creating the RAID array. All Rights Reversed. [ CREATE VOLUME MENU ] Name : RAID Level : Disks : Strip Size : Capacity : RAID_Volume0 RAID0(Stripe) Select Disks 128KB 223...

Manual
Page 84
...will reset the disks to be deleted and press . WARNING: ALL DISK DATA WILL BE DELETED. [KL]-Select [ESC]-Previous Menu Figure 8 [DEL]-Delete Volume GA-EP43-DS3LR/DS3L/S3L Motherboard - 84 - All Rights Reversed. [ DELETE VOLUME MENU ] Name Volume0 Level RAID0(Stripe) Drives Capacity Status Bootable 2 223.6GB Normal Yes [ DELETE... VOLUME VERIFICATION ] ALL DATA IN THE[VHOELLUPM] E WILL BE LOST! When prompted to confirm your selection (Figure 8), press to confirm or to abort. Delete RAID Volume To delete a RAID array, select Delete RAID Volume in MAIN MENU and press .
...will reset the disks to be deleted and press . WARNING: ALL DISK DATA WILL BE DELETED. [KL]-Select [ESC]-Previous Menu Figure 8 [DEL]-Delete Volume GA-EP43-DS3LR/DS3L/S3L Motherboard - 84 - All Rights Reversed. [ DELETE VOLUME MENU ] Name Volume0 Level RAID0(Stripe) Drives Capacity Status Bootable 2 223.6GB Normal Yes [ DELETE... VOLUME VERIFICATION ] ALL DATA IN THE[VHOELLUPM] E WILL BE LOST! When prompted to confirm your selection (Figure 8), press to confirm or to abort. Delete RAID Volume To delete a RAID array, select Delete RAID Volume in MAIN MENU and press .

Manual
Page 85
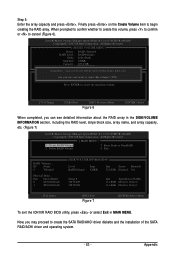
... driver file to copy the driver in the BootDrv folder (Figure 3). Appendix 5-1-2 Making a SATA RAID/AHCI Driver Diskette (Required for AHCI and RAID Mode) To successfully install operating system onto SATA hard drive(s) that is/are configured to RAID/AHCI mode, you first have to copy the SATA controller driver from the motherboard...
... driver file to copy the driver in the BootDrv folder (Figure 3). Appendix 5-1-2 Making a SATA RAID/AHCI Driver Diskette (Required for AHCI and RAID Mode) To successfully install operating system onto SATA hard drive(s) that is/are configured to RAID/AHCI mode, you first have to copy the SATA controller driver from the motherboard...
Manual
Page 86
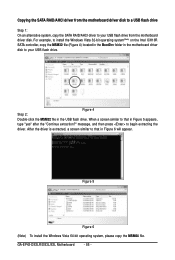
... driver from the motherboard driver disk to a USB flash drive Step 1: On an alternative system, copy the SATA RAID/AHCI driver to your USB flash drive from the motherboard driver disk. GA-EP43-DS3LR/DS3L/S3L Motherboard - 86 - For example, to install the Windows Vista 32-bit operating system(Note) on the Intel ICH10R...
... driver from the motherboard driver disk to a USB flash drive Step 1: On an alternative system, copy the SATA RAID/AHCI driver to your USB flash drive from the motherboard driver disk. GA-EP43-DS3LR/DS3L/S3L Motherboard - 86 - For example, to install the Windows Vista 32-bit operating system(Note) on the Intel ICH10R...

Manual
Page 87
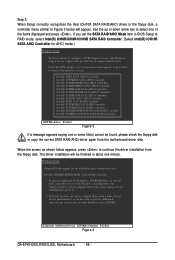
... installed in your system, or you have chosen to install a third party SCSI or RAID driver. 5-1-3 Installing the SATA RAID/AHCI Driver and Operating System Now that you have prepared the SATA RAID/AHCI driver diskette and configured the required BIOS settings, you are ready to that below ...appears, insert the floppy disk containing the SATA RAID/AHCI driver and press (Figure 2). A. Appendix The following mass storage devices(s) * To specify additional SCSI adapters, CD-ROM drives, or ...
... installed in your system, or you have chosen to install a third party SCSI or RAID driver. 5-1-3 Installing the SATA RAID/AHCI Driver and Operating System Now that you have prepared the SATA RAID/AHCI driver diskette and configured the required BIOS settings, you are ready to that below ...appears, insert the floppy disk containing the SATA RAID/AHCI driver and press (Figure 2). A. Appendix The following mass storage devices(s) * To specify additional SCSI adapters, CD-ROM drives, or ...
Manual
Page 88
... to return to the previous screen. S=Specify Additional Device ENTER=Continue F3=Exit Figure 4 GA-EP43-DS3LR/DS3L/S3L Motherboard - 88 - If you set the SATA RAID/AHCI Mode item in BIOS Setup to RAID mode, select Intel(R) ICH8R/ICH9R/ICH10R SATA RAID Controller. (Select Intel(R) ICH10R SATA AHCI Controller for AHCI mode.) Windows Setup You...
... to return to the previous screen. S=Specify Additional Device ENTER=Continue F3=Exit Figure 4 GA-EP43-DS3LR/DS3L/S3L Motherboard - 88 - If you set the SATA RAID/AHCI Mode item in BIOS Setup to RAID mode, select Intel(R) ICH8R/ICH9R/ICH10R SATA RAID Controller. (Select Intel(R) ICH10R SATA AHCI Controller for AHCI mode.) Windows Setup You...
Manual
Page 89
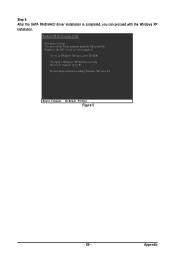
Step 4: After the SATA RAID/AHCI driver installation is completed, you can proceed with the Windows XP installation. Enter= Continue R=Repair F3=Exit Figure 5 - 89 - To set up Windows XP now, press ENTER. WindowsXP Professional Setup Welcome to run on your computer. This port of the Setup program prepares Microsoft(R) Windows (R) XP to Setup. To quit Setup without installing Windows XP, press F3. To repair a Windows XP installation using Recovery Console, press R. Appendix
Step 4: After the SATA RAID/AHCI driver installation is completed, you can proceed with the Windows XP installation. Enter= Continue R=Repair F3=Exit Figure 5 - 89 - To set up Windows XP now, press ENTER. WindowsXP Professional Setup Welcome to run on your computer. This port of the Setup program prepares Microsoft(R) Windows (R) XP to Setup. To quit Setup without installing Windows XP, press F3. To repair a Windows XP installation using Recovery Console, press R. Appendix
Manual
Page 90
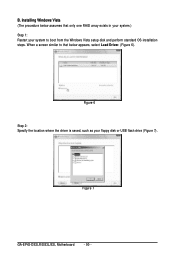
Figure 7 GA-EP43-DS3LR/DS3L/S3L Motherboard - 90 - When a screen similar to boot from the Windows Vista setup disk and perform standard OS installation steps. Figure 6 Step 2: Specify the location where the driver is saved, such as your system to that below appears, select Load Driver. (Figure 6). B. Installing Windows Vista (The procedure below assumes that only one RAID array exists in your system.) Step 1: Restart your floppy disk or USB flash drive (Figure 7).
Figure 7 GA-EP43-DS3LR/DS3L/S3L Motherboard - 90 - When a screen similar to boot from the Windows Vista setup disk and perform standard OS installation steps. Figure 6 Step 2: Specify the location where the driver is saved, such as your system to that below appears, select Load Driver. (Figure 6). B. Installing Windows Vista (The procedure below assumes that only one RAID array exists in your system.) Step 1: Restart your floppy disk or USB flash drive (Figure 7).

Manual
Page 91
Figure 8 Step 4: After the driver is loaded, select the RAID/AHCI drive(s) where you want to install the operating system and then press Next to AHCI mode. - 91 - Appendix Figure 9 (Note) The item displayed in Figure 8 appears, select Intel(R) ICH8R/ICH9R/ICH10R SATA RAID Controller (Note) and press Next. Step 3: When a screen as shown in Figure 8 will be shown as Intel(R) ICH10R SATA AHCI Controller when the SATA controllers are set to continue the OS installation (Figure 9).
Figure 8 Step 4: After the driver is loaded, select the RAID/AHCI drive(s) where you want to install the operating system and then press Next to AHCI mode. - 91 - Appendix Figure 9 (Note) The item displayed in Figure 8 appears, select Intel(R) ICH8R/ICH9R/ICH10R SATA RAID Controller (Note) and press Next. Step 3: When a screen as shown in Figure 8 will be shown as Intel(R) ICH10R SATA AHCI Controller when the SATA controllers are set to continue the OS installation (Figure 9).


