Manual
Page 4
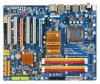
... ...6 OptionalItems ...6 GA-EP43-DS3R/DS3 Motherboard Layout 7 Block Diagram ...8 Chapter 1 Hardware Installation 9 1-1 Installation Precautions 9 1-2 Product Specifications 10 1-3 Installing the CPU and CPU Cooler 13 1-3-1 Installing the CPU 13 1-3-2 Installing the CPU Cooler 15 1-4 Installing the Memory 16 1-4-1 Dual Channel Memory Configuration 16 1-4-2 Installing a Memory 17 1-5 Installing an Expansion Card 18 1-6 Installing the SATA Bracket 19 1-7 Back Panel Connectors 20 1-8 Internal Connectors 22 Chapter 2 BIOS Setup 35 2-1 Startup Screen 36 2-2 The Main Menu 37 2-3 MB...
... ...6 OptionalItems ...6 GA-EP43-DS3R/DS3 Motherboard Layout 7 Block Diagram ...8 Chapter 1 Hardware Installation 9 1-1 Installation Precautions 9 1-2 Product Specifications 10 1-3 Installing the CPU and CPU Cooler 13 1-3-1 Installing the CPU 13 1-3-2 Installing the CPU Cooler 15 1-4 Installing the Memory 16 1-4-1 Dual Channel Memory Configuration 16 1-4-2 Installing a Memory 17 1-5 Installing an Expansion Card 18 1-6 Installing the SATA Bracket 19 1-7 Back Panel Connectors 20 1-8 Internal Connectors 22 Chapter 2 BIOS Setup 35 2-1 Startup Screen 36 2-2 The Main Menu 37 2-3 MB...
Manual
Page 10
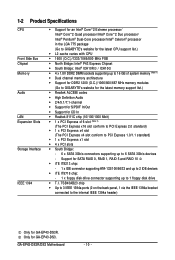
GA-EP43-DS3R/DS3 Motherboard - 10 - 1-2 Product Specifications CPU Front Side Bus Chipset Memory Audio LAN Expansion Slots Storage Interface IEEE 1394 Š Support for an Intel® CoreTM 2 Extreme processor/ Intel® CoreTM 2 Quad processor/Intel® CoreTM 2 Duo processor/ Intel® Pentium® Dual-Core processor/Intel® Celeron® processor in the LGA 775 package (Go to GIGABYTE's website for the latest CPU support list.) Š L2 cache varies with CPU Š 1600 (O.C.)/1333...
GA-EP43-DS3R/DS3 Motherboard - 10 - 1-2 Product Specifications CPU Front Side Bus Chipset Memory Audio LAN Expansion Slots Storage Interface IEEE 1394 Š Support for an Intel® CoreTM 2 Extreme processor/ Intel® CoreTM 2 Quad processor/Intel® CoreTM 2 Duo processor/ Intel® Pentium® Dual-Core processor/Intel® Celeron® processor in the LGA 775 package (Go to GIGABYTE's website for the latest CPU support list.) Š L2 cache varies with CPU Š 1600 (O.C.)/1333...
Manual
Page 12
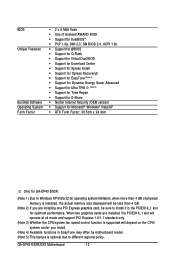
....4cm Only for GA-EP43-DS3R. (Note 1) Due to Windows XP/Vista 32-bit operating system limitation, when more than 4 GB of physical memory is installed, the actual memory size displayed will depend on the CPU/ system cooler you are installed, the PCIEX16_1 slot will operate at x4 mode and support PCI Express 1.0/1.1 standard only. (Note 3) Whether the CPU/system fan speed control function is optional due to install it in the...
....4cm Only for GA-EP43-DS3R. (Note 1) Due to Windows XP/Vista 32-bit operating system limitation, when more than 4 GB of physical memory is installed, the actual memory size displayed will depend on the CPU/ system cooler you are installed, the PCIEX16_1 slot will operate at x4 mode and support PCI Express 1.0/1.1 standard only. (Note 3) Whether the CPU/system fan speed control function is optional due to install it in the...
Manual
Page 16
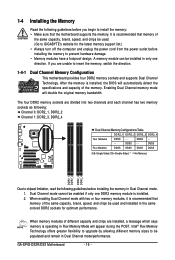
Enabling Dual Channel memory mode will automatically detect the specifications and capacity of the same capacity, brand, speed, and chips be used . (Go to GIGABYTE's website for optimum performance. DS/SS - - GA-EP43-DS3R/DS3 Motherboard - 16 - If you begin to install the memory: • Make sure that memory of the memory. After the memory is recommended that memory of different capacity and chips are unable to insert the memory, switch the direction. 1-4-1 Dual Channel Memory Configuration This...
Enabling Dual Channel memory mode will automatically detect the specifications and capacity of the same capacity, brand, speed, and chips be used . (Go to GIGABYTE's website for optimum performance. DS/SS - - GA-EP43-DS3R/DS3 Motherboard - 16 - If you begin to install the memory: • Make sure that memory of the memory. After the memory is recommended that memory of different capacity and chips are unable to insert the memory, switch the direction. 1-4-1 Dual Channel Memory Configuration This...
Manual
Page 18
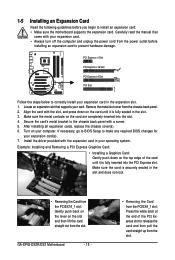
... the power cord from the slot. Remove the metal slot cover from the slot. Install the driver provided with your operating system. Carefully read the manual that supports your computer. PCI Express x1 Slot PCI Express x16 Slot PCI Express x4 Slot PCI Slot Follow the steps below to correctly install your expansion card(s). 7. Turn on your card. Example: Installing and Removing a PCI Express Graphics Card: • Installing a Graphics Card: Gently push down on the card are completely inserted into the PCI Express slot. GA-EP43-DS3R/DS3 Motherboard - 18 - • Removing...
... the power cord from the slot. Remove the metal slot cover from the slot. Install the driver provided with your operating system. Carefully read the manual that supports your computer. PCI Express x1 Slot PCI Express x16 Slot PCI Express x4 Slot PCI Slot Follow the steps below to correctly install your expansion card(s). 7. Turn on your card. Example: Installing and Removing a PCI Express Graphics Card: • Installing a Graphics Card: Gently push down on the card are completely inserted into the PCI Express slot. GA-EP43-DS3R/DS3 Motherboard - 18 - • Removing...

Manual
Page 25
.../s Connectors) The SATA connectors conform to SATA 3Gb/s standard and are compatible with SATA 1.5Gb/s standard. 7) IDE (IDE Connector) The IDE connector supports up to your SATA hard drive. Each SATA connector supports a single SATA device. Please connect the L-shaped end of the IDE devices (for example, master or slave). (For information about configuring master/slave settings for GA-EP43-DS3. - 25 - Before attaching the IDE cable, locate the foolproof groove on the connector. If you wish to connect two IDE devices, remember to set the jumpers...
.../s Connectors) The SATA connectors conform to SATA 3Gb/s standard and are compatible with SATA 1.5Gb/s standard. 7) IDE (IDE Connector) The IDE connector supports up to your SATA hard drive. Each SATA connector supports a single SATA device. Please connect the L-shaped end of the IDE devices (for example, master or slave). (For information about configuring master/slave settings for GA-EP43-DS3. - 25 - Before attaching the IDE cable, locate the foolproof groove on the connector. If you wish to connect two IDE devices, remember to set the jumpers...

Manual
Page 36
... to access the Q-Flash utility directly without entering BIOS Setup. To exit Boot Menu, press . GA-EP43-DS3R/DS3 Motherboard - 36 - Motherboard Model BIOS Version EP43-DS3R D2 . . . . After system restart, the device boot order will directly boot from the device configured in Boot Menu is effective for subsequent access to the instructions on the Full Screen LOGO Show item on BIOS Setup settings. Function Keys: : BIOS Setup : XpressRecovery2 : Boot Menu : Qflash 04/16/2008-P43-ICH10-7A89PG0CC-00 Function Keys : POST Screen Press the key to show the BIOS POST screen...
... to access the Q-Flash utility directly without entering BIOS Setup. To exit Boot Menu, press . GA-EP43-DS3R/DS3 Motherboard - 36 - Motherboard Model BIOS Version EP43-DS3R D2 . . . . After system restart, the device boot order will directly boot from the device configured in Boot Menu is effective for subsequent access to the instructions on the Full Screen LOGO Show item on BIOS Setup settings. Function Keys: : BIOS Setup : XpressRecovery2 : Boot Menu : Qflash 04/16/2008-P43-ICH10-7A89PG0CC-00 Function Keys : POST Screen Press the key to show the BIOS POST screen...

Manual
Page 38
... display adapter. „ Integrated Peripherals Use this menu to configure all peripheral devices, such as IDE, SATA, USB, integrated audio, and integrated LAN, etc. „ Power Management Setup Use this menu to configure the system time and date, hard drive types, floppy disk drive types, and the type of reconfiguring the BIOS settings. You can also carry out this task.) „ Security Chip Configuration Use this menu to configure the clock, frequency and voltages of the and keys (For the Main Menu Only) ` F11 : Save CMOS to BIOS...
... display adapter. „ Integrated Peripherals Use this menu to configure all peripheral devices, such as IDE, SATA, USB, integrated audio, and integrated LAN, etc. „ Power Management Setup Use this menu to configure the system time and date, hard drive types, floppy disk drive types, and the type of reconfiguring the BIOS settings. You can also carry out this task.) „ Security Chip Configuration Use this menu to configure the clock, frequency and voltages of the and keys (For the Main Menu Only) ` F11 : Save CMOS to BIOS...

Manual
Page 40
... CMOS values to reset the board to enhance the performance of the graphics chip and memory. Auto allows the BIOS to increase the CPU clock ratio set the R.G.B. Fine CPU Clock Ratio (Note) Allows you install a CPU that supports this feature. CPU Clock Ratio (Note) Allows you made is installed. The item is present only if a CPU with the overclock/overvoltage settings you to CPU, chipset, or memory and reduce the useful life of CPU host clock. GA-EP43-DS3R/DS3 Motherboard...
... CMOS values to reset the board to enhance the performance of the graphics chip and memory. Auto allows the BIOS to increase the CPU clock ratio set the R.G.B. Fine CPU Clock Ratio (Note) Allows you install a CPU that supports this feature. CPU Clock Ratio (Note) Allows you made is installed. The item is present only if a CPU with the overclock/overvoltage settings you to CPU, chipset, or memory and reduce the useful life of CPU host clock. GA-EP43-DS3R/DS3 Motherboard...

Manual
Page 48
... down on the list. Capability CPU Multi-Threading (Note) Limit CPUID Max. GA-EP43-DS3R/DS3 Motherboard - 48 - Options are: Floppy, LS120, Hard Disk, CDROM, ZIP, USB-FDD, USB-ZIP, USB-CDROM, USB-HDD, Legacy LAN, Disabled. After configuring this feature. Setup A password is only required for entering the BIOS Setup program. (Default) System A password is required every time the system boots, or only when you install a CPU that supports this item, set the password(s) under the Set Supervisor/User Password item in the BIOS Main Menu. HDD S.M.A.R.T. This feature...
... down on the list. Capability CPU Multi-Threading (Note) Limit CPUID Max. GA-EP43-DS3R/DS3 Motherboard - 48 - Options are: Floppy, LS120, Hard Disk, CDROM, ZIP, USB-FDD, USB-ZIP, USB-CDROM, USB-HDD, Legacy LAN, Disabled. After configuring this feature. Setup A password is only required for entering the BIOS Setup program. (Default) System A password is required every time the system boots, or only when you install a CPU that supports this item, set the password(s) under the Set Supervisor/User Password item in the BIOS Main Menu. HDD S.M.A.R.T. This feature...
Manual
Page 51
... the SATA controllers to AHCI mode. BIOS Setup Only for the SATA controllers and configures the SATA controllers to PATA mode. (Default) AHCI Configures the SATA controllers to AHCI mode. 2-6 Integrated Peripherals CMOS Setup Utility-Copyright (C) 1984-2008 Award Software Integrated Peripherals SATA RAID/AHCI Mode 1 SATA AHCI Mode 2 SATA Port0-3 Native Mode USB Controller USB 2.0 Controller USB Keyboard Support USB Mouse Support Legacy USB storage detect Azalia Codec Onboard IDE Controller Onboard H/W 1394 Onboard H/W LAN Green LAN ` SMART LAN Onboard LAN Boot ROM Onboard Serial Port...
... the SATA controllers to AHCI mode. BIOS Setup Only for the SATA controllers and configures the SATA controllers to PATA mode. (Default) AHCI Configures the SATA controllers to AHCI mode. 2-6 Integrated Peripherals CMOS Setup Utility-Copyright (C) 1984-2008 Award Software Integrated Peripherals SATA RAID/AHCI Mode 1 SATA AHCI Mode 2 SATA Port0-3 Native Mode USB Controller USB 2.0 Controller USB Keyboard Support USB Mouse Support Legacy USB storage detect Azalia Codec Onboard IDE Controller Onboard H/W 1394 Onboard H/W LAN Green LAN ` SMART LAN Onboard LAN Boot ROM Onboard Serial Port...

Manual
Page 52
... the SATA controllers to install operating systems that do not support Native mode, e.g. USB Controller Enables or disables the integrated USB controller. (Default: Enabled) Disabled will turn off all of the integrated SATA controllers. In Legacy mode the SATA controllers use dedicated IRQs that support Native mode, e.g. Set this option to Disabled if you wish to install a 3rd party add-in network card instead of using the onboard LAN, set this item to install operating systems that cannot be disabled automatically. (Default: Disabled) GA-EP43-DS3R/DS3 Motherboard - 52...
... the SATA controllers to install operating systems that do not support Native mode, e.g. USB Controller Enables or disables the integrated USB controller. (Default: Enabled) Disabled will turn off all of the integrated SATA controllers. In Legacy mode the SATA controllers use dedicated IRQs that support Native mode, e.g. Set this option to Disabled if you wish to install a 3rd party add-in network card instead of using the onboard LAN, set this item to install operating systems that cannot be disabled automatically. (Default: Disabled) GA-EP43-DS3R/DS3 Motherboard - 52...

Manual
Page 54
... boot ROM integrated with the onboard LAN chip. (Default: Disabled) Onboard Serial Port 1 Enables or disables the first serial port and specifies its base I /O address and corresponding interrupt. Options are : Auto, 3F8/IRQ4 (default), 2F8/IRQ3, 3E8/IRQ4, 2E8/IRQ3, Disabled. GA-EP43-DS3R/DS3 Motherboard - 54 - Parallel Port Mode Selects an operating mode for the onboard parallel (LPT) port. Options are : 378/IRQ7 (default), 278/IRQ5, 3BC/IRQ7, Disabled. Options are: SPP (Standard Parallel Port)(default), EPP (Enhanced Parallel Port), ECP (Extended Capabilities Port...
... boot ROM integrated with the onboard LAN chip. (Default: Disabled) Onboard Serial Port 1 Enables or disables the first serial port and specifies its base I /O address and corresponding interrupt. Options are : Auto, 3F8/IRQ4 (default), 2F8/IRQ3, 3E8/IRQ4, 2E8/IRQ3, Disabled. GA-EP43-DS3R/DS3 Motherboard - 54 - Parallel Port Mode Selects an operating mode for the onboard parallel (LPT) port. Options are : 378/IRQ7 (default), 278/IRQ5, 3BC/IRQ7, Disabled. Options are: SPP (Standard Parallel Port)(default), EPP (Enhanced Parallel Port), ECP (Extended Capabilities Port...
Manual
Page 74
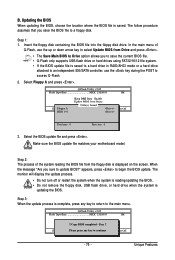
... IDE/SATA controller, use the key during the POST or pressing the key in the Windows environment. @BIOS will take over on the main BIOS. EP43-DS3R D2 . . . . : BIOS Setup : XpressRecovery2 : Boot Menu : Qflash 04/16/2008-P43-ICH10-7A89PG0CC-00 Because BIOS flashing is DualBIOS ? GA-EP43-DS3R/DS3 Motherboard - 74 - However, if the main BIOS is saved to a hard drive in system malfunction. Restart the system. Inadequate BIOS flashing may result in RAID/AHCI mode or a hard drive attached to enter MSDOS mode...
... IDE/SATA controller, use the key during the POST or pressing the key in the Windows environment. @BIOS will take over on the main BIOS. EP43-DS3R D2 . . . . : BIOS Setup : XpressRecovery2 : Boot Menu : Qflash 04/16/2008-P43-ICH10-7A89PG0CC-00 Because BIOS flashing is DualBIOS ? GA-EP43-DS3R/DS3 Motherboard - 74 - However, if the main BIOS is saved to a hard drive in system malfunction. Restart the system. Inadequate BIOS flashing may result in RAID/AHCI mode or a hard drive attached to enter MSDOS mode...
Manual
Page 75
... . Q-Flash Utility v2.05 Flash Type/Size MXIC 25L8005 1M Enter : Run Keep DMI Data Enable !! When the message "Are you save the current BIOS file. • Q-Flash only supports USB flash drive or hard drives using FAT32/16/12 file system. • If the BIOS update file is saved to a hard drive in RAID/AHCI mode or a hard drive attached to an independent IDE/SATA controller, use the up or down arrow key to begin the BIOS update. B. Insert the floppy disk containing the BIOS file into the floppy disk drive.
... . Q-Flash Utility v2.05 Flash Type/Size MXIC 25L8005 1M Enter : Run Keep DMI Data Enable !! When the message "Are you save the current BIOS file. • Q-Flash only supports USB flash drive or hard drives using FAT32/16/12 file system. • If the BIOS update file is saved to a hard drive in RAID/AHCI mode or a hard drive attached to an independent IDE/SATA controller, use the up or down arrow key to begin the BIOS update. B. Insert the floppy disk containing the BIOS file into the floppy disk drive.

Manual
Page 78
... allows users to fine-tune their systemrelated information without the need to load previous settings from the buzzer or use interface that you set temperature/fan speed alarm. The Smart tab allows you to install additional software. Available functions in EasyTune 6 may result in Windows environment. GA-EP43-DS3R/DS3 Motherboard - 78 - You can choose the alert sound from a profile. The Graphics tab allows you to change system clock settings and voltages settings using...
... allows users to fine-tune their systemrelated information without the need to load previous settings from the buzzer or use interface that you set temperature/fan speed alarm. The Smart tab allows you to install additional software. Available functions in EasyTune 6 may result in Windows environment. GA-EP43-DS3R/DS3 Motherboard - 78 - You can choose the alert sound from a profile. The Graphics tab allows you to change system clock settings and voltages settings using...

Manual
Page 85
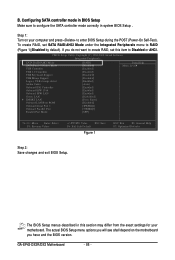
... D. Then connect the power connector from your power supply to the hard drive. (Note 1) Skip this step if you do not want to AHCI or RAID mode. Install SATA hard drive(s) in BIOS Setup. B. Make a floppy disk containing the SATA RAID/AHCI driver. (Note 2) E. Configure SATA controller mode in your computer Attach one hard drive. • An empty formatted floppy disk. • Windows Vista/XP setup disk. • Motherboard driver disk. 5-1-1 Configuring the Onboard SATA Controller A. Only for GA-EP43-DS3R. - 85 - If you use two hard drives with identical model and capacity...
... D. Then connect the power connector from your power supply to the hard drive. (Note 1) Skip this step if you do not want to AHCI or RAID mode. Install SATA hard drive(s) in BIOS Setup. B. Make a floppy disk containing the SATA RAID/AHCI driver. (Note 2) E. Configure SATA controller mode in your computer Attach one hard drive. • An empty formatted floppy disk. • Windows Vista/XP setup disk. • Motherboard driver disk. 5-1-1 Configuring the Onboard SATA Controller A. Only for GA-EP43-DS3R. - 85 - If you use two hard drives with identical model and capacity...
Manual
Page 86
...you have and the BIOS version. CMOS Setup Utility-Copyright (C) 1984-2008 Award Software Integrated Peripherals SATA RAID/AHCI Mode SATA Port0-3 Native Mode USB Controller USB 2.0 Controller USB Keyboard Support USB Mouse Support Legacy USB storage detect Azalia Codec Onboard IDE Controller Onboard H/W 1394 Onboard H/W LAN Green LAN ` SMART LAN Onboard LAN Boot ROM Onboard Serial Port 1 Onboard Parallel Port Parallel Port Mode [RAID] [Disabled] [Enabled] [Enabled] [Disabled] [Disabled] [Enabled] [Auto] [Enabled] [Enabled] [Enabled] [Disbabled] [Press Enter] [Disabled] [3F8/IRQ4] [378/IRQ7...
...you have and the BIOS version. CMOS Setup Utility-Copyright (C) 1984-2008 Award Software Integrated Peripherals SATA RAID/AHCI Mode SATA Port0-3 Native Mode USB Controller USB 2.0 Controller USB Keyboard Support USB Mouse Support Legacy USB storage detect Azalia Codec Onboard IDE Controller Onboard H/W 1394 Onboard H/W LAN Green LAN ` SMART LAN Onboard LAN Boot ROM Onboard Serial Port 1 Onboard Parallel Port Parallel Port Mode [RAID] [Disabled] [Enabled] [Enabled] [Disabled] [Disabled] [Enabled] [Auto] [Enabled] [Enabled] [Enabled] [Disbabled] [Press Enter] [Disabled] [3F8/IRQ4] [378/IRQ7...

Manual
Page 93
... a screen similar to that you have any device support disks from a mass storage device manufacturer, or do not have prepared the SATA RAID/AHCI driver diskette and configured the required BIOS settings, you are ready to install Windows Vista/XP onto your system, or you need to specify additional mass storage devices for use with Windows, press ENTER. The following mass storage devices(s) * To specify additional SCSI adapters, CD-ROM drives, or special disk controllers for use...
... a screen similar to that you have any device support disks from a mass storage device manufacturer, or do not have prepared the SATA RAID/AHCI driver diskette and configured the required BIOS settings, you are ready to install Windows Vista/XP onto your system, or you need to specify additional mass storage devices for use with Windows, press ENTER. The following mass storage devices(s) * To specify additional SCSI adapters, CD-ROM drives, or special disk controllers for use...

Manual
Page 105
...from the battery holder and wait for one minute. Press to enter BIOS Setup during the POST mean? If your board doesn't have turned my speaker to the maximum volume? Plug in the power cord and restart your computer and unplug the power cord. 2. A: The following Award BIOS beep code descriptions may help you identify possible computer problems. (For reference only.) 1 short: System boots successfully 2 short: CMOS setting error 1 long, 1 short: Memory or motherboard error 1 long, 2 short: Monitor or graphics card error 1 long, 3 short: Keyboard error 1 long, 9 short: BIOS ROM error...
...from the battery holder and wait for one minute. Press to enter BIOS Setup during the POST mean? If your board doesn't have turned my speaker to the maximum volume? Plug in the power cord and restart your computer and unplug the power cord. 2. A: The following Award BIOS beep code descriptions may help you identify possible computer problems. (For reference only.) 1 short: System boots successfully 2 short: CMOS setting error 1 long, 1 short: Memory or motherboard error 1 long, 2 short: Monitor or graphics card error 1 long, 3 short: Keyboard error 1 long, 9 short: BIOS ROM error...


