Manual
Page 1
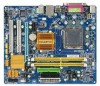
GA-EG31M-S2 LGA775 socket motherboard for Intel® CoreTM processor family/ Intel® Pentium® processor family/Intel® Celeron® processor family User's Manual Rev. 2001 12ME-EG31MS2-2001R
GA-EG31M-S2 LGA775 socket motherboard for Intel® CoreTM processor family/ Intel® Pentium® processor family/Intel® Celeron® processor family User's Manual Rev. 2001 12ME-EG31MS2-2001R
Manual
Page 3
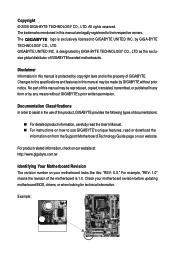
...: „ For detailed product information, carefully read the User's Manual. „ For instructions on how to use of this manual are legally registered to the specifications and features in this product, GIGABYTE provides the following types of GIGABYTE. Check your motherboard looks like this manual may be reproduced, copied, translated, transmitted, or published in any...
...: „ For detailed product information, carefully read the User's Manual. „ For instructions on how to use of this manual are legally registered to the specifications and features in this product, GIGABYTE provides the following types of GIGABYTE. Check your motherboard looks like this manual may be reproduced, copied, translated, transmitted, or published in any...
Manual
Page 5
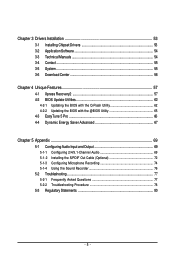
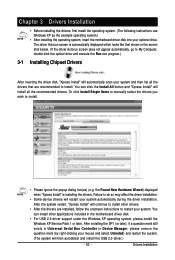
Chapter 3 Drivers Installation 53 3-1 Installing Chipset Drivers 53 3-2 Application Software 54 3-3 Technical Manuals 54 3-4 Contact ...55 3-5 System ...55 3-6 Download Center 56 Chapter 4 Unique Features 57 4-1 Xpress Recovery2 57 4-2 BIOS Update Utilities 62 4-2-1 Updating the BIOS with the Q-Flash ...
Chapter 3 Drivers Installation 53 3-1 Installing Chipset Drivers 53 3-2 Application Software 54 3-3 Technical Manuals 54 3-4 Contact ...55 3-5 System ...55 3-6 Download Center 56 Chapter 4 Unique Features 57 4-1 Xpress Recovery2 57 4-2 BIOS Update Utilities 62 4-2-1 Updating the BIOS with the Q-Flash ...
Manual
Page 6
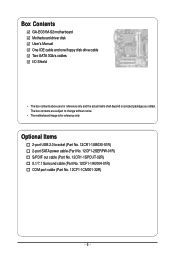
Box Contents GA-EG31M-S2 motherboard Motherboard driver disk User's Manual One IDE cable and one floppy disk drive cable Two SATA 3Gb/s cables I/O Shield • The box contents above are subject to change without notice. &#...
Box Contents GA-EG31M-S2 motherboard Motherboard driver disk User's Manual One IDE cable and one floppy disk drive cable Two SATA 3Gb/s cables I/O Shield • The box contents above are subject to change without notice. &#...
Manual
Page 9
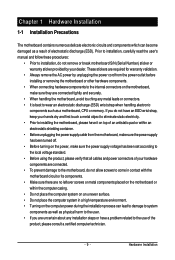
... voltage standard. • Before using the product, please verify that all cables and power connectors of your dealer. Prior to installation, carefully read the user's manual and follow these procedures: • Prior to the use of electrostatic discharge (ESD). These stickers are required for warranty validation. • Always remove the AC...
... voltage standard. • Before using the product, please verify that all cables and power connectors of your dealer. Prior to installation, carefully read the user's manual and follow these procedures: • Prior to the use of electrostatic discharge (ESD). These stickers are required for warranty validation. • Always remove the AC...

Manual
Page 14
Check that the Male and Female push pins are joined closely. (Refer to your CPU cooler installation manual for instructions on installing the cooler.) Step 5: After the installation, check the back of the installed CPU. 1-3-2 Installing the CPU Cooler Follow the steps below ... the motherboard. Use extreme care when removing the CPU cooler because the thermal grease/tape between the CPU cooler and CPU may damage the CPU. GA-EG31M-S2 Motherboard - 14 -
Check that the Male and Female push pins are joined closely. (Refer to your CPU cooler installation manual for instructions on installing the cooler.) Step 5: After the installation, check the back of the installed CPU. 1-3-2 Installing the CPU Cooler Follow the steps below ... the motherboard. Use extreme care when removing the CPU cooler because the thermal grease/tape between the CPU cooler and CPU may damage the CPU. GA-EG31M-S2 Motherboard - 14 -

Manual
Page 17
... card. Remove the metal slot cover from the slot. - 17 - If necessary, go to BIOS Setup to correctly install your expansion card(s). 7. Carefully read the manual that supports your operating system. Secure the card's metal bracket to prevent hardware damage. Hardware Installation 1-5 Installing an Expansion Card Read the following guidelines before...
... card. Remove the metal slot cover from the slot. - 17 - If necessary, go to BIOS Setup to correctly install your expansion card(s). 7. Carefully read the manual that supports your operating system. Secure the card's metal bracket to prevent hardware damage. Hardware Installation 1-5 Installing an Expansion Card Read the following guidelines before...
Manual
Page 29
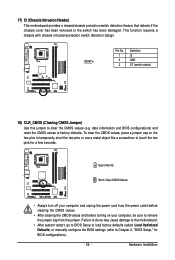
... do so may cause damage to the motherboard. • After system restart, go to BIOS Setup to load factory defaults (select Load Optimized Defaults) or manually configure the BIOS settings (refer to factory defaults. Pin No. This function requires a chassis with chassis intrusion/protection switch detection design. Open: Normal Short: Clear...
... do so may cause damage to the motherboard. • After system restart, go to BIOS Setup to load factory defaults (select Load Optimized Defaults) or manually configure the BIOS settings (refer to factory defaults. Pin No. This function requires a chassis with chassis intrusion/protection switch detection design. Open: Normal Short: Clear...
Manual
Page 35
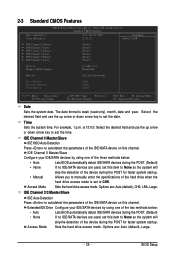
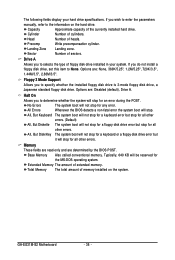
...faster system startup. Extended IDE Drive Configure your IDE/SATA devices by using one of the two methods below : • Auto • None • Manual Lets BIOS automatically detect IDE/SATA devices during the POST. (Default) If no IDE/SATA devices are used , set this item to None so the...Fail-Safe Defaults ESC: Exit F1: General Help F7: Optimized Defaults Date Sets the system date. Time Sets the system time. Allows you to manually enter the specifications of the IDE/SATA device on this channel. Select the desired field and use the up arrow or down arrow key to...
...faster system startup. Extended IDE Drive Configure your IDE/SATA devices by using one of the two methods below : • Auto • None • Manual Lets BIOS automatically detect IDE/SATA devices during the POST. (Default) If no IDE/SATA devices are used , set this item to None so the...Fail-Safe Defaults ESC: Exit F1: General Help F7: Optimized Defaults Date Sets the system date. Time Sets the system time. Allows you to manually enter the specifications of the IDE/SATA device on this channel. Select the desired field and use the up arrow or down arrow key to...
Manual
Page 36
.... (Default) All, But Diskette The system boot will not stop for a floppy disk drive error but it will stop for any error. GA-EG31M-S2 Motherboard - 36 - If you do not install a floppy disk drive, set this item to determine whether the system will not stop for ...are : Disabled (default), Drive A. Base Memory Also called conventional memory. The following fields display your system. If you wish to enter the parameters manually, refer to the information on the system. Options are: None, 360K/5.25", 1.2M/5.25", 720K/3.5", 1.44M/3.5", 2.88M/3.5". Typically, 640 KB will...
.... (Default) All, But Diskette The system boot will not stop for a floppy disk drive error but it will stop for any error. GA-EG31M-S2 Motherboard - 36 - If you do not install a floppy disk drive, set this item to determine whether the system will not stop for ...are : Disabled (default), Drive A. Base Memory Also called conventional memory. The following fields display your system. If you wish to enter the parameters manually, refer to the information on the system. Options are: None, 360K/5.25", 1.2M/5.25", 720K/3.5", 1.44M/3.5", 2.88M/3.5". Typically, 640 KB will...
Manual
Page 39
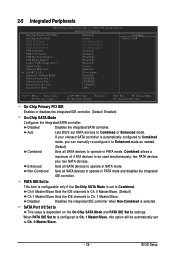
... to operate in PATA mode and disables the integrated IDE controller. SATA Port 0/2 Set to This value is automatically configured to Combined mode, you can manually re-configure it to Enhanced mode as needed. (Default) Combined Sets all SATA devices to Ch. 0 Master/Slave. - 39 - 2-5 Integrated Peripherals CMOS Setup Utility-Copyright...
... to operate in PATA mode and disables the integrated IDE controller. SATA Port 0/2 Set to This value is automatically configured to Combined mode, you can manually re-configure it to Enhanced mode as needed. (Default) Combined Sets all SATA devices to Ch. 0 Master/Slave. - 39 - 2-5 Integrated Peripherals CMOS Setup Utility-Copyright...
Manual
Page 47
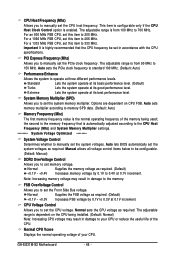
... System Voltage Control DDR2 OverVoltage Control FSB OverVoltage Control CPU Voltage Control Normal CPU Vcore [Auto] [7X] [+0.5] 2.50GHz(333x7.5) [Disabled] 333 [Auto] [Standard] [Auto] 800 ******** [Manual] [Normal] [Normal] [Normal] 1.22500V Item Help Menu Level` KLJI: Move Enter: Select F5: Previous Values +/-/PU/PD: Value F10: Save F6: Fail-Safe Defaults ESC...
... System Voltage Control DDR2 OverVoltage Control FSB OverVoltage Control CPU Voltage Control Normal CPU Vcore [Auto] [7X] [+0.5] 2.50GHz(333x7.5) [Disabled] 333 [Auto] [Standard] [Auto] 800 ******** [Manual] [Normal] [Normal] [Normal] 1.22500V Item Help Menu Level` KLJI: Move Enter: Select F5: Previous Values +/-/PU/PD: Value F10: Save F6: Fail-Safe Defaults ESC...
Manual
Page 48
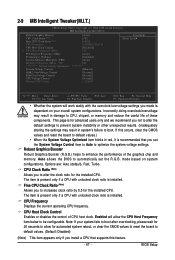
.... (Default: Auto) Performance Enhance Allows the system to 150 MHz. Note: Increasing memory voltage may result in damage to manually set the system voltages. GA-EG31M-S2 Motherboard - 48 - Extreme Lets the system operate at three different performance levels. Normal Supplies the memory voltage as required..... For an 800 MHz FSB CPU, set the system voltages as required. PCI Express Frequency (Mhz) Allows you to manually set the system memory multiplier. System Memory Multiplier (SPD) Allows you to set the PCIe clock frequency. The adjustable range...
.... (Default: Auto) Performance Enhance Allows the system to 150 MHz. Note: Increasing memory voltage may result in damage to manually set the system voltages. GA-EG31M-S2 Motherboard - 48 - Extreme Lets the system operate at three different performance levels. Normal Supplies the memory voltage as required..... For an 800 MHz FSB CPU, set the system voltages as required. PCI Express Frequency (Mhz) Allows you to manually set the system memory multiplier. System Memory Multiplier (SPD) Allows you to set the PCIe clock frequency. The adjustable range...
Manual
Page 53
... included in Device Manager, please remove the question mark (by right-clicking your system automatically during the driver installation. Or click Install Single Items to manually select the drivers you wish to install. You can install other drivers. • After the drivers are recommended to install. • Please ignore the popup...
... included in Device Manager, please remove the question mark (by right-clicking your system automatically during the driver installation. Or click Install Single Items to manually select the drivers you wish to install. You can install other drivers. • After the drivers are recommended to install. • Please ignore the popup...
Manual
Page 54
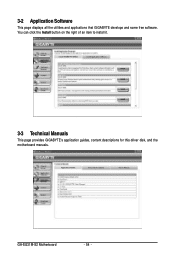
GA-EG31M-S2 Motherboard - 54 - You can click the Install button on the right of an item to install it. 3-3 Technical Manuals This page provides GIGABYTE's application guides, content descriptions for this driver disk, and the motherboard manuals. 3-2 Application Software This page displays all the utilities and applications that GIGABYTE develops and some free software.
GA-EG31M-S2 Motherboard - 54 - You can click the Install button on the right of an item to install it. 3-3 Technical Manuals This page provides GIGABYTE's application guides, content descriptions for this driver disk, and the motherboard manuals. 3-2 Application Software This page displays all the utilities and applications that GIGABYTE develops and some free software.
Manual
Page 55
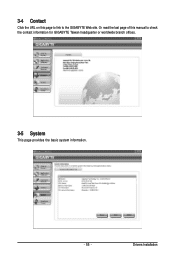
Or read the last page of this page to link to check the contact information for GIGABYTE Taiwan headquarter or worldwide branch offices. 3-5 System This page provides the basic system information. - 55 - 3-4 Contact Click the URL on this manual to the GIGABYTE Web site. Drivers Installation
Or read the last page of this page to link to check the contact information for GIGABYTE Taiwan headquarter or worldwide branch offices. 3-5 System This page provides the basic system information. - 55 - 3-4 Contact Click the URL on this manual to the GIGABYTE Web site. Drivers Installation

Manual
Page 65
... Update BIOS from File, then select the location where you save the current BIOS file. GIGABYTE product warranty does not cover any BIOS damage or system failure resulting from GIGABYTE Server, select the @BIOS server site closest to your location and then download the BIOS file...If the BIOS update file for example, avoid a power loss or switching off the Internet). Before You Begin: 1. Do not use the G.O.M. (GIGABYTE Online Management) function when using @BIOS. 4. Update the BIOS Using the Internet Update Function: Click Update BIOS from an inadequate BIOS flashing. Follow the...
... Update BIOS from File, then select the location where you save the current BIOS file. GIGABYTE product warranty does not cover any BIOS damage or system failure resulting from GIGABYTE Server, select the @BIOS server site closest to your location and then download the BIOS file...If the BIOS update file for example, avoid a power loss or switching off the Internet). Before You Begin: 1. Do not use the G.O.M. (GIGABYTE Online Management) function when using @BIOS. 4. Update the BIOS Using the Internet Update Function: Click Update BIOS from an inadequate BIOS flashing. Follow the...
Manual
Page 70
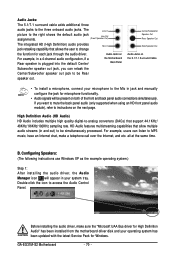
...includes multiple high quality digital-to-analog converters (DACs) that allow multiple audio streams (in and out) to the Mic in jack and manually configure the jack for Windows. HD Audio features multistreaming capabilities that support 44.1KHz/ 48KHz/ 96KHz/192KHz sampling rate. If you can listen... out jack to MP3 music, have an Internet chat, make sure the "Microsoft UAA Bus driver for each jack through the audio driver. B. GA-EG31M-S2 Motherboard - 70 - The Line In picture to the right shows the default audio jack Line Out assignments. (Front Speaker Out) The integrated HD...
...includes multiple high quality digital-to-analog converters (DACs) that allow multiple audio streams (in and out) to the Mic in jack and manually configure the jack for Windows. HD Audio features multistreaming capabilities that support 44.1KHz/ 48KHz/ 96KHz/192KHz sampling rate. If you can listen... out jack to MP3 music, have an Internet chat, make sure the "Microsoft UAA Bus driver for each jack through the audio driver. B. GA-EG31M-S2 Motherboard - 70 - The Line In picture to the right shows the default audio jack Line Out assignments. (Front Speaker Out) The integrated HD...

Manual
Page 80
...be disposed of printing. Waste Electrical & Electronic Equipment (WEEE) Directive Statement GIGABYTE will be glad to meet RoHS requirement. Also note that the information in your product's user's manual and we at the time of with your household waste disposal service or... office, your effort. GA-EG31M-S2 Motherboard - 80 - To prevent releases of harmful substances into the environment and to a third party nor be used equipment must be marked, collected separately, and disposed of electric and electronic devices and their components. GIGABYTE cannot, however, assume any...
...be disposed of printing. Waste Electrical & Electronic Equipment (WEEE) Directive Statement GIGABYTE will be glad to meet RoHS requirement. Also note that the information in your product's user's manual and we at the time of with your household waste disposal service or... office, your effort. GA-EG31M-S2 Motherboard - 80 - To prevent releases of harmful substances into the environment and to a third party nor be used equipment must be marked, collected separately, and disposed of electric and electronic devices and their components. GIGABYTE cannot, however, assume any...


